How to search QRadar using REST API
Posted on 09 January 2022
TweetIntroduction
In this tutorial, we will learn how to leverage the QRadar Ariel Search REST API endpoints to run Ariel searches and fetch their results programmatically using Python.
Note: This tutorial assumes you have admin access to a live QRadar deployment. For the purpose of this tutorial, I am using QRadar Community Edition. Please follow my step-by-step guide - How to install IBM QRadar CE V7.3.3 on VirtualBox to get a basic QRadar deployment up and running in your lab environment.
Note: This tutorial also assumes you have some experience with QRadar REST APIs and Python scripting. Please follow my step-by-step guide - QRadar REST APIs with Python to setup your Python environment with pip and Jupyter Notebook, generate a QRadar API Token, and write simple Python scripts which demonstrate how to make REST API requests to QRadar.
Pre-requisites
- QRadar with admin access
I am using QRadar CE V7.3.3 as described above.
- QRadar API Token
On QRadar, the API Token is also known as a SEC Token and must be generated by the admin on the QRadar Console. Please refer here for more information.
- Python 3.x.x
I am using Python 3.9.7 on my MacBook Pro with macOS Big Sur.
The code written in this tutorial might cause issues with Python 2. Please refer to Python.org to download the latest release of Python 3 for your OS.
- pip (Python Package Installer)
pip is a useful utility to install Python packages. I am using pip 21.2.4. If your Python environment does not have pip installed by default, please refer to the pip Installation documentation.
- Install the following Python packages using pip:
Searching in QRadar
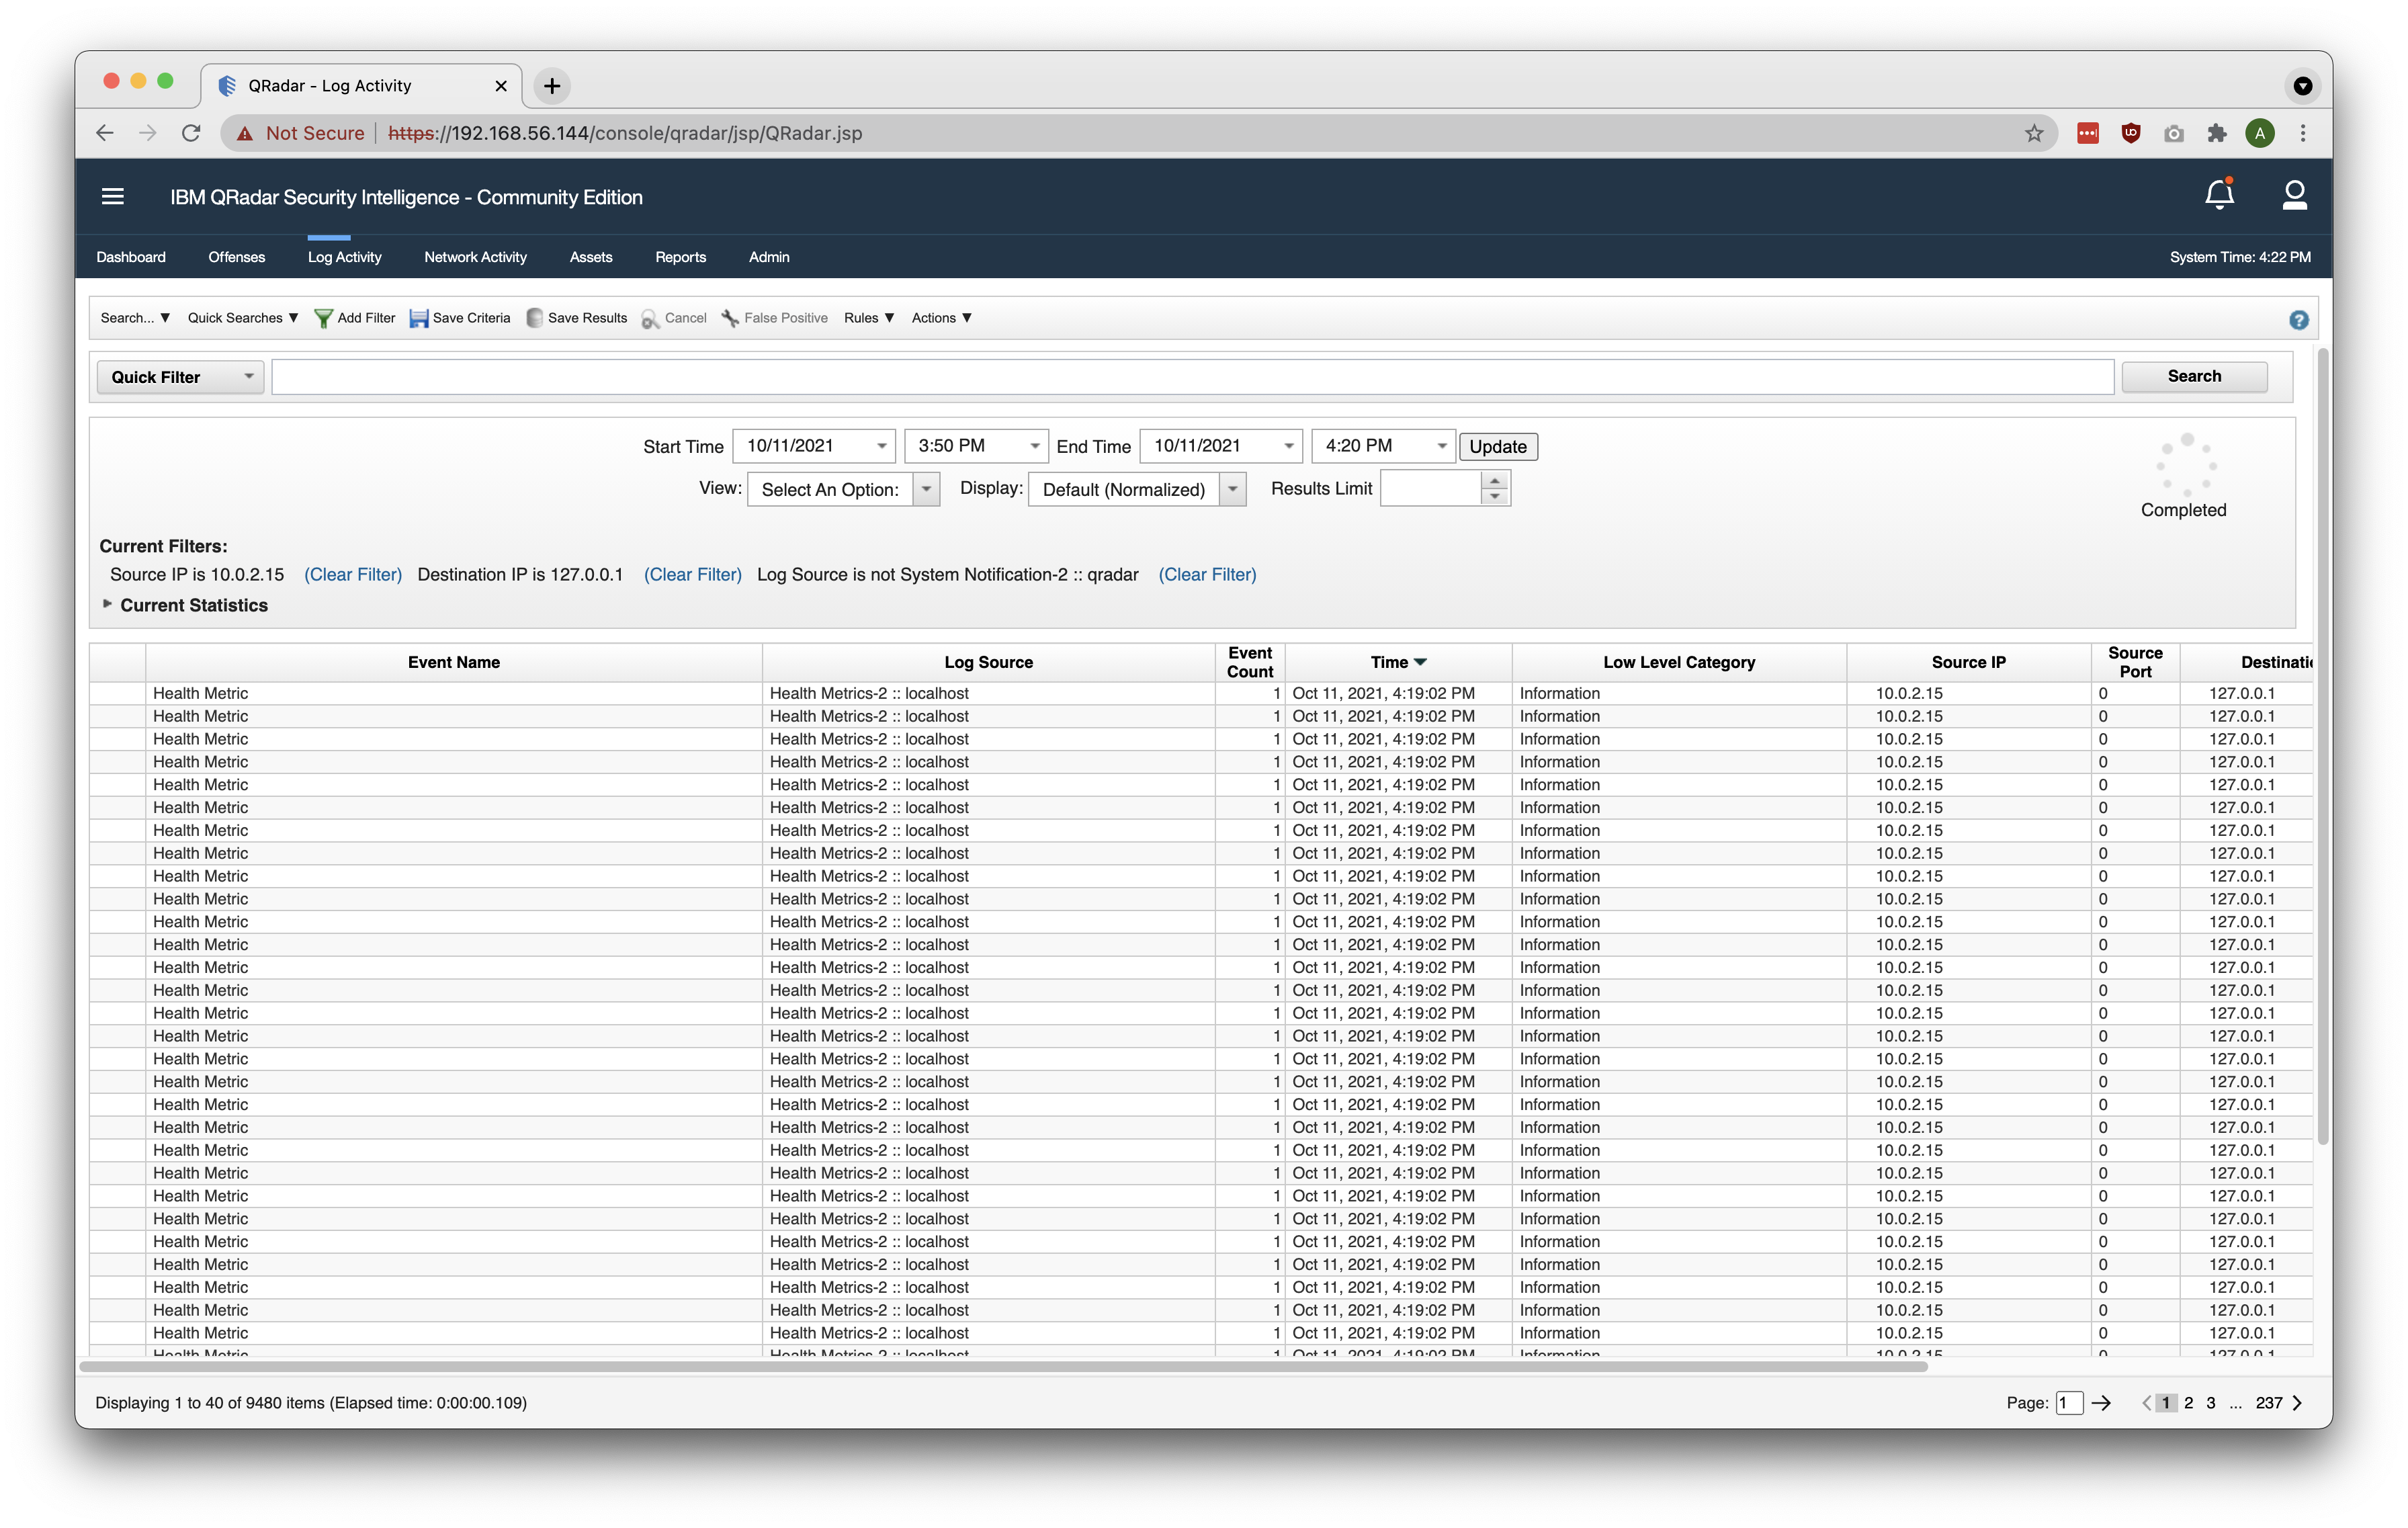
Searching in QRadar is a basic but essential functionality. For instance, if a new Offense is created, you will ultimately navigate to the Log Activity tab to investigate associated Events as seen in the screenshot below. Although the filters are automatically applied, it is fundamentally executing an Ariel search in the background.
Furthermore, SOC Analysts also leverage the search functionality to proactively query the SIEM against Indicators of Compromise (IoCs), Hacker Tactics, Techniques, and Procedures (TTPs), and other malicious behaviors to determine the presence of cyber threats. This is known as Threat Hunting.
SIEM Administrators also rely upon the search functionality to ensure that the system is running as expected. Common use-cases include examining Events to ensure that necessary fields are correctly parsed, and calculating the Events per Second (EPS) consumption of onboarded Log Sources.
QRadar Ariel Search
In this section, we will start by dissecting the high-level steps involved in running a new QRadar Ariel Search programmatically. Then, we will move onto the various QRadar Ariel Search REST API endpoints and their specifications including parameters and responses. Finally, we will write Python code to implement the concepts and retrieve the result of a QRadar Saved Search titled Top Log Sources.
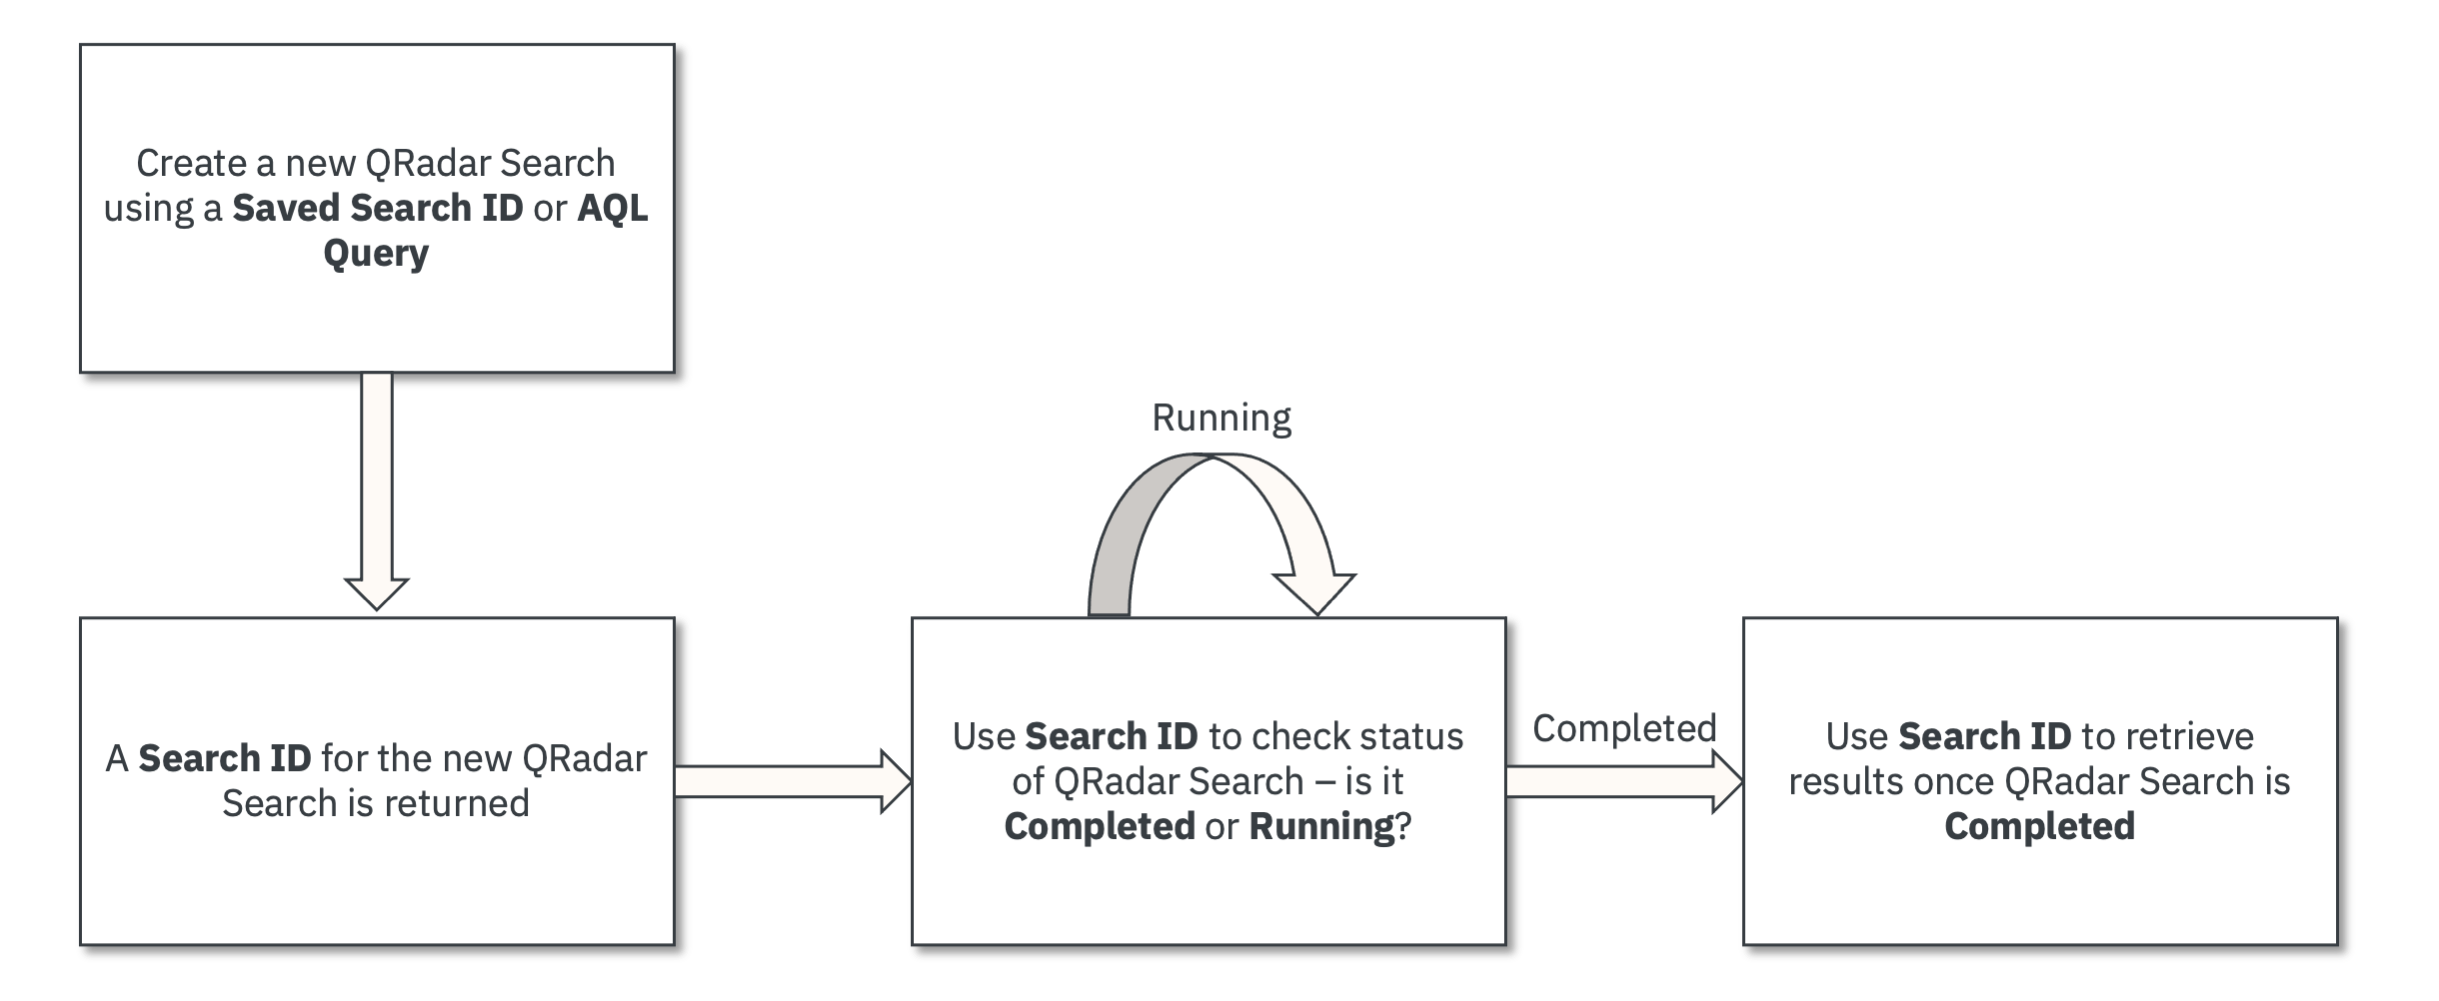
Workflow
Let us understand the high-level steps involved in running a new QRadar Ariel Search programmatically. They are:
1. Create a new QRadar Ariel Search using a Saved Search ID or AQL Query
We start by creating a new REST API request. You can either provide a raw AQL Query or a Saved Search ID within the REST API request for QRadar to execute.
According to IBM QRadar documentation:
The Ariel Query Language (AQL) is a structured query language that you use to communicate with the Ariel databases. Use AQL to query and manipulate event and flow data from the Ariel database.
According to IBM QRadar documentation:
You can save configured search criteria so that you can reuse the criteria and use the Saved Search criteria in other components, such as reports. Saved Search criteria does not expire.
Using the Saved Search ID is preferred when you want to perform the same Ariel Search without modifying its associated AQL Query.
For example: Top Log Sources in the last 6 Hours.
There is no need for a SIEM Administrator to modify the AQL Query associated with the above Saved Search if they intend to run it every 6 hours. In this case, using the Saved Search ID corresponding to that AQL Query is the best approach.
Using the raw AQL Query is preferred when you cannot save the AQL Query as a Saved Search. This occurs when the AQL Query is dynamically created.
For example: Login Failures for User {XYZ}.
Assume we have a list of usernames as follows:
tom
anthony
raj
Our goal is to search QRadar for “Login Failure” Events for each user. The AQL Query will likely need to be modified with each username as follows:
... WHERE username ILIKE '%tom%'
... WHERE username ILIKE '%anthony%'
... WHERE username ILIKE '%raj%'
It does not make sense to save each AQL Query as a separate Saved Search. Instead, it is easier to dynamically construct the AQL Query at runtime with the username.
2. A Search ID for the new QRadar Ariel Search is returned
Once the above request is created with the Saved Search ID or AQL Query, a response is returned with a unique Search ID.
3. Use Search ID to check status of QRadar Ariel Search
We utilize the returned Search ID to create a new REST API request to retrieve the status of the QRadar Ariel Search.
The goal is to determine if the QRadar Ariel Search has completed execution.
There are multiple factors which affect the performance of a QRadar Ariel Search. Some searches are likely to take longer considering the complexity and duration of the AQL Query. In practice, the recommended approach is to continuously poll the REST API for the status of the QRadar Ariel Search at defined intervals. You can define the interval as 30 seconds, 1 minute, 5 minutes, 10 minutes, or longer based on previous knowledge and experience.
Note: Run the AQL Query or Saved Search manually at least once on the QRadar Console to approximately determine its execution time.
4. Use Search ID to retrieve result once QRadar Ariel Search is Completed
Once it is determined that the QRadar Ariel Search is successfully completed, we can create a new REST API request with the Search ID to retrieve the result.
The below diagram summarizes the workflow and its steps:
QRadar Ariel Search REST API Endpoints
Let us understand the various QRadar Ariel Search REST API endpoints and their specifications, which will allow us to complete all the steps in the above workflow. They are:
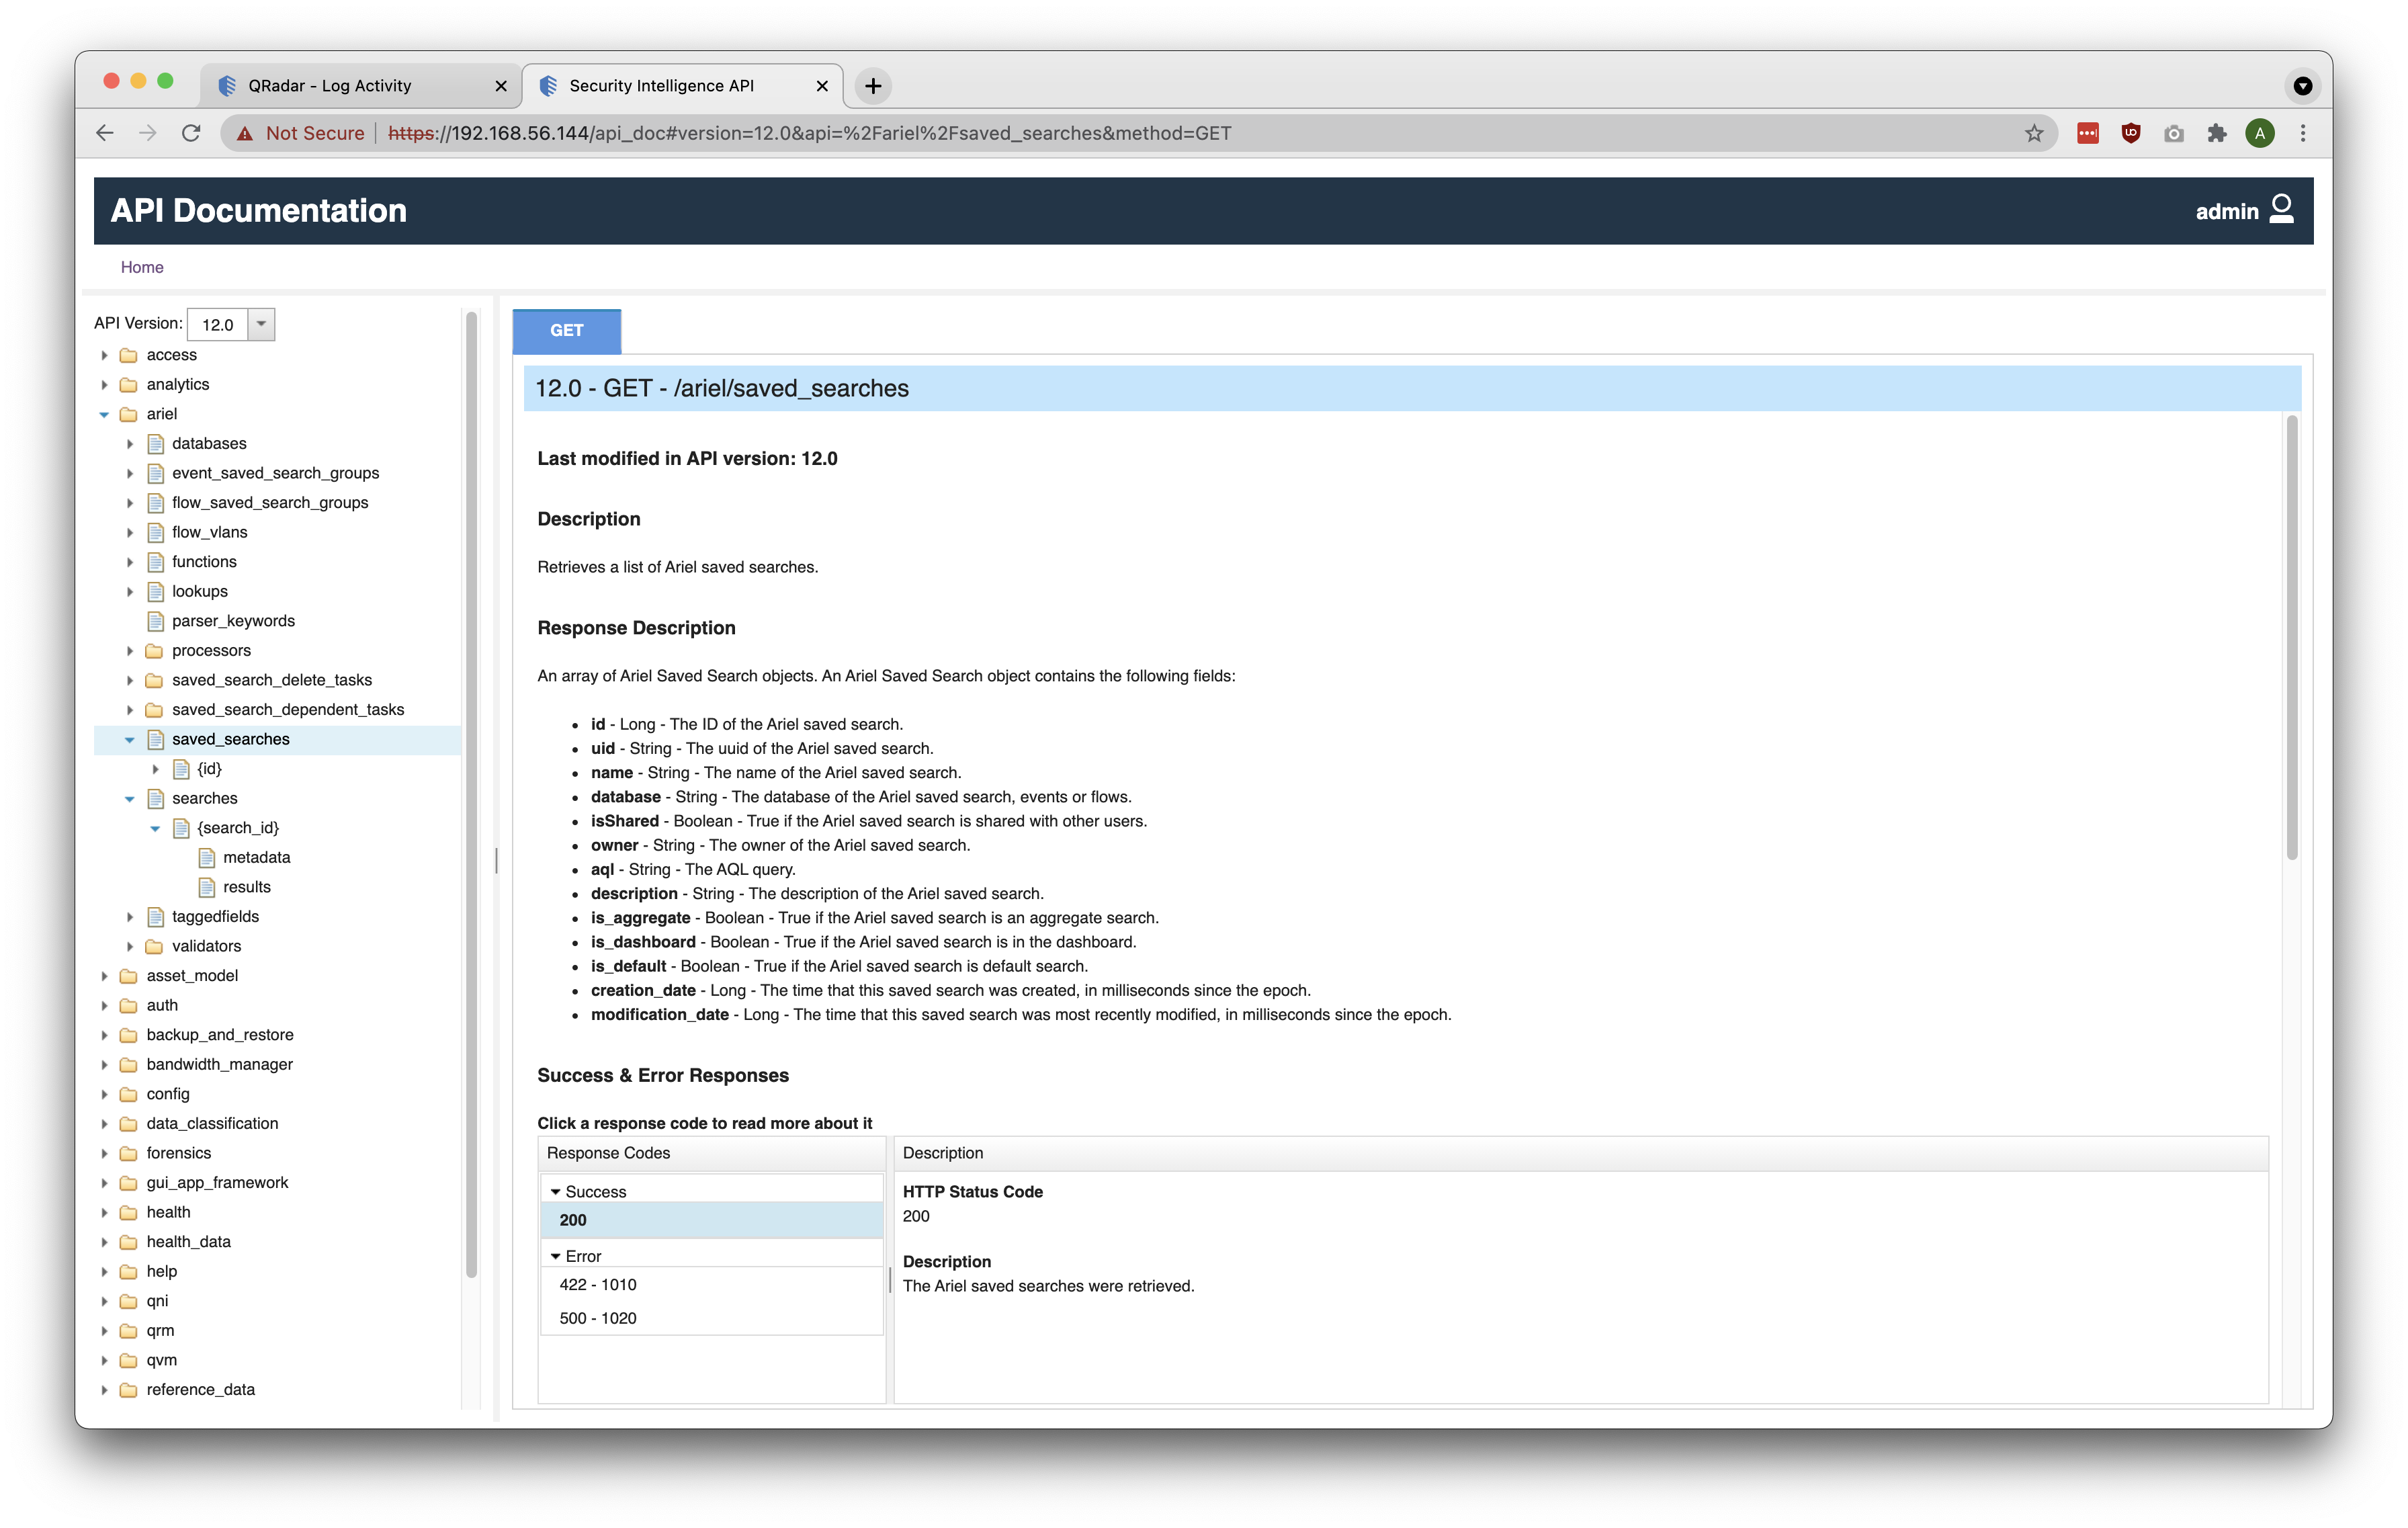
1. Find QRadar Ariel Saved Searches
It was mentioned above that we can create a new QRadar Ariel Search using a Saved Search ID or an AQL Query. If you want to proceed with Saved Search ID, you will need to first query QRadar and capture the correct Saved Search ID for the desired search/AQL Query.
The /ariel/saved_searches REST API endpoint can be used to retrieve a list of existing Saved Searches on QRadar. As seen in the screenshot below, a GET request to /ariel/saved_searches returns many useful fields including the name of the Saved Search, its ID, and its corresponding AQL Query.
Below is a sample JSON snippet displaying the name, id, and aql fields for a Saved Search titled Top Log Sources.
{
"name": "Top Log Sources",
"id": 2721,
"aql": "SELECT logsourcename(logSourceId) AS 'Log Source', UniqueCount(\"sourceIP\") AS 'Source IP (Unique Count)', UniqueCount(\"destinationIP\") AS 'Destination IP (Unique Count)', UniqueCount(\"destinationPort\") AS 'Destination Port (Unique Count)', UniqueCount(qid) AS 'Event Name (Unique Count)', UniqueCount(category) AS 'Low Level Category (Unique Count)', UniqueCount(\"protocolId\") AS 'Protocol (Unique Count)', UniqueCount(\"userName\") AS 'Username (Unique Count)', MAX(\"magnitude\") AS 'Magnitude (Maximum)', SUM(\"eventCount\") AS 'Event Count (Sum)', COUNT(*) AS 'Count' from events GROUP BY logSourceId order by \"Event Count (Sum)\" desc last 6 hours"
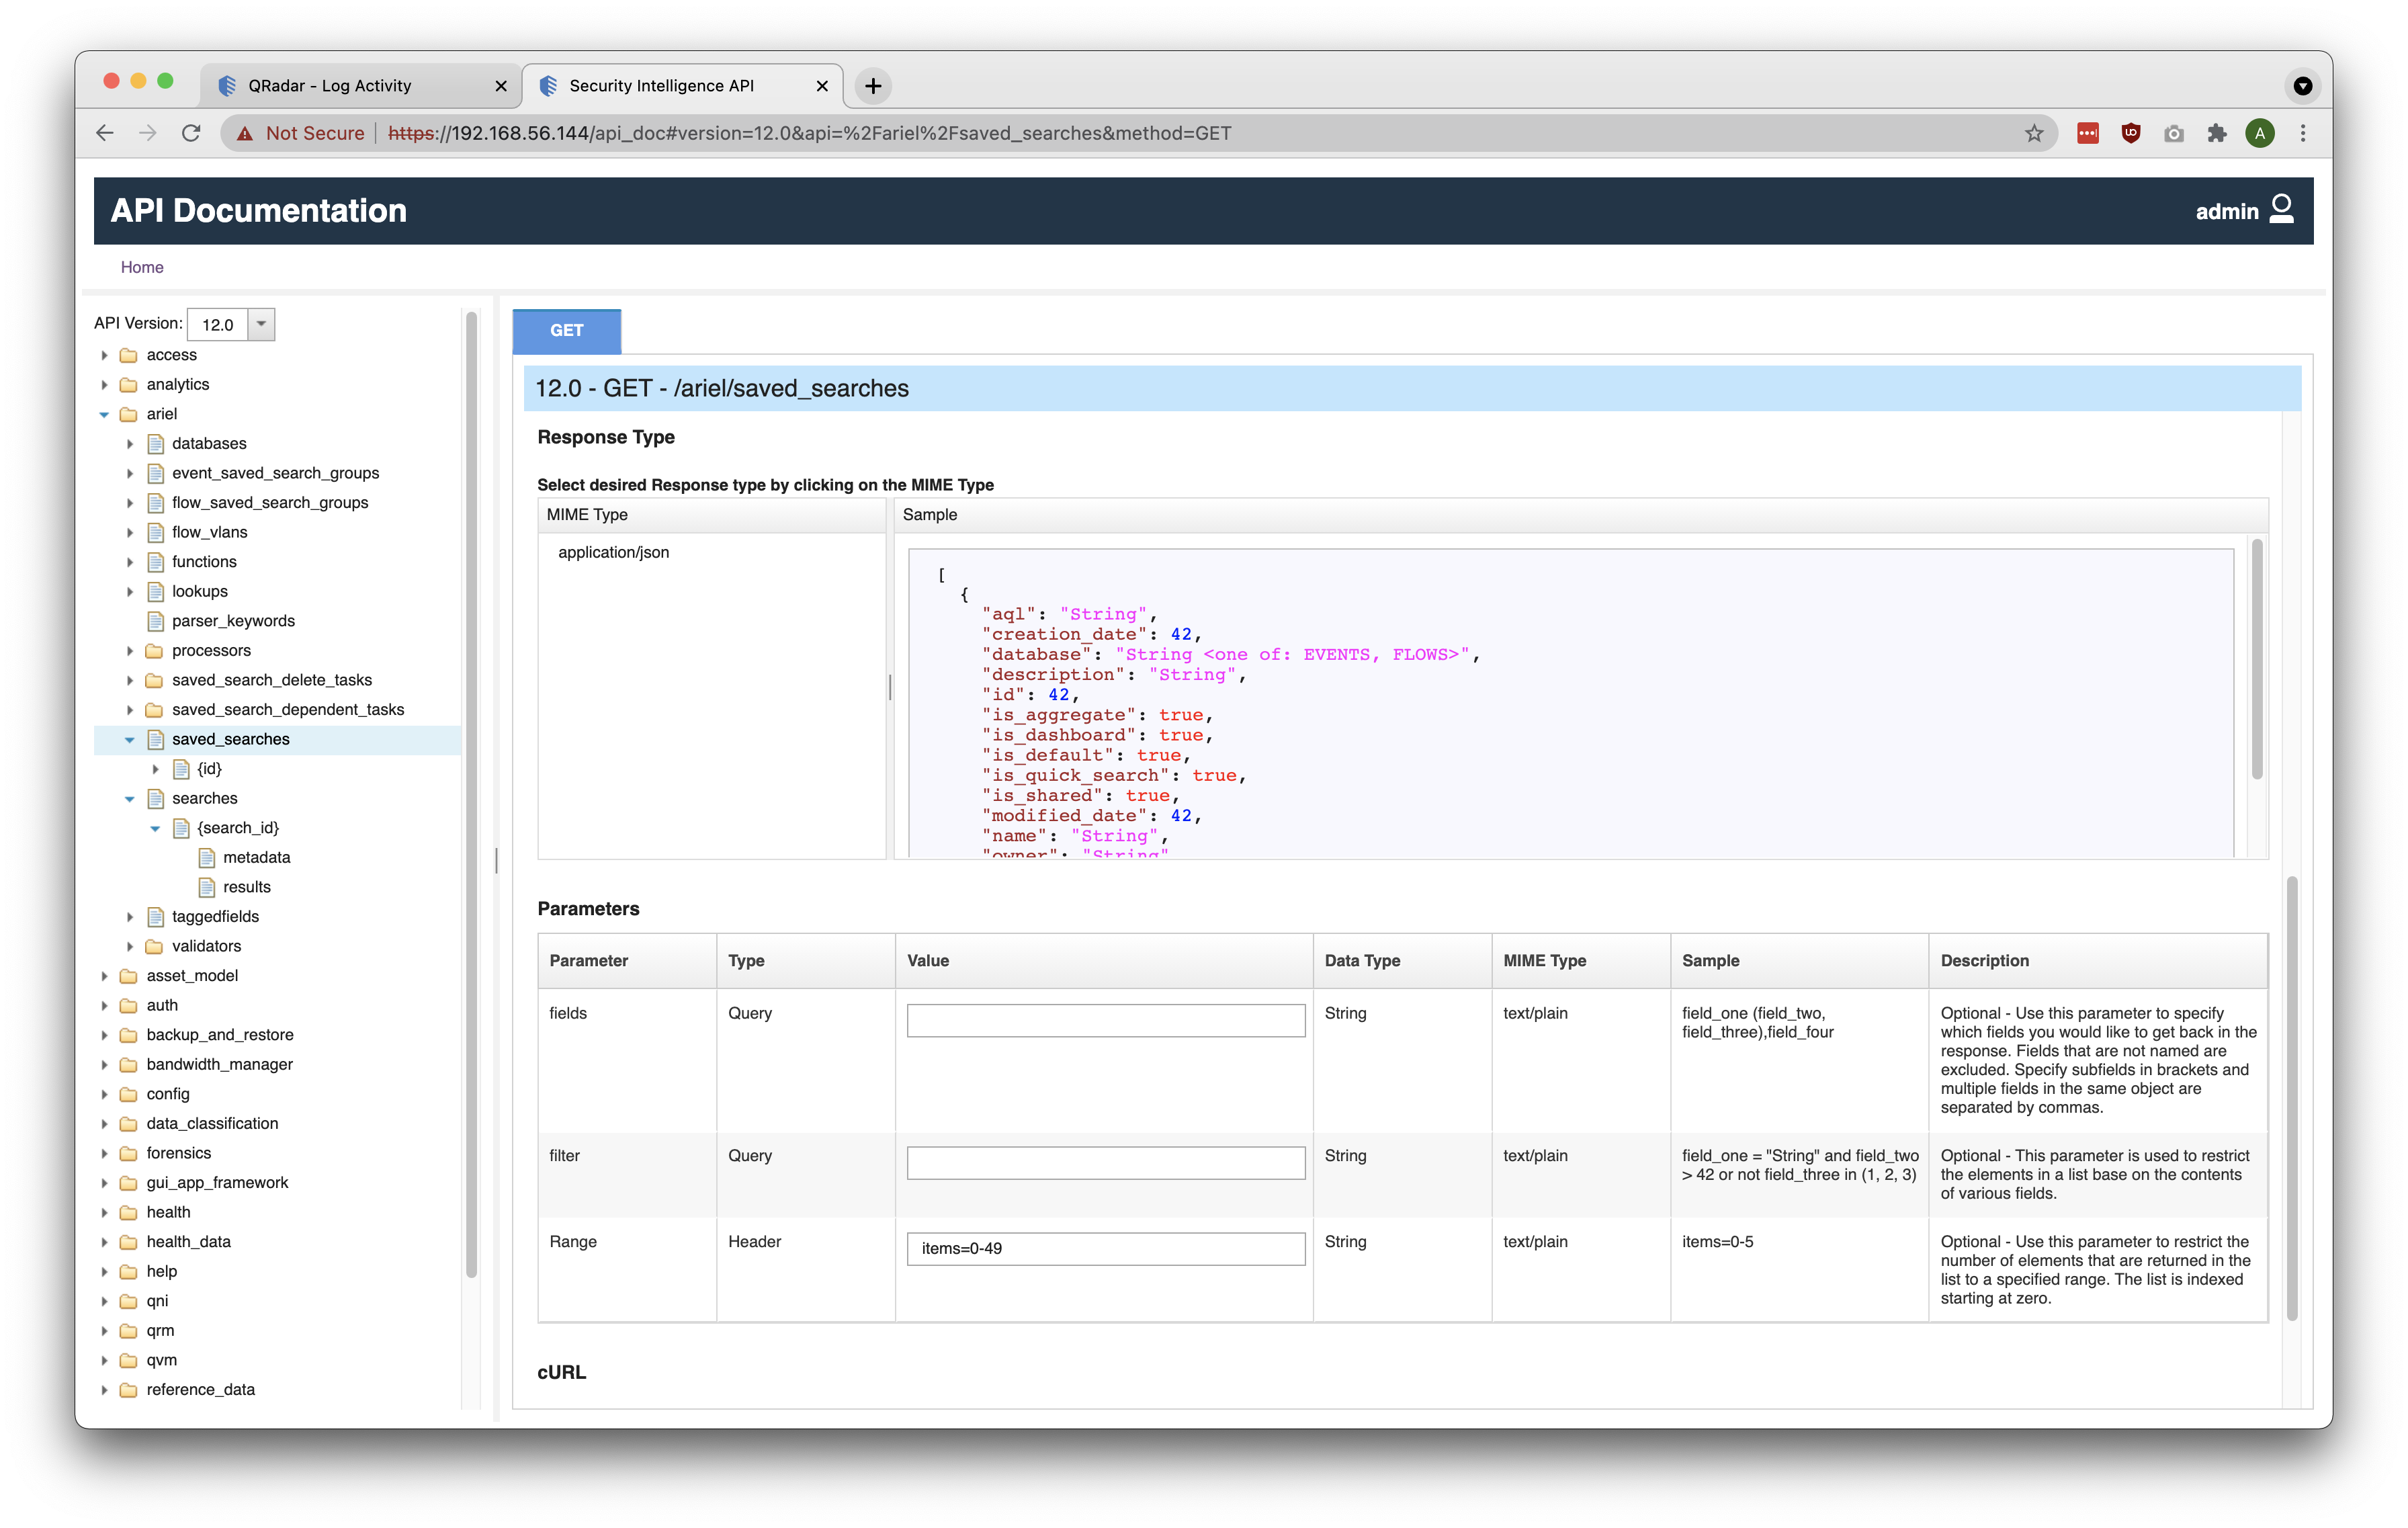
}It is to be noted that making a GET request to /ariel/saved_searches will return an Array of JSON objects. To make it easier, we can consider using a filter within the GET request. As seen in the screenshot below, the REST API endpoint has an optional Query parameter called filter, which can be used to limit the response to a specific Saved Search or a subset of Saved Searches. Similarly, the fields optional Query parameter can be used to specify which fields should be returned in the query response.
2. Create QRadar Ariel Search
To create a new QRadar Ariel Search, make a POST request to the /ariel/searches REST API endpoint. As seen in the screenshot below, there are 2 optional Query parameters - query_expression and saved_search_id, corresponding to the AQL Query and Saved Search ID respectively. Depending on the selected approach, provide an appropriate value.
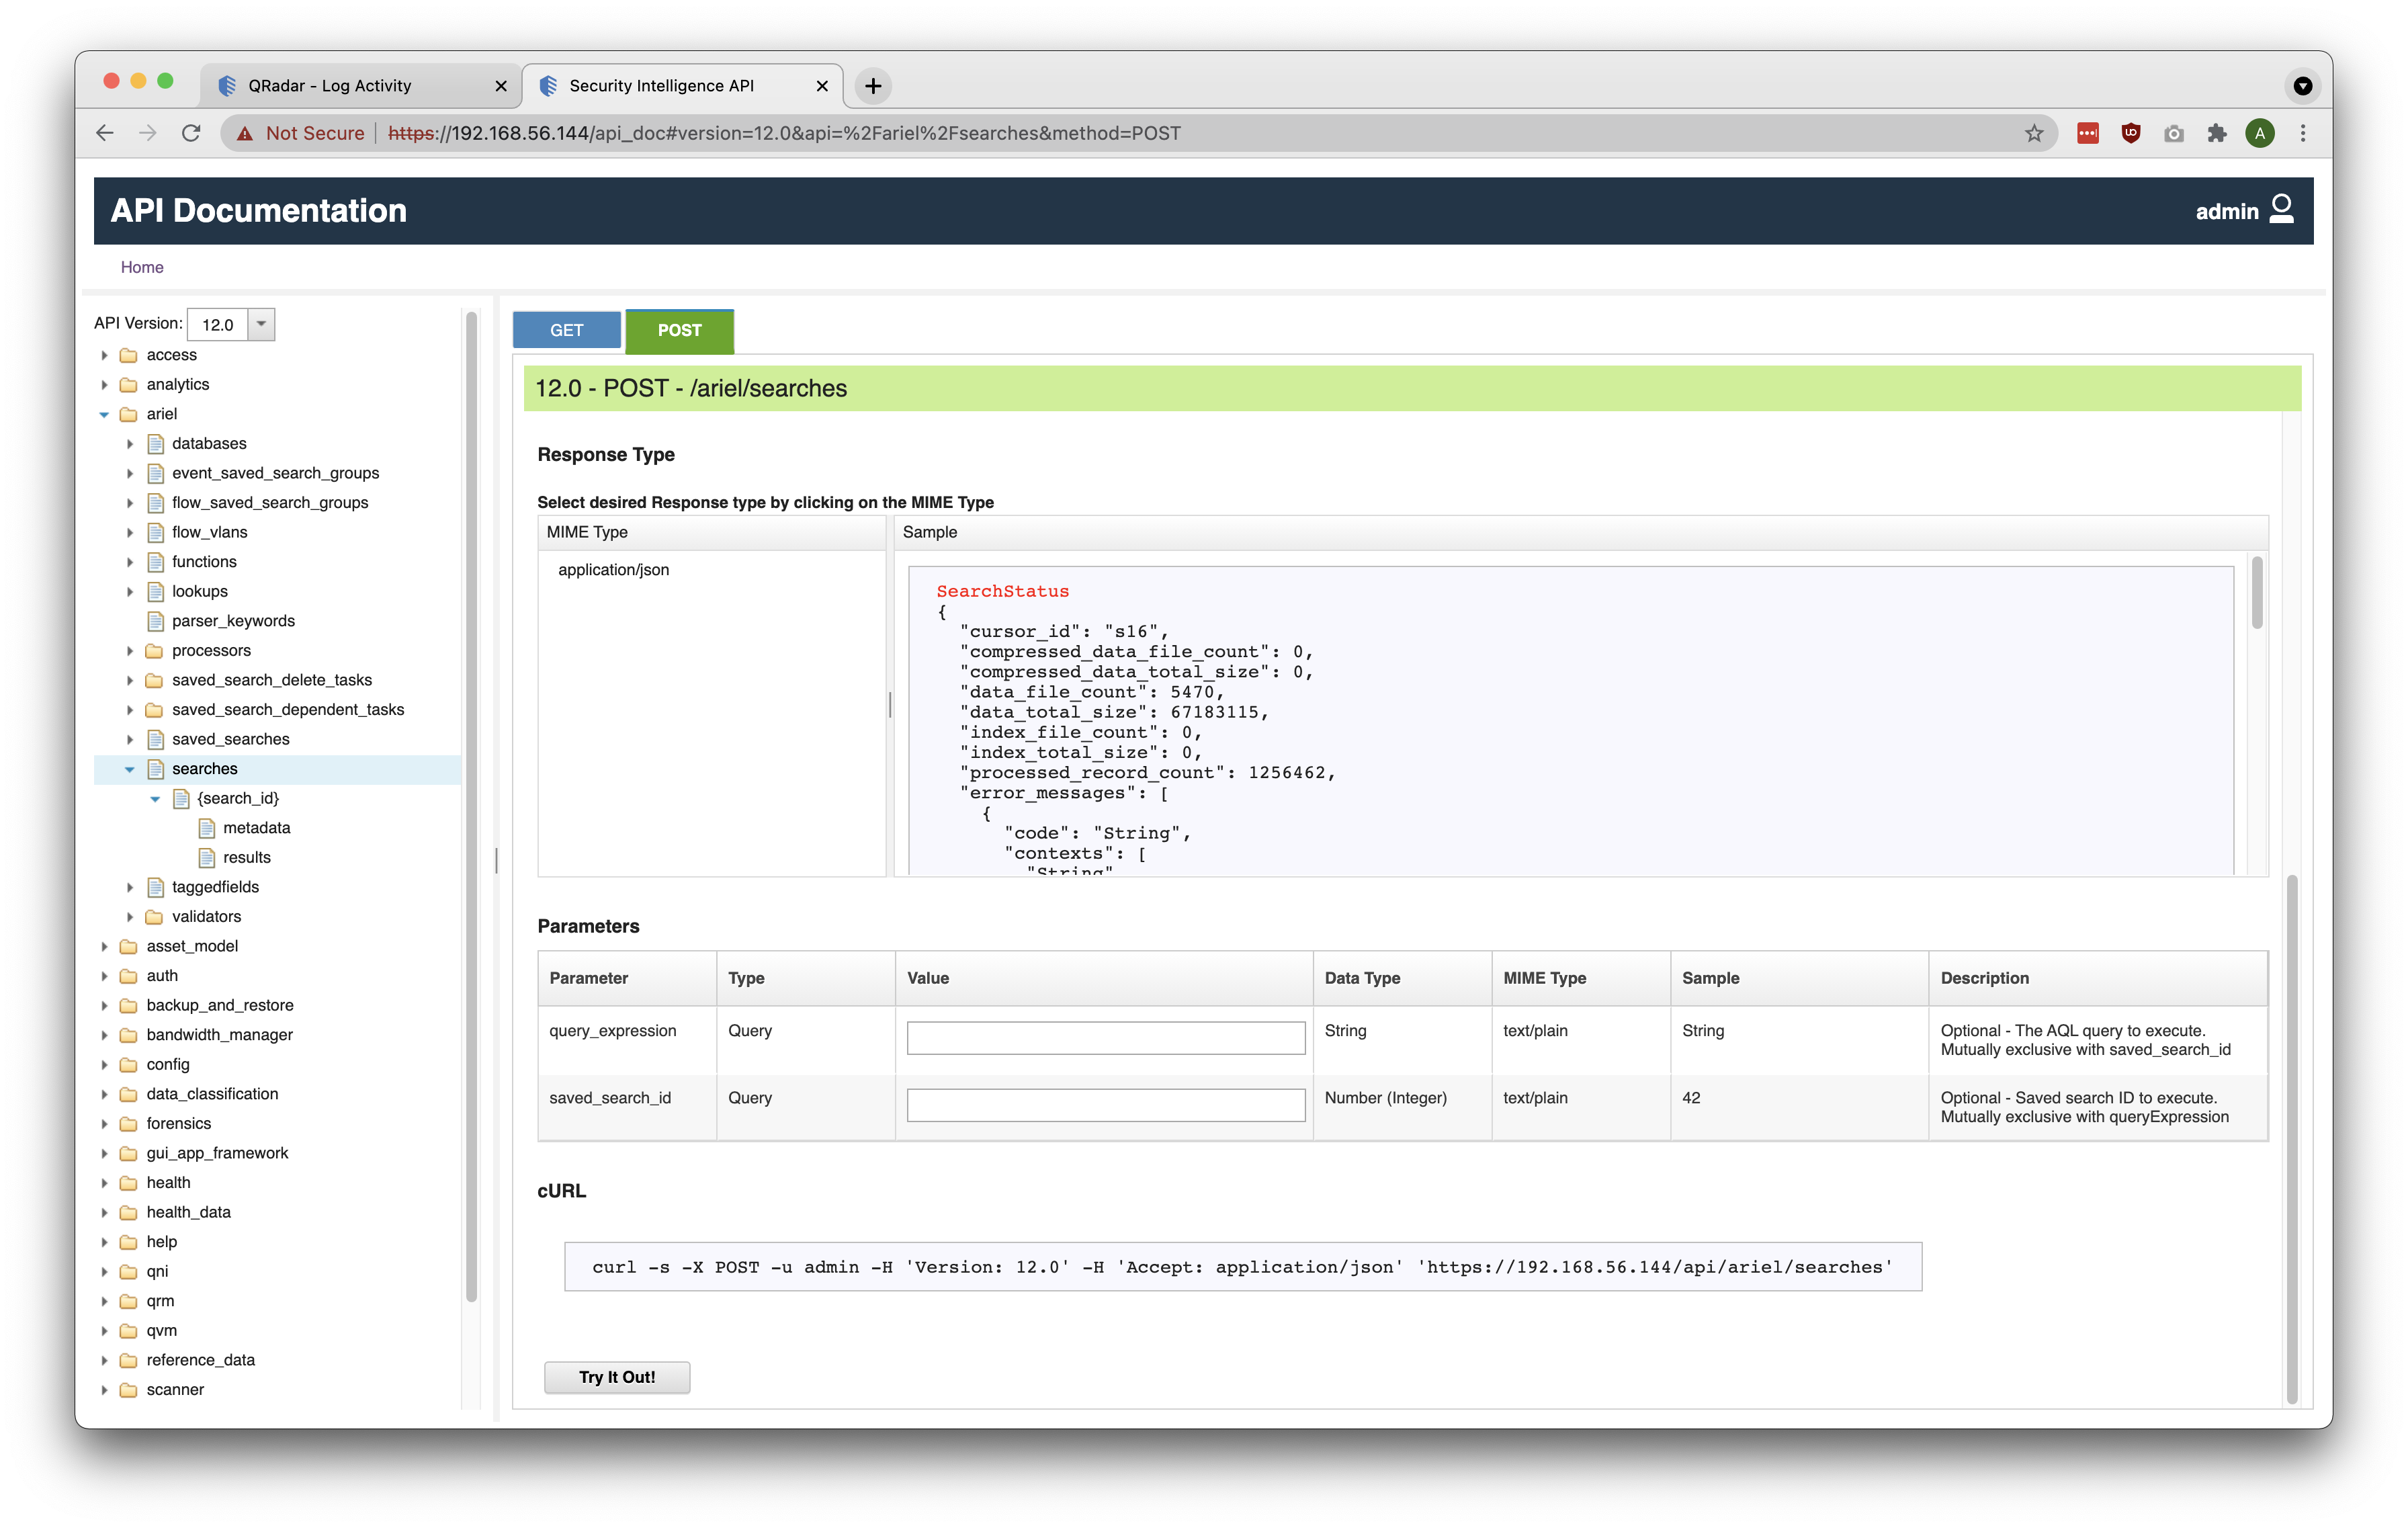
The request will return a JSON response containing a unique Search ID. Below is a sample JSON snippet displaying the search_id field.
{
  "search_id": "fdd8c0be-c88b-43fe-a3fd-6f88abfb9046"
}
3. Check Status of QRadar Ariel Search
Once a new QRadar Ariel Search is created, its unique Search ID can be used to check the completion status. To retrieve the status of a created search, make a GET request to /ariel/searches/{search_id} by replacing {search_id} with the actual Search ID associated with the search. As seen in the screenshot below, search_id is a required Path parameter to be sent along with the request.
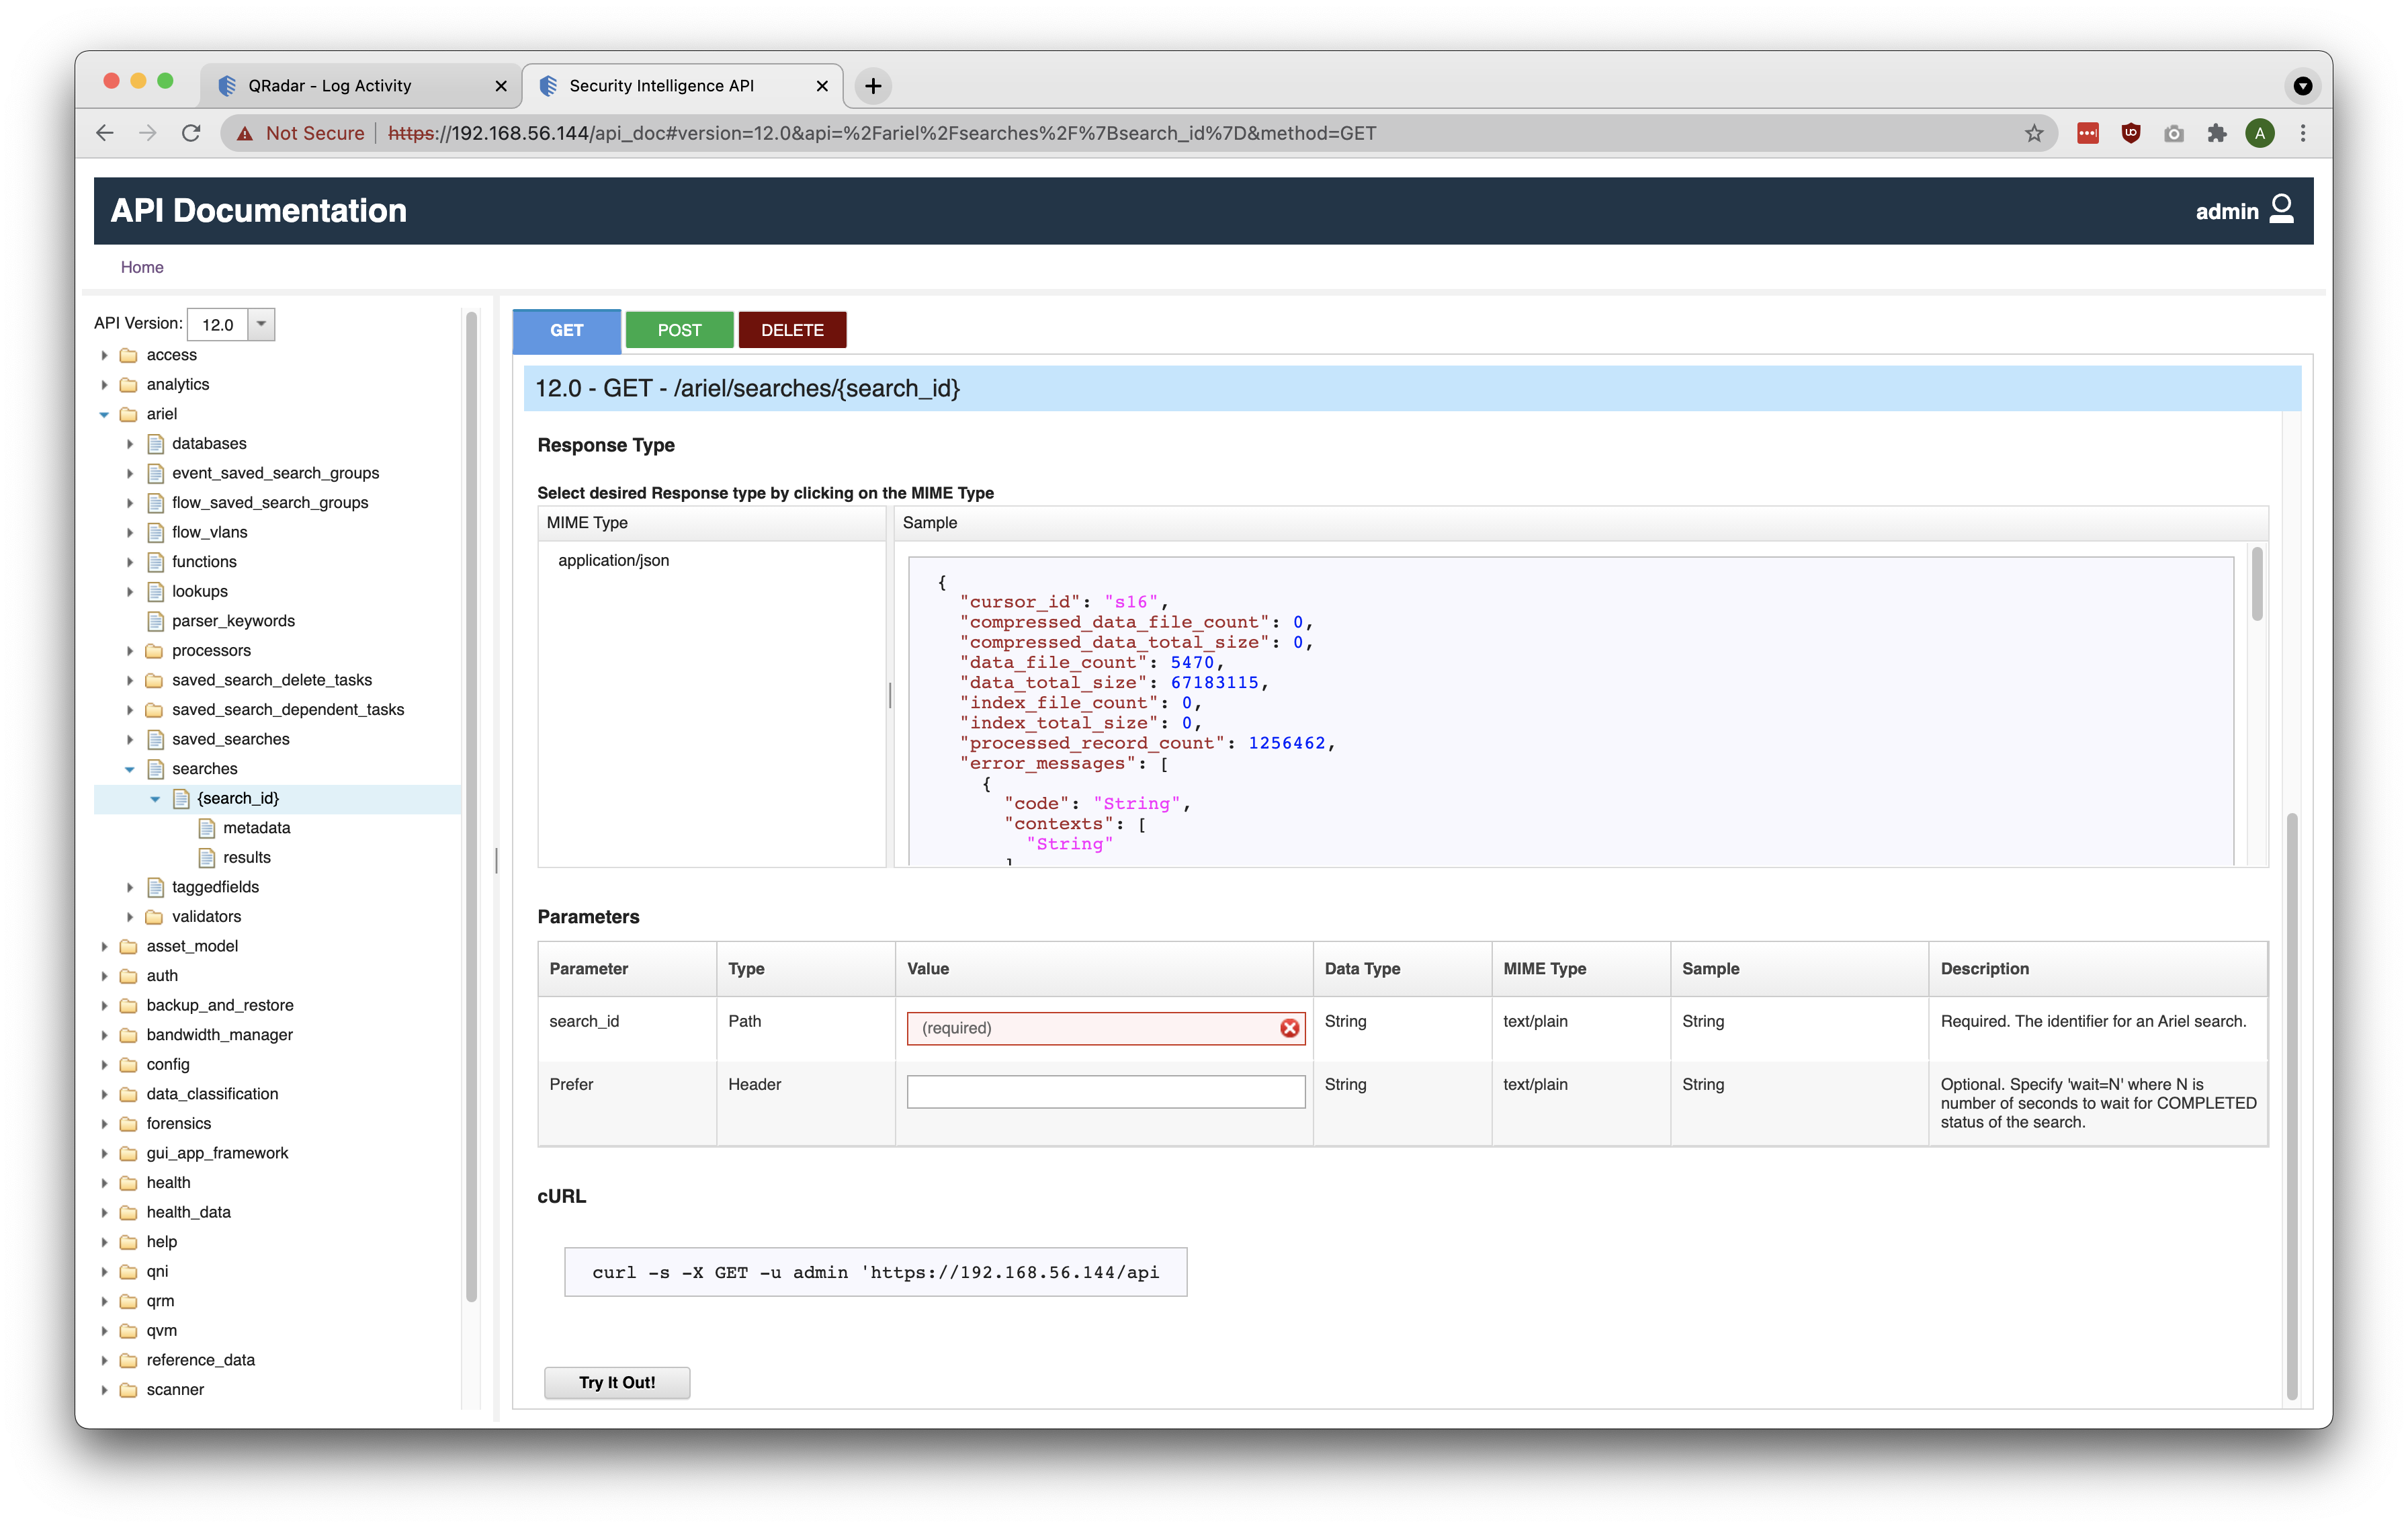
If we replace search_id with the Search ID from the previous snippet, the request URL would look like:
/ariel/searches/fdd8c0be-c88b-43fe-a3fd-6f88abfb9046The request will return a JSON response containing many fields pertaining to the status of the search. Below is a sample JSON snippet of the response displaying the progress, query_execution_time, and status fields.
{
  "progress": 46,
  "query_execution_time": 1480,
  "status": "COMPLETED"
}
4. Get Result of QRadar Ariel Search
Once it is ascertained that the QRadar Ariel Search is completed, make a GET request to /ariel/searches/{search_id}/results to retrieve the result of the search by replacing {search_id} with the actual Search ID associated with the search. As seen in the screenshot below, search_id is a required Path parameter to be sent along with the request. It is also worth noting that the result can be retrieved in various formats. The Accepts request header indicates the format of the result. The formats are RFC compliant and can be JSON, CSV, XML, or tabular text.
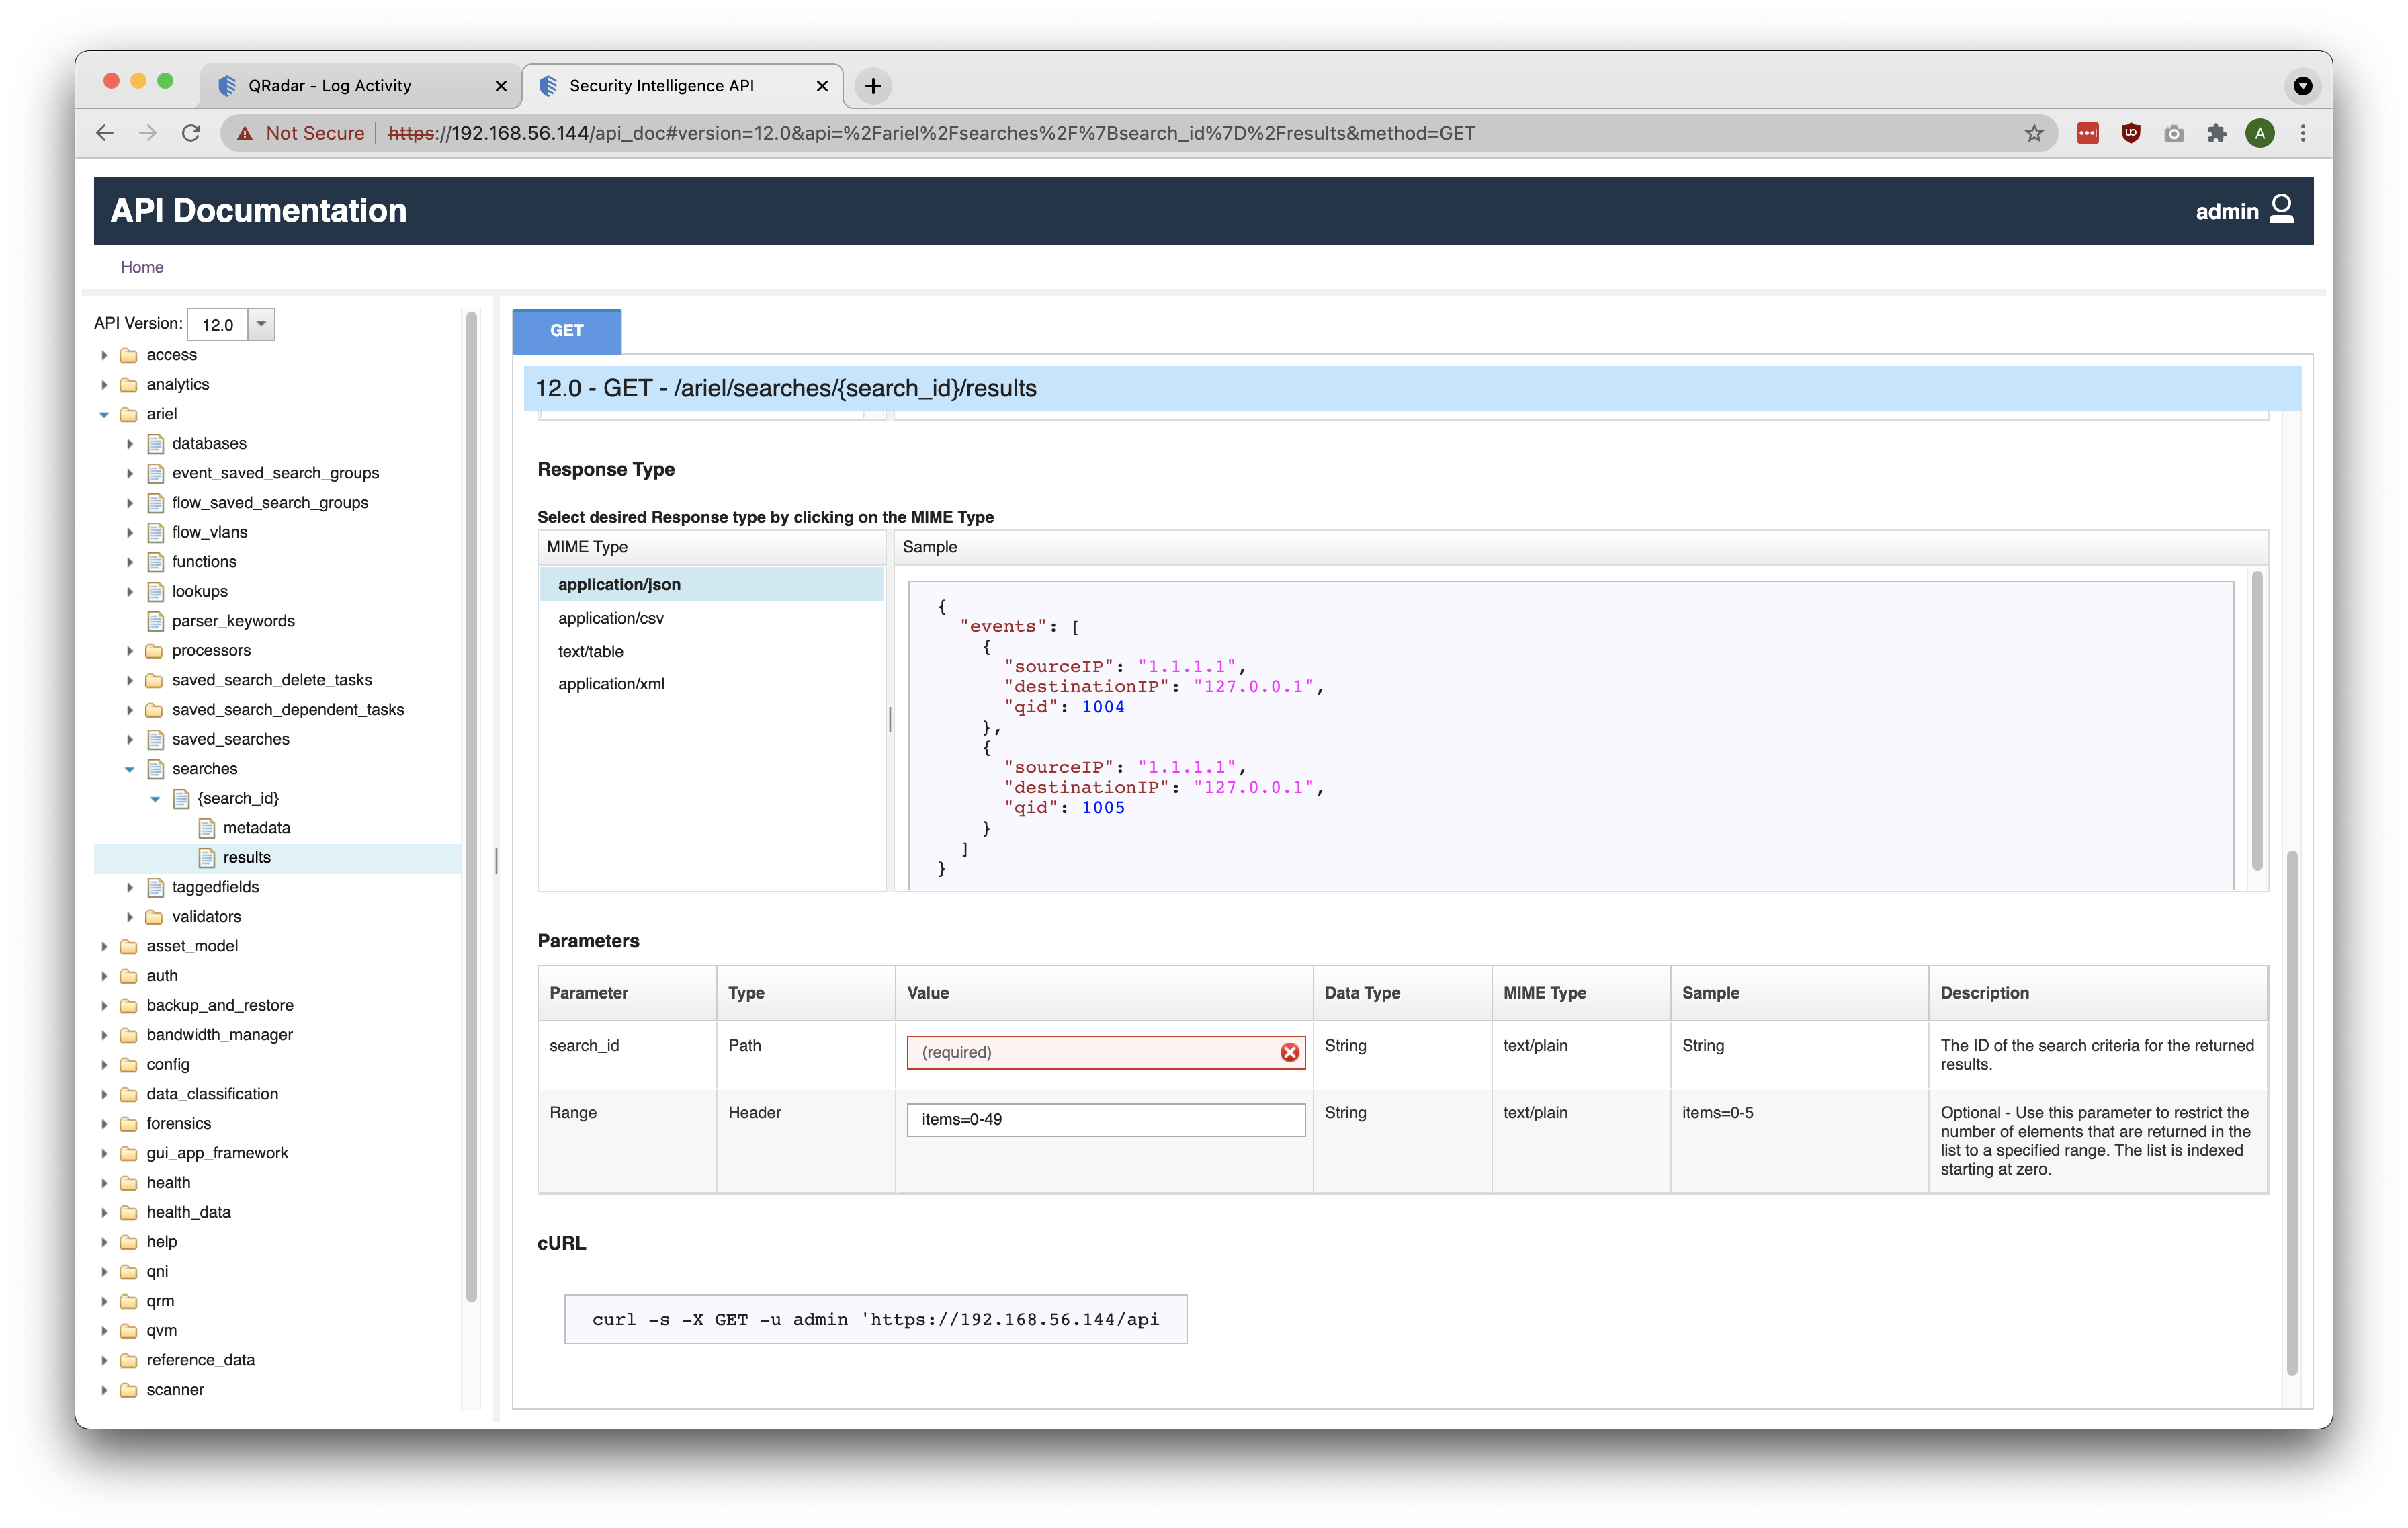
Below is a sample JSON snippet of the response displaying the fields specified in the AQL Query associated with the QRadar Ariel Search.
"events": [
  {
    "Log Source": "Health Metrics-2 :: localhost",
    "Source IP (Unique Count)": 1.0,
    "Destination IP (Unique Count)": 1.0,
    "Destination Port (Unique Count)": 1.0,
    "Event Name (Unique Count)": 1.0,
    "Low Level Category (Unique Count)": 1.0,
    "Protocol (Unique Count)": 1.0,
    "Username (Unique Count)": 0.0,
    "Magnitude (Maximum)": 4.0,
    "Event Count (Sum)": 30040.0,
    "Count": 30040.0
  },
  .
  .
  .
]
It is to be noted that the request will mostly return an Array of JSON objects. In the snippet above, events is an Array containing raw JSON objects, each pertaining to a specific Log Source.
The fields returned in the response are solely dependent on the AQL Query associated with the QRadar Ariel Search. We can see that all the fields returned in the JSON response above are specified in the SELECT statement of the AQL Query below.
SELECT   logsourcename(logSourceId)     AS 'Log Source',
         UniqueCount("sourceIP")        AS 'Source IP (Unique Count)',
         UniqueCount("destinationIP")   AS 'Destination IP (Unique Count)',
         UniqueCount("destinationPort") AS 'Destination Port (Unique Count)',
         UniqueCount(qid)               AS 'Event Name (Unique Count)',
         UniqueCount(category)          AS 'Low Level Category (Unique Count)',
         UniqueCount("protocolId")      AS 'Protocol (Unique Count)',
         UniqueCount("userName")        AS 'Username (Unique Count)',
         MAX("magnitude")               AS 'Magnitude (Maximum)',
         SUM("eventCount")              AS 'Event Count (Sum)',
         COUNT(*)                       AS 'Count'
FROM     events
GROUP BY logSourceId
ORDER BY "Event Count (Sum)" DESC
LAST 6 HOURS
Python Code
We will use the programming concept of recursion to implement the QRadar Ariel Search workflow on Python.
According to GeeksforGeeks:
The process in which a function calls itself directly or indirectly is called recursion and the corresponding function is called as recursive function. Using recursive algorithm, certain problems can be solved quite easily. Examples of such problems are Towers of Hanoi (TOH), Inorder/Preorder/Postorder Tree Traversals, DFS of Graph, etc.
We will start by importing the necessary Python packages as seen below.
import requests
import pandas
import time
The next step is to define a variable called SEC_TOKEN to hold the QRadar API Token as seen below. Please refer here on how to generate a QRadar API Token.
SEC_TOKEN = '4150d602-11ba-4d55-b3de-b6ebfe8b93ac'The next step is to define a variable called header to hold the Header content for the API request as seen below. We will utilize the SEC_TOKEN variable that was defined above as a value to the key SEC.
header = {
    'SEC':SEC_TOKEN,
    'Content-Type':'application/json',
    'accept':'application/json'
}
After the variables have been defined, we will define 2 functions as follows:
1. do_request function
This function is responsible for making the actual REST API request using the requests Python module as seen below. It takes the HTTP method, request URL, and request parameters as function arguments and returns the JSON response. It is generic by design to promote re-usability and reduce the lines of code.
Note:
paramsin this function is an example of a default parameter which allows us to specify a default value for the parameter in case we do not pass an argument. By default,paramswill take the value of{}which is an empty dictionary unless a value is explicitly passed as an argument.
def do_request(method, url, params={}):
    r = requests.request(method=method, url=url, params=params, headers=header, verify=False)
    return r.json()
2. check_status function
This function is the recursive function responsible for checking the status of the QRadar Ariel Search at a defined interval of 3 seconds as seen below. The function will return the JSON response once the search is completed.
The base case in the function is when the variable search_status is set to COMPLETED. In the base case, the do_request function is called to retrieve the result of the QRadar Ariel Search.
When search_status is set a value other than COMPLETED, the recursive case is triggered and the same function (check_status) calls itself. First, we use time.sleep(3) to suspend the execution for 3 seconds. Then, the do_request function is called to fetch the status of the QRadar Ariel Search. The status of the search, accessed via resp_json['status'], is used as an argument in the recursive function call.
The recursive function calls are repeated until the base case is satisified i.e., when search_status="COMPLETED", which then stops the recursion and retrieves the result of the search. Our goal is to ensure that the base case is triggered successfully, else the function will call itself over and over endlessly resulting in infinite recursion.
def check_status(search_status, search_id):
    if search_status=="COMPLETED":
        print("Search Completed")
        method = "GET"
        url = 'https://192.168.56.144/api/ariel/searches/%s/results' % search_id
        return do_request(method, url)
    else:
        print("Waiting for 3 seconds...")
        time.sleep(3)
        method = "GET"
        url = 'https://192.168.56.144/api/ariel/searches/%s' % search_id
        resp_json = do_request(method, url)
        return check_status(resp_json['status'], search_id)
According to IBM QRadar documentation:
The search status value be one of:
WAIT,EXECUTE,SORTING,COMPLETED,CANCELED, orERROR.
It is to be noted that we are only considering COMPLETED as the base case in our code for the sake of simplicity. A more concrete implementation of this function will likely have more base cases in the recursive function to consider CANCELED and ERROR search statuses.
According to MIT:
A recursive implementation may have more than one base case, or more than one recursive step. For example, the Fibonacci function has two base cases,
n=0andn=1.
The next step is to utilize the above 2 defined functions to perform a new QRadar Ariel Search and display its result. Let us attempt to perform the Saved Search titled Top Log Sources.
To capture the correct Saved Search ID associated with the Top Log Sources Saved Search, we will define the request URL and request parameters as seen below.
url = 'https://192.168.56.144/api/ariel/saved_searches'
params = {'filter':'name="Top Log Sources"'}
type(params)
# dict
params is a dictionary with a single key called filter. The associated value is name="Top Log Sources". It is important to note the double quotes encapsulating the Saved Search name.
The next step is to make a GET request using our previously defined function do_request as seen below. The result is stored in a variable called res_json.
method = "GET"
res_json = do_request(method, url, params)
res_json
'''
[{'owner': 'admin',
  'is_dashboard': True,
  'description': '',
  'creation_date': 1245191315681,
  'uid': 'SYSTEM-13',
  'database': 'EVENTS',
  'is_default': False,
  'is_quick_search': True,
  'name': 'Top Log Sources',
  'modified_date': 1622547778276,
  'id': 2721,
  'is_aggregate': True,
  'aql': 'SELECT logsourcename(logSourceId) AS \'Log Source\', UniqueCount("sourceIP") AS \'Source IP (Unique Count)\', UniqueCount("destinationIP") AS \'Destination IP (Unique Count)\', UniqueCount("destinationPort") AS \'Destination Port (Unique Count)\', UniqueCount(qid) AS \'Event Name (Unique Count)\', UniqueCount(category) AS \'Low Level Category (Unique Count)\', UniqueCount("protocolId") AS \'Protocol (Unique Count)\', UniqueCount("userName") AS \'Username (Unique Count)\', MAX("magnitude") AS \'Magnitude (Maximum)\', SUM("eventCount") AS \'Event Count (Sum)\', COUNT(*) AS \'Count\' from events GROUP BY logSourceId order by "Event Count (Sum)" desc last 6 hours',
  'is_shared': True}]
'''
type(res_json)
# list
len(res_json)
# 1
It is to be noted that res_json is of type list with a length of 1. We must remember this while attempting to parse the values.
Our goal is to capture the Saved Search ID using its key - id. We will define a variable called SAVED_SEARCH_ID to hold the Saved Search ID as seen below.
SAVED_SEARCH_ID = res_json[0]['id']
SAVED_SEARCH_ID
# 2721
Now that we have the Saved Search ID (2721), we can create the QRadar Ariel Search by defining the request URL and request parameters as seen below.
method = "POST"
url = 'https://192.168.56.144/api/ariel/searches'
params = {'saved_search_id':SAVED_SEARCH_ID}
params
# {'saved_search_id': 2721}
The next step is to make a POST request using our previously defined function do_request as seen below. The result is stored in a variable called res_json.
res_json = do_request(method, url, params)
res_json
'''
{'cursor_id': '789355dd-2bb9-454a-9d05-26ba4d373d48',
 'status': 'WAIT',
 'compressed_data_file_count': 0,
 'compressed_data_total_size': 0,
 'data_file_count': 0,
 'data_total_size': 0,
 'index_file_count': 0,
 'index_total_size': 0,
 'processed_record_count': 0,
 'desired_retention_time_msec': 86400000,
 'progress': 0,
 'progress_details': [],
 'query_execution_time': 0,
 'query_string': 'SELECT logsourcename(logSourceId) AS \'Log Source\', UniqueCount("sourceIP") AS \'Source IP (Unique Count)\', UniqueCount("destinationIP") AS \'Destination IP (Unique Count)\', UniqueCount("destinationPort") AS \'Destination Port (Unique Count)\', UniqueCount(qid) AS \'Event Name (Unique Count)\', UniqueCount(category) AS \'Low Level Category (Unique Count)\', UniqueCount("protocolId") AS \'Protocol (Unique Count)\', UniqueCount("userName") AS \'Username (Unique Count)\', MAX("magnitude") AS \'Magnitude (Maximum)\', SUM("eventCount") AS \'Event Count (Sum)\', COUNT(*) AS \'Count\' from events GROUP BY logSourceId order by "Event Count (Sum)" desc last 6 hours',
 'record_count': 0,
 'size_on_disk': 0,
 'save_results': False,
 'completed': False,
 'subsearch_ids': [],
 'snapshot': None,
 'search_id': '789355dd-2bb9-454a-9d05-26ba4d373d48'}
'''
Our goal is to capture the Search ID using its key - search_id. We will define a variable called SEARCH_ID to hold the Search ID as seen below.
SEARCH_ID = res_json['search_id']
SEARCH_ID
# '789355dd-2bb9-454a-9d05-26ba4d373d48'
The next step is to invoke the check_status recursive function with the Search ID as seen below. The return value will be stored into a variable called resp.
resp = check_status("WAIT", SEARCH_ID)
'''
Waiting for 3 seconds...
Search Completed
'''
resp
'''
{'events': [{'Log Source': 'Health Metrics-2 :: localhost',
   'Source IP (Unique Count)': 1.0,
   'Destination IP (Unique Count)': 1.0,
   'Destination Port (Unique Count)': 1.0,
   'Event Name (Unique Count)': 1.0,
   'Low Level Category (Unique Count)': 1.0,
   'Protocol (Unique Count)': 1.0,
   'Username (Unique Count)': 0.0,
   'Magnitude (Maximum)': 5.0,
   'Event Count (Sum)': 113760.0,
   'Count': 113760.0},
  {'Log Source': 'System Notification-2 :: qradar',
   'Source IP (Unique Count)': 2.0,
   'Destination IP (Unique Count)': 1.0,
   'Destination Port (Unique Count)': 1.0,
   'Event Name (Unique Count)': 4.0,
   'Low Level Category (Unique Count)': 3.0,
   'Protocol (Unique Count)': 1.0,
   'Username (Unique Count)': 0.0,
   'Magnitude (Maximum)': 7.0,
   'Event Count (Sum)': 23292.0,
   'Count': 23292.0},
  {'Log Source': 'SIM Audit-2 :: qradar',
   'Source IP (Unique Count)': 3.0,
   'Destination IP (Unique Count)': 1.0,
   'Destination Port (Unique Count)': 1.0,
   'Event Name (Unique Count)': 8.0,
   'Low Level Category (Unique Count)': 2.0,
   'Protocol (Unique Count)': 1.0,
   'Username (Unique Count)': 5.0,
   'Magnitude (Maximum)': 8.0,
   'Event Count (Sum)': 168.0,
   'Count': 168.0},
  {'Log Source': 'Anomaly Detection Engine-2 :: qradar',
   'Source IP (Unique Count)': 1.0,
   'Destination IP (Unique Count)': 1.0,
   'Destination Port (Unique Count)': 1.0,
   'Event Name (Unique Count)': 1.0,
   'Low Level Category (Unique Count)': 1.0,
   'Protocol (Unique Count)': 1.0,
   'Username (Unique Count)': 0.0,
   'Magnitude (Maximum)': 3.0,
   'Event Count (Sum)': 16.0,
   'Count': 16.0}]}
'''
type(resp)
# dict
The print statements defined in the check_status function help us understand if the search is still running or if it has completed.
Note: You can customize the verbosity of the messages in the
check_statusfunction. While simple
We can see that resp contains the response - the result of our Top Log Sources QRadar Ariel Search in JSON format. However, the actual data we are interested in is stored under the key events.
type(resp['events'])
# list
len(resp['events'])
# 4
At this point, it is useful to store the raw JSON data into a different data structure - namely, a Pandas DataFrame.
The best way to convert our Array of JSON objects; i.e., resp['events'] which is of type list into a DataFrame is by using the pandas.json_normalize function as seen below.
df = pandas.json_normalize(resp['events'])
type(df)
# pandas.core.frame.DataFrame
df
As per the above snippet, the variable df now holds our result DataFrame.
The dimensions of the DataFrame can be retrieved using pandas.DataFrame.shape which returns a tuple of dimensions as seen below.
df.shape
# (4, 11)
Now that we have our result DataFrame, we can aggregate, visualize, and export the data as desired.
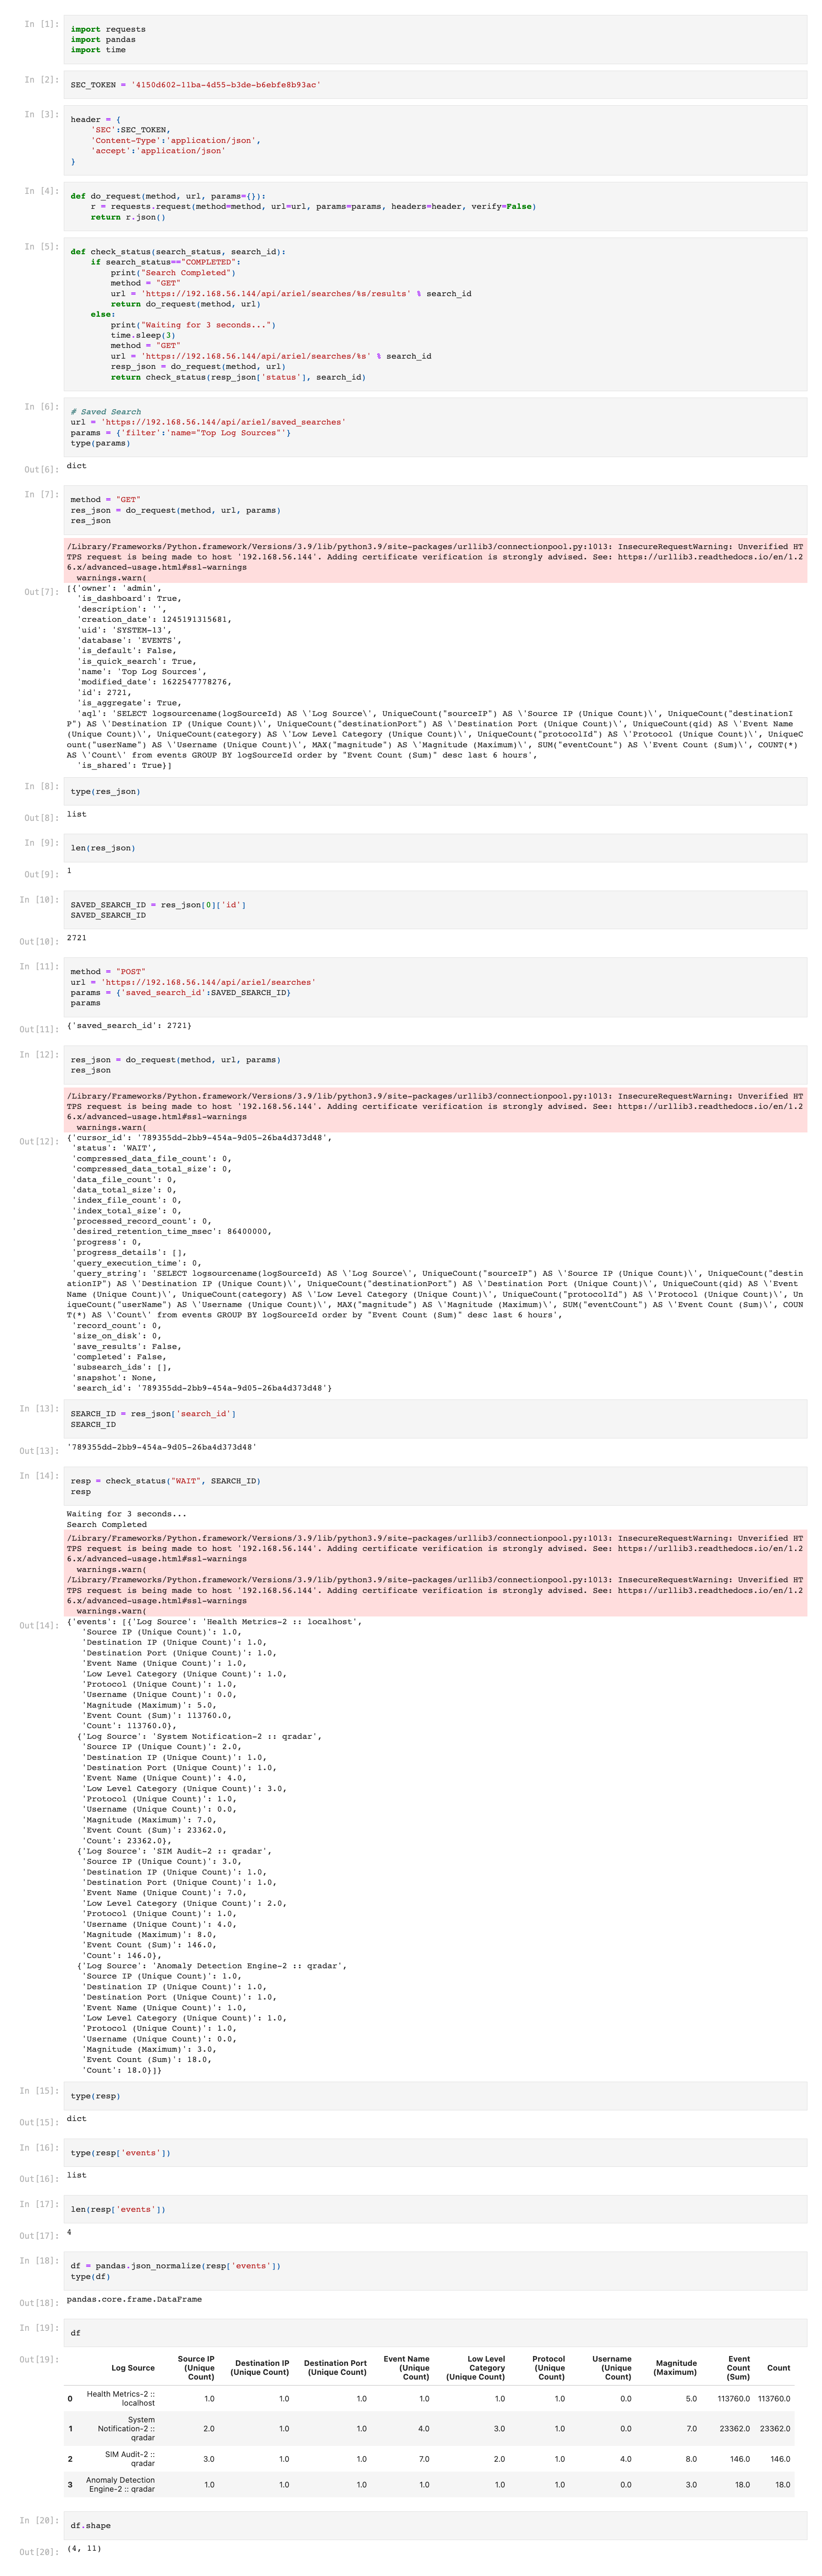
The below screenshot shows the final Jupyter Notebook.
Conclusion
In this tutorial, we learnt how to leverage the QRadar Ariel Search REST API endpoints to run Ariel searches and fetch their results programmatically using Python. To summarize:
We started by understanding the relevance of searching in QRadar and how it is a basic but essential functionality.
Then, we dissected the high-level steps involved in running a new QRadar Ariel Search programmatically. Here, we discussed when to use a raw AQL Query and when to use a Saved Search ID. A diagram was provided to visualize the steps in the workflow.
Next, we delved into the various QRadar Ariel Search REST API endpoints available on QRadar to complete all the steps in the workflow. Here, we discussed about each endpoint including its response fields, parameters, and sample JSON response.
Then, we wrote Python code using the concept of recursion to implement the steps in the workflow. We took an example Saved Search (Top Log Sources) and explained how we can capture its corresponding Saved Search ID, create a new QRadar Ariel Search, check its completion status, and retrieve the result in JSON format. We also converted the JSON response into a Pandas DataFrame to make querying and aggregation easier.
Using the concepts discussed in this tutorial, you can easily write Python code to automate QRadar searching tasks (such as Threat Hunting and SOC Reporting) which previously required manual effort.
You can view and download the Jupyter Notebook from this tutorial using the link below.
I hope you enjoyed reading this tutorial. Please reach out via email if you have any questions or comments.