QRadar REST APIs with Python
Posted on 06 October 2021
TweetIntroduction
In this tutorial, we will learn how to get started with the QRadar REST APIs and write basic Python scripts to fetch sample data from QRadar.
Note: This tutorial assumes you have admin access to a live QRadar deployment. For the purpose of this tutorial, I am using QRadar Community Edition. Please follow my step-by-step guide - How to install IBM QRadar CE V7.3.3 on VirtualBox to get a basic QRadar deployment up and running in your lab environment.
According to IBM QRadar documentation:
You access the RESTful API by sending HTTPS requests to specific URLs (endpoints) on the QRadar® SIEM Console. To send these requests, use the HTTP implementation that is built in to the programming language of your choice. Each request contains authentication information, and parameters that modify the request.
Pre-requisites
- QRadar with admin access
I am using QRadar CE V7.3.3 as described above.
- Python 3.x.x
I am using Python 3.9.7 on my MacBook Pro with macOS Big Sur.
The code written in this tutorial might cause issues with Python 2. Please refer to Python.org to download the latest release of Python 3 for your OS.
Use the command:
python --versionto find the exact version of Python installed on your system. You might also want to try:python3 --versionaspythonmight refer to Python 2. - pip (Python Package Installer)
pip is a useful utility to install Python packages. I am using pip 21.2.4.
Usually, pip comes automatically installed with Python. You can verify by running the command:
pip --versionwhich should output the exact version of pip and which Python version it is associated with. You might also want to try:pip3 --versionaspipmight refer to Python 2.If your Python environment does not have pip installed by default, please refer to the pip Installation documentation.
Setting up the Environment
In this section, we will set-up the environment by installing the necessary tools and packages to start writing Python code to make REST API requests to QRadar.
Installing Python Packages
Let us install the following Python packages using pip:
- requests - requests is an elegant and simple HTTP library for Python, built for human beings.
pip install requests - pandas - pandas is a fast, powerful, flexible and easy to use open source data analysis and manipulation tool,
built on top of the Python programming language.
pip install pandas
Installing Jupyter Notebook
Creating scripts in Python for beginners can be a daunting task. To make the coding experience easier and more intuitive, we will use a Jupyter Notebook.
According to Project Jupyter:
The Jupyter Notebook is an open-source web application that allows you to create and share documents that contain live code, equations, visualizations and narrative text. Uses include: data cleaning and transformation, numerical simulation, statistical modeling, data visualization, machine learning, and much more.
Jupyter supports over 40 programming languages, including Python, R, Julia, and Scala. Notebooks can be shared with others using email, Dropbox, GitHub and the Jupyter Notebook Viewer.
We will create a new Jupyter Notebook with Python code. The first step is to install Jupyter. The recommended approach is to install Jupyter using Anaconda and conda. According to Jupyter documentation:
While Jupyter runs code in many programming languages, Python is a requirement (Python 3.3 or greater, or Python 2.7) for installing the Jupyter Notebook.
For new users, we highly recommend installing Anaconda. Anaconda conveniently installs Python, the Jupyter Notebook, and other commonly used packages for scientific computing and data science.
However, for the purpose of this tutorial, we will use the alternative approach which involves manually installing Jupyter with pip. According to Jupyter documentation:
First, ensure that you have the latest pip; older versions may have trouble with some dependencies:
pip3 install --upgrade pipThen install the Jupyter Notebook using:
pip3 install jupyter
Note: If pip3 does not work, please try using pip or python3 -m pip instead.
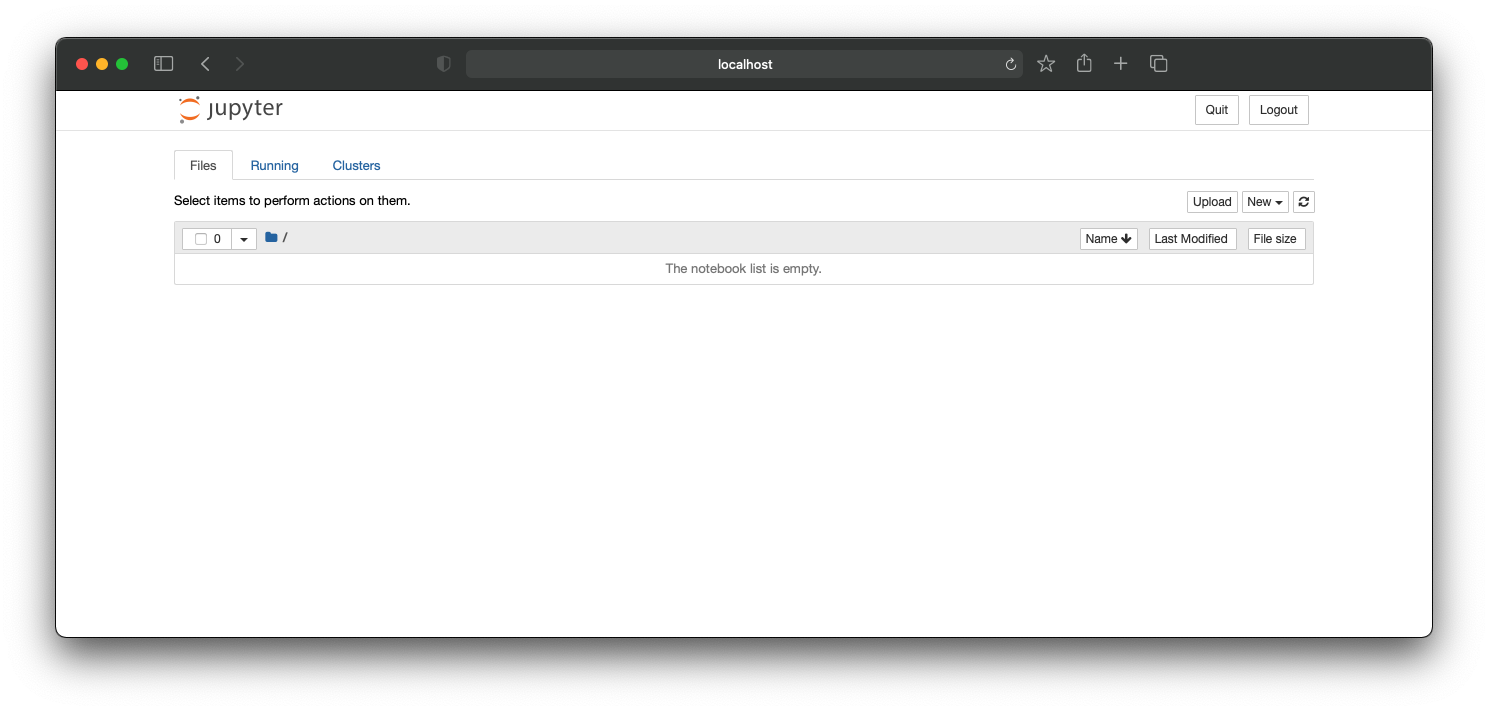
Once completed, start the Jupyter Notebook server using the command jupyter notebook as seen in the screenshot below.
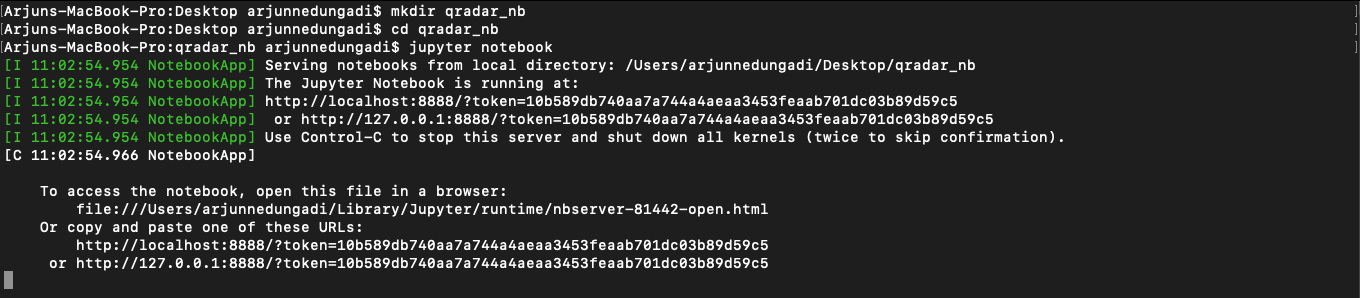
If successful, your browser should automatically open and navigate to the Notebook Dashboard at http://localhost:8888.
If the browser is not launched automatically, copy-and-paste the URL to the browser as mentioned in the CLI. For example: http://localhost:8888/?token=10b589db740aa7a744a4aeaa3453feaab701dc03b89d59c5. Then, the browser should navigate to the Notebook Dashboard as seen above.
For more information about running the Jupyter Notebook Server, please refer to Running the Notebook.
Creating a Jupyter Notebook
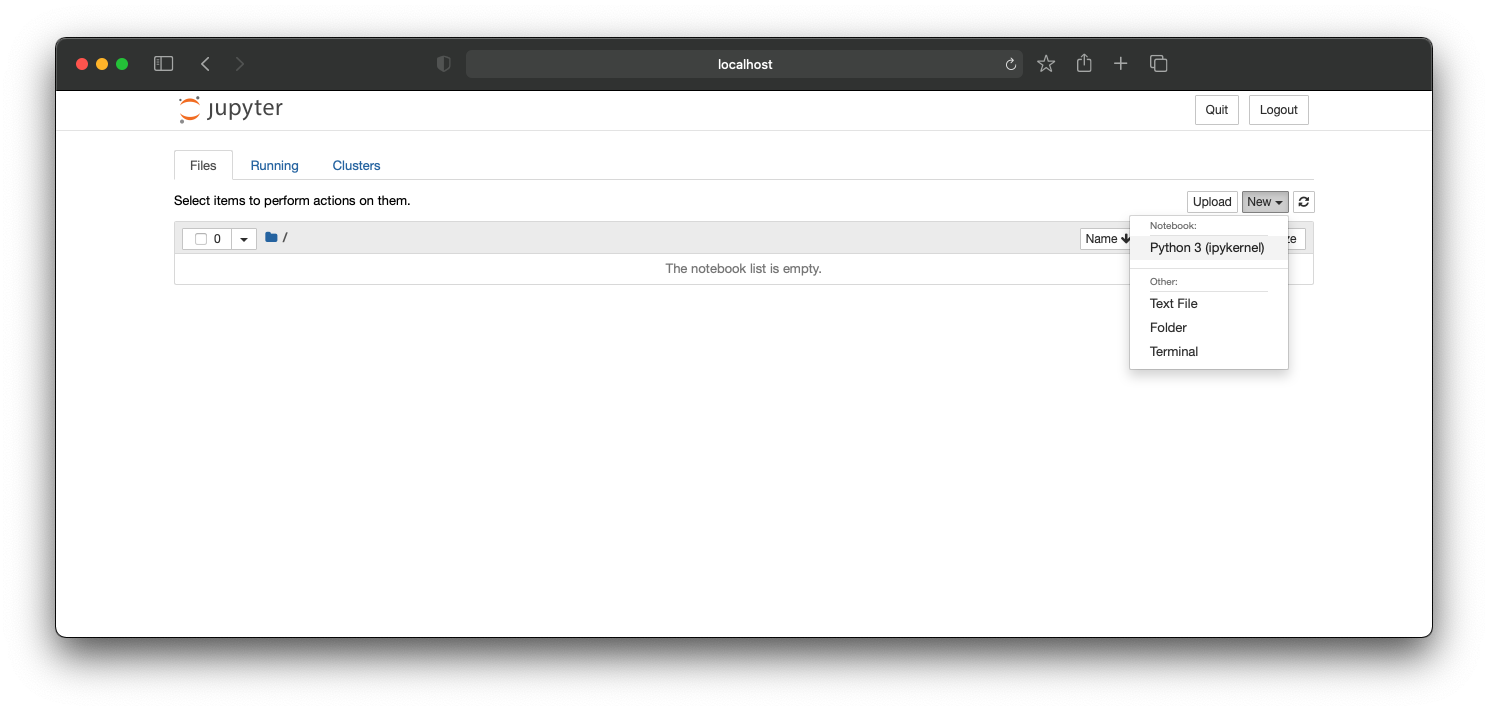
To create a new Jupyer Notebook, click on the New drop-down button and select Python 3 (ipykernal) as seen in the screenshot below.
A new browser tab will be opened with the Notebook User Interface as seen in the screenshot below.
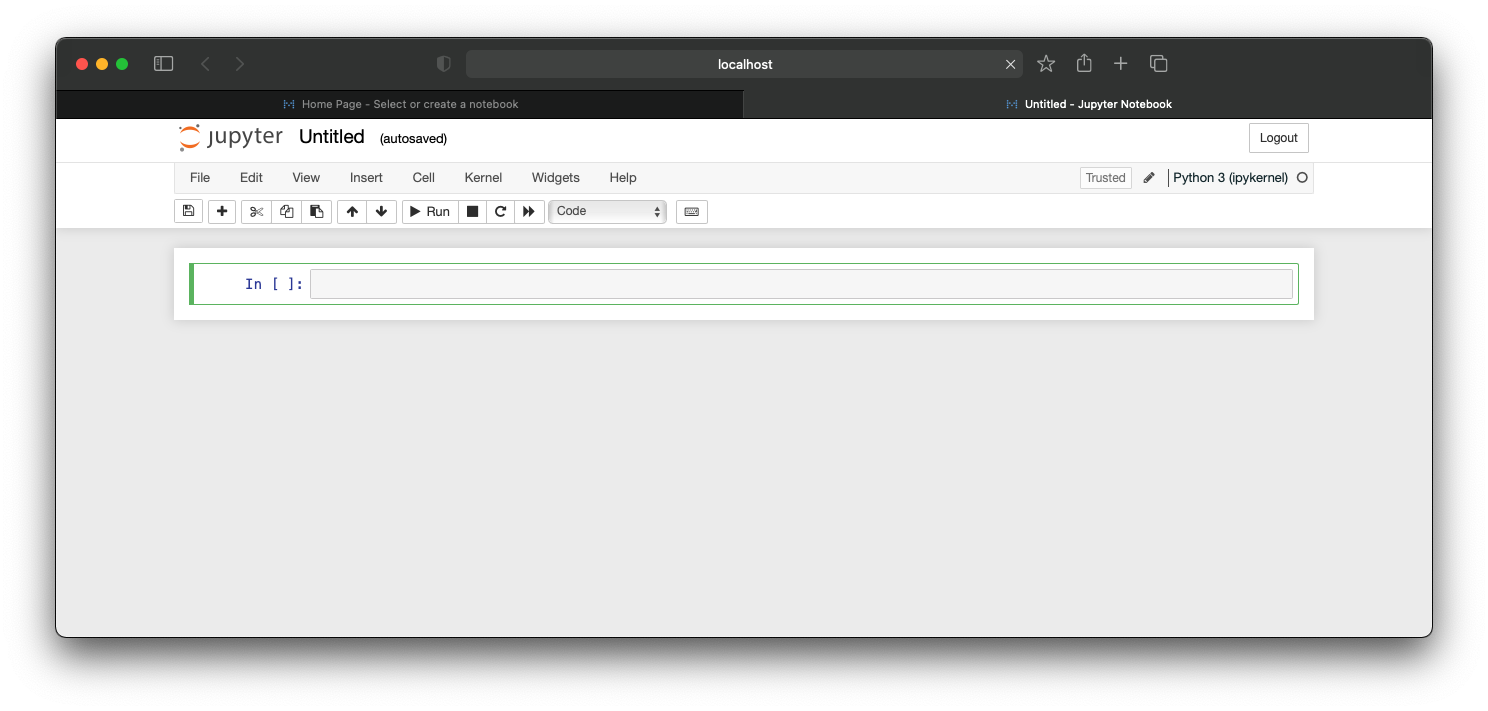
Python code can be written in the code cell. When the Run button is clicked, the code cell is executed and its output is displayed as seen in the screenshot below.

According to Jupyter documentation:
There are three types of cells: code cells, markdown cells, and raw cells.
A code cell allows you to edit and write new code, with full syntax highlighting and tab completion. The programming language you use depends on the kernel, and the default kernel (IPython) runs Python code.
You can document the computational process in a literate way, alternating descriptive text with code, using rich text. In IPython this is accomplished by marking up text with the Markdown language. The corresponding cells are called Markdown cells.
Raw cells provide a place in which you can write output directly. Raw cells are not evaluated by the notebook.
Generating a QRadar API Token
There are 2 ways to authenticate to QRadar while making an API request:
- Username and Password
- API Token
The recommended approach is to use an API Token for authentication via scripts. On QRadar, the API Token is also known as a SEC Token and must be generated by the admin on the QRadar Console.
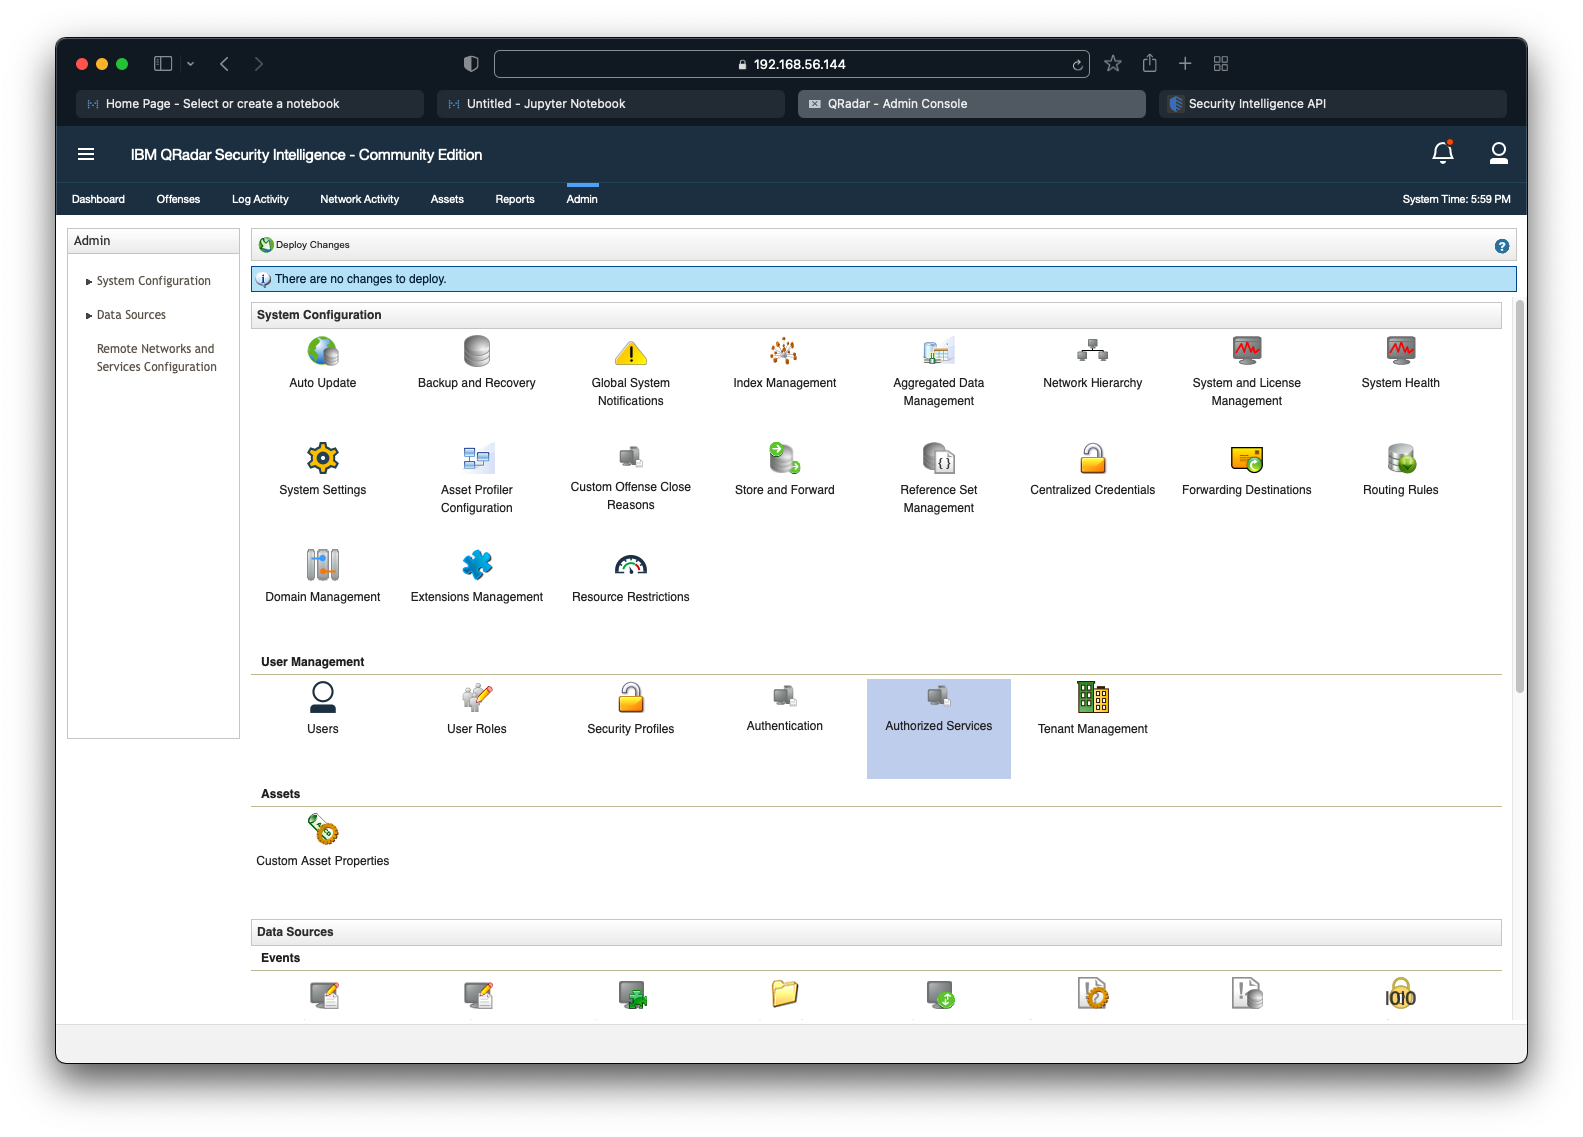
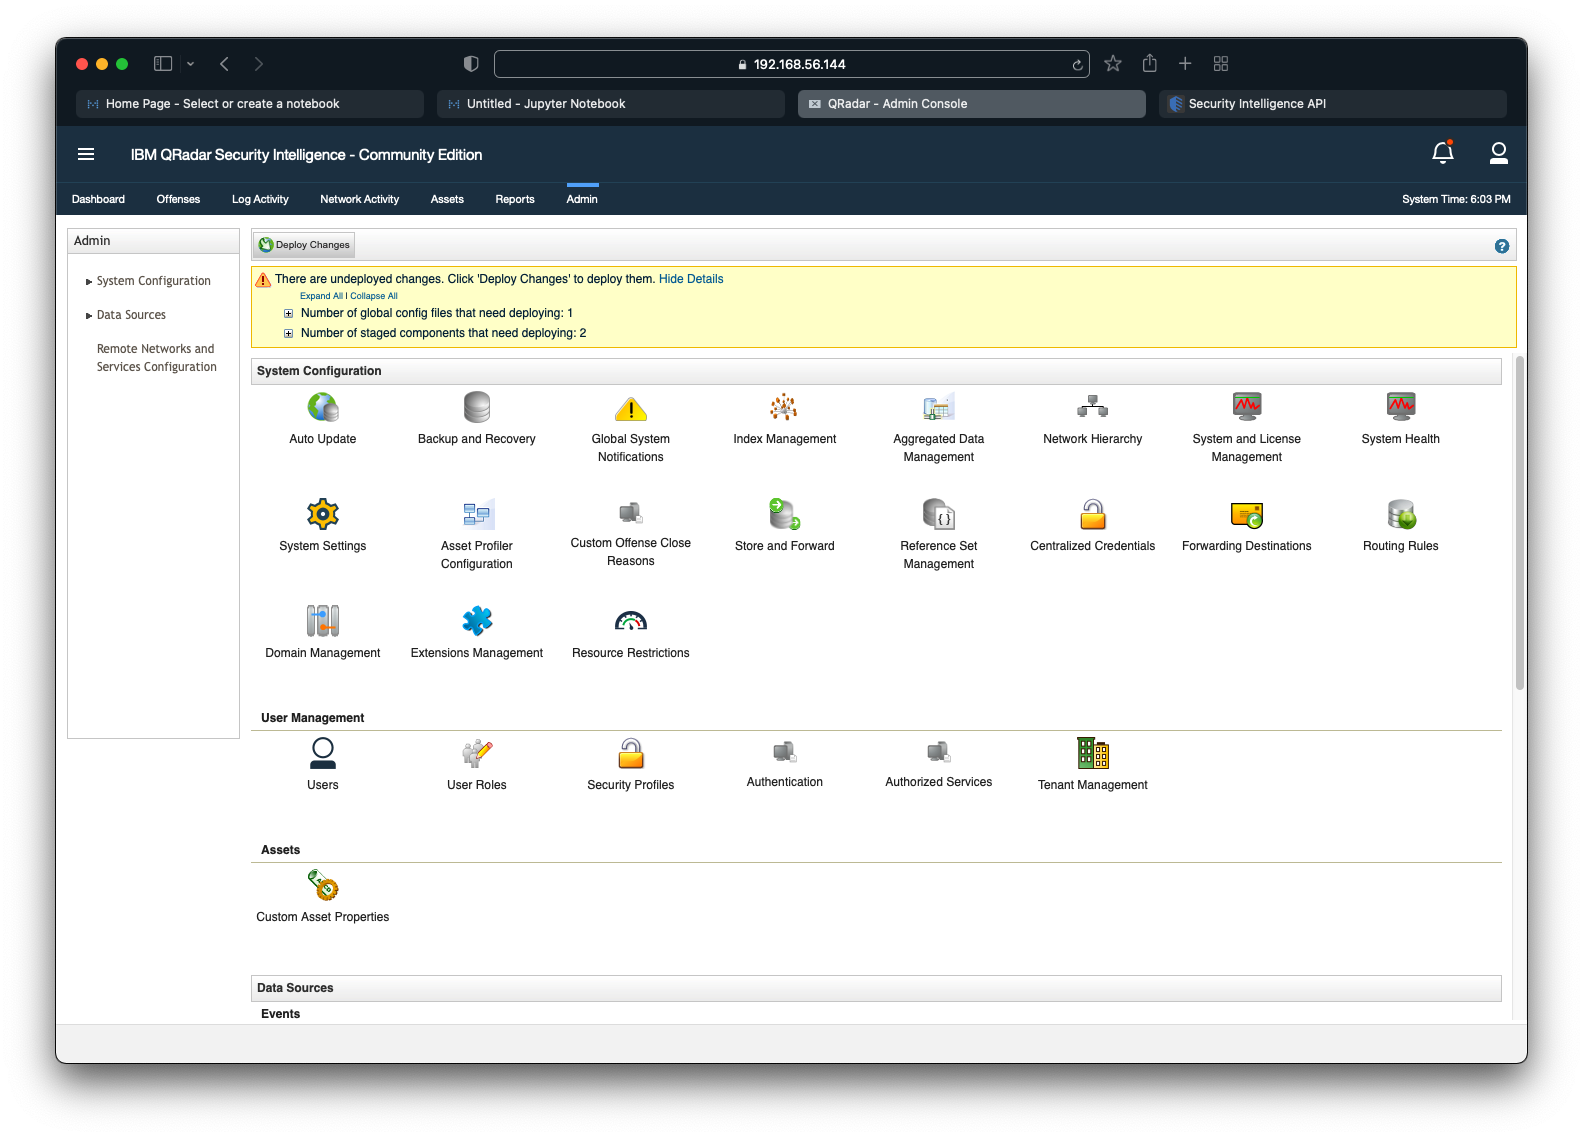
To generate a QRadar API Token, navigate to the Admin tab and click on Authorized Services as seen in the screenshot below.
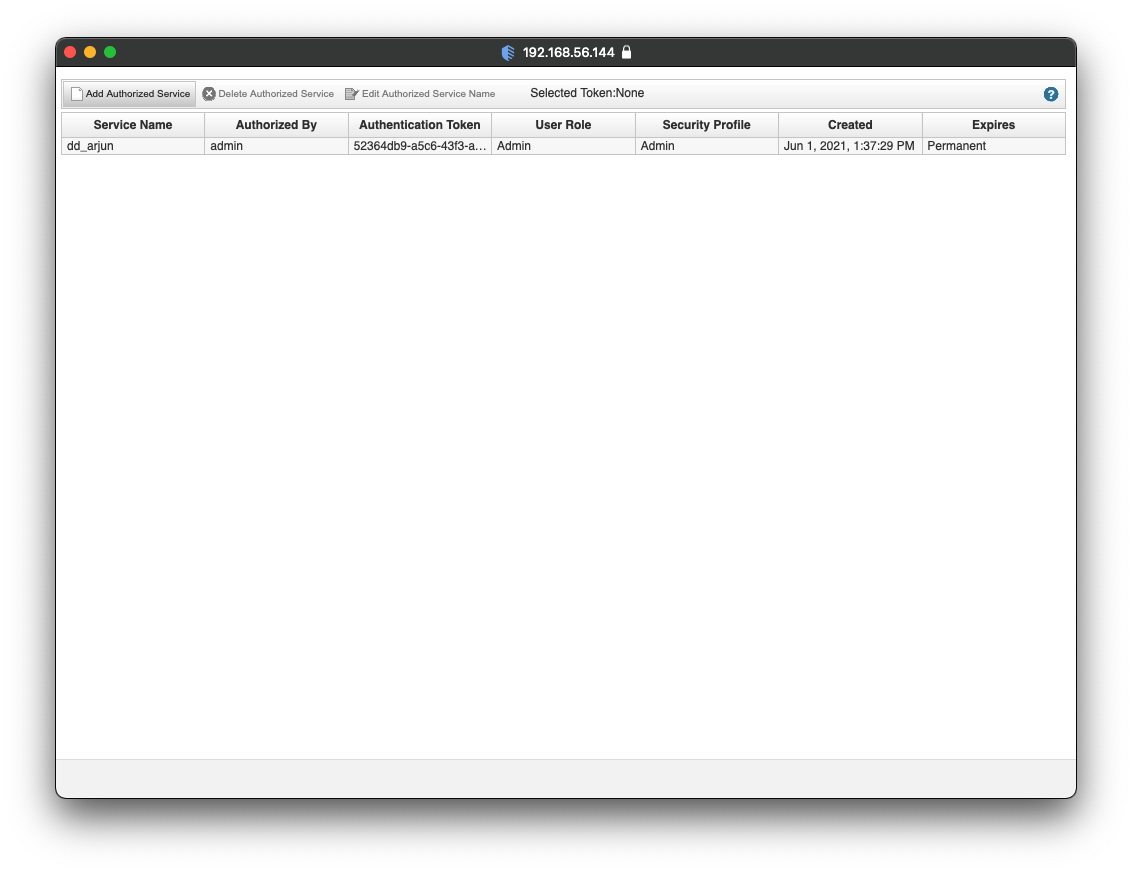
A list of existing authorized services will be displayed as seen in the screenshot below. Click on Add Authorized Service to generate a new API Token.
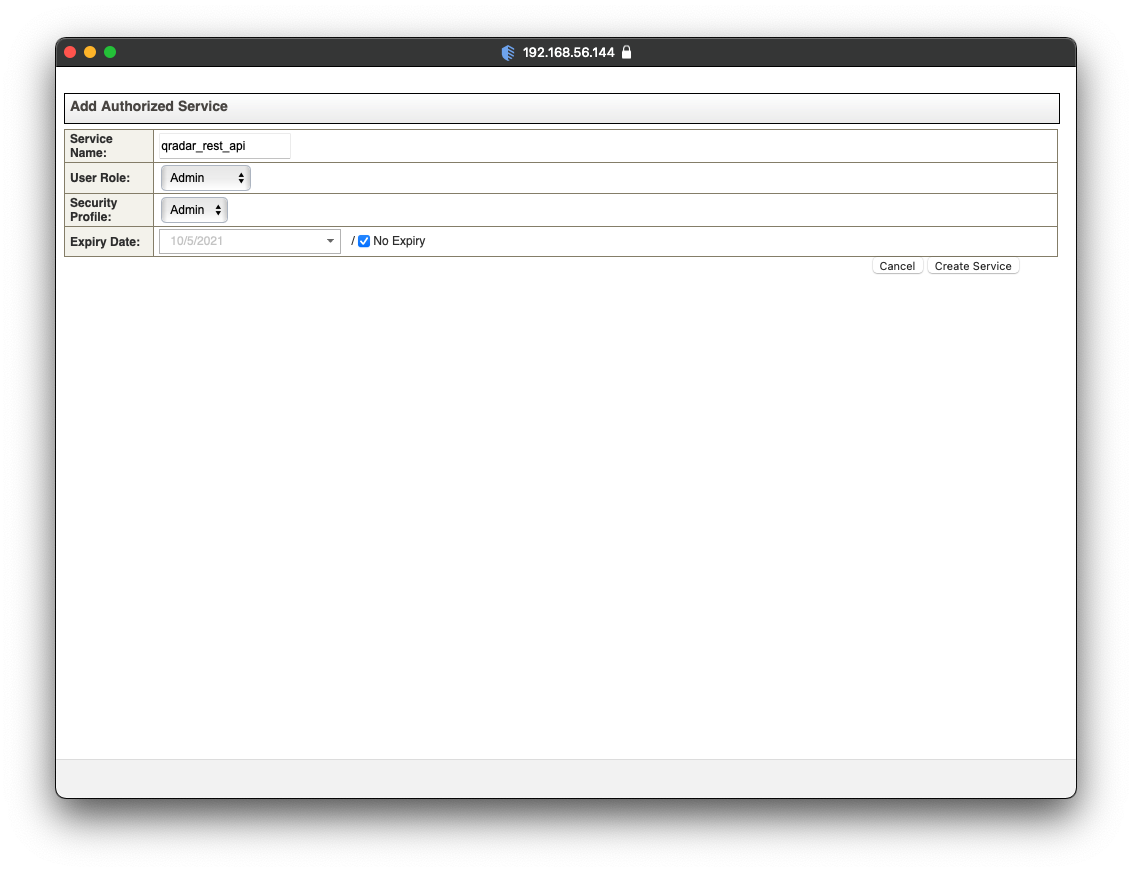
A pop-up will emerge with a form. In the form, provide a Service Name and select No Expiry for the Expiry Date as seen in the screenshot below. Click on Create Service.
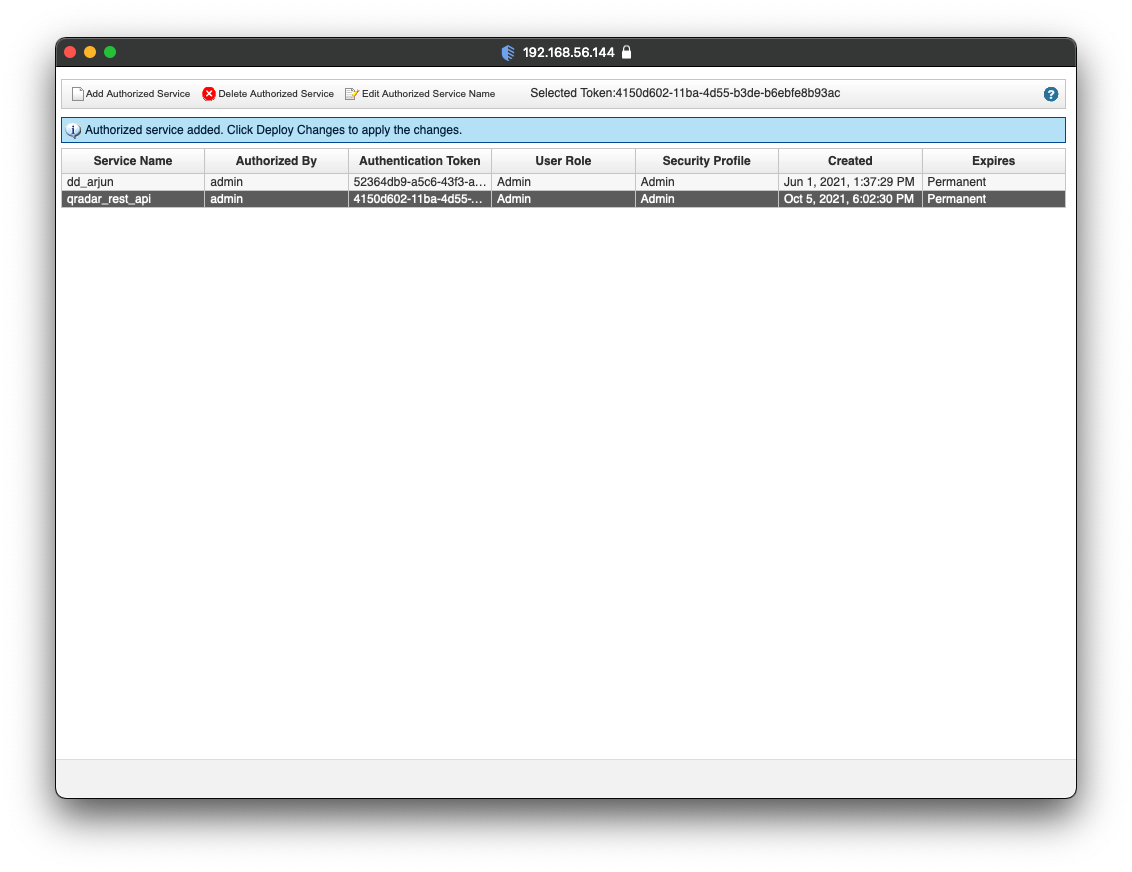
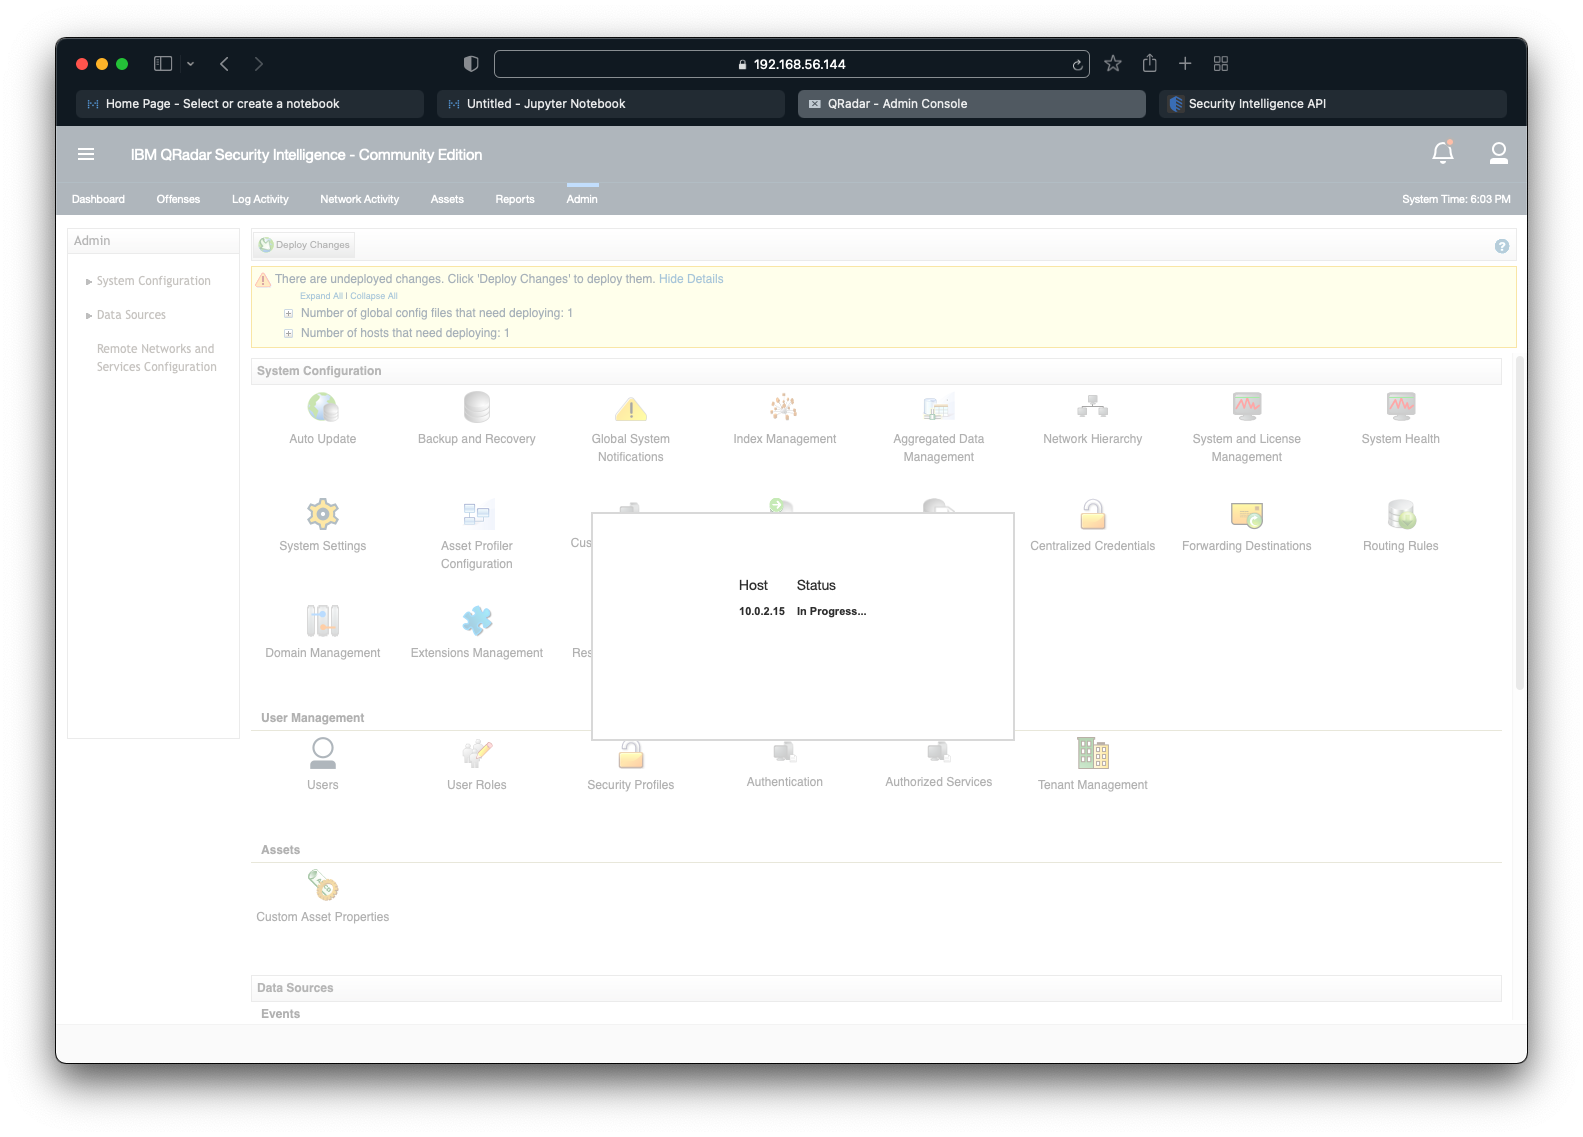
QRadar will create a new authorized service. Copy the content under Authentication Token and paste it someplace safe. As seen in the screenshot below, QRadar requires to Deploy Changes to persist the newly created authorized service. Close the pop-up.
On the Admin tab, QRadar will alert us about undeployed changes as seen in the screenshot below. Click on Deploy Changes.
Allow the process a couple of minutes to complete successfully.
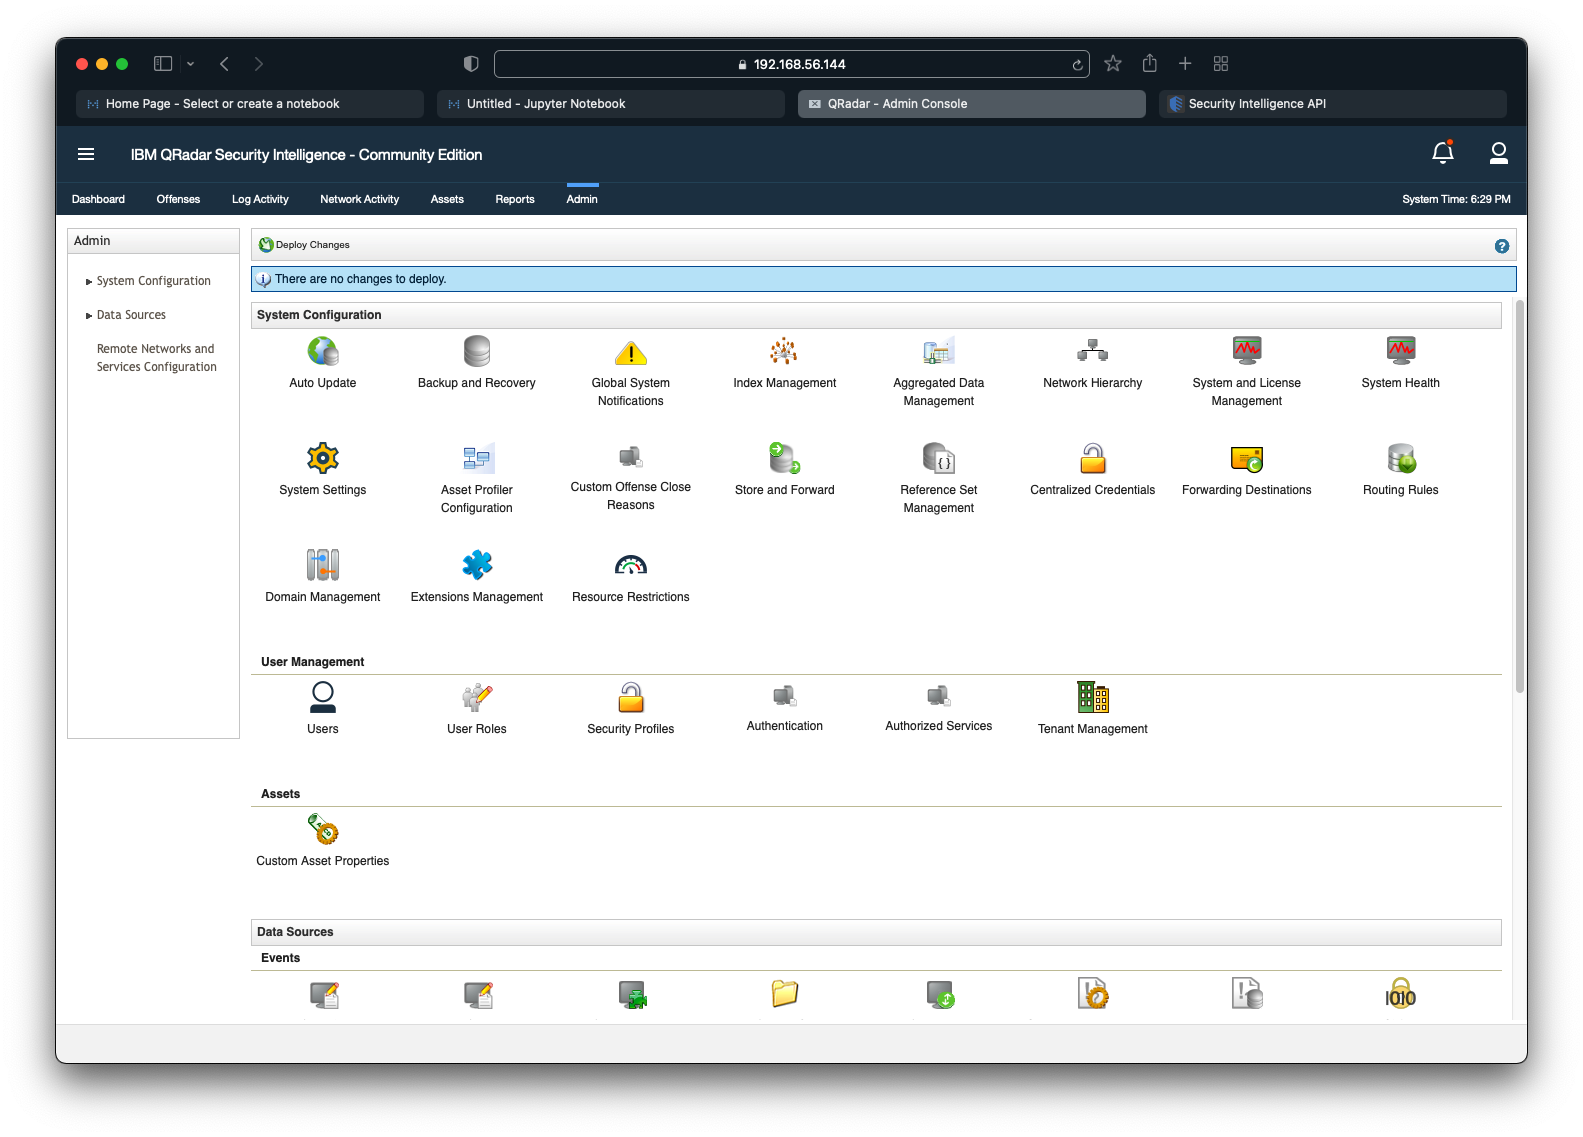
Once completed, the alert will disappear.
For more information about authorized services, please refer to Managing authorized services.
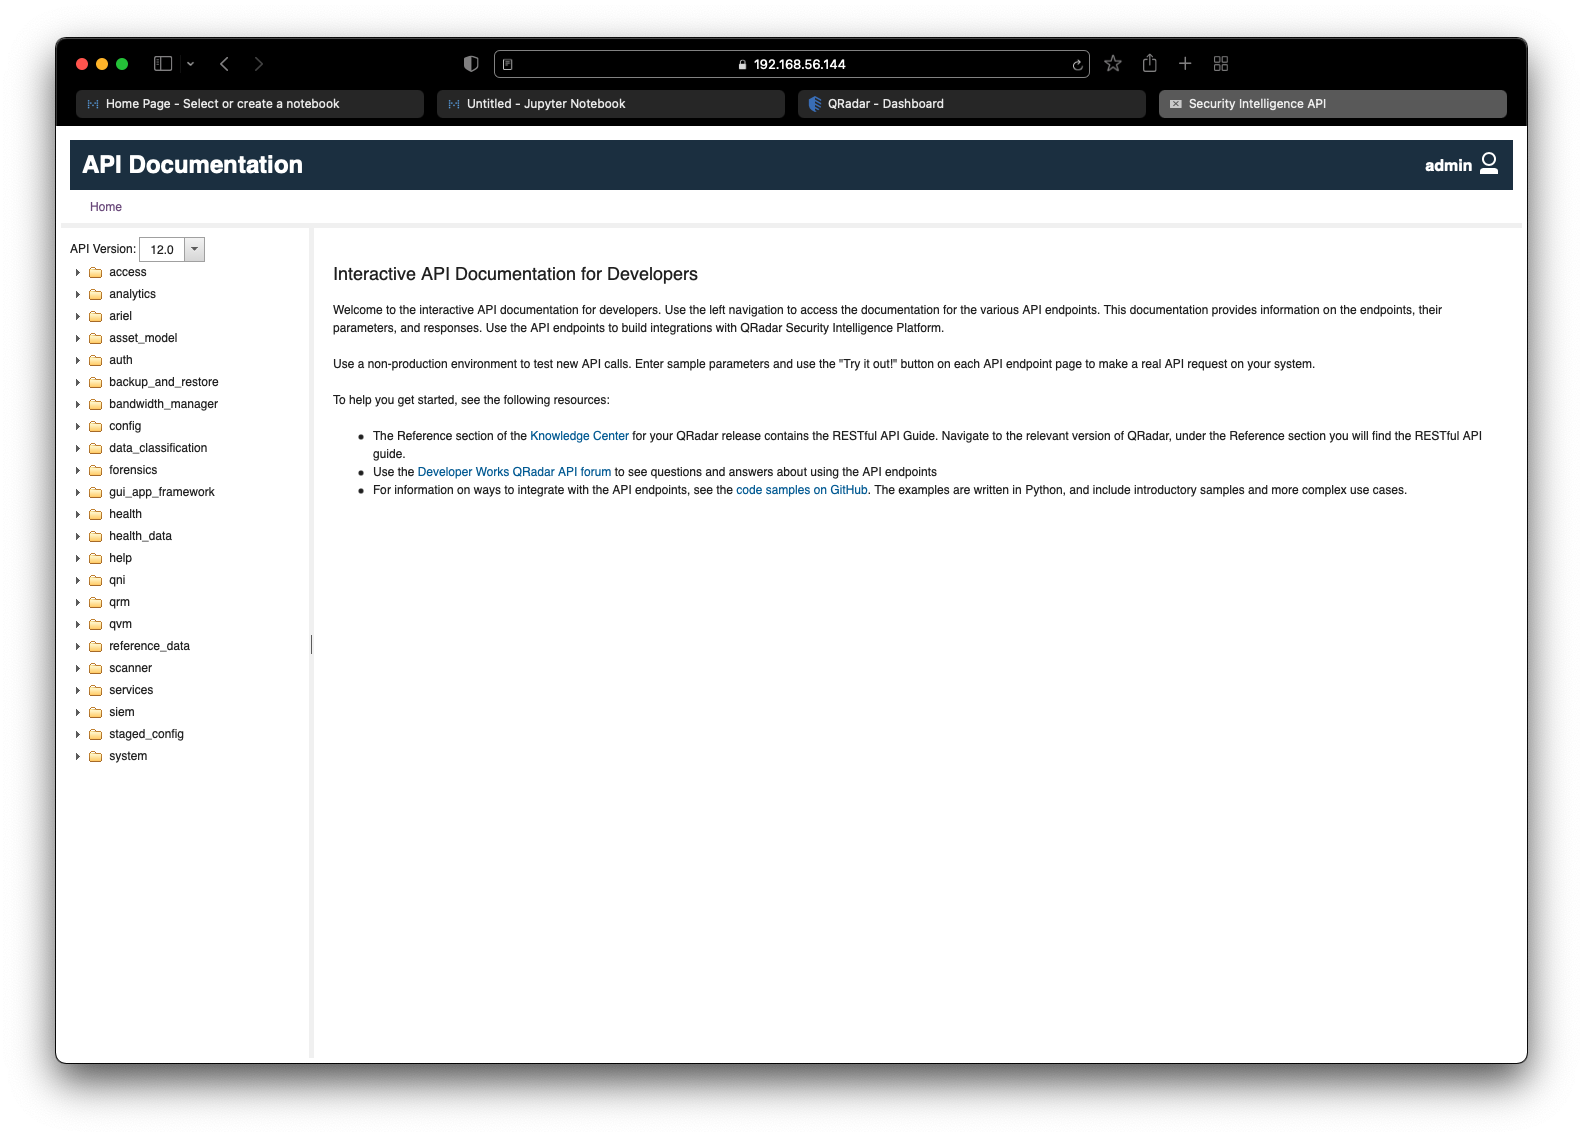
QRadar Interactive API Documentation
Before we dive into the QRadar APIs, it is essential to keep a reference to the Interactive API Documentation for Developers page.
The Interactive API Documentation for Developers page is accessible from the QRadar Console and provides access to the documentation for various endpoints including their parameters and responses. Users can execute the APIs with custom parameters to view responses in real-time. It provides developers an opportunity to test the API before writing scripts.
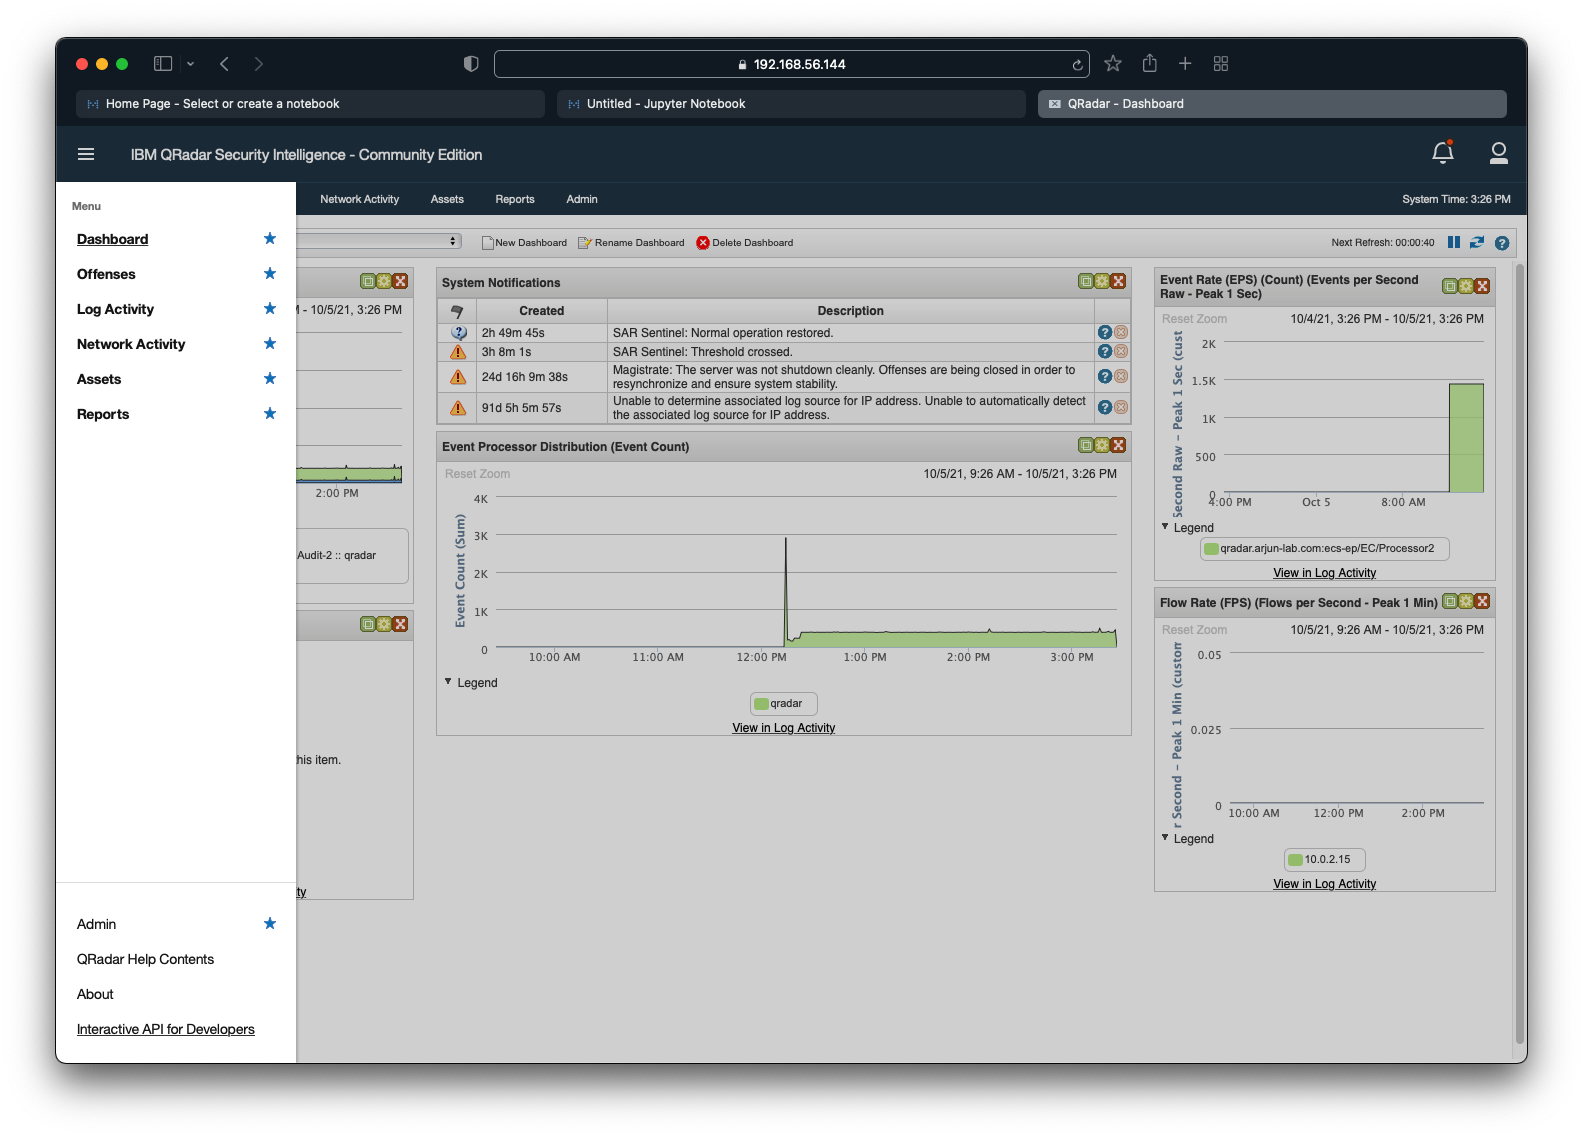
To access the Interactive API Documentation for Developers page, login to the QRadar Console, click on the hamburger menu on the top-left, and then click on Interactive API for Developers as seen in the screenshot below.
A new browser tab will be opened with the Interactive API Documentation for Developers page as seen in the screenshot below.
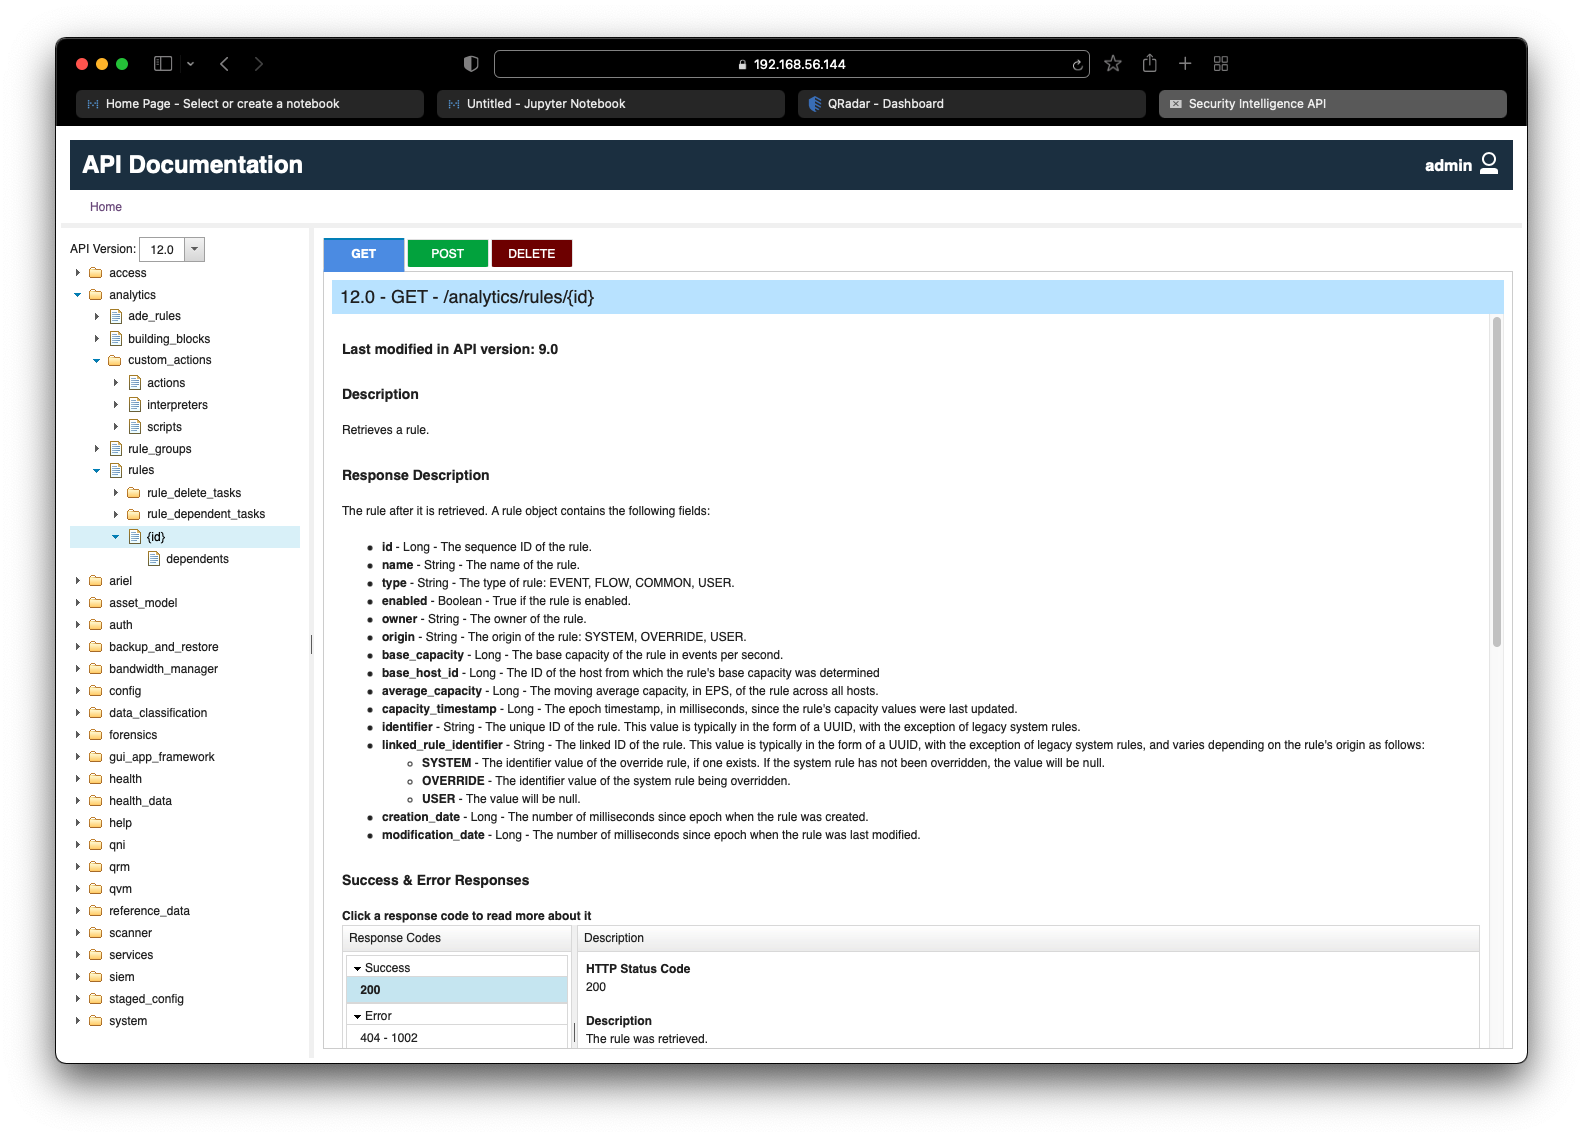
To view the documentation of a specific API, expand the folders on the left side and select the desired endpoint. Depending on the endpoint, all available methods (GET, POST, PUT, DELETE) will be displayed on the top. Click on the desired method to view the corresponding API documentation. In the screenshot below, we can see the API documentation for the endpoint /analytics/rules/{id} with the GET method.
API #1: About System
We begin the journey of discovering QRadar APIs with a simple goal to retrieve the current system information.
QRadar Interactive API
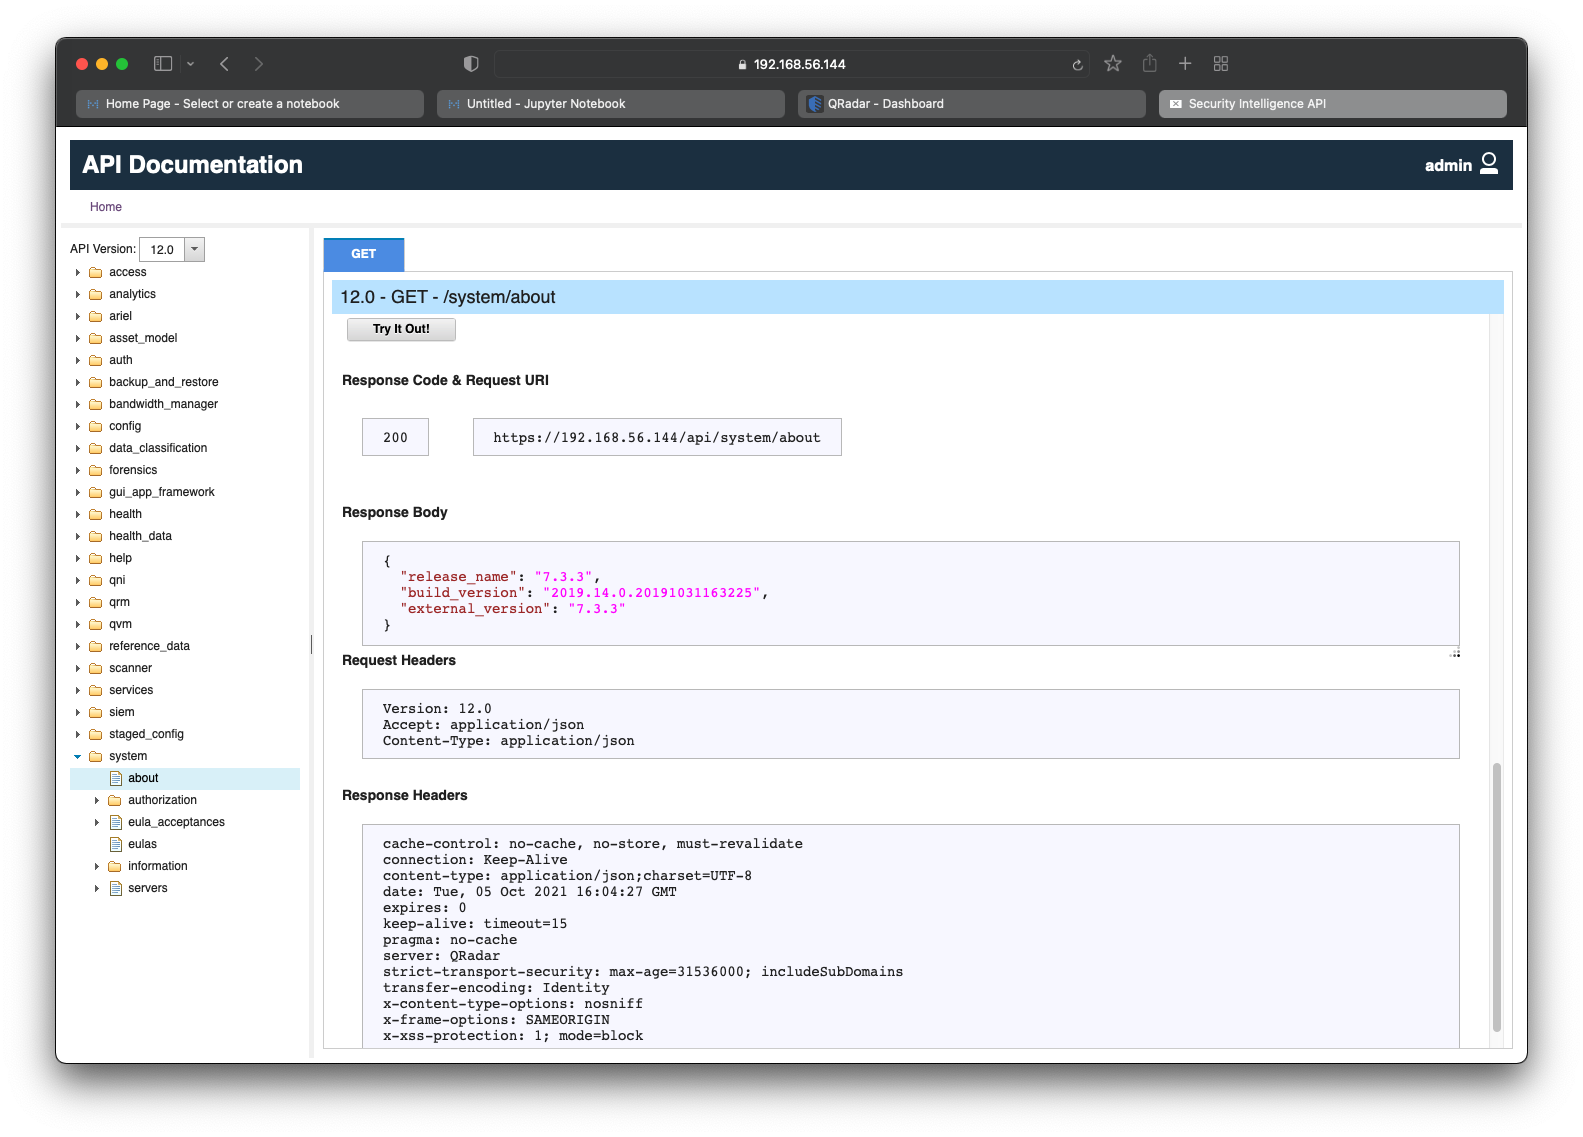
We can dissect our goal and map a retrieval to a GET request. Based on this, the correct QRadar endpoint to target is /system/about which only has GET in its list of available methods as seen in the screenshot below.
We can also identify the expected response of the API request. The response is in JSON format and contains 3 fields:
build_version- Stringexternal_version- Stringrelease_name- String
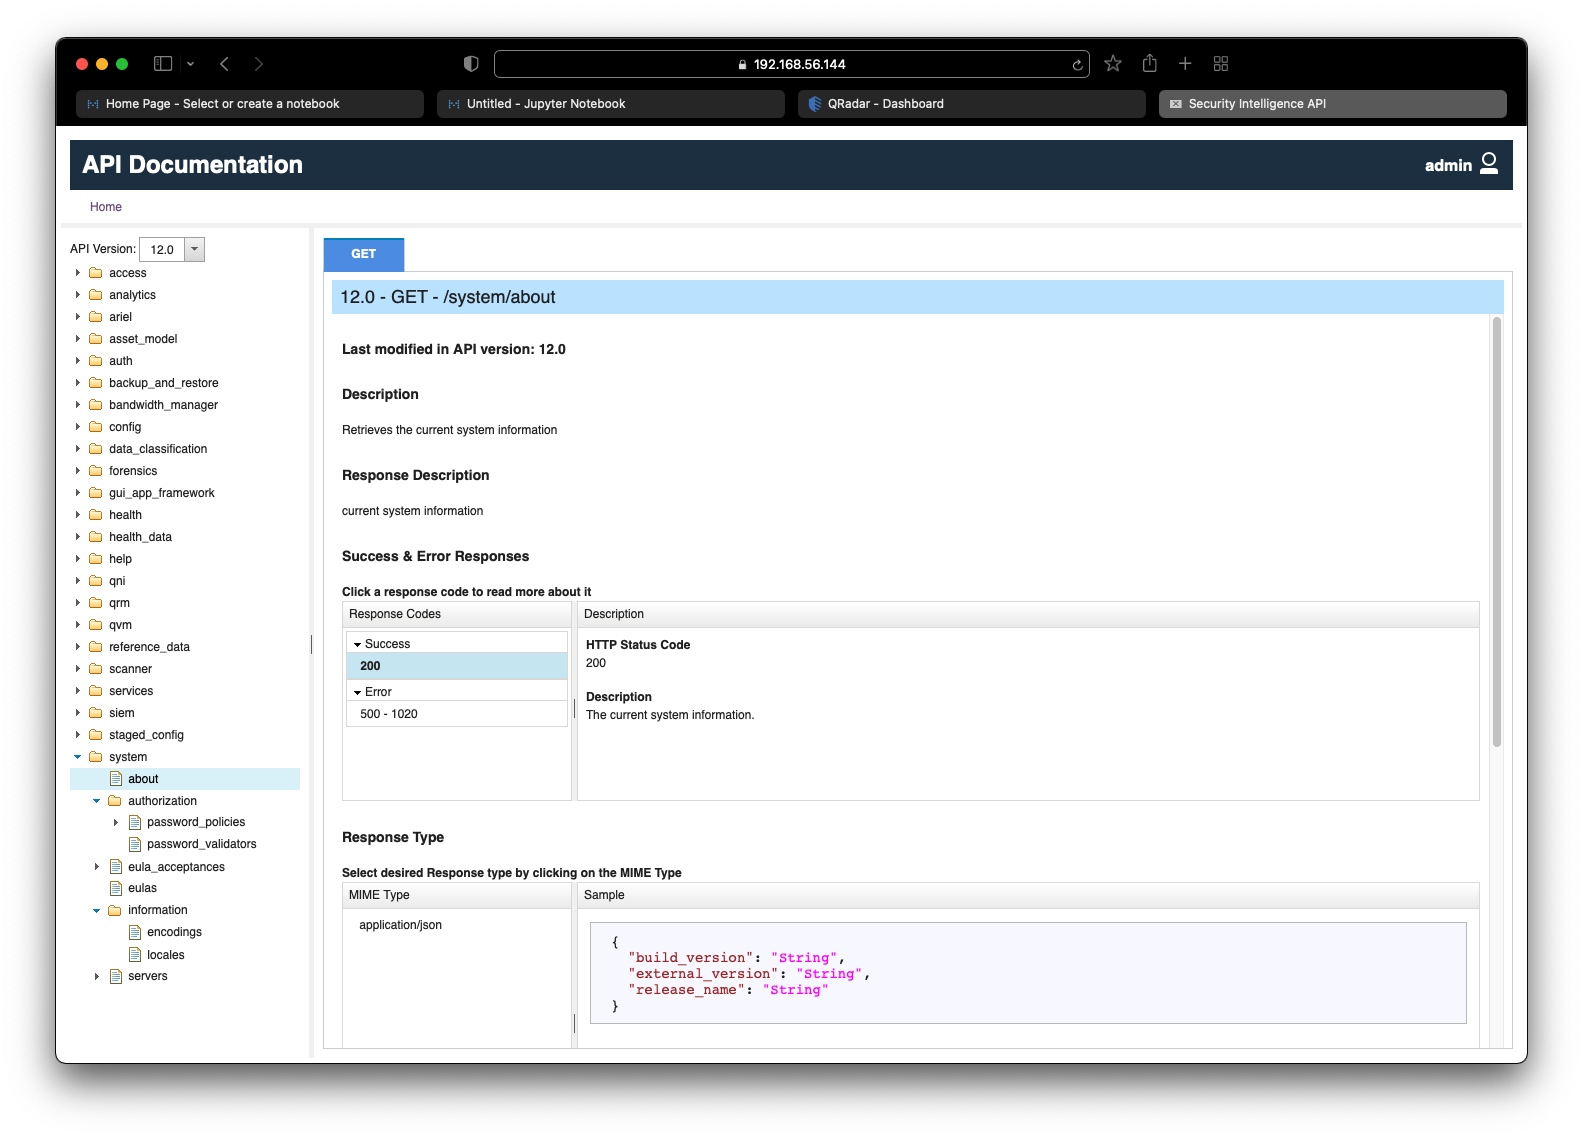
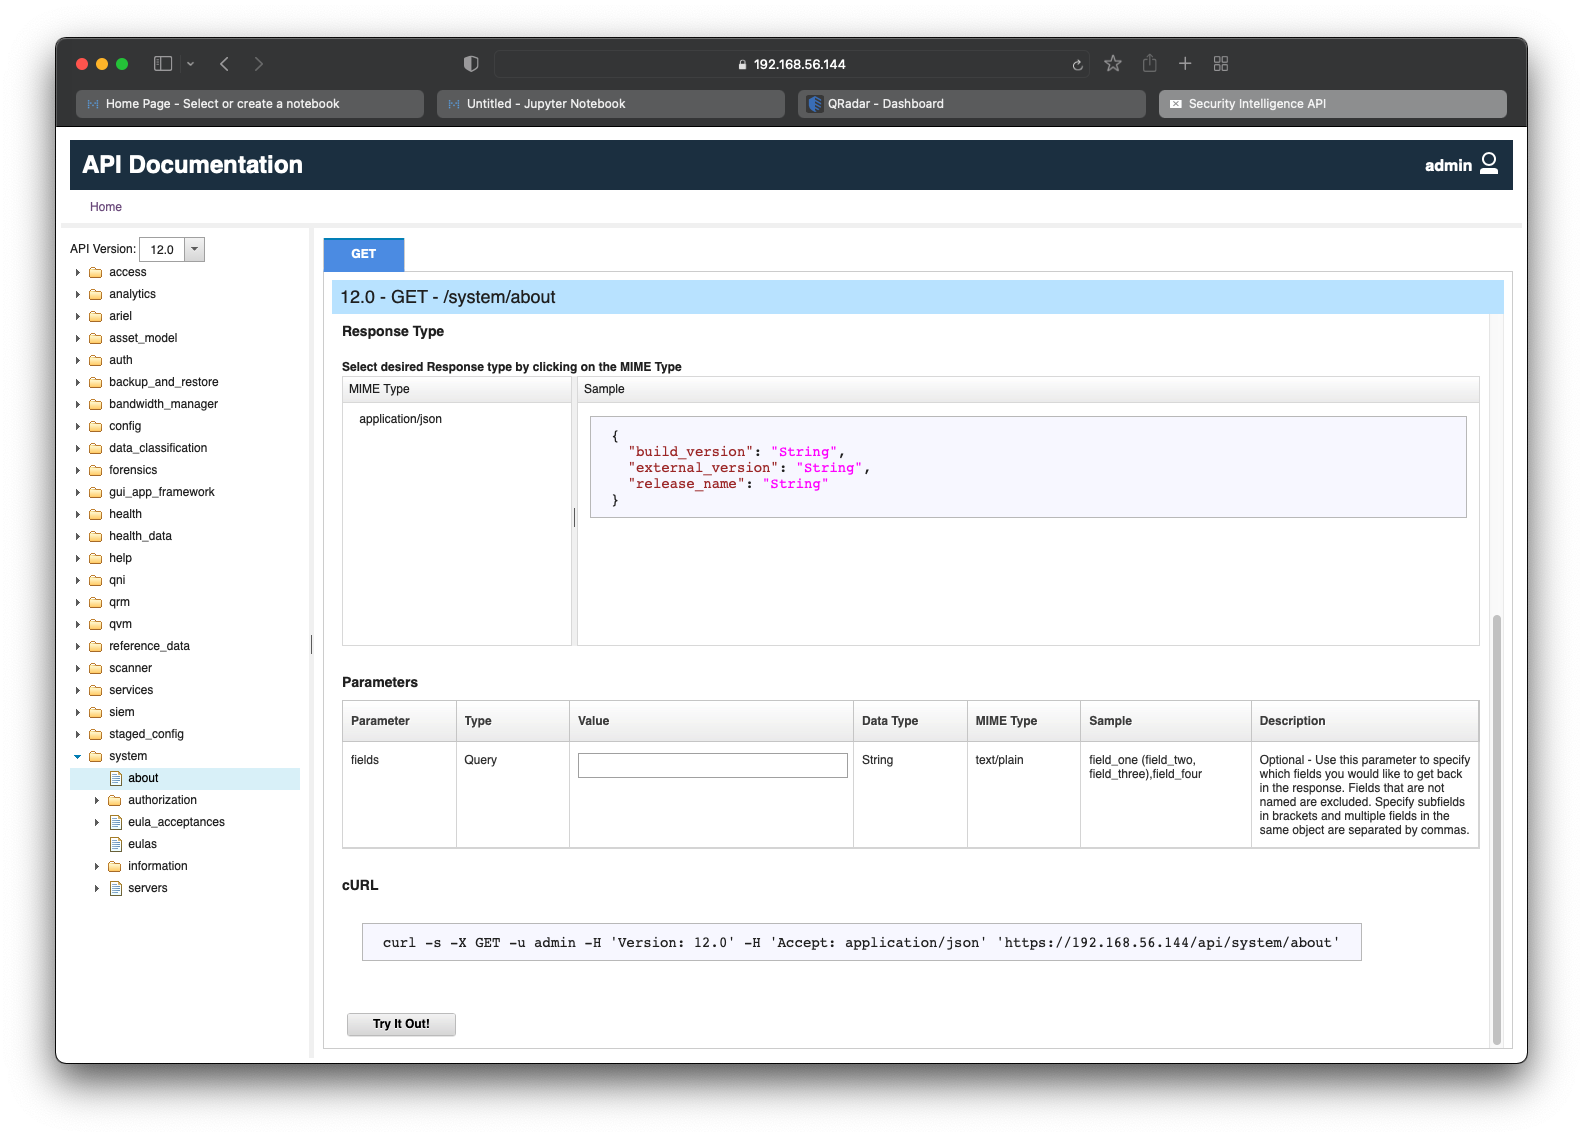
Scroll down to see information about any optional and required parameters for the API request. As per the screenshot below, there is one optional Query parameter called fields which allows us to specify which fields we would like to be returned in the response.
It is also useful to note the cURL one-liner command which can be used verbatim to make the API request and retrieve its response using the popular cURL utility.
Click on Try It Out! to execute the API request in real-time and view its response as seen in the screenshot below.
From the above screenshot, we have the JSON response, which is:
{
  "release_name": "7.3.3",
  "build_version": "2019.14.0.20191031163225",
  "external_version": "7.3.3"
}
Now that we have tested the /system/about API on the Interactive API Documentation page, it is time to write Python code to make the API request and retrieve its response.
Python Code
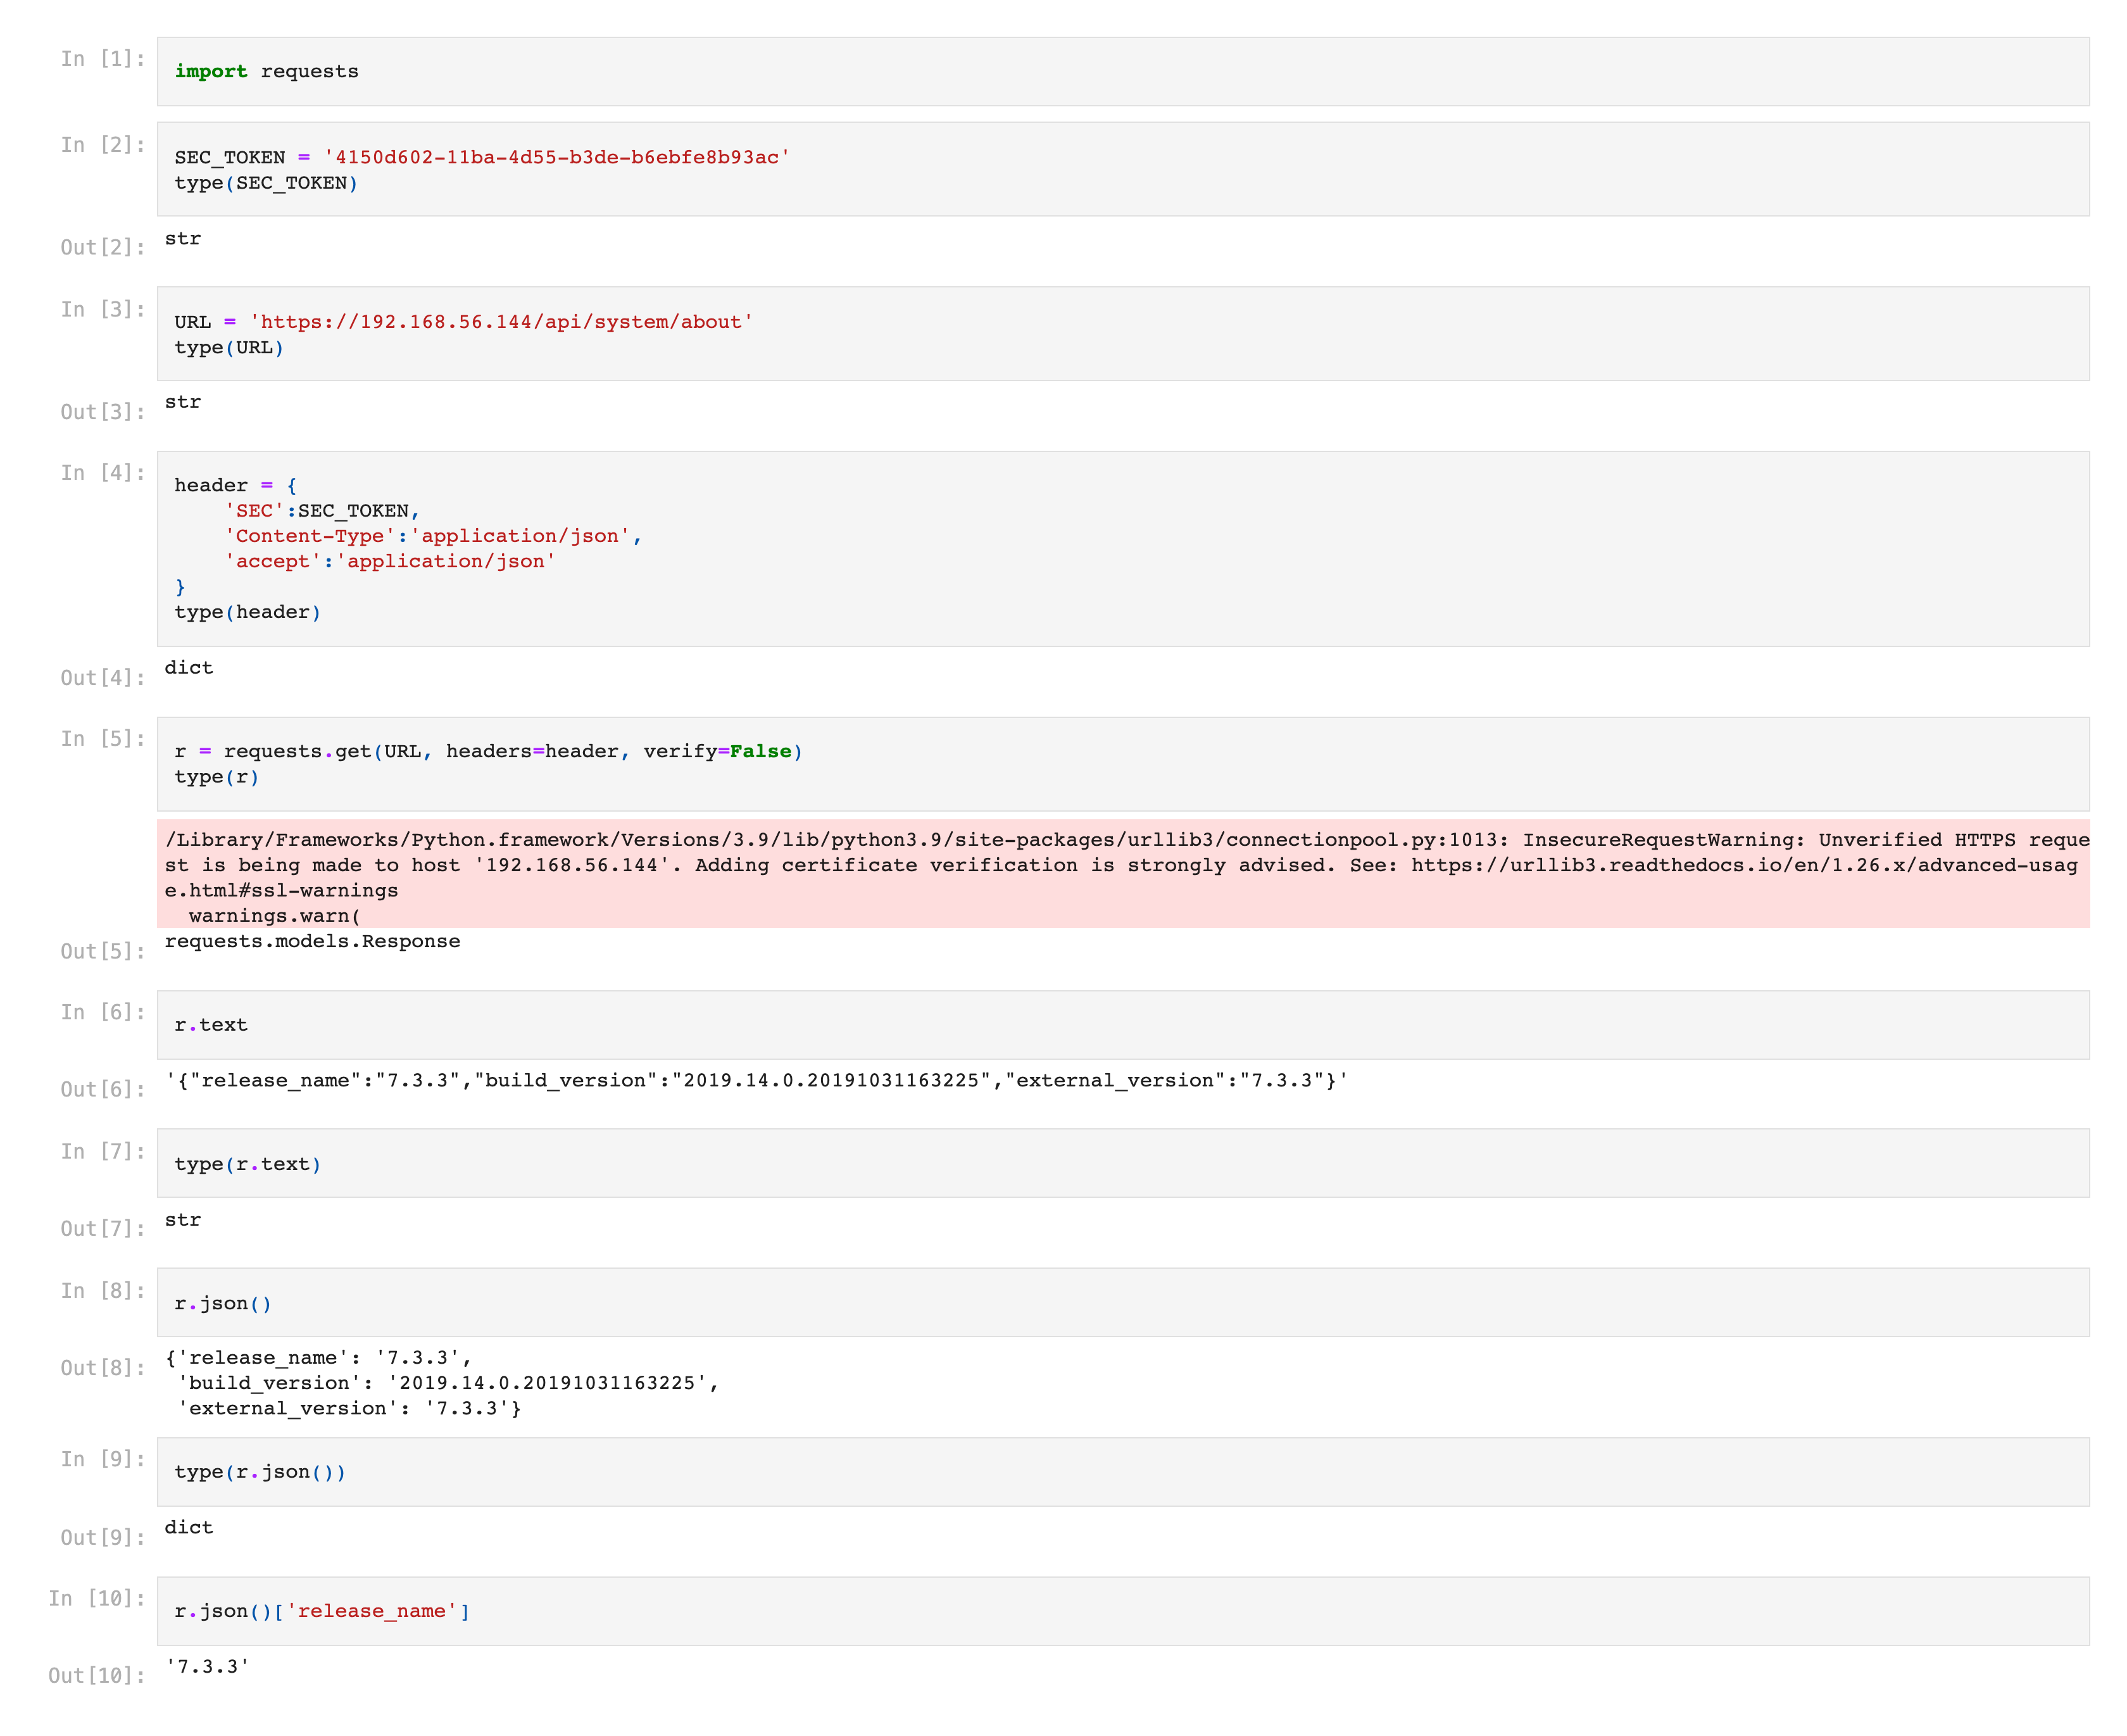
We start by importing the requests Python package as seen below.
import requestsThe next step is to define a variable called SEC_TOKEN to hold the QRadar API Token that we generated above as seen below.
SEC_TOKEN = '4150d602-11ba-4d55-b3de-b6ebfe8b93ac'
type(SEC_TOKEN)
# str
We will also define a variable called URL to hold the complete QRadar API URL to target the /system/about endpoint as seen below.
URL = 'https://192.168.56.144/api/system/about'
type(URL)
# str
Note: The complete QRadar API URL is provided on the Interactive API Documentation page corresponding to the endpoint.
The next step is to define a variable called header to hold the Header content for the API request as seen below. We will utilize the SEC_TOKEN variable that was defined above as a value to the key SEC.
header = {
    'SEC':SEC_TOKEN,
    'Content-Type':'application/json',
    'accept':'application/json'
}
type(header)
# dict
After the variables have been defined, we can make the GET request using the requests.get function as seen below. The result is stored in a variable called r.
According to Python requests documentation:
Requests verifies SSL certificates for HTTPS requests, just like a web browser. By default, SSL verification is enabled, and Requests will throw a SSLError if it’s unable to verify the certificate.
Requests can also ignore verifying the SSL certificate if you set
verifyto False.
r = requests.get(URL, headers=header, verify=False)
type(r)
# requests.models.Response
Note: As we have set
verifyto False, you will likely see anInsecureRequestWarning, which can be safely ignored in this tutorial.
We can access the content of the response using response.text as seen below.
r.text
# '{"release_name":"7.3.3","build_version":"2019.14.0.20191031163225","external_version":"7.3.3"}'
type(r.text)
# str
However, response.text contains a String value. Although, we could manually decode it using the json.loads function, the easier approach is to use the response.json function to decode the content in JSON format as seen below.
r.json()
'''
{'release_name': '7.3.3',
 'build_version': '2019.14.0.20191031163225',
 'external_version': '7.3.3'}
'''
type(r.json())
# dict
It is now easy to access each field using its key. Below, we see how to access the content of release_name.
r.json()['release_name']
# '7.3.3'
The below screenshot shows the final Jupyter Notebook.
API #2: QRadar Rules
In the previous section, we targeted a simple QRadar API and retrieved the current system information. Let us take things to the next-level!
In this section, we will target a more complex QRadar API with an aim to retrieve all the Rules on the system. Once the Rules are retrieved, we will export them to a neat CSV file.
Note: This is a practical example. As a QRadar admin, you are likely to receive requests to generate an export of the Rules. Don’t worry, I got you covered!
QRadar Interactive API
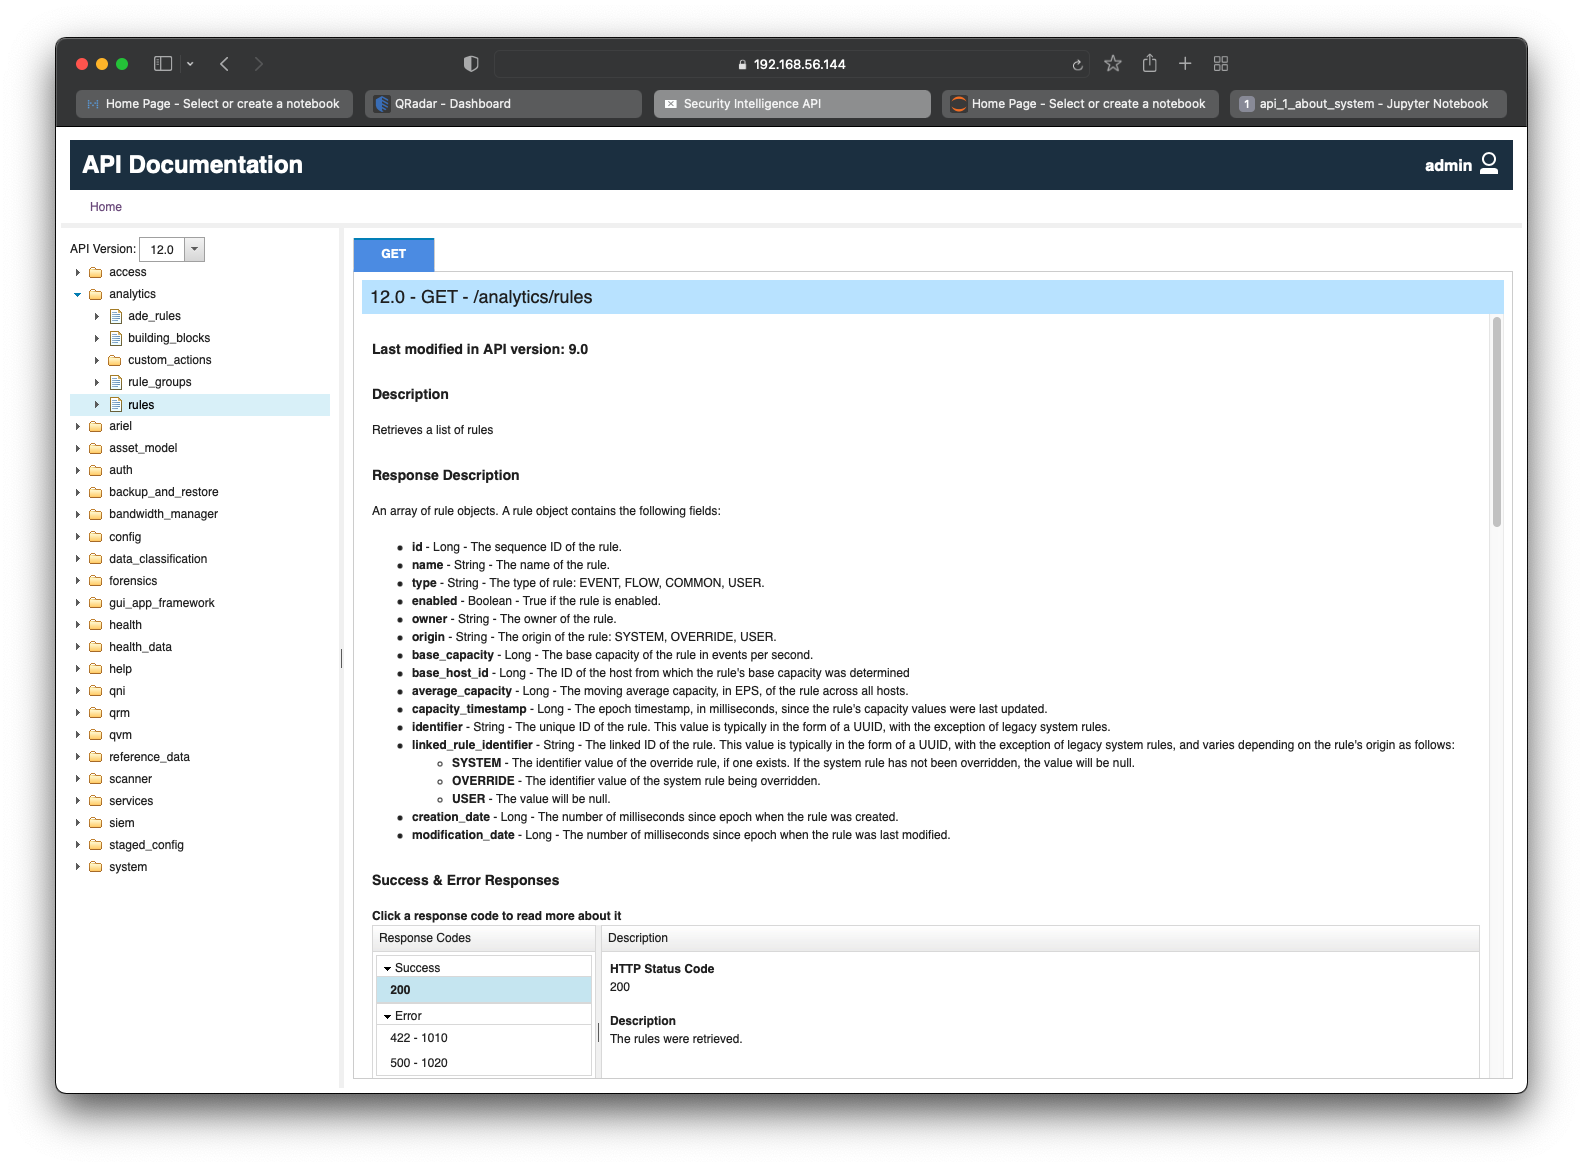
Similar to the goal in previous section, we can dissect our current goal and map a retrieval to a GET request. Based on this, the correct QRadar endpoint to target is /analytics/rules which only has GET in its list of available methods as seen in the screenshot below.
There are 14 fields returned in the JSON response. They are:
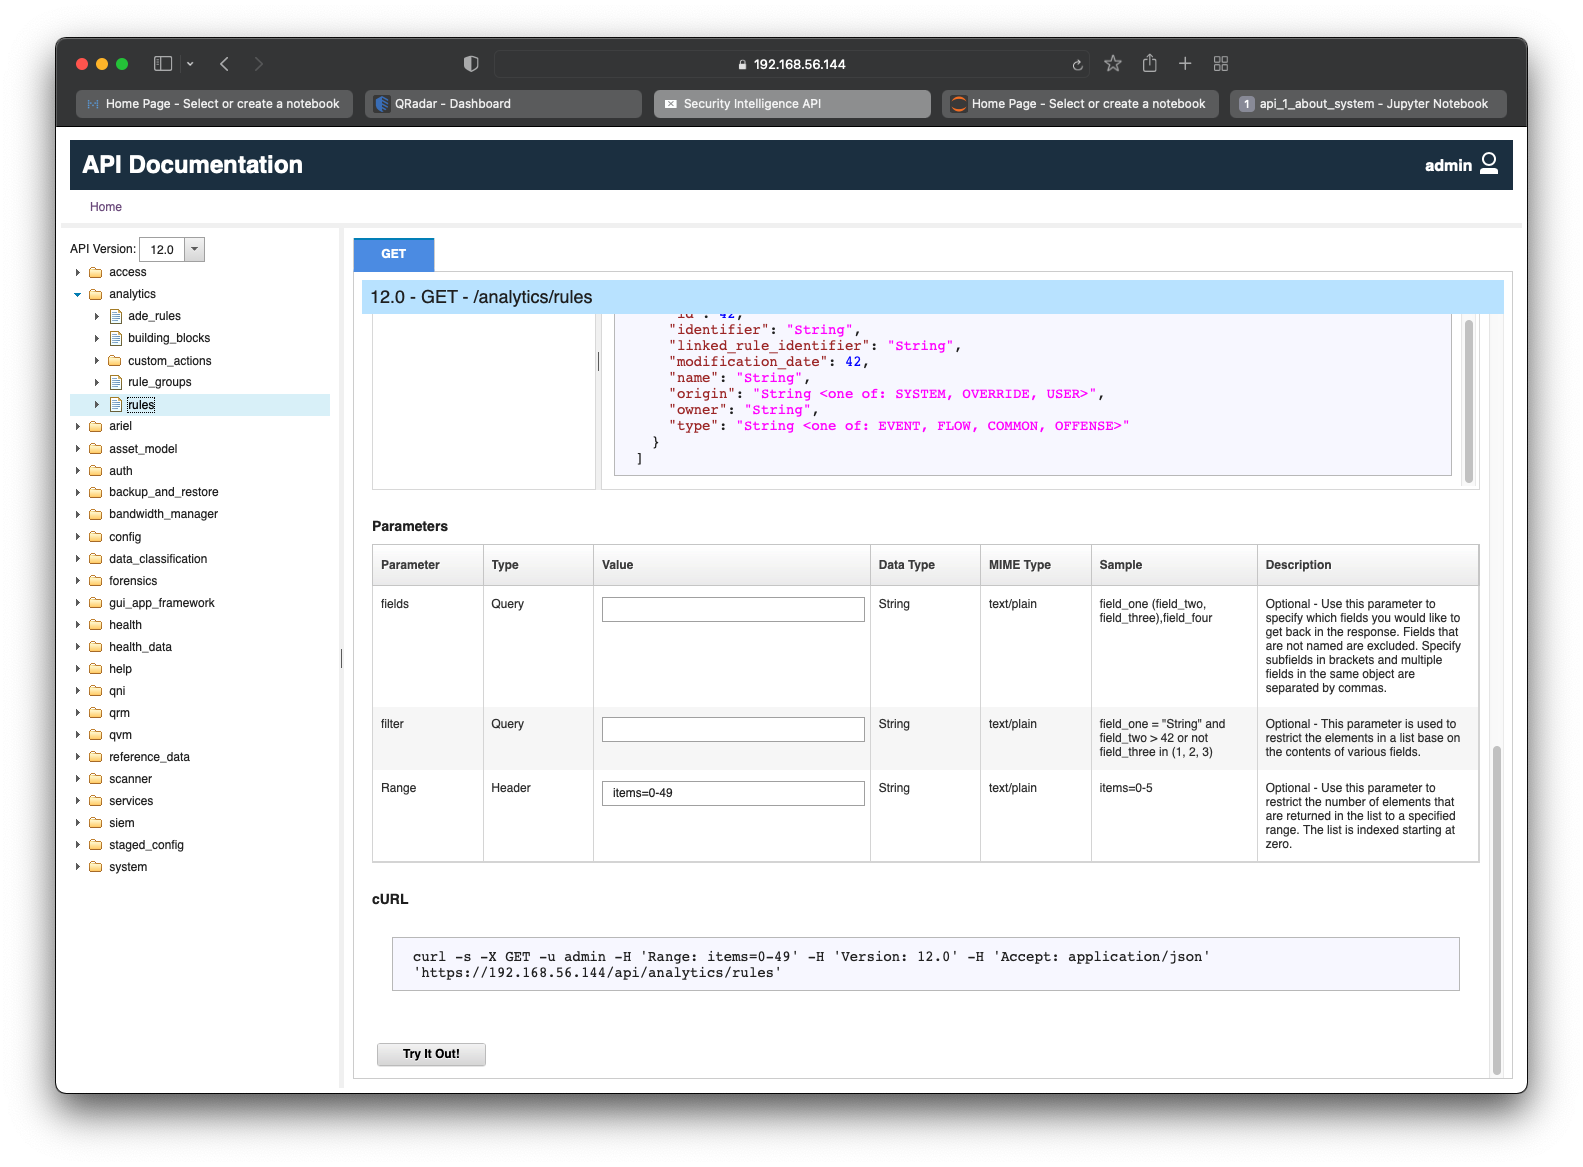
id- Longname- Stringtype- Stringenabled- Booleanowner- Stringorigin- Stringbase_capacity- Longbase_host_id- Longaverage_capacity- Longcapacity_timestamp- Longidentifier- Stringlinked_rule_identifier- Stringcreation_date- Longmodification_date- Long
Scroll down to see information about the parameters. As per the screenshot below, there are 3 optional parameters:
fields- Query parameter which allows us to specify which fields we would like to be returned in the response.filter- Query parameter which allows us to specify filters to limit the contents returned in the response.Range- Header parameter which allows us to to restrict the number of elements that are returned in the response.
Note: The
Rangeparameter is usually pre-populated with the valueitems=0-49on the Interactive API Documentation page. This is done to ensure that particularly large API requests do not bombard the system and increase utilization of resources. However, this can be modified or removed, as the parameter value is in a text-box which is editable.While testing, it is always recommended to limit the number of elements returned in the response by using the
RangeHeader parameter.
Click on Try It Out! to execute the API request in real-time and view its response as seen in the screenshot below.
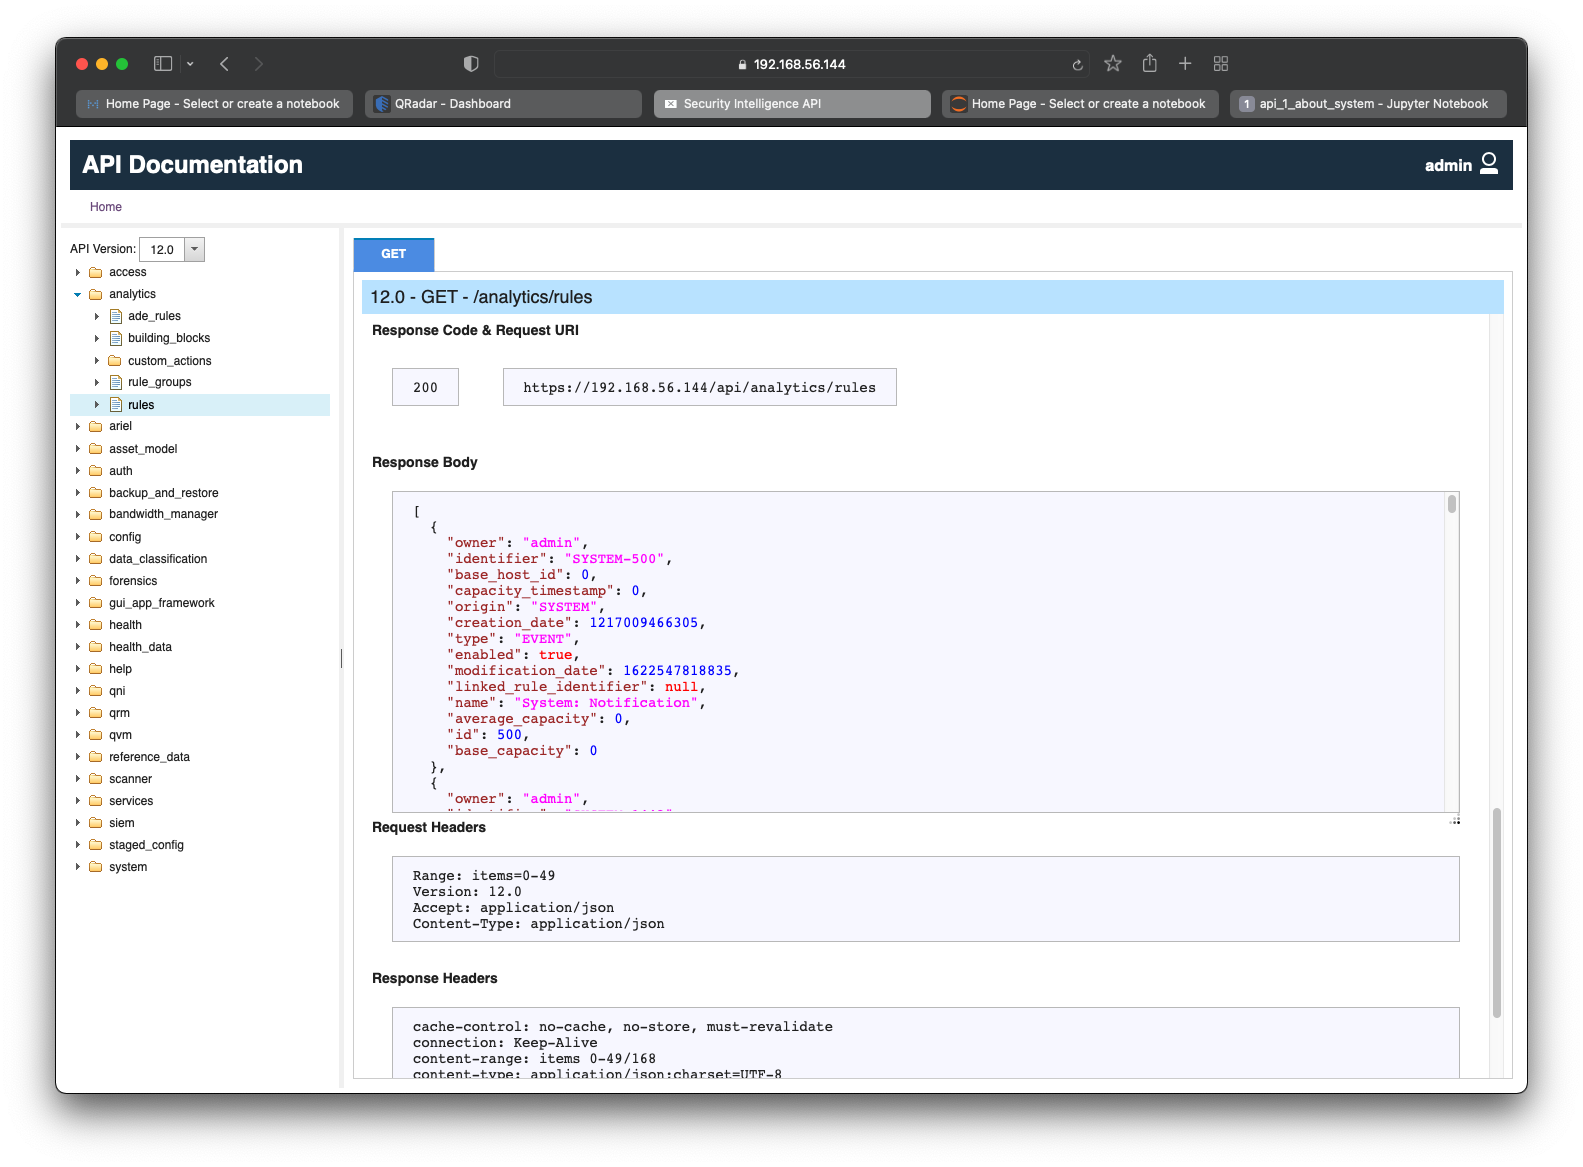
From the above screenshot, we have the JSON response, which is:
[
  {
    "owner": "admin",
    "identifier": "SYSTEM-500",
    "base_host_id": 0,
    "capacity_timestamp": 0,
    "origin": "SYSTEM",
    "creation_date": 1217009466305,
    "type": "EVENT",
    "enabled": true,
    "modification_date": 1622547818835,
    "linked_rule_identifier": null,
    "name": "System: Notification",
    "average_capacity": 0,
    "id": 500,
    "base_capacity": 0
  },
  {
    "owner": "admin",
    "identifier": "SYSTEM-1443",
    "base_host_id": 0,
    "capacity_timestamp": 0,
    "origin": "SYSTEM",
    "creation_date": 1273171233573,
    "type": "EVENT",
    "enabled": false,
    "modification_date": 1622547818194,
    "linked_rule_identifier": null,
    "name": "Devices with High Event Rates",
    "average_capacity": 0,
    "id": 100001,
    "base_capacity": 0
  },
  .
  .
  .
]
Basically, there is raw JSON data associated with 50 QRadar Rules. The above snippet has been truncated considering the number of lines required to represent the entire JSON response.
It is crucial to note that the response is NOT just a single JSON object. In fact, it is an Array of JSON objects. This representation makes sense because each QRadar Rule is a JSON object with its own key-value pairs. Since there are multiple Rules in the response, an Array is the perfect data structure to contain all the Rules.
Now that we have tested the /analytics/rules API on the Interactive API Documentation page, it is time to write Python code to make the API request and retrieve its response.
Python Code
Create a new Jupyter Notebook and start by importing the requests and pandas Python packages as seen below.
import requests
import pandas
Similar to the Python code in the previous section, we will define a variable called SEC_TOKEN to hold the QRadar API Token that we generated above as seen below.
SEC_TOKEN = '4150d602-11ba-4d55-b3de-b6ebfe8b93ac'
type(SEC_TOKEN)
# str
Similar to the Python code in the previous section, we will also define a variable called URL to hold the complete QRadar API URL to target the /analytics/rules endpoint as seen below.
URL = 'https://192.168.56.144/api/analytics/rules'
type(URL)
# str
Note: The complete QRadar API URL is provided on the Interactive API Documentation page corresponding to the endpoint.
Similar to the Python code in the previous section, we will also define a variable called header to hold the Header content for the API request as seen below. We will utilize the SEC_TOKEN variable that was defined above as a value to the key SEC.
header = {
    'SEC':SEC_TOKEN,
    'Content-Type':'application/json',
    'accept':'application/json'
}
type(header)
# dict
After the variables have been defined, we can make the GET request using the requests.get function as seen below. The result is stored in a variable called r.
r = requests.get(URL, headers=header, verify=False)
type(r)
# requests.models.Response
Note: As we have set
verifyto False, you will likely see anInsecureRequestWarning, which can be safely ignored in this tutorial.
We can access the content of the response using response.text as seen below.
r.text
# '[{"owner":"admin","identifier":"SYSTEM-500","base_host_id":0,"capacity_timestamp":0,"origin":"SYSTEM","creation_date":1217009466305,"type":"EVENT","enabled":true,"modification_date":1622547818835,"linked_rule_identifier":null,"name":"System: Notification","average_capacity":0,"id":500,"base_capacity":0},{"owner":"admin","identifier":"SYSTEM-1443","base_host_id":0,"capacity_timestamp":0,"origin":"SYSTEM","creation_date":1273171233573,"type":"EVENT","enabled":false,"modification_date":1622547818194,"linked_rule_identifier":null,"name":"Devices with High Event Rates","average_capacity":0,"id":100001,"base_capacity":0},...]'
type(r.text)
# str
The output of r.text has been truncated considering the number of lines required to represent the entire response.
Similar to the Python code in the previous section, we will utilize the response.json function to decode the content in JSON format as seen below.
r.json()
'''
[{'owner': 'admin',
  'identifier': 'SYSTEM-500',
  'base_host_id': 0,
  'capacity_timestamp': 0,
  'origin': 'SYSTEM',
  'creation_date': 1217009466305,
  'type': 'EVENT',
  'enabled': True,
  'modification_date': 1622547818835,
  'linked_rule_identifier': None,
  'name': 'System: Notification',
  'average_capacity': 0,
  'id': 500,
  'base_capacity': 0},
 {'owner': 'admin',
  'identifier': 'SYSTEM-1443',
  'base_host_id': 0,
  'capacity_timestamp': 0,
  'origin': 'SYSTEM',
  'creation_date': 1273171233573,
  'type': 'EVENT',
  'enabled': False,
  'modification_date': 1622547818194,
  'linked_rule_identifier': None,
  'name': 'Devices with High Event Rates',
  'average_capacity': 0,
  'id': 100001,
  'base_capacity': 0},
  .
  .
  .
]
'''
type(r.json())
# list
len(r.json())
# 168
type(len(r.json()))
# int
It is crucial to note the type of r.json(). It is a list and NOT dict like in the previous section.
Based on this, we can derive our first insight from the data - the total number of QRadar Rules on the system, which can be captured by calculating the length of the JSON response. In the above snippet, len(r.json()) does exactly this and gives us 168 (an integer).
Now, consider querying the data. For starters, we would need to loop the list and go item-by-item. Below, we attempt to print out the name of each Rule line-by-line.
for rule in r.json():
    print(rule['name'])
'''
System: Notification
Devices with High Event Rates
Excessive Database Connections
Excessive Firewall Accepts Across Multiple Hosts
Excessive Firewall Denies from Single Source
AssetExclusion: Exclude DNS Name By IP
AssetExclusion: Exclude DNS Name By MAC Address
AssetExclusion: Exclude DNS Name By NetBIOS Name
.
.
.
'''
Okay, that was straightforward. How about performing a group-by operation? For example: Count of Rules by enabled; i.e., how many Rules are enabled and how many Rules are disabled?
Note:
enabledis a column in theJSONresponse and holds a Boolean value of eitherTrueorFalseto indicate if a Rule is enabled or not on the system.
enabled_count = 0
disabled_count = 0
for rule in r.json():
    if rule['enabled']==True:
        enabled_count += 1
    else:
        disabled_count += 1
print(enabled_count)
# 131
print(disabled_count)
# 37
Probably not the most efficient approach, but it does give us the answer to our question.
At this point, it is useful to store the raw JSON data into a different data structure - namely, a Pandas DataFrame.
According to GeeksforGeeks:
Pandas DataFrame is two-dimensional size-mutable, potentially heterogeneous tabular data structure with labeled axes (rows and columns). A Data frame is a two-dimensional data structure, i.e., data is aligned in a tabular fashion in rows and columns. Pandas DataFrame consists of three principal components, the data, rows, and columns.
The best way to convert our Array of JSON objects; i.e., r.json() which is of type list into a DataFrame is by using the pandas.json_normalize function as seen below.
According to Pandas documentation:
pandas provides a utility function to take a
dictorlistofdictsand normalize this semi-structured data into a flat table.
df = pandas.json_normalize(r.json())
type(df)
# pandas.core.frame.DataFrame
df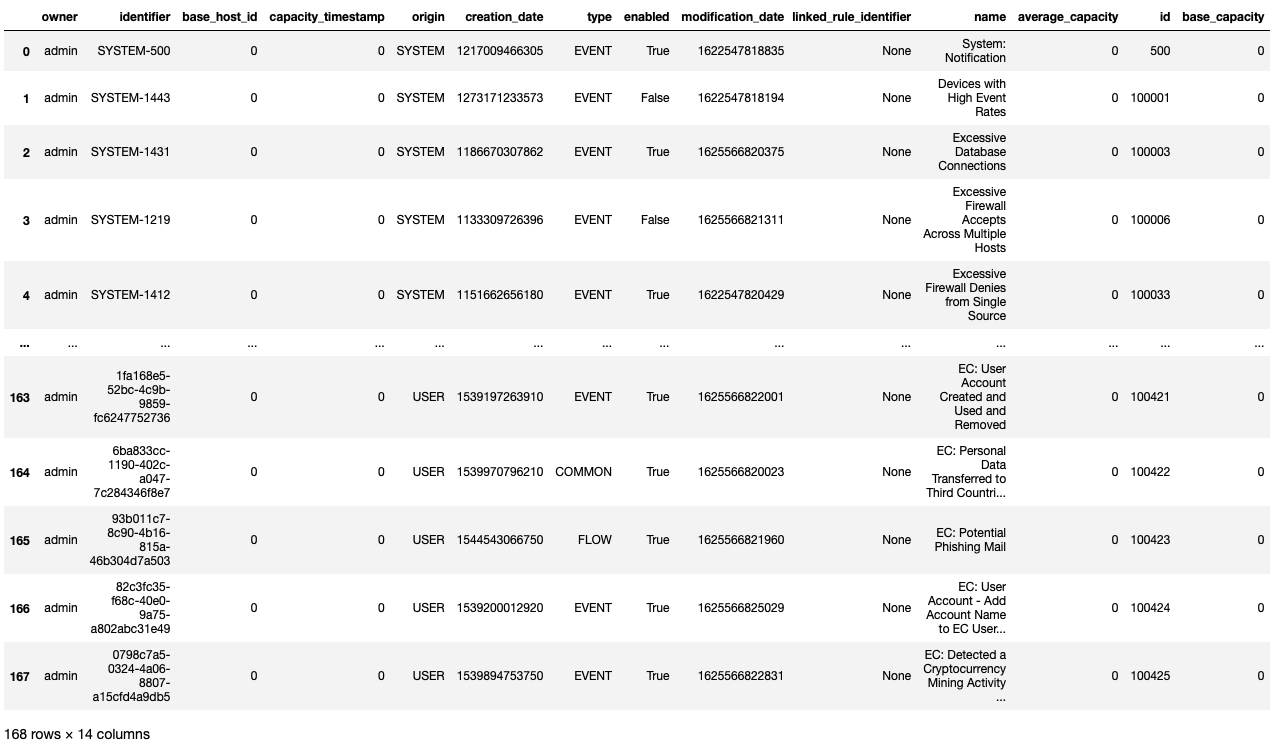
As per the above snippet, the variable df now holds our Rules DataFrame.
In this output of df, we can see the dimensions of the DataFrame, which is 168 rows x 14 columns. The same can be retrieved using pandas.DataFrame.shape which returns a tuple of dimensions as seen below.
df.shape
# (168, 14)
type(df.shape)
# tuple
Okay, we now have our DataFrame. What’s next?
Well, let’s go back to that group-by operation from earlier; i.e., Count of Rules by enabled. Below, we will attempt to calculate the result using the DataFrame and its associated functions.
df.groupby('enabled').size()
'''
enabled
False     37
True     131
dtype: int64
'''
Look at that, a one-liner!
If we dissect the above snippet, we can see the use of the pandas.DataFrame.groupby function to perform the actual grouping based on the enabled column. Once the grouping is completed, we can aggregate and calculate the counts in each group using the pandas.core.groupby.GroupBy.size function which returns a pandas.core.series.Series.
According to GeeksforGeeks:
Pandas Series is a one-dimensional labeled array capable of holding data of any type (integer, string, float, python objects, etc.).
To retrieve the actual values from the Series, we simply need to use the index as seen below.
enabled_count = df.groupby('enabled').size()[True]
enabled_count
# 131
type(enabled_count)
# numpy.int64
disabled_count = df.groupby('enabled').size()[False]
disabled_count
# 37
type(disabled_count)
# numpy.int64
Note: The
indexvalues (TrueandFalse) are of type Boolean (bool) and NOT String.
Awesome! If you remember, we have one more thing to do. Yes, we wanted to export the QRadar Rules to CSV.
We can easily export a DataFrame to CSV using the pandas.DataFrame.to_csv function as seen below.
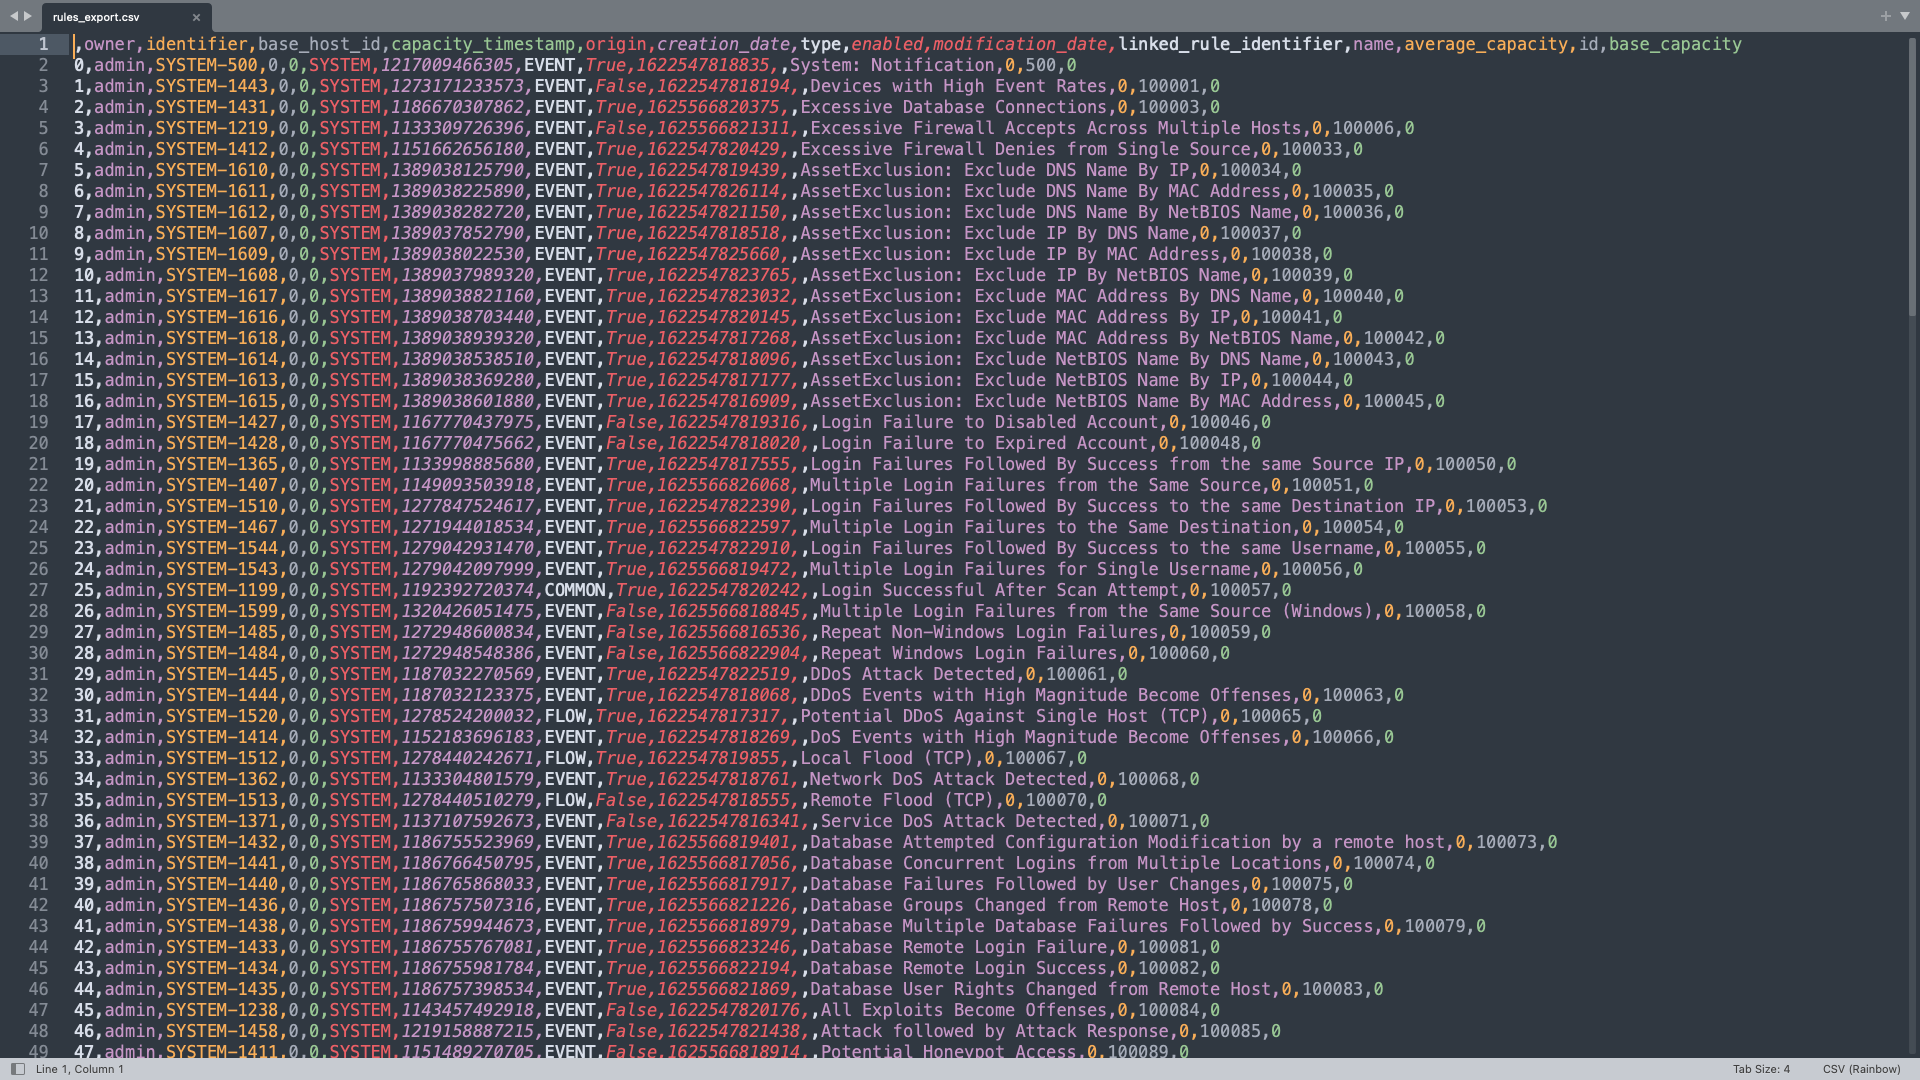
df.to_csv('rules_export.csv')The file should be exported to the directory from where you are running your Jupyter Notebook.
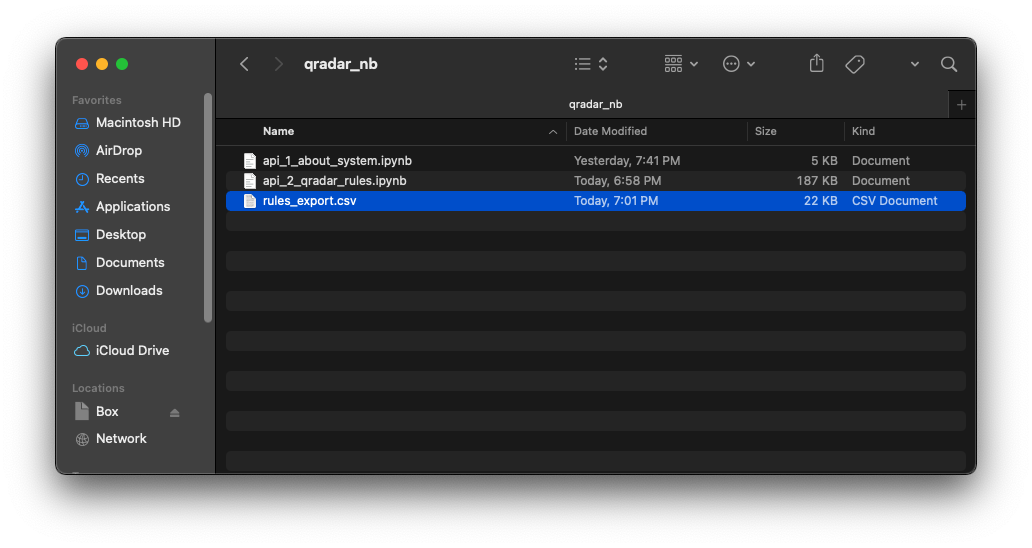
We can open the file rules_export.csv on a text editor to view the raw data as seen in the screenshot below.
We can also open the file rules_export.csv with Microsoft Excel which provides a more tabular view of the data as seen in the screenshot below.
The below screenshot shows the final Jupyter Notebook.
Conclusion
In this tutorial, we installed and leveraged Jupyter Notebook to write Python code to programmatically retrieve and parse data from QRadar. To summarize:
We started by setting up the environment which involved installing the relevant Python packages, installing Jupyter Notebook, and generating a QRadar API Token to authenticate to QRadar while make API requests.
Then, we touched on the QRadar Interactive API Documentation, which is a powerful knowledge-base for developers.
We began our QRadar API journey with an aim to retrieve the current system information. We went step-by-step in the process of identifying the corresponding API’s response fields, parameters, and sample JSON response in the Interactive API Documentation page. Then, we wrote Python code using the requests Python package to make a GET request and parse the response to capture individual field values.
Next, we advanced on our journey with an aim to retrieve all the QRadar Rules and export them to a CSV file. Again, we went step-by-step in the process of identifying the corresponding API’s response fields, parameters, and sample JSON response in the Interactive API Documentation page. In the sample JSON response, we identified that the response was NOT a single JSON object. Instead, the response was an Array of JSON objects. Keeping that in mind, we wrote Python code using the requests Python package to make a GET request and parse the response. The response was a Python list and posed challenges while performing querying and aggregation. To better store and analyze the data, we leveraged the pandas Python package and created a new DataFrame which made querying and aggregation much easier. Finally, we exported the Rules to a CSV file using the handy pandas.DataFrame.to_csv function.
You can view and download the Jupyter Notebooks from this tutorial using the links below.
I hope you enjoyed reading this tutorial. Please reach out via email if you have any questions or comments.