How to archive QRadar Reports with Python
Posted on 16 December 2022
TweetIntroduction
Have you ever wanted to download all your QRadar reports and store them in a centralized location? You could always use the QRadar UI and download each report manually. Instead, how about we automate this tedious task with a Python script?
In this tutorial, we will write a Python script to identify, parse, map, and upload QRadar reports from QRadar to Azure Blob Storage.
Note: This tutorial assumes you have admin access to a live QRadar deployment. For the purpose of this tutorial, I am using QRadar Community Edition. Please follow my step-by-step guide - How to install IBM QRadar CE V7.3.3 on VirtualBox to get a basic QRadar deployment up and running in your lab environment.
Note: This tutorial also assumes you have some experience with Microsoft Azure. This tutorial is not intended to be a deep-dive into Microsoft Azure and will not go into intricate details about the platform and its services. The aim is to leverage Azure Blob Storage as a means to store and organize QRadar reports. If you are new to Azure and Cloud Computing, please refer to Introduction to Azure fundamentals on Microsoft Learn.
Pre-requisites
- QRadar with admin access
I am using QRadar CE V7.3.3 as described above.
- Python 2.x.x
I am using Python 2.7.5 which comes installed by default on QRadar CE V7.3.3.
- Microsoft Azure account
Reports in QRadar
According to IBM QRadar documentation:
You can use the Reports tab to create, edit, distribute, and manage reports. Detailed, flexible reporting options satisfy your various regulatory standards, such as PCI compliance. You can create your own custom reports or use default reports. You can customize and rebrand default reports and distribute these to other users.
Where are QRadar Reports stored?
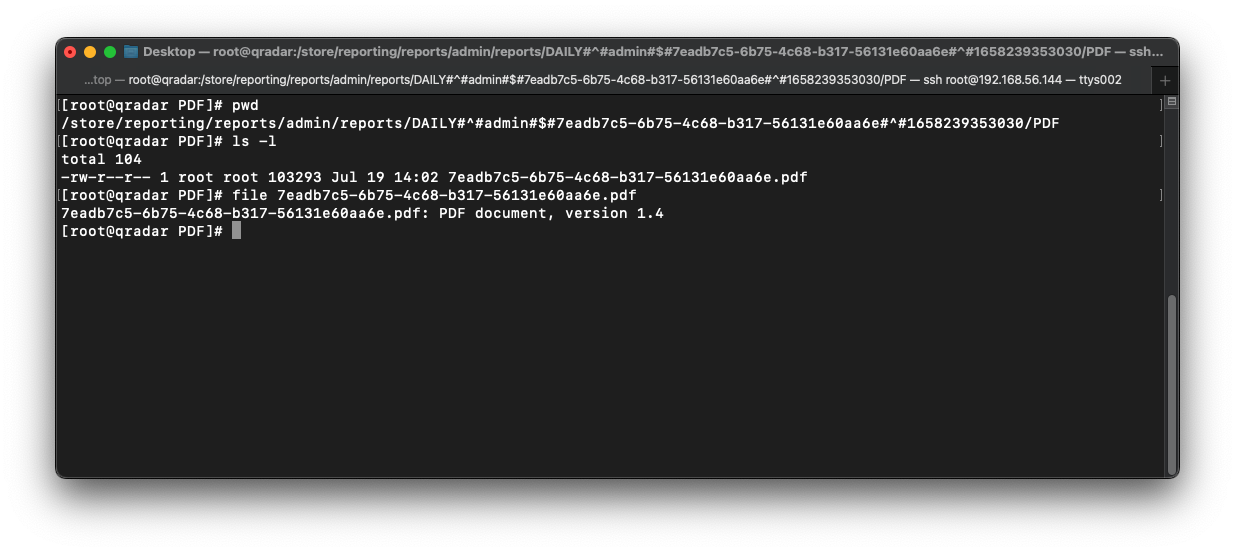
In QRadar, reports are stored under /store/reporting/reports and are organized by user.
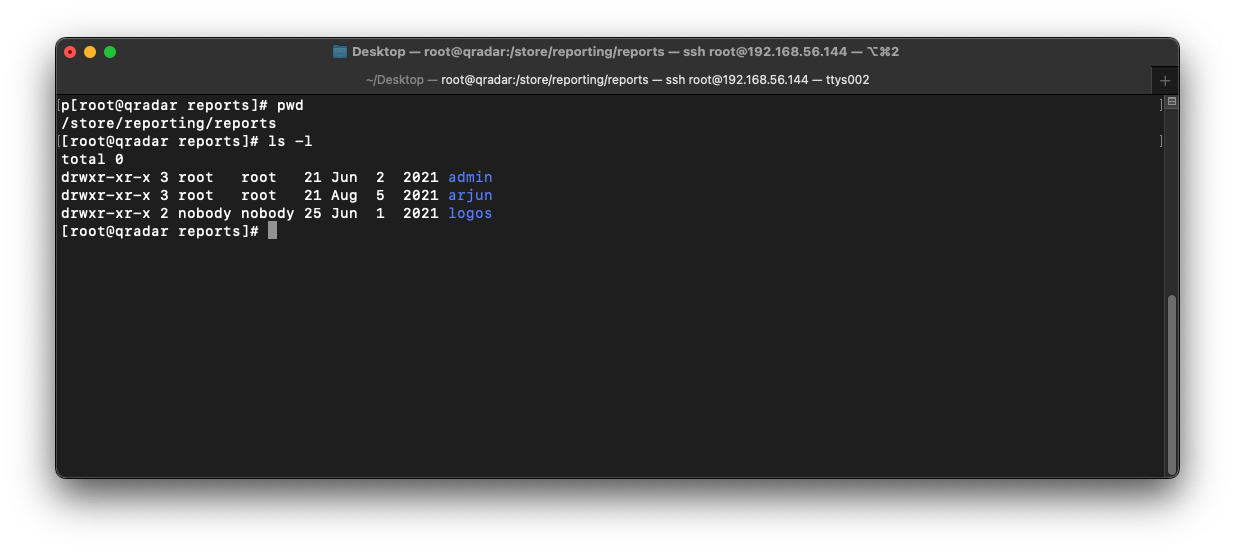
If we open the admin directory, we can see a directory called reports.
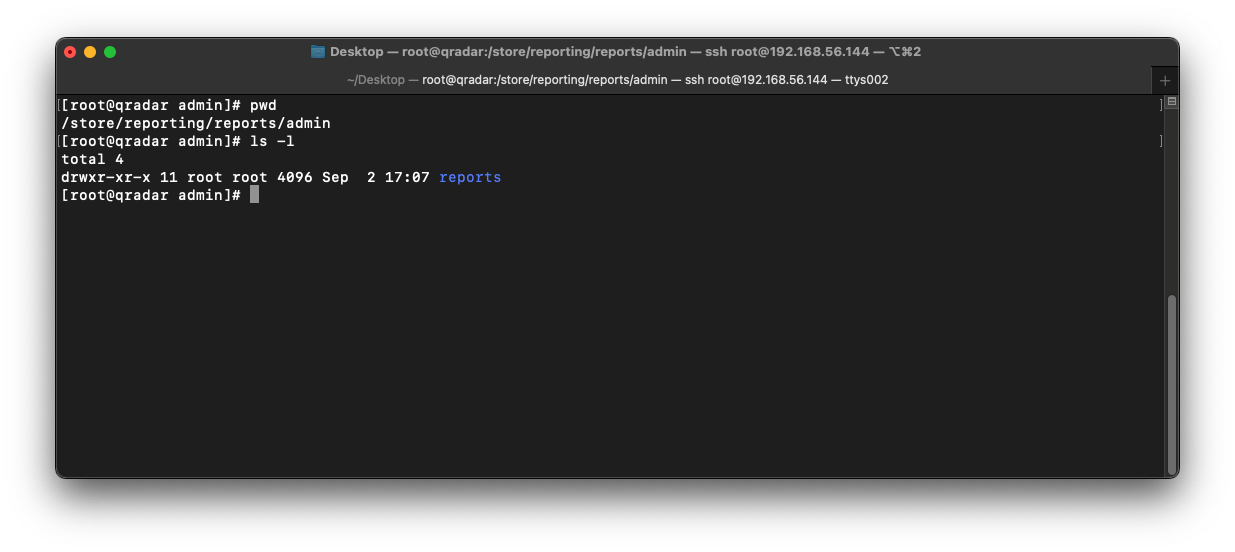
If we open the reports directory, there appears to be multiple directories within containing long names. But, what is the naming convention and where are the actual report files (PDF/HTML/XML/XLS) stored?
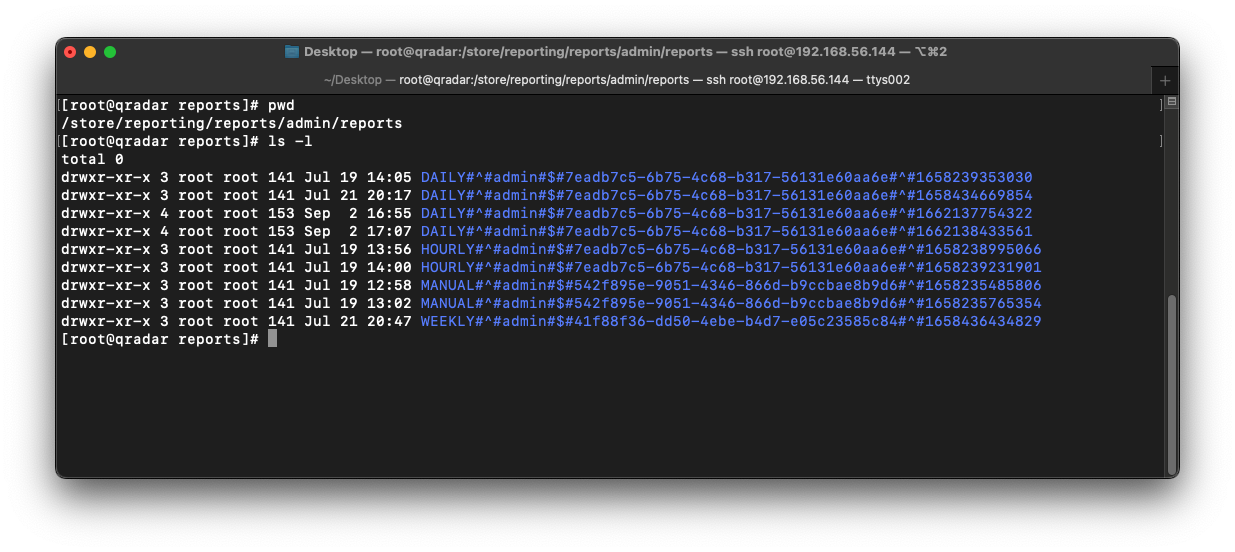
To answer the above questions, let us dissect the first directory name:
DAILY#^#admin#$#7eadb7c5-6b75-4c68-b317-56131e60aa6e#^#1658239353030
DAILYIt is clear that the first part of the directory name denotes the report schedule. The schedule can be one of DAILY, HOURLY, WEEKLY, MONTHLY, or MANUAL.
adminThe next part denotes the report owner. The owner will be one of the usernames on QRadar.
7eadb7c5-6b75-4c68-b317-56131e60aa6eThe next part denotes the report ID. This is a unique ID value assigned to a particular report regardless of factors such as schedule or owner.
1658239353030The last part denotes the number of milliseconds since the Unix epoch when the report was generated.
If we open this directory, we can see some XML files, metadata files, and a directory called PDF.
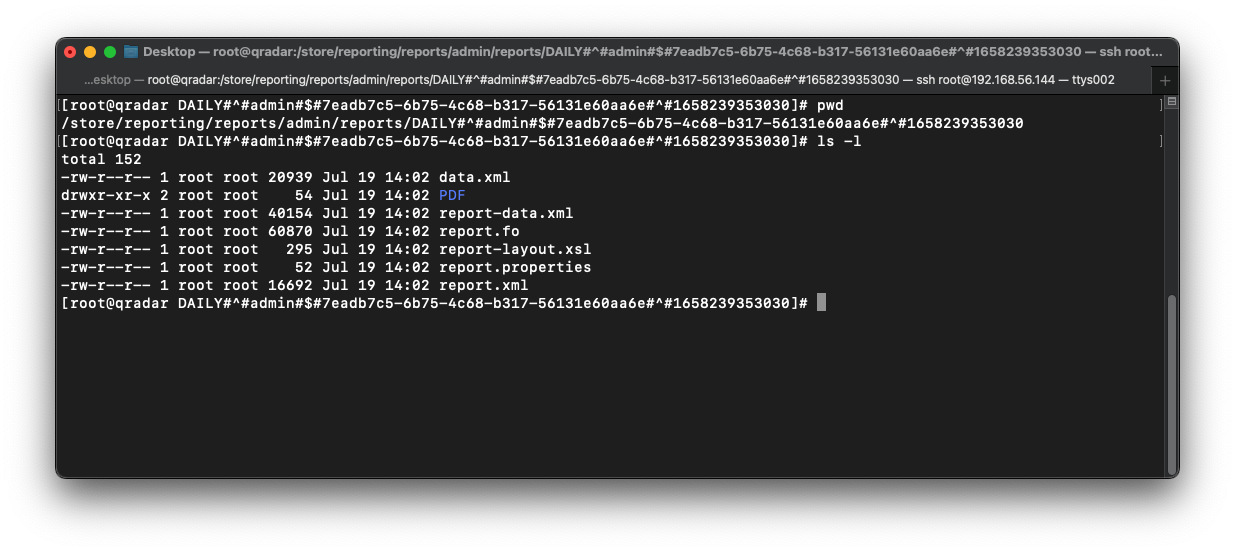
Finally, if we open the PDF directory, we can see the actual PDF report document :)
Azure Blob Storage
According to Microsoft Azure documentation:
Azure Blob Storage is Microsoft’s object storage solution for the cloud. Blob Storage is optimized for storing massive amounts of unstructured data. Unstructured data is data that doesn’t adhere to a particular data model or definition, such as text or binary data.
Based on the above description, Azure Blob Storage seems like the perfect cloud-based solution to archive QRadar reports.
Note: You can leverage Amazon Simple Storage Service (Amazon S3) if your preferred Cloud Service Provider is AWS.
Blob Storage offers three types of resources:
- The storage account
- A container in the storage account
- A blob in a container
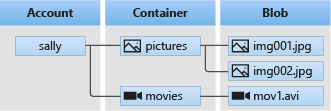 Diagram from Microsoft
Note: Please refer to Introduction to Azure Blob Storage to learn more about the Blob Storage concepts and terminology.
Configure Azure Blob Storage
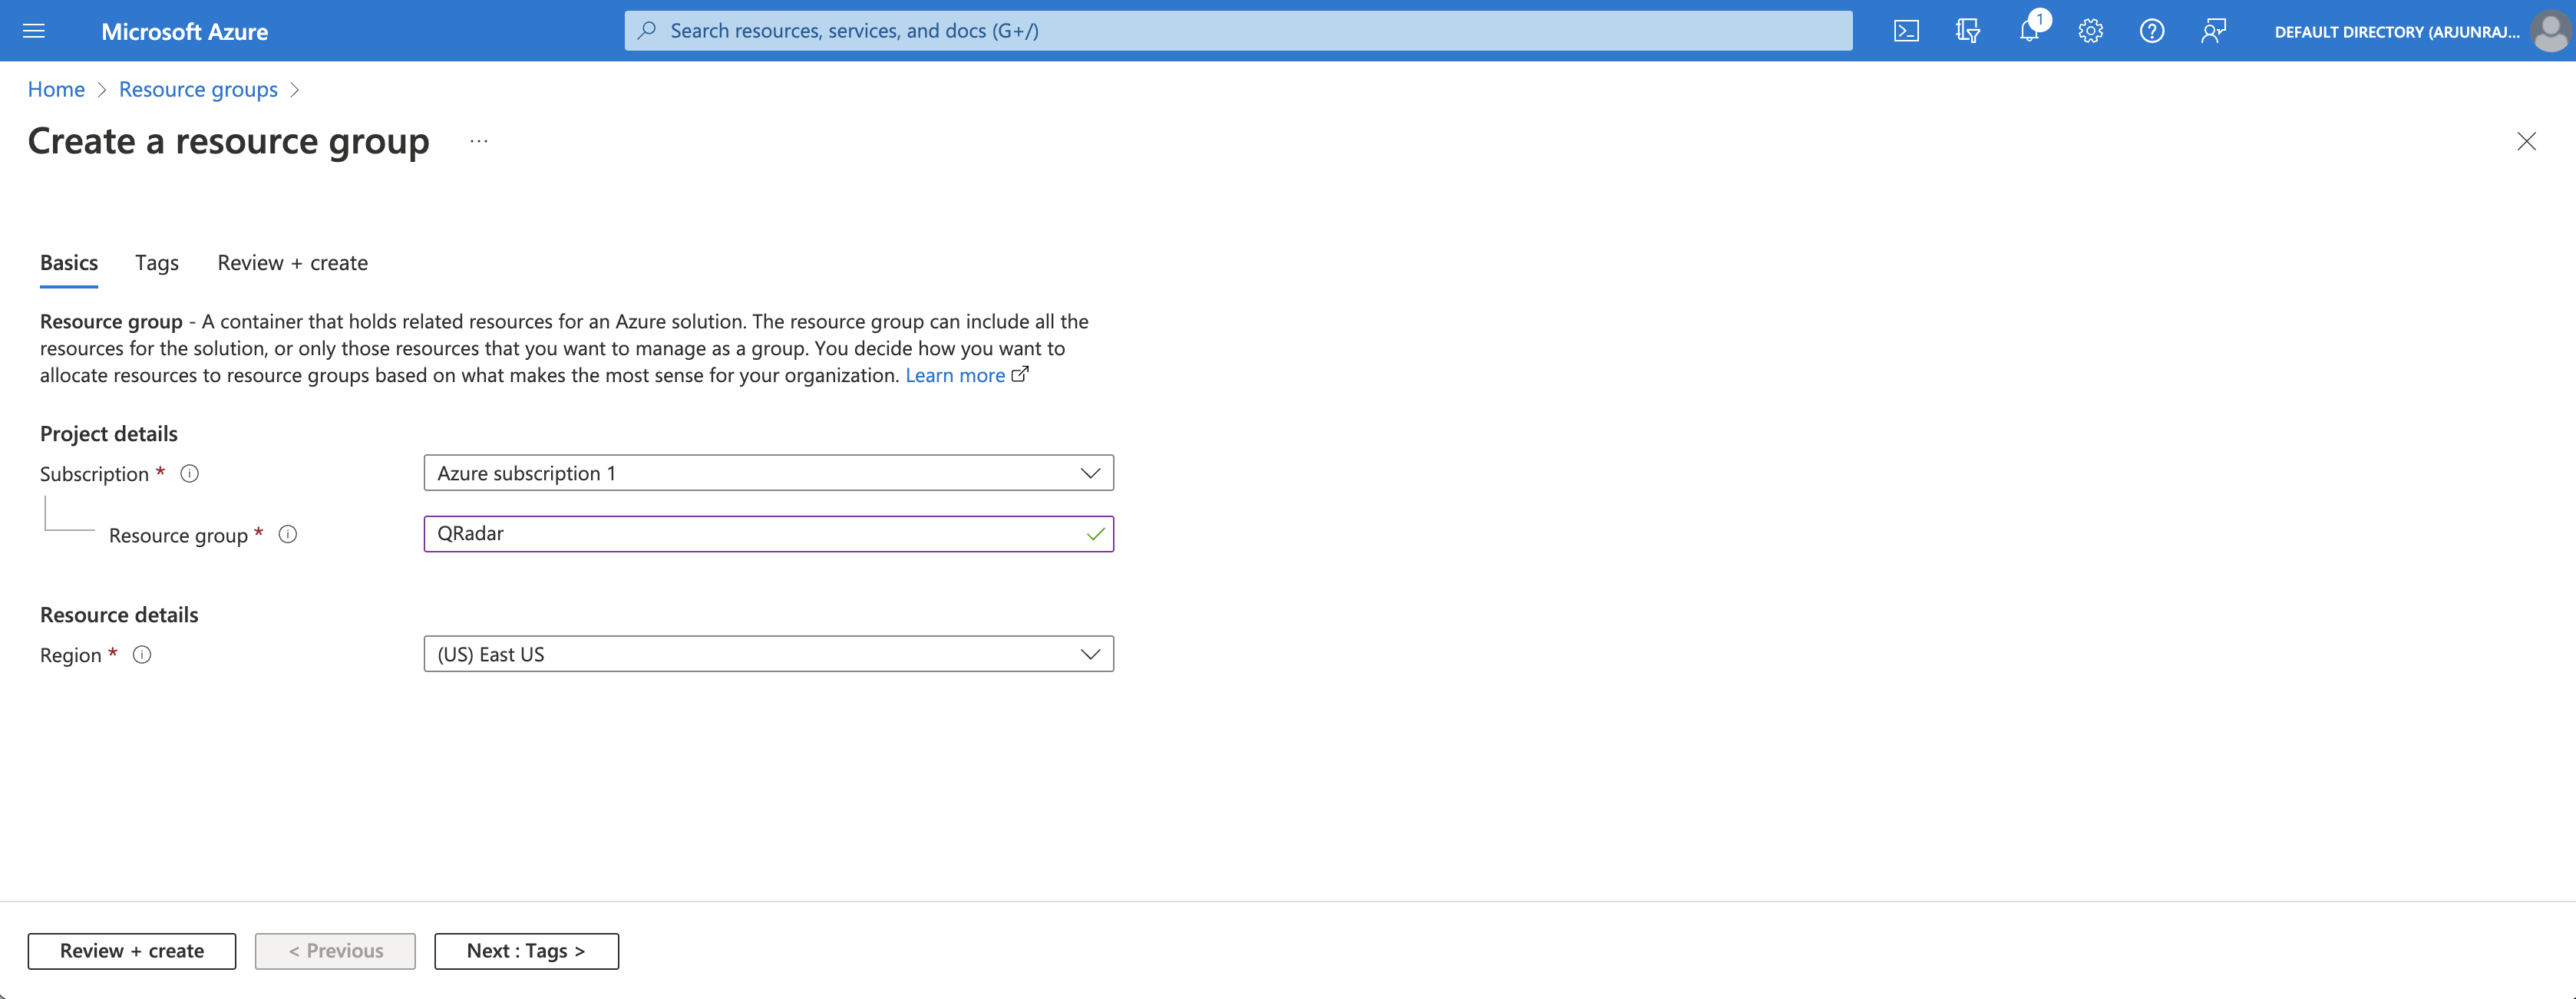
Create Resource Group
The first step is to create a new resource group on the Azure Portal. As seen in the screenshot below, we create a new resource group called QRadar in the East US region. This resource group is the virtual container that will hold our storage account.
Create Storage Account
The next step is to create a new storage account within the QRadar resource group. As seen in the screenshot below, we create a new storage account called qradarreports with resource group as QRadar.
Note: Pay close attention to the redundancy option and select the best option by considering your availability requirements.

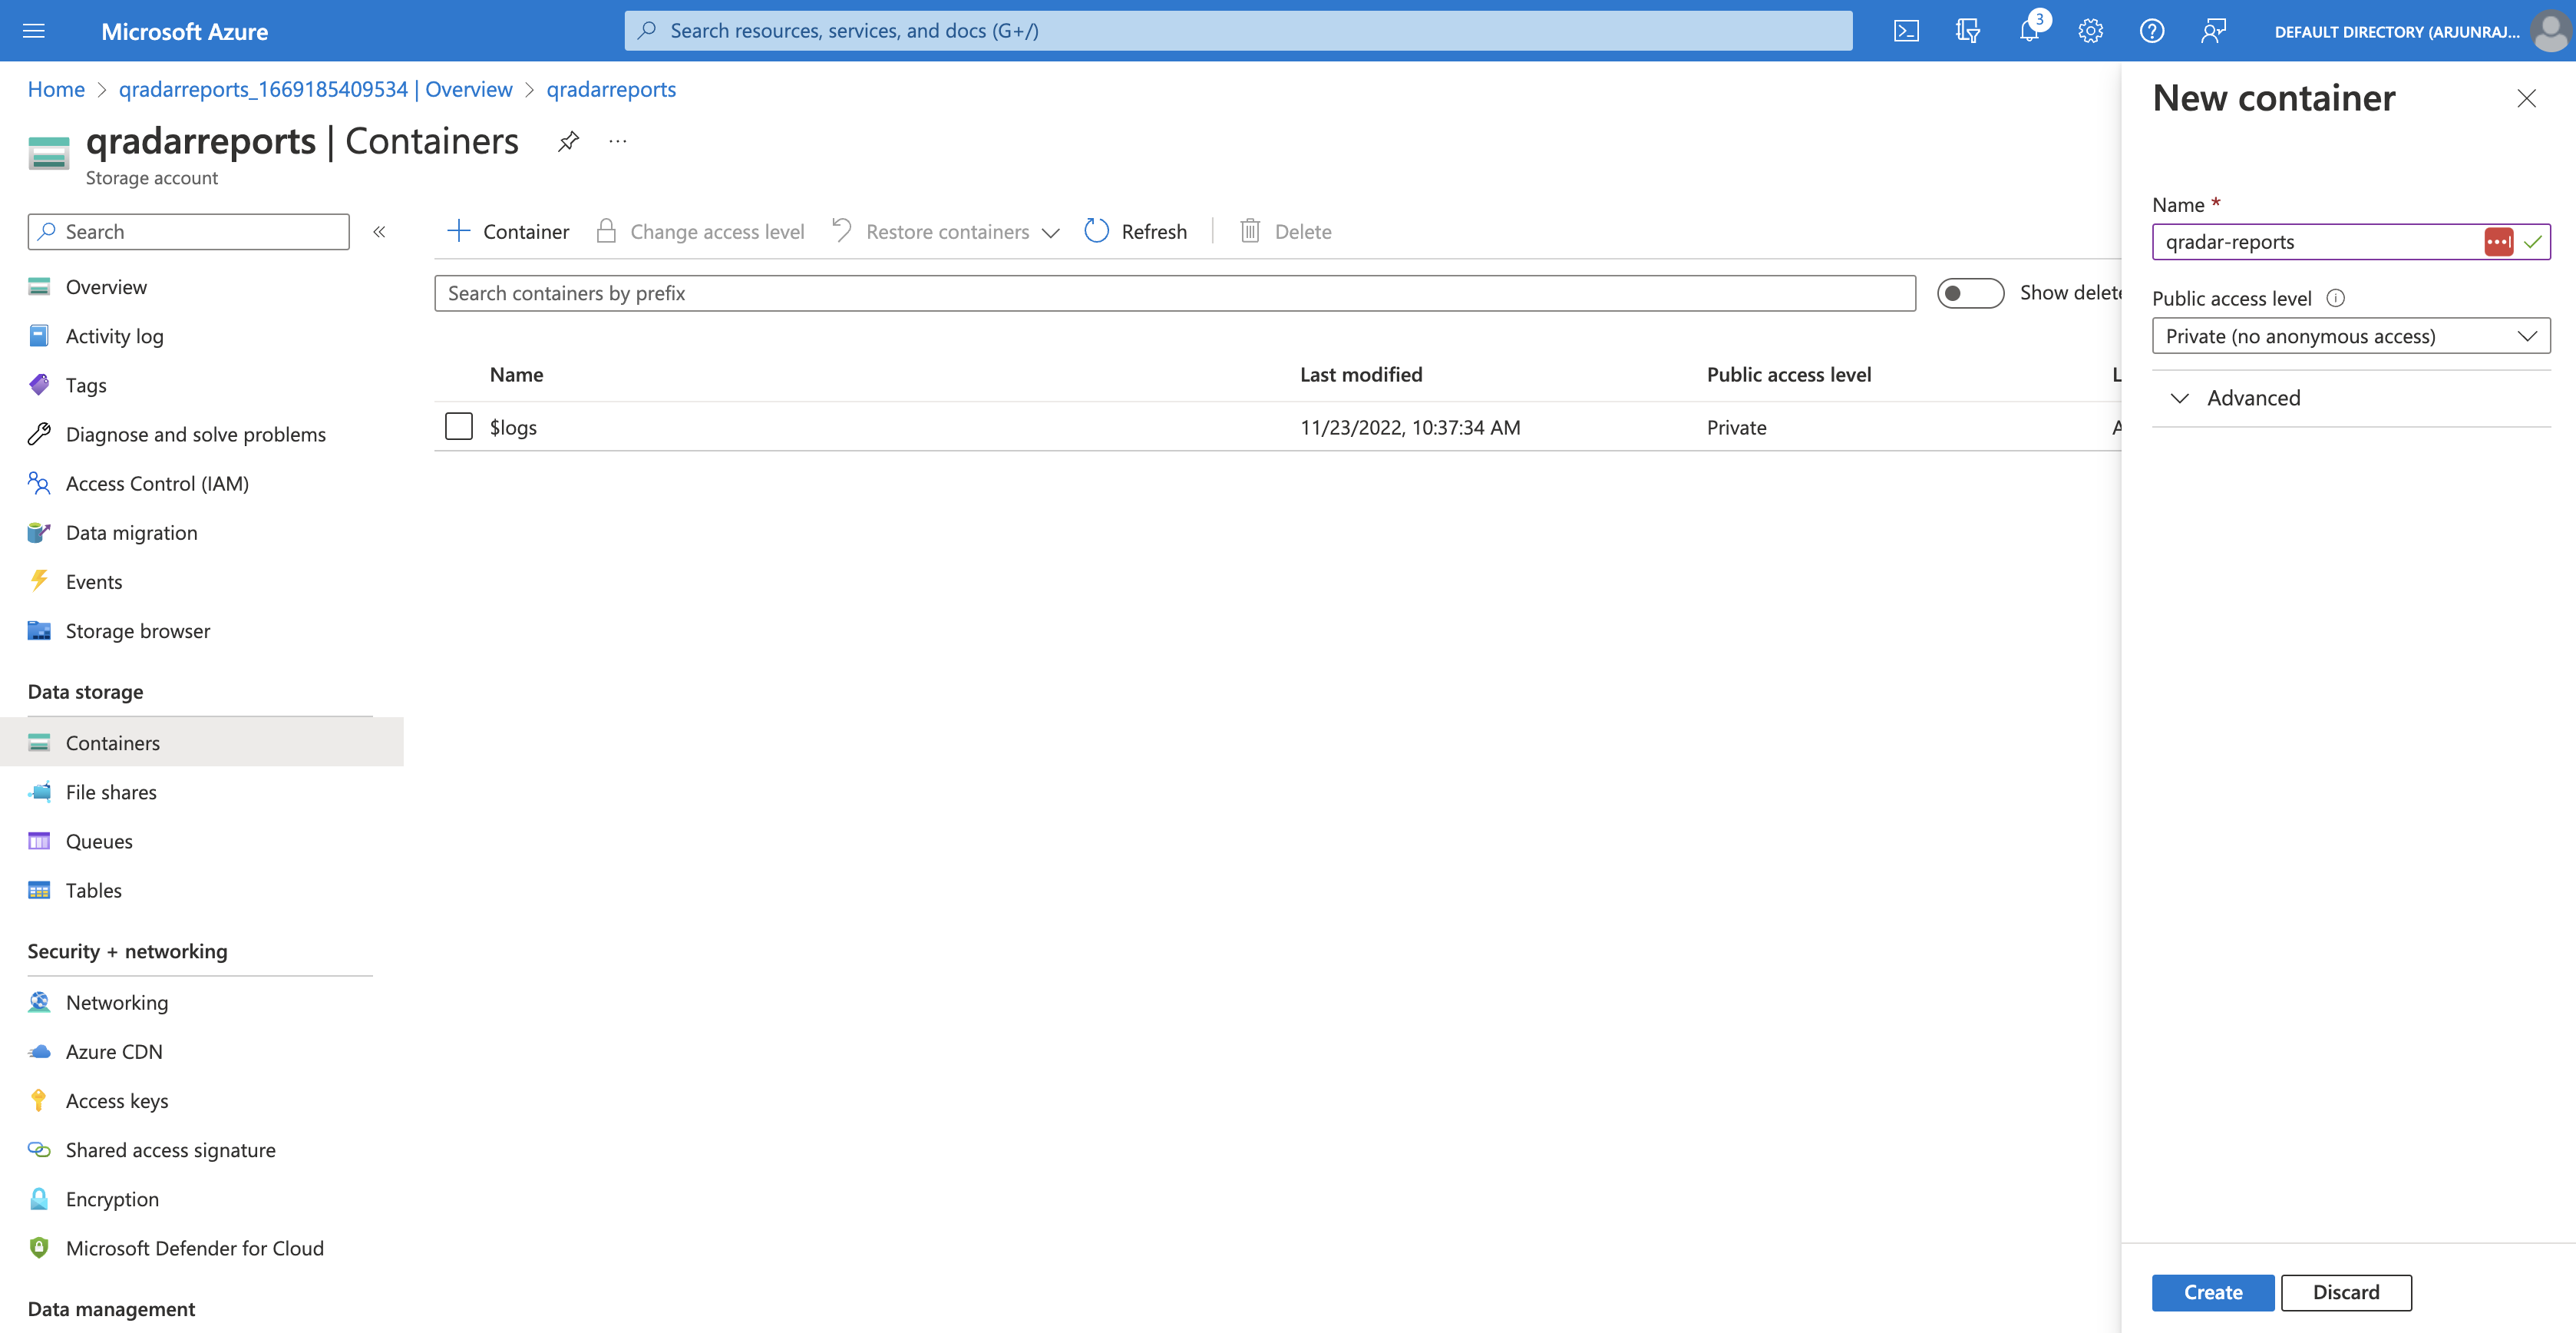
Create Container
The next step is to create a new container within the qradarreports storage account. As seen in the screenshot below, we create a new container called qradar-reports with access restricted to Private (no anonymous access).
Note: It is recommended to use restrict public access to ensure confidentiality of the data (QRadar reports with sensitive organization-specific information) being stored on Azure.
According to Microsoft Azure documentation:
When a container is configured for public access, any client can read data in that container. Public access presents a potential security risk, so if your scenario does not require it, we recommend that you disallow it for the storage account.
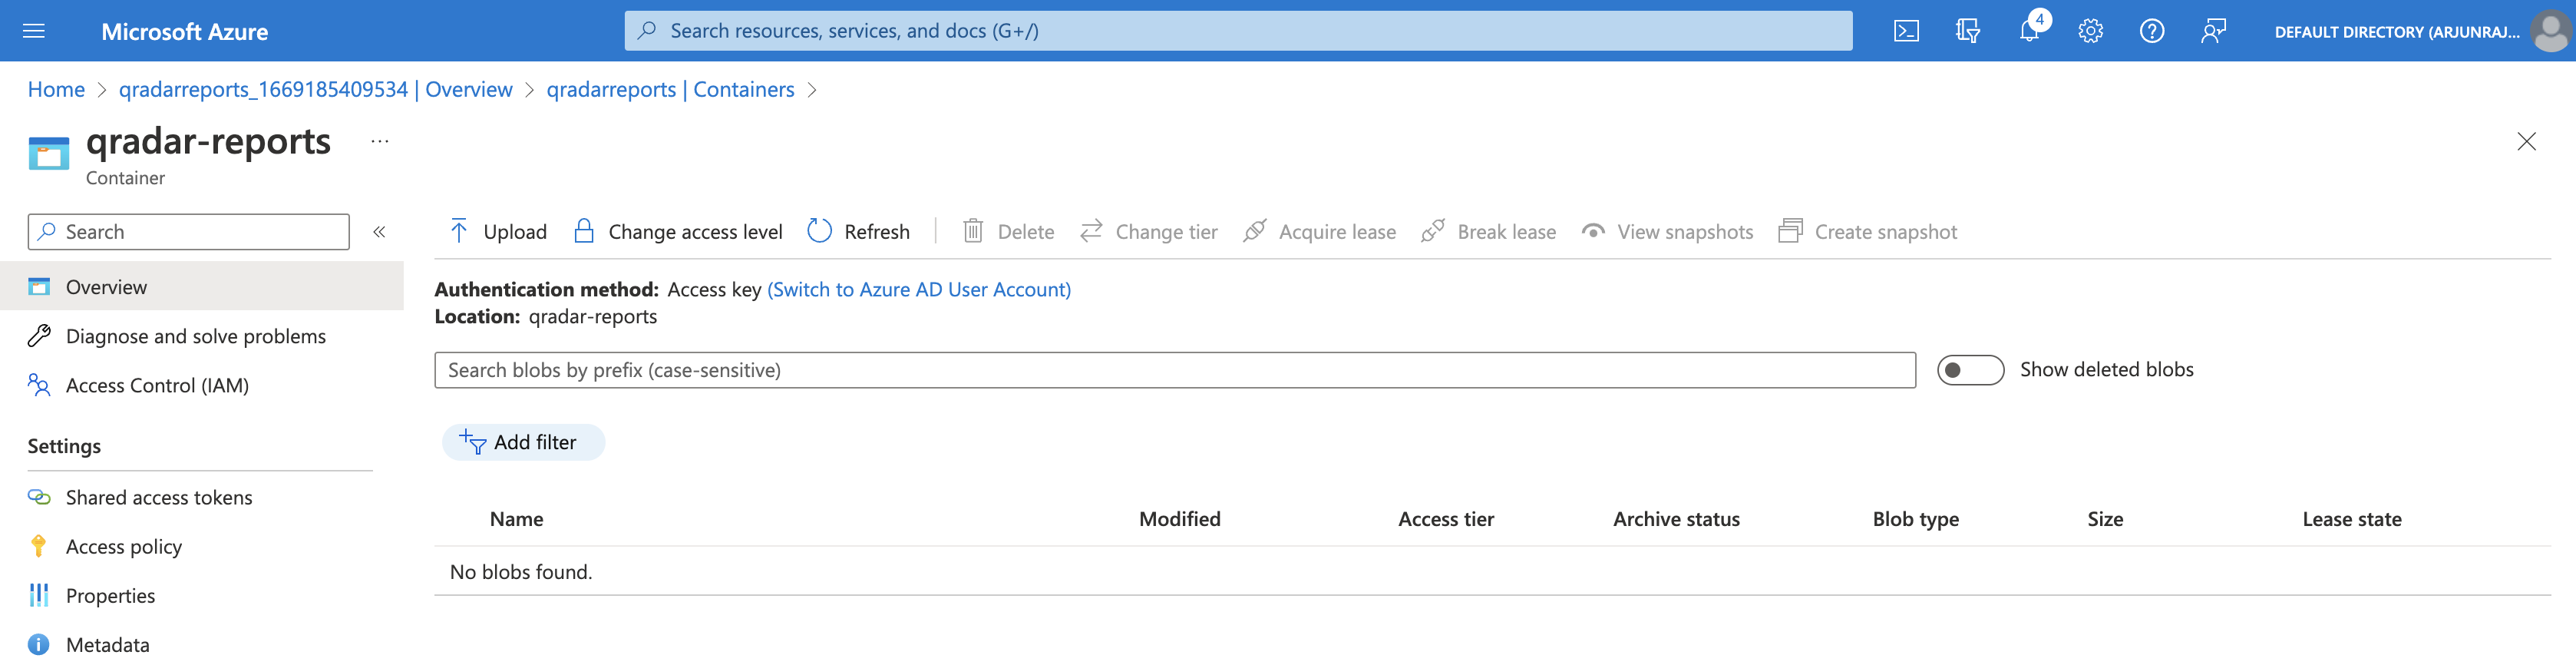
The newly created container qradar-reports is empty and does not contain any blobs.
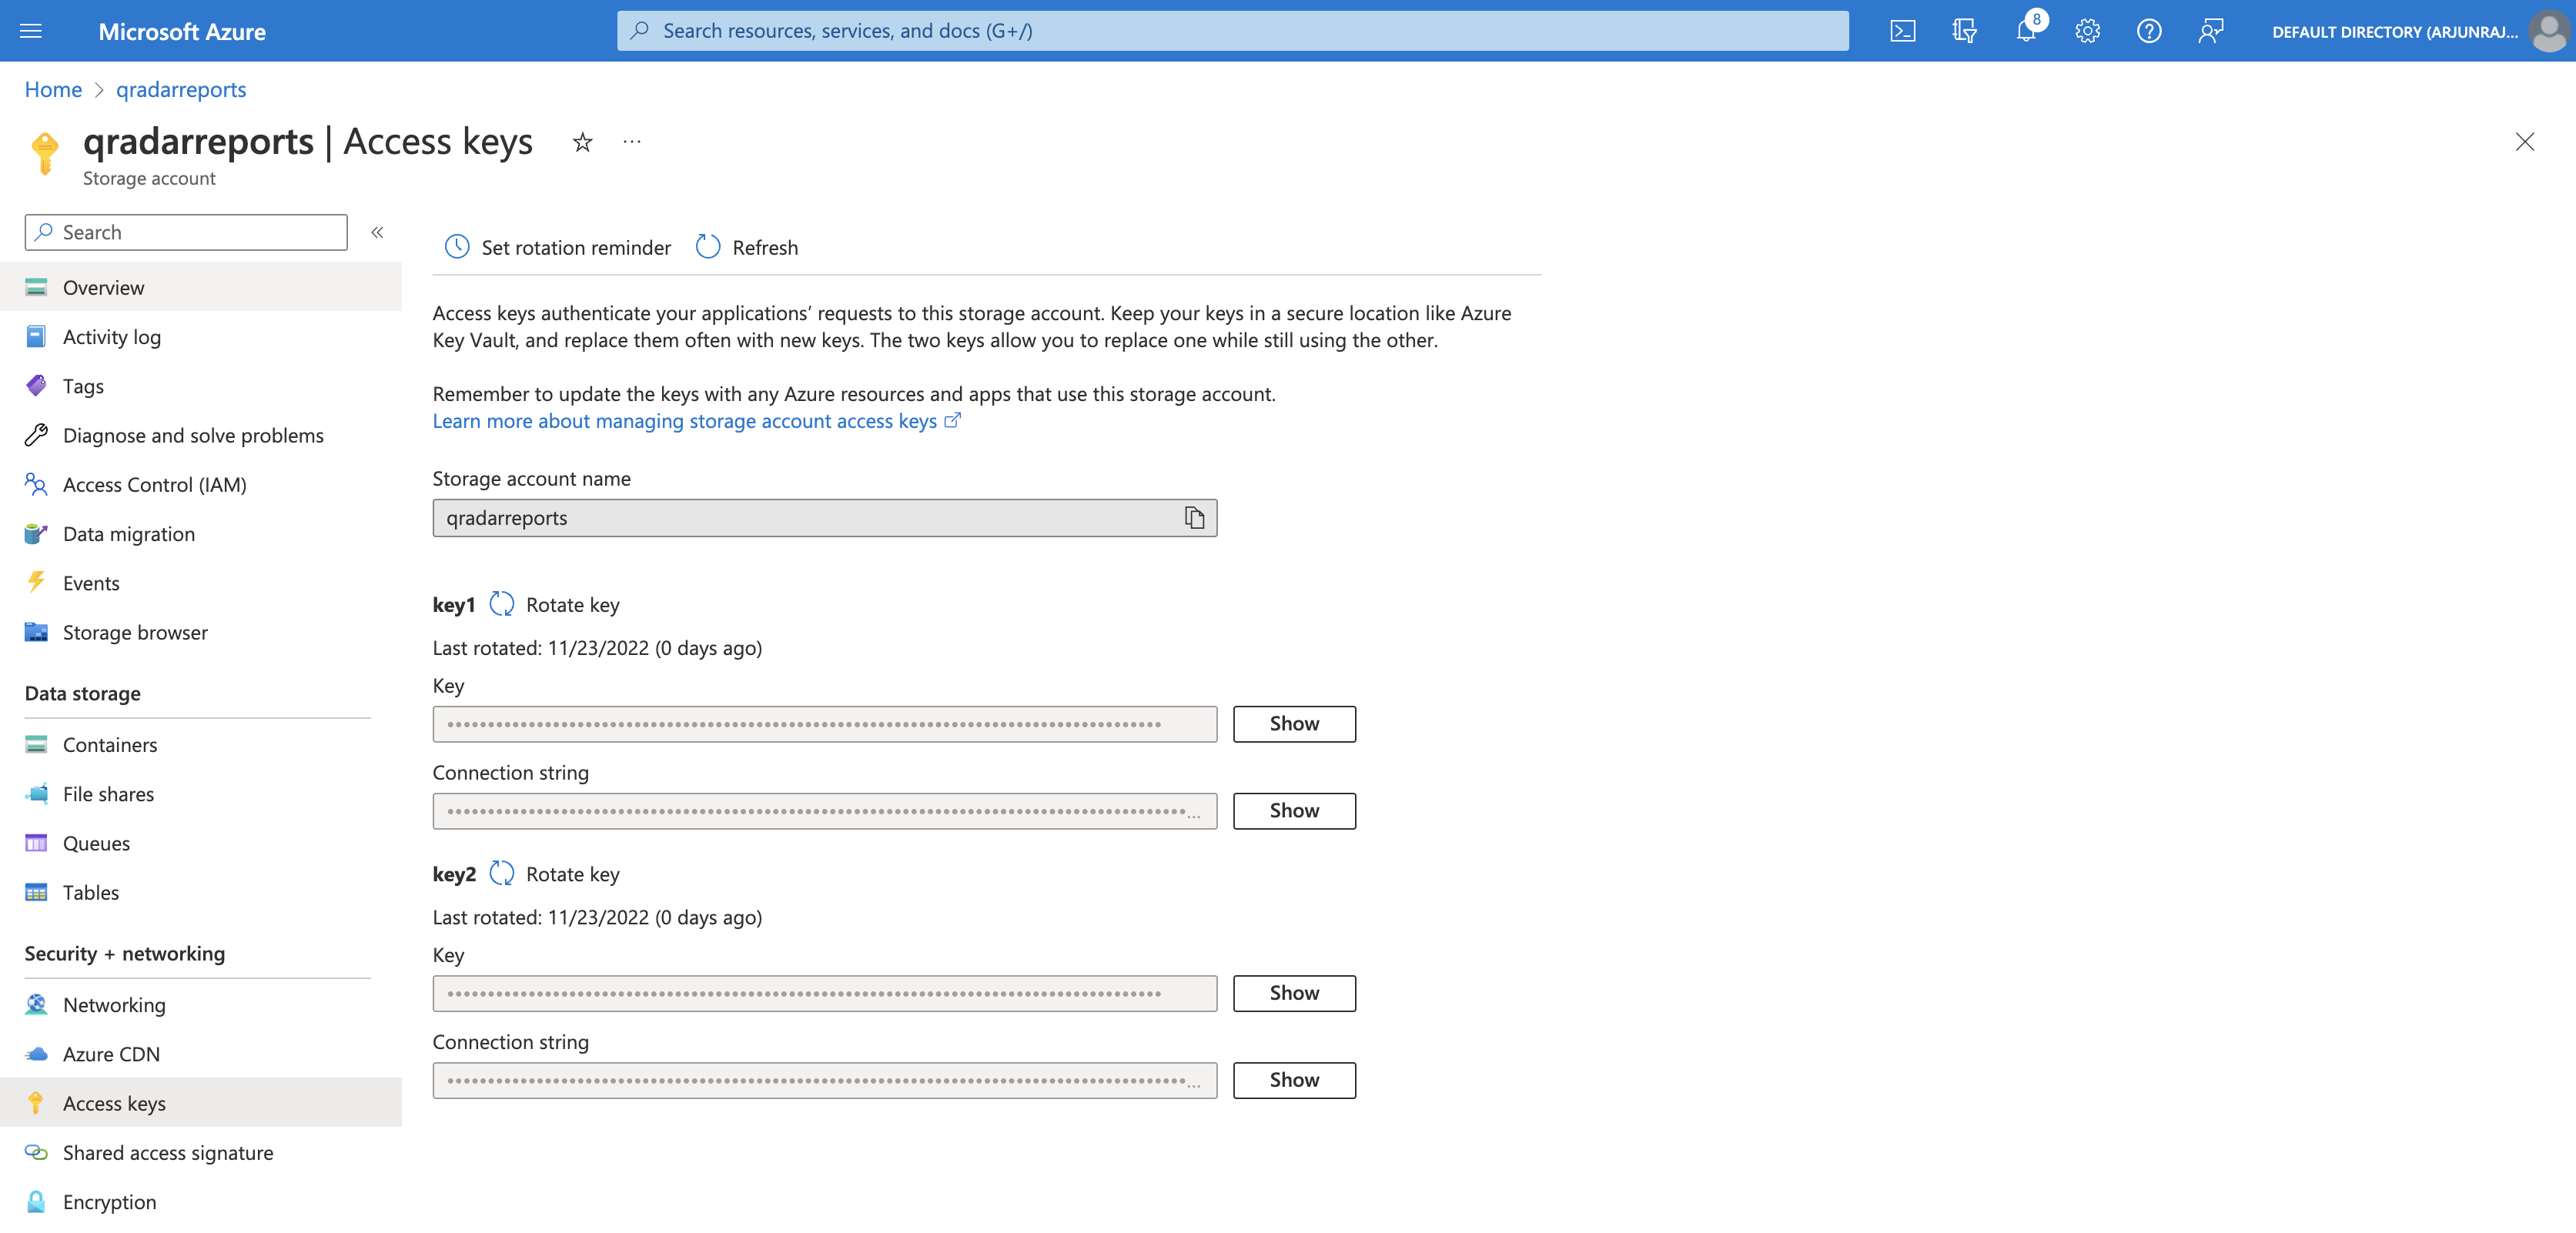
Acquire Connection String
Earlier, we created our container qradar-reports with access restricted to Private (no anonymous access). This is a security feature that we enabled to ensure confidentiality of our QRadar reports. If we want to upload blobs to our container, we will need some mechanism of authentication.
According to Microsoft Azure documentation:
Every request made against a storage service must be authorized, unless the request is for a blob or container resource that has been made available for public or signed access. One option for authorizing a request is by using Shared Key.
As seen in the screenshot below, we can view and copy the Connection string (either one) for the qradarreports storage account from the Access keys tab.
Writing the Script
With an understanding of where and how reports are stored on QRadar, we can start writing a Python script to correctly identify, parse, map, and upload all reports to Azure Blob Storage.
Installing Azure Blob Storage Client Library for Python
The easiest way to interact with Azure via Python is by leveraging the Azure Blob Storage client library. The alternative is to DIY by making REST API requests to Azure. If you decide to go down that route, check out the Azure Blob Storage REST API documentation.
According to the project’s PyPI page:
The Azure Storage Blobs client library for Python allows you to interact with three types of resources: the storage account itself, blob storage containers, and blobs.
Now, the easiest way to install the library is by using pip - Python’s package installer. However, pip is not available by default on QRadar CE and requires manual installation.
To install pip, run the following commands in order:
wget https://bootstrap.pypa.io/get-pip.pypython get-pip.py
Note: Make sure QRadar has access to the Internet.
Basically, we download the get-pip.py using the wget utility and then execute the script. Check out this link for more information about installing pip.
Let us install the Azure Blob Storage client library for Python using pip:
pip install --ignore-installed azure-storage-blob
Identify, Parse and Map Reports
In the previous section, we learned that /store/reporting/reports/admin/reports is the deepest we can go on QRadar before each report is an individual directory whose name is composed of the report’s schedule, owner, time generated, and unique ID.
Now, a question arises - how can we identify the name of a QRadar report based on its ID?
Let us consider the previously discussed directory name as an example:
DAILY#^#admin#$#7eadb7c5-6b75-4c68-b317-56131e60aa6e#^#1658239353030
We identified that the unique report ID is 7eadb7c5-6b75-4c68-b317-56131e60aa6e. But, what is the name of this report?
To answer this question, we must look inside the report.properties file within the directory itself.
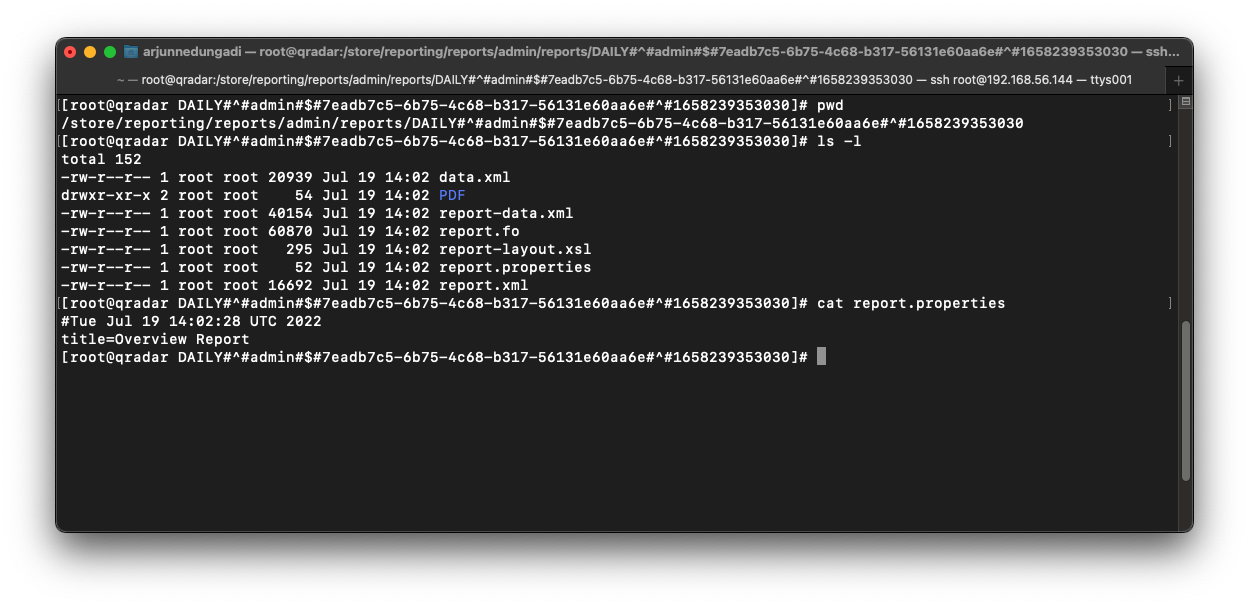
As seen in the above screenshot, the report name (or title) is Overview Report. This information is valuable to us for the purpose of archiving reports.
Hence, a good starting point is to write Python code to create a map of report IDs and report names.
We start by importing the required Python packages as seen below.
from os import listdir
from os.path import join, getsize, isdir
import re
from datetime import datetime
from azure.storage.blob import BlobServiceClient
The next step is to define some variables.
base_dir is the full path to the location of the reports on QRadar.
We will also define report_dirs which is an empty list to store the report directory names, and report_name_dir_mapping which is an empty dict to store the mapping between report IDs and report names.
base_dir = '/store/reporting/reports/admin/reports'
report_dirs = []
report_name_dir_mapping = {}
We will also define a string called AZ_CONN_STR which holds the connection string acquired in the Acquire Connection String section above.
AZ_CONN_STR = "DefaultEndpointsProtocol=https;AccountName=qradarreports;AccountKey=...........;EndpointSuffix=core.windows.net"
AZ_CONTAINER = "qradar-reports"
The next step is to actually create the mapping and populate report_name_dir_mapping.
In the first loop, we initialize report_name_dir_mapping with multiple children dict items. Each child dict has one key called “name” to contain the report name. It is initialized with an empty string.
In the second loop, we open the report.properties file within each report directory and populate the “name” key for each child dict with the report name (title) corresponding to the report ID.
for report_dir in filter(isdir,map(lambda s: join(base_dir,s), listdir(base_dir))):
    report_dirs.append(report_dir)
    report_id = report_dir.split("#")[4]
    name = ""
    report_name_dir_mapping[report_id] = {'name': name}

for report_dir in report_dirs:
    report_id = report_dir.split("#")[4]
    file_name = "%s/report.properties" % report_dir
    with open(file_name,"r") as f:
        raw_title = f.readlines()[1].strip()
        title = re.findall("(title=)(.*)", raw_title)[0][1]
    report_name_dir_mapping[report_id]['name'] = title

print(report_name_dir_mapping)

'''
{
  "542f895e-9051-4346-866d-b9ccbae8b9d6": {
    "name": "Offense Report"
  },
  "41f88f36-dd50-4ebe-b4d7-e05c23585c84": {
    "name": "Top Users by Remote Access Activity"
  },
  "7eadb7c5-6b75-4c68-b317-56131e60aa6e": {
    "name": "Overview Report"
  }
}
'''
Upload Reports to Azure
Now that we have created the mapping between report IDs and report names, the next step is to upload each report to Azure using the Azure Blob Storage client library.
We will implement three versions (functions) to organize reports in different styles on Azure Blob Storage.
In version 1, we will simply upload all the PDF report documents to the qradar-reports container on Azure Blob Storage.
In version 2, we will organize reports into folders and sub-folders based on the year, month, and day in an hierarchical manner within the qradar-reports container on Azure Blob Storage.
In version 3, we will organize reports into folders based on the report name within the qradar-reports container on Azure Blob Storage.
Note: You can easily modify these functions to create your own style.
Version 1 - All reports in one container
In this version, we start by creating an object of BlobServiceClient called blob_service_client. We then use blob_service_client and its method get_blob_client to initialize a client to represent the blob, which is synonymous with the report PDF. We provide the container name and blob name (report name) as parameters.
Then, we leverage the exists() function to check if the blob already exists. Essentially, we are checking if the report PDF was already uploaded or not. If it exists, we exit the function. If it does not exist, we upload the report PDF and print the returned metadata.
def upload_to_azure(file_name, new_file_name):
    blob_service_client =  BlobServiceClient.from_connection_string(AZ_CONN_STR)
    blob_client = blob_service_client.get_blob_client(container=AZ_CONTAINER,blob=new_file_name)
    if blob_client.exists() == True:
      return "Blob (%s) already exists (skipping)" % new_file_name
    with open(file_name, "rb") as data:
        upload_metadata = blob_client.upload_blob(data)
    return "Uploaded %s" % new_file_name, upload_metadata, "\n"
Version 2 - Reports organized by year, month, and day
This version is a modification of the one above. The main difference is that we extract the year, month, and day using the datetime.strptime function. Thanks to this useful tip for pointing out that we can create hierarchies on Azure Blob Storage by using “/” as a separator. In our case, the blob naming convention would be “<year>/<month>/<day>/<report_name>.pdf”.
def upload_to_azure_dt(file_name, new_file_name):
    report_dt = datetime.strptime(new_file_name.split(" ")[0],"%Y-%m-%d")
    report_year = report_dt.year
    report_month = report_dt.month
    report_day = report_dt.day
    new_file_name_dt = "%s/%s/%s/%s" % (report_year,report_month,report_day,new_file_name)
    blob_service_client =  BlobServiceClient.from_connection_string(AZ_CONN_STR)
    blob_client = blob_service_client.get_blob_client(container=AZ_CONTAINER,blob=new_file_name_dt)
    if blob_client.exists() == True:
      return "Blob (%s) already exists (skipping)" % new_file_name
    with open(file_name, "rb") as data:
        upload_metadata = blob_client.upload_blob(data)
    return "Uploaded %s" % new_file_name, upload_metadata, "\n"
Version 3 - Reports organized by name
Like above, this version is also a modification of version 1. The main difference is that we extract the report name using string manipulation techniques. Here, the blob naming convention would be “<report_title>/<report_name>.pdf”.
def upload_to_azure_report_name(file_name, new_file_name):
    report_name = ' '.join(new_file_name.split(' ')[2:])[:-4]
    new_file_name_report = "%s/%s" % (report_name,new_file_name)
    blob_service_client =  BlobServiceClient.from_connection_string(AZ_CONN_STR)
    blob_client = blob_service_client.get_blob_client(container=AZ_CONTAINER,blob=new_file_name_report)
    if blob_client.exists() == True:
      return "Blob (%s) already exists (skipping)" % new_file_name
    with open(file_name, "rb") as data:
        upload_metadata = blob_client.upload_blob(data)
    return "Uploaded %s" % new_file_name, upload_metadata, "\n"
Executing the Script
To execute the script, we simply need to iterate through each report directory stored in the report_dirs list. Then, we use various string manipulation and datetime functions to extract the report’s unique ID and time generated. With the extracted fields, we construct the required file name (or blob name). Finally, we invoke the three Azure upload functions with the required parameters.
for report_dir in report_dirs:
    report_id = report_dir.split("#")[4]
    report_gen = report_dir.split("#")[6]
    report_gen_dt = datetime.fromtimestamp(int(report_gen)/1000.0)
    report_gen_dt_str = report_gen_dt.strftime("%Y-%m-%d %H:%M:%S")
    file_name = "%s/PDF/%s.pdf" % (report_dir,report_id)
    new_file_name = "%s %s.pdf" % (report_gen_dt_str, report_name_dir_mapping[report_id]["name"])
    # version 1
    print(upload_to_azure(file_name, new_file_name))
    # version 2
    print(upload_to_azure_dt(file_name, new_file_name))
    # version 3
    print(upload_to_azure_report_name(file_name, new_file_name))
Version 1 on Azure
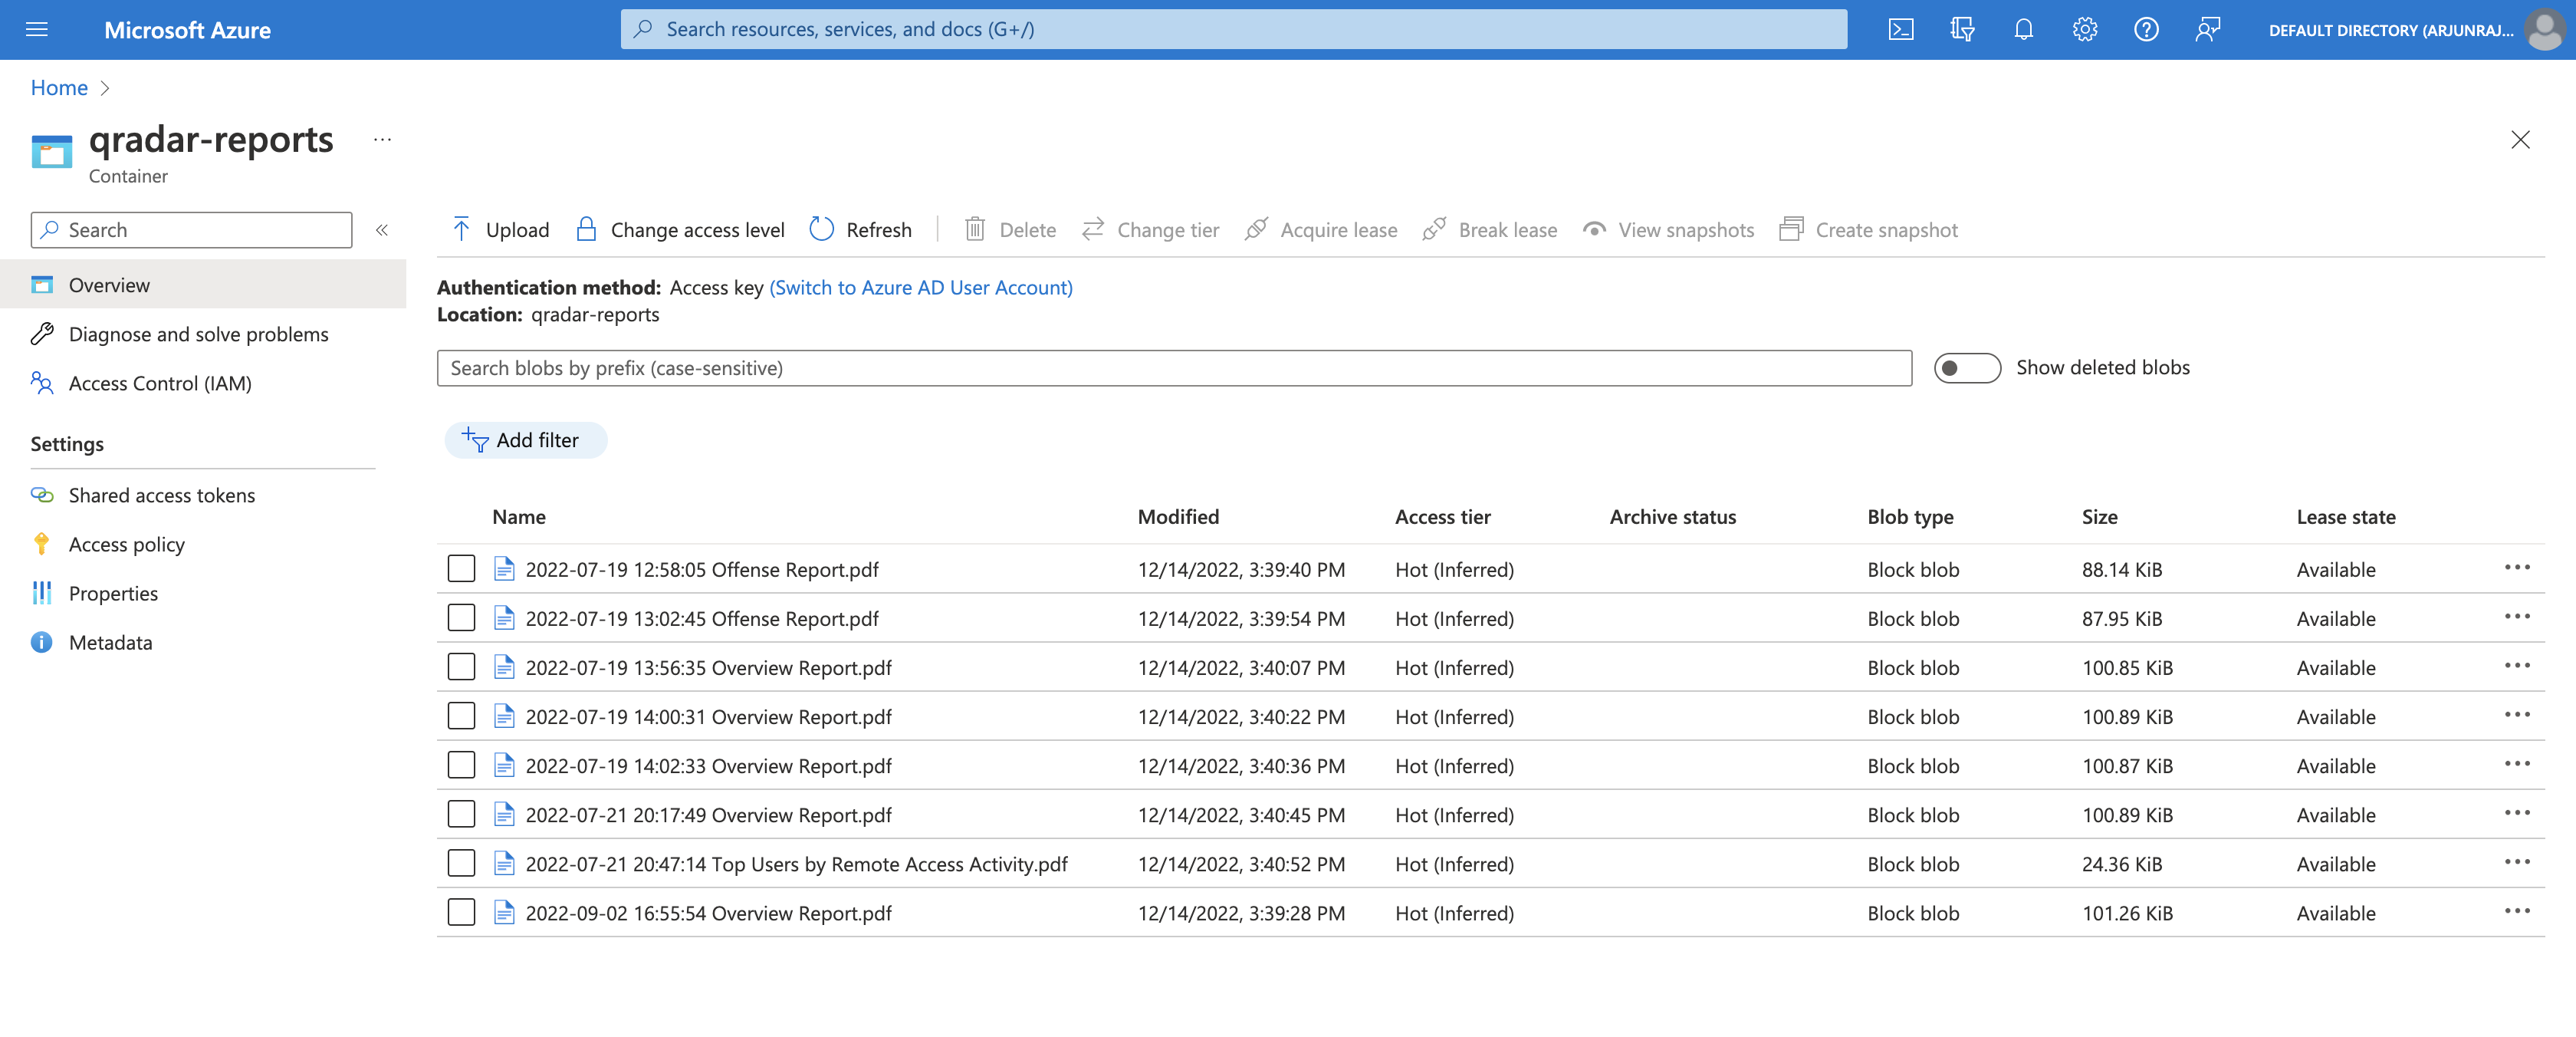
After executing the Python script, we can see that all the QRadar reports were successfully uploaded to the qradar-reports container.
Version 2 on Azure
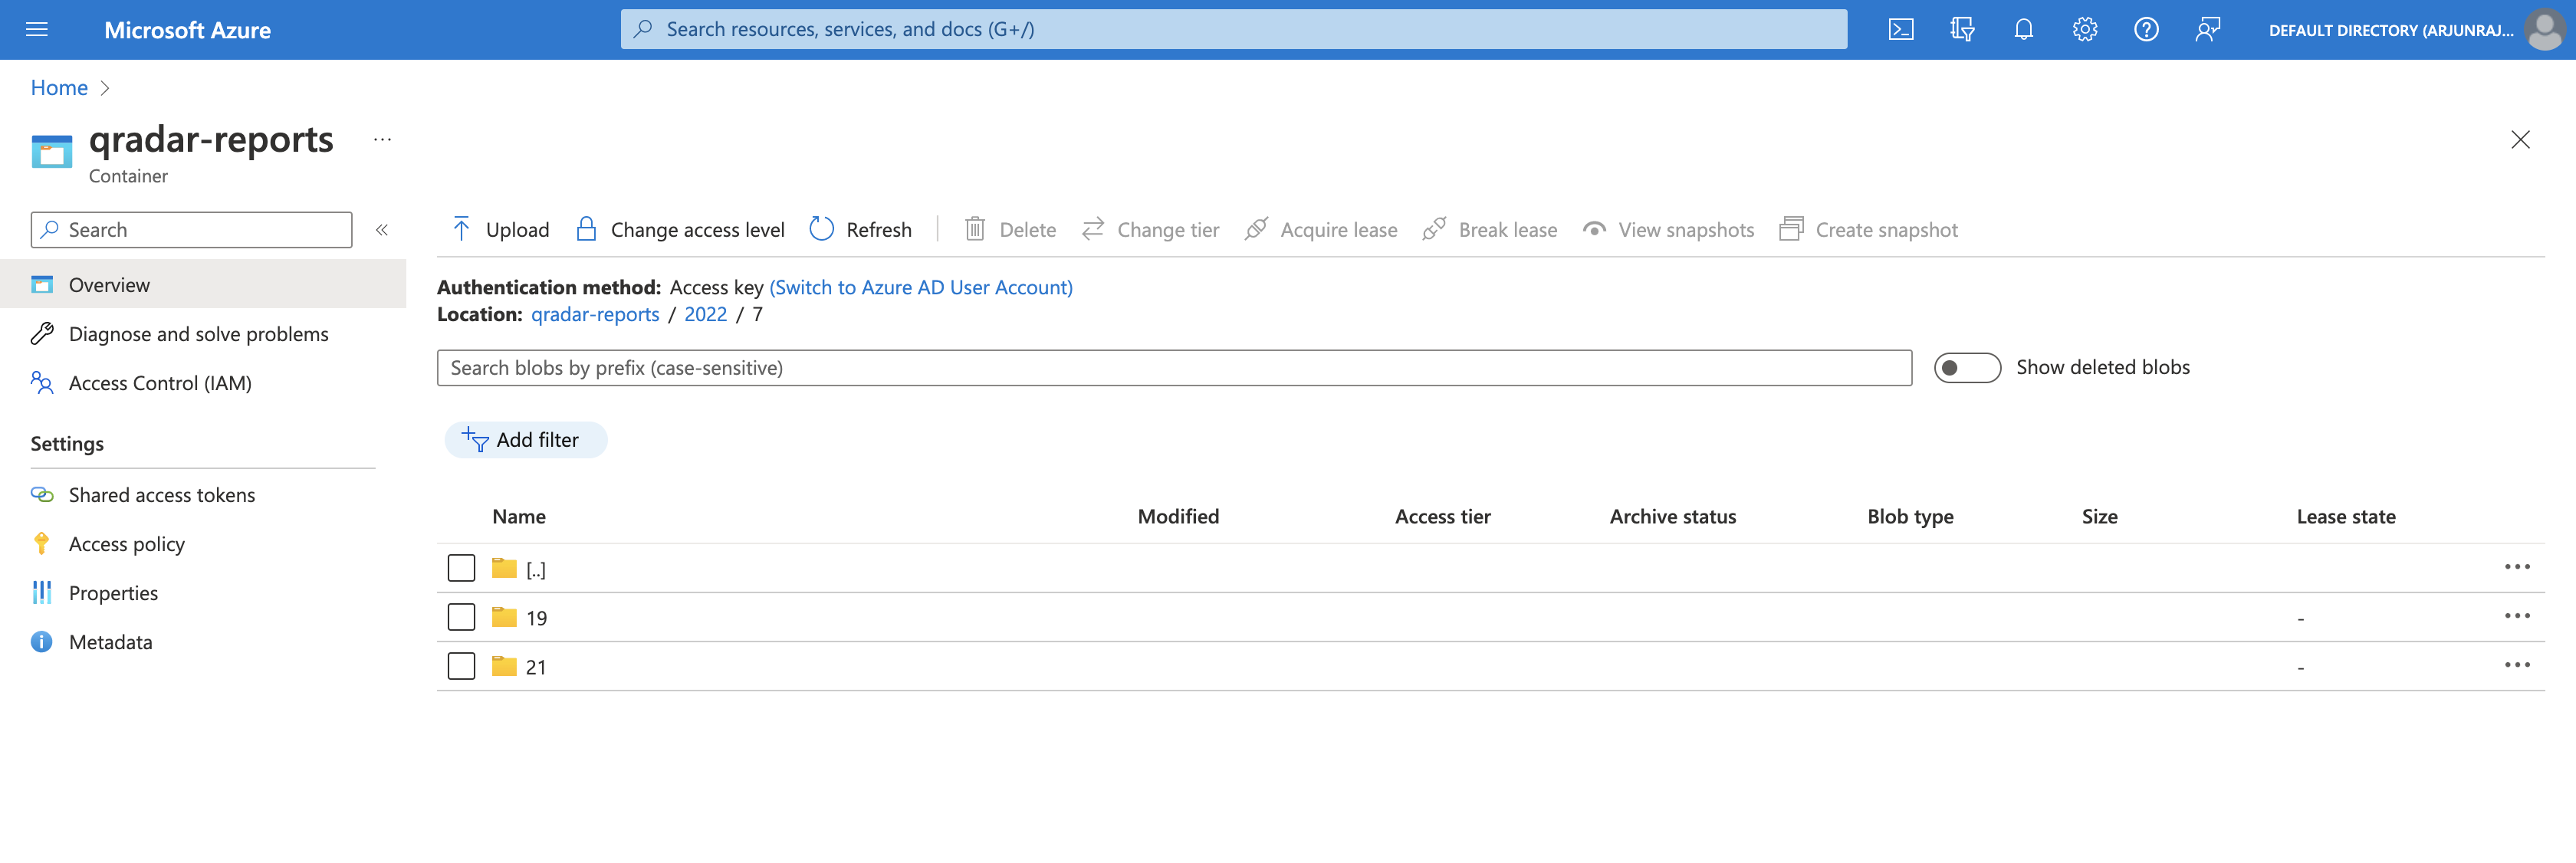
After executing the Python script, we can see that the qradar-reports container has a new folder called 2022, corresponding to the year that all the QRadar reports were generated.

If we open 2022, we can see two folders - 7 and 9, corresponding to the months of July 2022 and September 2022 respectively.

If we open 7, we can see two folders - 19 and 21, corresponding to the days the QRadar reports were generated in July 2022.
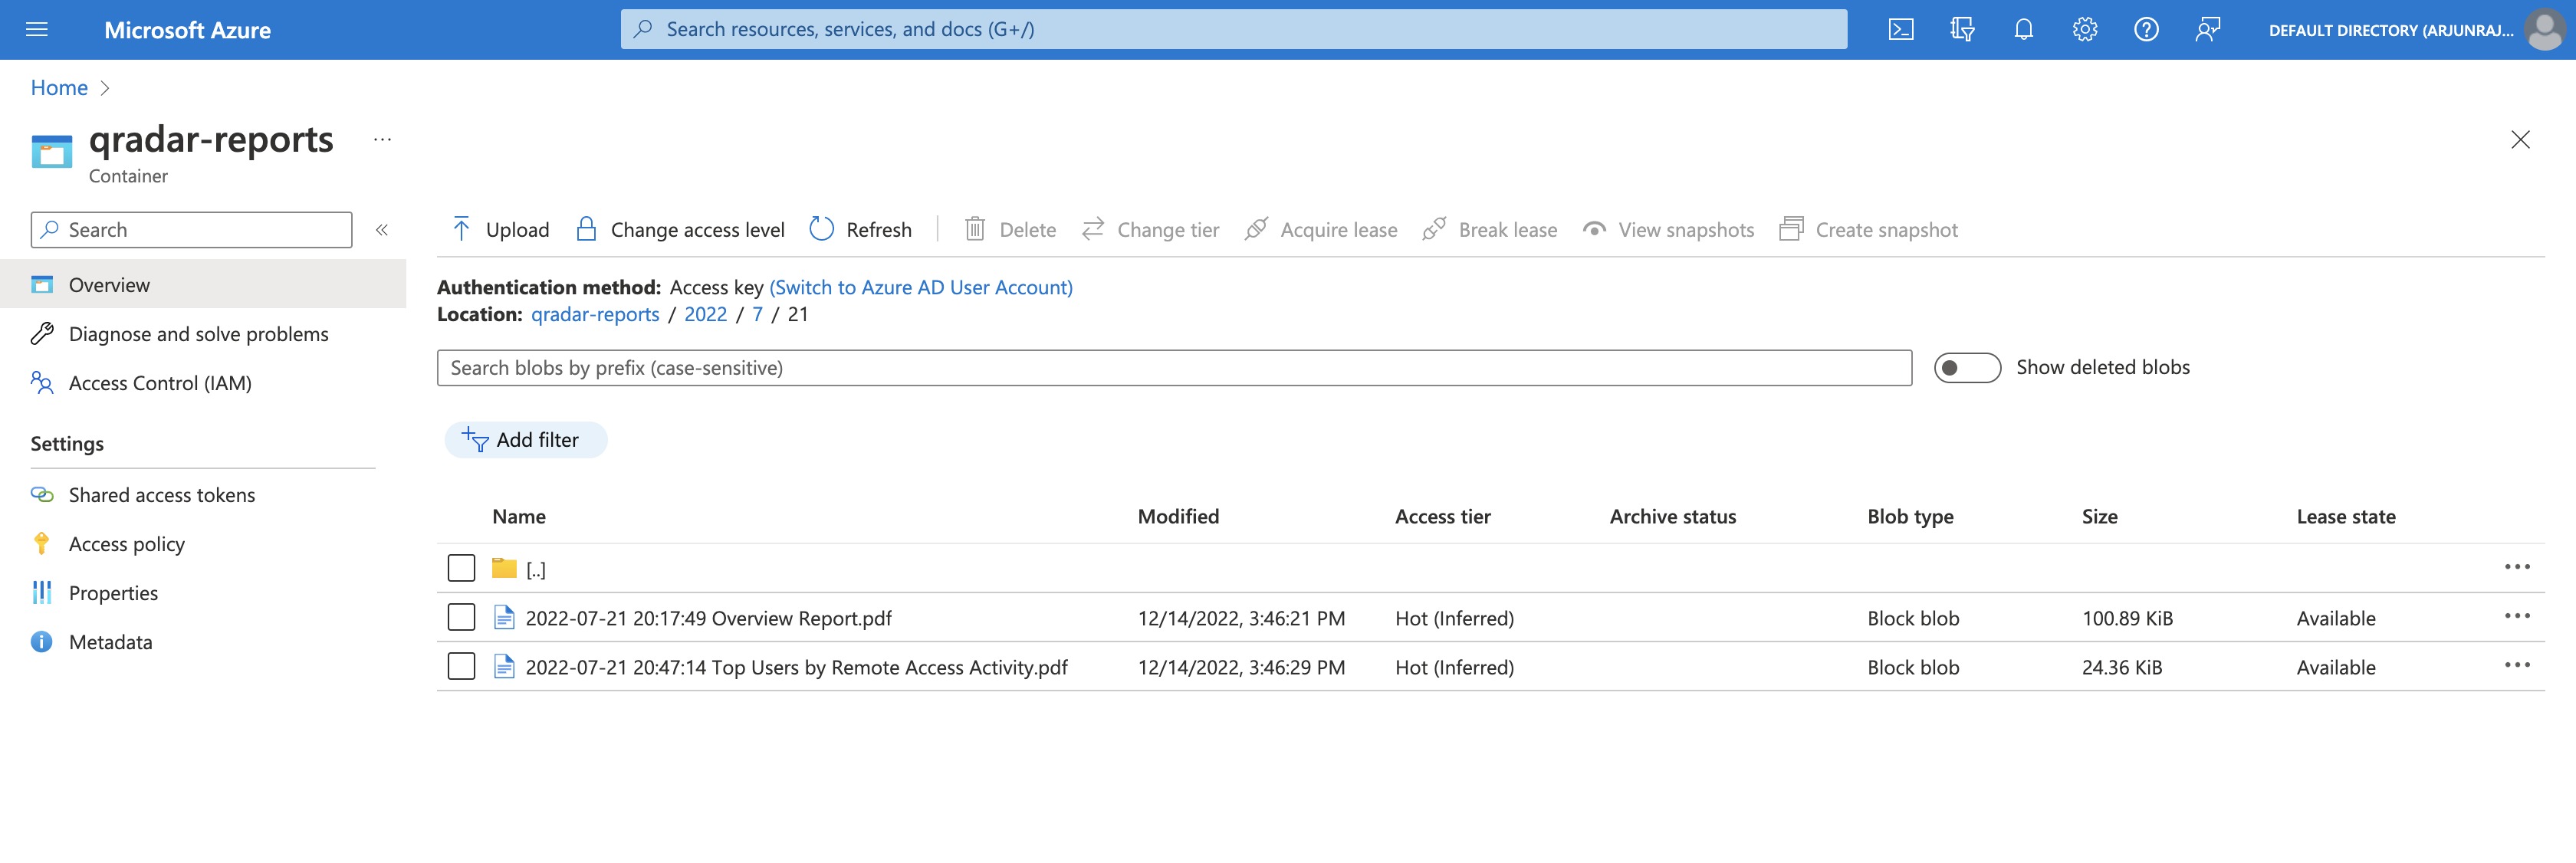
If we open 21, we can see that the QRadar reports generated on 21st July 2022 were successfully uploaded.
Version 3 on Azure
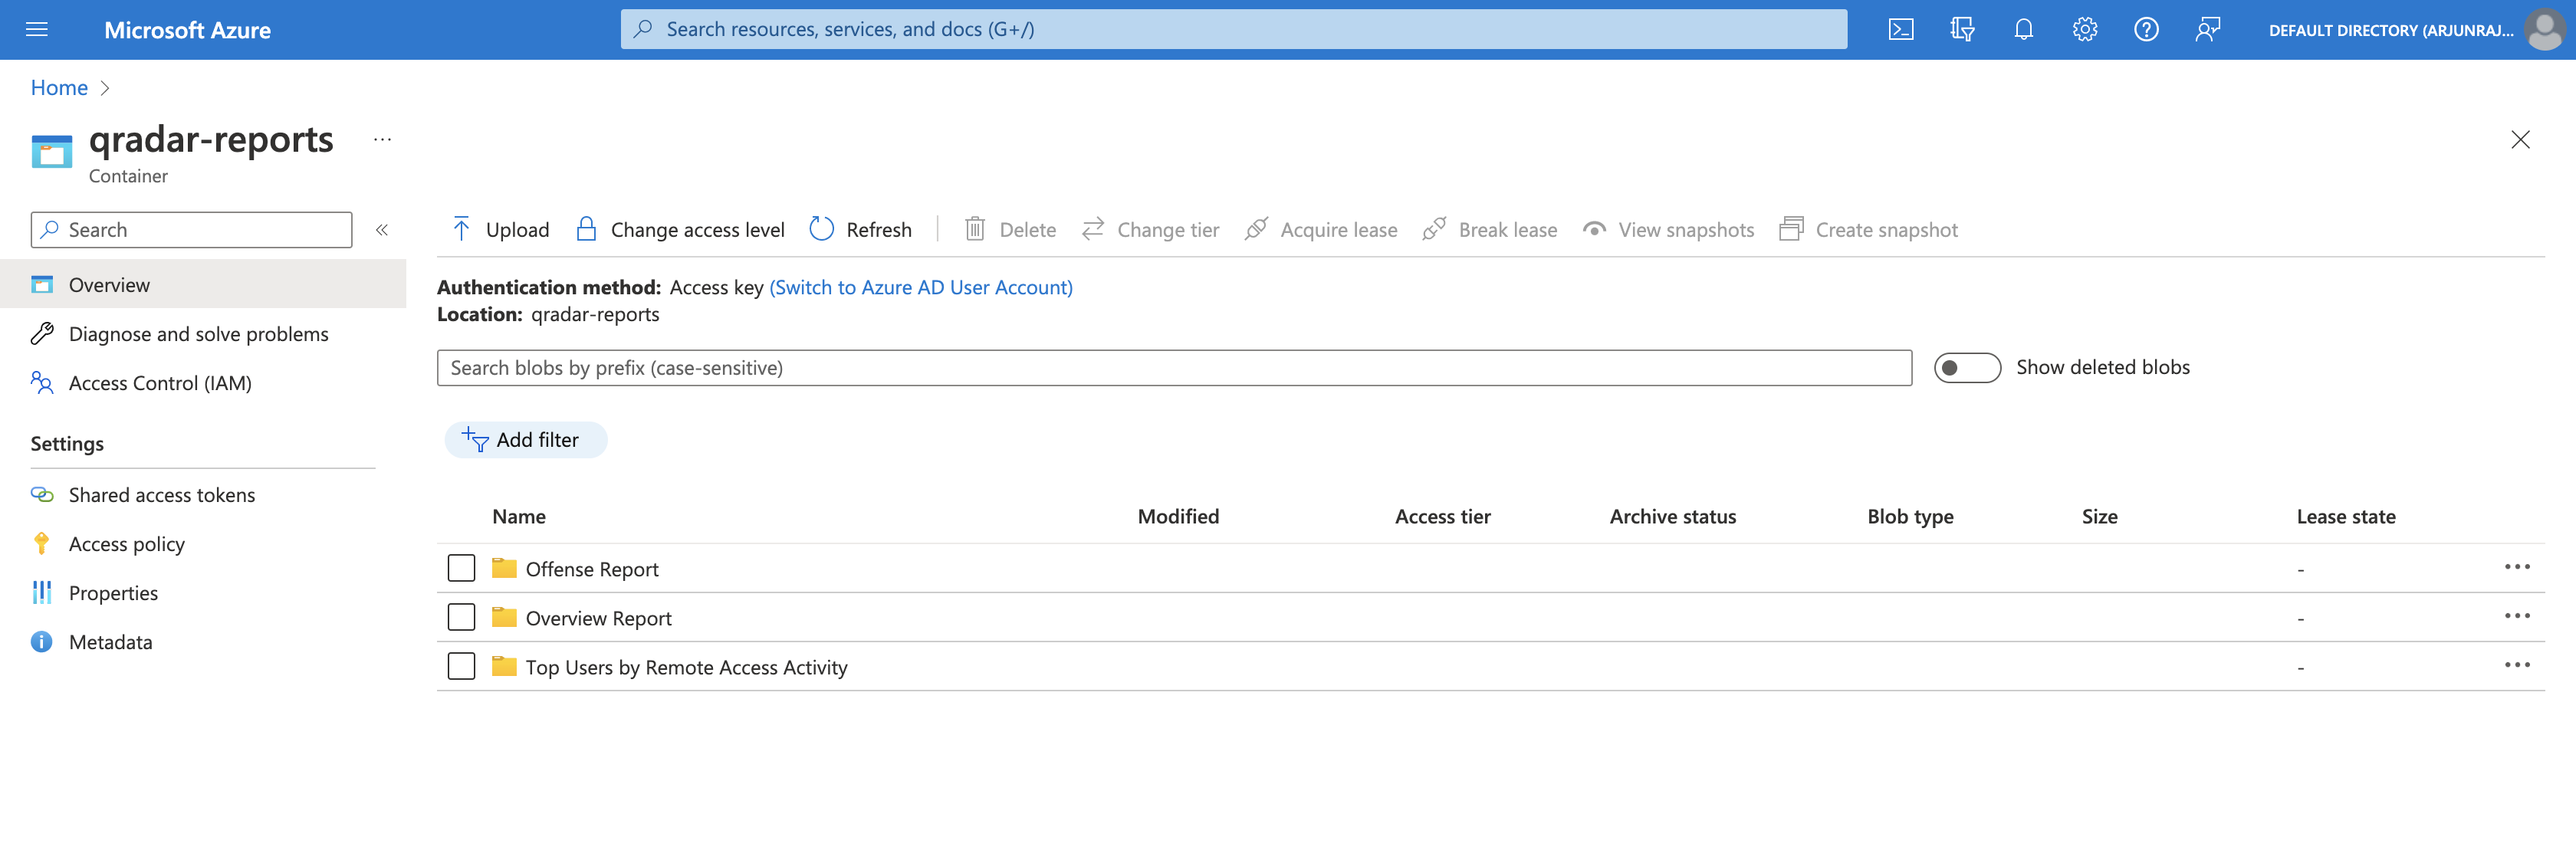
After executing the Python script, we can see that the qradar-reports container has three new folders - Offense Report, Overview Report, and Top Users by Remote Access Activity, corresponding to the unique report titles of the QRadar reports.
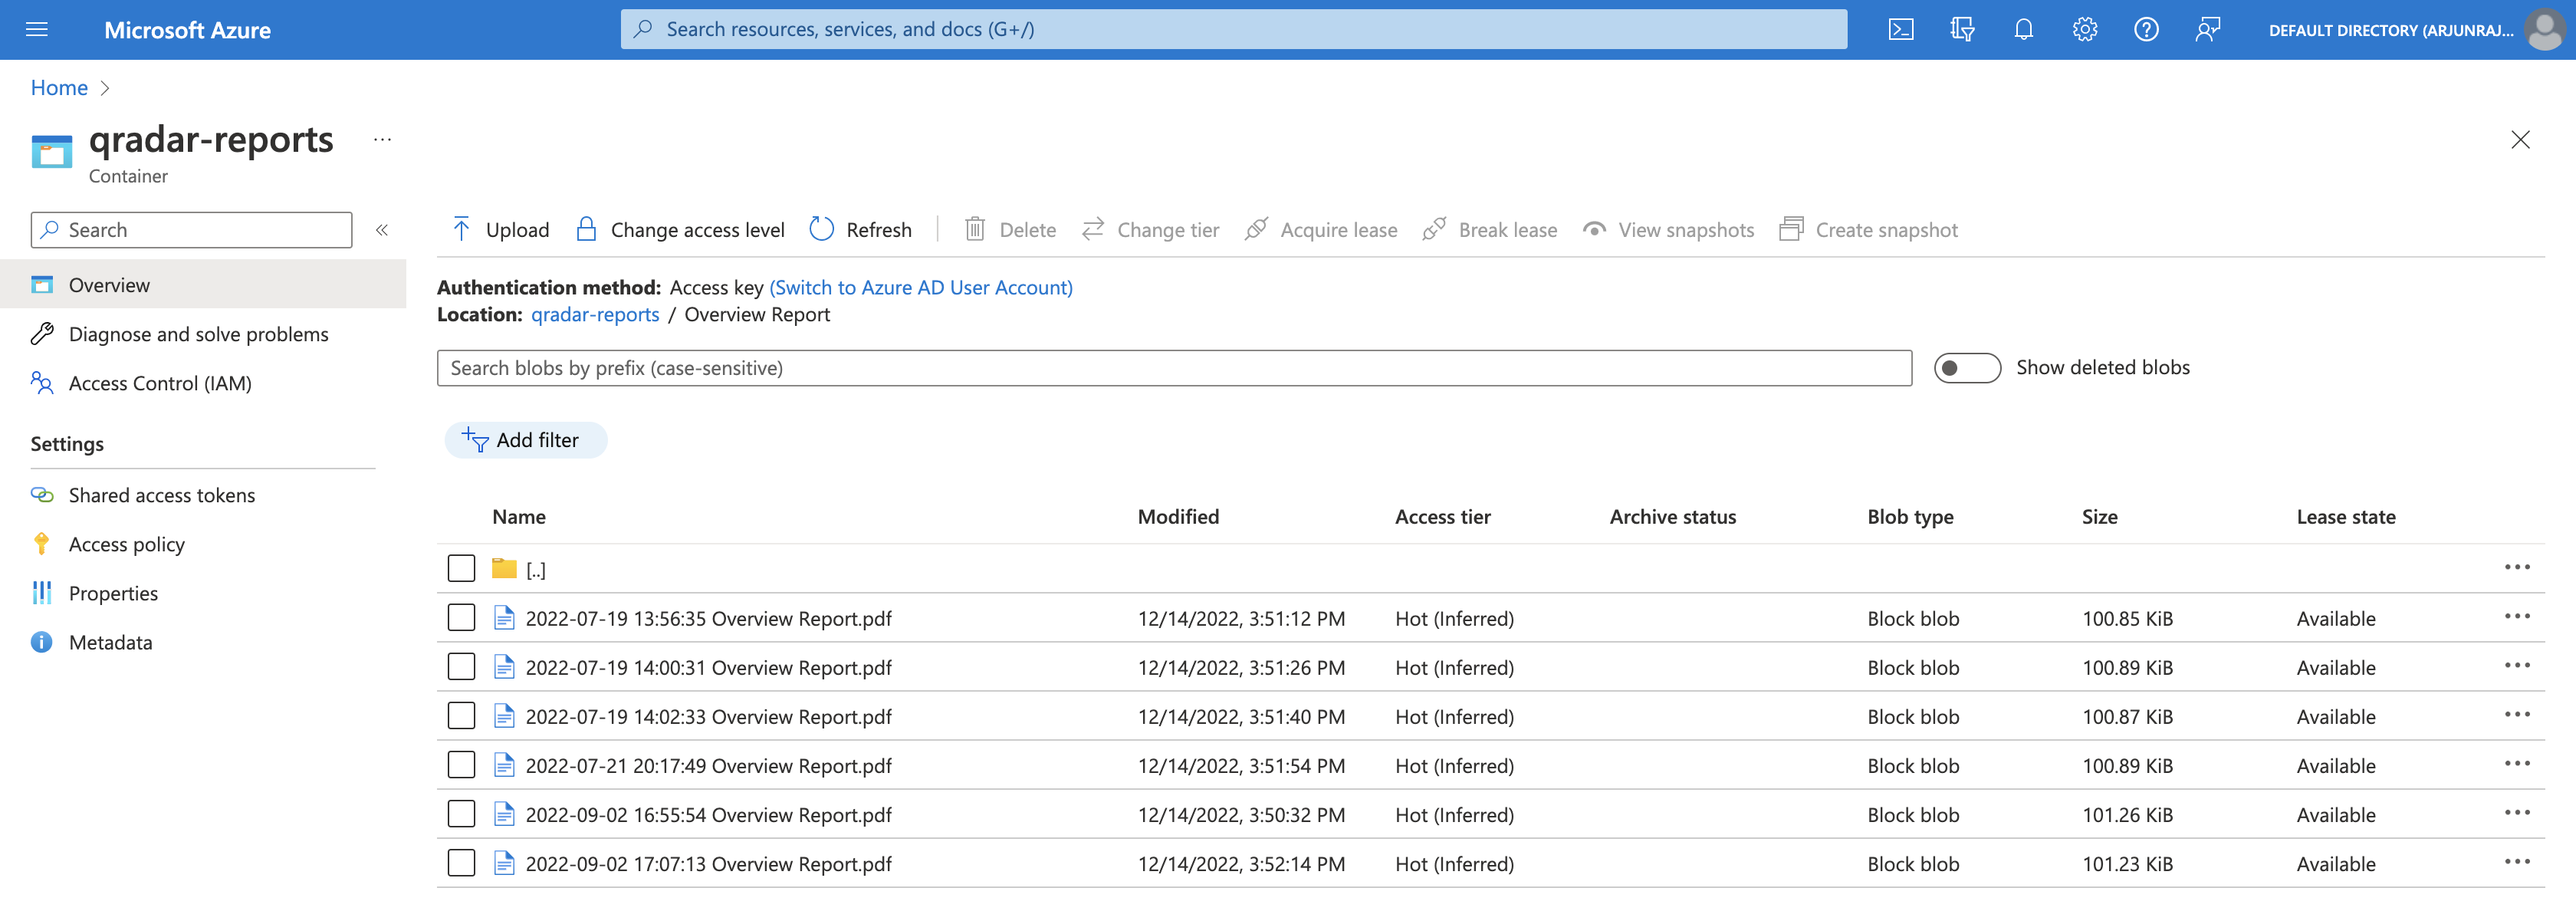
If we open Overview Report, we can see that all the QRadar reports (with title = Overview Report) were successfully uploaded.
Conclusion
In this tutorial, we learnt how to archive QRadar reports to Azure Blob Storage using Python. To summarize:
We started by discussing where and how reports are stored and organized in QRadar. We also dissected the directory naming convention employed by QRadar for each report.
On the Azure Portal, we configured Azure Blob Storage to serve as a storage location for the QRadar reports. We started by creating a resource group on the Azure Portal, which is a virtual container for storing related resources. Next, we created a storage account and tied it with the newly created resource group. Then, we created a container within the newly created storage account, which is where the blobs (QRadar reports) would reside. Finally, we acquired a connection string to programmatically authenticate to and interact with the storage account.
Then, we began our journey to write the Python script.
First, we installed the Azure Blob Storage Client Library for Python, which is a Python library to interact with the Azure Blob Storage service without having to recreate essential functionality. Next, we discussed how to identify the name (title) of a QRadar report based on its ID by searching inside the report.properties file within each report directory. Based on this understanding, we implemented Python code to achieve the mapping. Next, we discussed and implemented 3 unique versions of organizing QRadar reports on Azure Blob Storage:
- Version 1 - All reports in one container
- Version 2 - Reports organized by year, month, and day
- Version 3 - Reports organized by name
Finally, we executed the script by iterating through each report directory and visualized the output of each version on Azure.
Using the concepts and example code from this tutorial, you can easily write your own scripts to archive QRadar reports to Azure or another Cloud Service Provider for long-term storage.
I hope you enjoyed reading this tutorial. Please reach out if you have any questions or comments.
Complete Code
You can download the Python script from GitHub below. To execute the script, run:
python qradar-reports-azure-blob.pyNote: Make sure you edit line number
11and paste your own valid connection string. Check above on how to acquire the connection string.Note: Make sure you install the Azure Blob Storage Client Library for Python as explained above.